
Upgrade Dataverse for Teams Environment to Dataverse Environment
Here’s how you upgrade from Dataverse for Teams to Dataverse permanently.
Brought to you by Dr. Ware, Microsoft Office 365 Silver Partner, Charleston SC.
Here’s how you upgrade from Dataverse for Teams to Dataverse permanently.
Brought to you by Dr. Ware, Microsoft Office 365 Silver Partner, Charleston SC.
Here’s how you can create a Dataverse for Teams environment and add a Canvas App to it.
Brought to you by Dr. Ware, Microsoft Office 365 Silver Partner, Charleston SC.
This article is contributed. See the original author and article here.

This article is contributed. See the original author and article here.
If you’re not already familiar with Mixed Reality Toolkit (MRTK), it’s an open-source project led by Microsoft that provides UX building blocks for MR and VR applications. The experiences you build with MRTK can run on any device that supports the OpenXR runtime such as HoloLens and Meta Quest. We’ve heard from the community that they love the richness of the MRTK UI controls and that it reduces development time, especially for apps that need to run on multiple platforms. Components for hand and eye tracking, inputs, solvers, diagnostic tools, scene management, and more can help you to build experiences that look great with less effort.
We’re excited to share the next release of this powerful toolkit, MRTK3 Public Preview, at Mixed Reality Dev Days on June 8-9. With MRTK3, you’ll have the option of a lighter-weight solution which allows you to select only the components of the toolkit you need. The release also includes a new interaction system, new theming and databinding features, Unity canvas support, and an updated design language that can help you refresh your app’s look and add polish. Additionally, native OpenXR support makes it even easier to target multiple devices such as HoloLens, Meta Quest, Windows Mixed Reality, and future OpenXR-supported devices.
Join us June 8th and 9th via livestream or at the Microsoft Campus in Redmond, WA. Either way, you’ll learn about MRTK3 directly from the engineers who are building the latest features. Catch deep technical sessions, provide feedback to the team, and ask your questions live.
By attending in-person, you’ll have access to even more goodness.
Mixed Reality Dev Days also marks the kickoff of a month-long online hackathon where you can compete for prizes while getting hands on with MRTK3 public preview or StereoKit. Join a team or build a solo project with access to expert support.
Learn more about Mixed Reality Dev Days and sign up now.
We look forward to connecting with you soon!
Mixed Reality Dev Days Team
This article is contributed. See the original author and article here.
The Data Science Virtual Machine (DSVM) is a powerful data science development environment where you can perform data exploration and modeling tasks. The environment comes already built and bundled with several popular data analytics and data science tools that make it easy to get started without spending 20 min to 1 hour deploying a suitable infrastructure.
A new learning experience for R developers
Also, we are delighted to announce some exciting new updates which makes R a 1st Class developer experience for learners on DSVMs and on Learn Sandboxes on MS Learn. Starting from April 2022, the DSVM offering has been enriched by DSVM for Windows 2019 v. 22.04.21, DSVM for Ubuntu 20.04 and Ubuntu 18.04 v. 22.04.27, which provide an updated R environment including the following R libraries: Cluster, Devtools Factoextra, GlueHere, Ottr, Paletteer, Patchwork, Plotly, Rmd2jupyter, Scales, Statip, Summarytools, Tidyverse, Tidymodels and Testthat.
Getting started with R on DSVMs : a guided tutorial
But how you can start using R on DSVMs in your course or lab to perform data science tasks? Let’s go through all the steps you’ll need to create a DSVM on Azure and run a R Jupyter notebook.
1. First of all, you’ll need an Azure subscription. You have not one yet, have a look on how to sign up for a free trial or to the offers dedicated to your students.
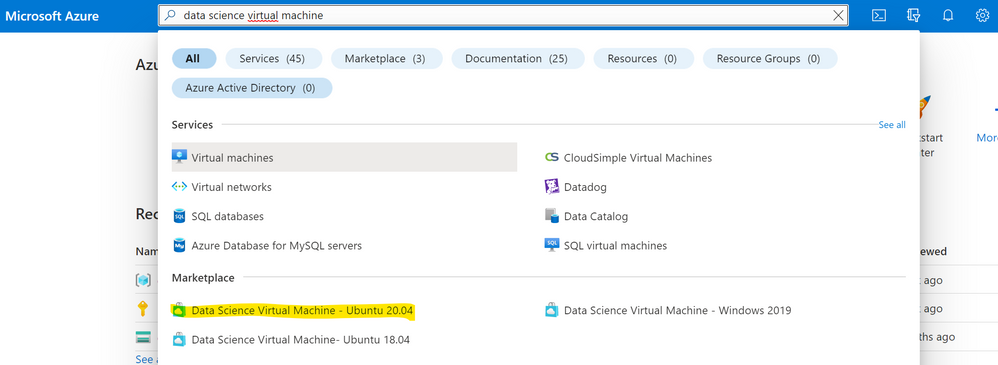
2. Sign in to the Azure Portal and search for “data science virtual machine”. Choose one of the resulting offerings by clicking on it. For this tutorial we will use Data Science Virtual Machine – Ubuntu 20.04.
3. Choose a resource group and the name of the VM you want to create as well as the Azure subscription on which the machine will be billed. Select the datacenter region closest to your physical location and, for quicker set up, select “Password” as authentication type. Then specify the username and password you’ll use to login into your virtual machine.
Click on Review + create and wait until the deploy is succesfully completed.
4. There are different ways to access your DSVM. One of these is Jupyter Hub, a multiuser Jupyter server. To connect, open a web browser from your local machine and navigate to https://your-vm-ip:8000, replacing “your-vm-ip” with the IP address you can find in the overview section of your resource.
5. At this point, you can sign in using the credentials you specified at the creation of the resource.
6. You’re now ready to start coding in R. You may browse the many sample notebooks that are available or you can create a new notebook by clicking on the R kernel button.
If you want to get more R code examples on data analysis and machine learning you can have a look to the exercise units of this MS Learn path: Create machine learning models with R and tidymodels .
7. Remember to shut down your machine when you are not using it.
Note that if you are an educator and you want to use DSVMs for you R course, you have the chance to choose if providing all your students with a single DSVM, by sharing the credentials within the class or to provide every student with a single DSVM, finding the right trade-off for you among costs and flexibility.
Keep on learning
The example above covers only one of the possible functionalities enabled by DSVMs. You can also open a session in an interactive R console or coding within RStudio, which is pre-installed in the VM. In addition, you can leverage on other Azure services for data storage and modeling and you can share code with your team by using GitHub and the pre-installed Git clients: Git Bash and Git GUI. Find out more guidance on the DSVM documentation.


Recent Comments