by Contributed | Oct 21, 2022 | Technology
This article is contributed. See the original author and article here.
Microsoft.Data.SqlClient 5.1 Preview 1 has been released. This release contains improvements and updates to the Microsoft.Data.SqlClient data provider for SQL Server.
Our plan is to provide GA releases twice a year with two or three preview releases in between. This cadence should provide time for feedback and allow us to deliver features and fixes in a timely manner. This third 5.0 preview includes fixes and changes over the previous preview release.
Fixed
- Fixed
ReadAsync() behavior to register Cancellation token action before streaming results. #1781
- Fixed
NullReferenceException when assigning null to SqlConnectionStringBuilder.Encrypt. #1778
- Fixed missing
HostNameInCertificate property in .NET Framework Reference Project. #1776
- Fixed async deadlock issue when sending attention fails due to network failure. #1766
- Fixed failed connection requests in ConnectionPool in case of PoolBlock. #1768
- Fixed hang on infinite timeout and managed SNI. #1742
- Fixed Default UTF8 collation conflict. #1739
Changed
- Updated
Microsoft.Data.SqlClient.SNI (.NET Framework dependency) and Microsoft.Data.SqlClient.SNI.runtime (.NET Core/Standard dependency) version to 5.1.0-preview1.22278.1. #1787 which includes TLS 1.3 Support and fix for AppDomain crash in issue #1418
- Changed the
SqlConnectionEncryptOption string parser to public. #1771
- Converted
ExecuteNonQueryAsync to use async context object. #1692
- Code health improvements #1604 #1598 #1595 #1443
Known issues
- When using
Encrypt=Strict with TLS v1.3, the TLS handshake occurs twice on initial connection on .NET Framework due to a timeout during the TLS handshake and a retry helper re-establishes the connection; however, on .NET Core, it will throw a System.ComponentModel.Win32Exception (258): The wait operation timed out. and is being investigated. If you’re using Microsoft.Data.SqlClient with .NET Core on Windows 11, you will need to enable the managed SNI on Windows context switch using following statement AppContext.SetSwitch(“Switch.Microsoft.Data.SqlClient.UseManagedNetworkingOnWindows”, true); to use TLS v1.3 or disabling TLS 1.3 from the registry by assigning 0 to the following HKEY_LOCAL_MACHINESYSTEMCurrentControlSetControlSecurityProvidersSCHANNELProtocolsTLS 1.3ClientEnabled registry key and it’ll use TLS v1.2 for the connection. This will be fixed in a future release.
For the full list of changes in Microsoft.Data.SqlClient 5.1 Preview 1, please see the Release Notes.
To try out the new package, add a NuGet reference to Microsoft.Data.SqlClient in your application and pick the 5.1 preview 1 version.
We appreciate the time and effort you spend checking out our previews. It makes the final product that much better. If you encounter any issues or have any feedback, head over to the SqlClient GitHub repository and submit an issue.
David Engel

by Scott Muniz | Oct 21, 2022 | Security, Technology
This article is contributed. See the original author and article here.
Summary
Actions to take today to mitigate cyber threats from ransomware:
• Install updates for operating systems, software, and firmware as soon as they are released.
• Require phishing-resistant MFA for as many services as possible.
• Train users to recognize and report phishing attempts.
Note: This joint Cybersecurity Advisory (CSA) is part of an ongoing #StopRansomware effort to publish advisories for network defenders that detail various ransomware variants and ransomware threat actors. These #StopRansomware advisories include recently and historically observed tactics, techniques, and procedures (TTPs) and indicators of compromise (IOCs) to help organizations protect against ransomware. Visit stopransomware.gov to see all #StopRansomware advisories and to learn more about other ransomware threats and no-cost resources.
The Federal Bureau of Investigation (FBI), Cybersecurity and Infrastructure Security Agency (CISA), and Department of Health and Human Services (HHS) are releasing this joint CSA to provide information on the “Daixin Team,” a cybercrime group that is actively targeting U.S. businesses, predominantly in the Healthcare and Public Health (HPH) Sector, with ransomware and data extortion operations.
This joint CSA provides TTPs and IOCs of Daixin actors obtained from FBI threat response activities and third-party reporting.
Download the PDF version of this report: pdf, 591 KB
Technical Details
Note: This advisory uses the MITRE ATT&CK® for Enterprise framework, version 11. See MITRE ATT&CK for Enterprise for all referenced tactics and techniques.
Cybercrime actors routinely target HPH Sector organizations with ransomware:
- As of October 2022, per FBI Internet Crime Complaint Center (IC3) data, specifically victim reports across all 16 critical infrastructure sectors, the HPH Sector accounts for 25 percent of ransomware complaints.
- According to an IC3 annual report in 2021, 649 ransomware reports were made across 14 critical infrastructure sectors; the HPH Sector accounted for the most reports at 148.
The Daixin Team is a ransomware and data extortion group that has targeted the HPH Sector with ransomware and data extortion operations since at least June 2022. Since then, Daixin Team cybercrime actors have caused ransomware incidents at multiple HPH Sector organizations where they have:
- Deployed ransomware to encrypt servers responsible for healthcare services—including electronic health records services, diagnostics services, imaging services, and intranet services, and/or
- Exfiltrated personal identifiable information (PII) and patient health information (PHI) and threatened to release the information if a ransom is not paid.
Daixin actors gain initial access to victims through virtual private network (VPN) servers. In one confirmed compromise, the actors likely exploited an unpatched vulnerability in the organization’s VPN server [T1190]. In another confirmed compromise, the actors used previously compromised credentials to access a legacy VPN server [T1078] that did not have multifactor authentication (MFA) enabled. The actors are believed to have acquired the VPN credentials through the use of a phishing email with a malicious attachment [T1598.002].
After obtaining access to the victim’s VPN server, Daixin actors move laterally via Secure Shell (SSH) [T1563.001] and Remote Desktop Protocol (RDP) [T1563.002]. Daixin actors have sought to gain privileged account access through credential dumping [T1003] and pass the hash [T1550.002]. The actors have leveraged privileged accounts to gain access to VMware vCenter Server and reset account passwords [T1098] for ESXi servers in the environment. The actors have then used SSH to connect to accessible ESXi servers and deploy ransomware [T1486] on those servers.
According to third-party reporting, the Daixin Team’s ransomware is based on leaked Babuk Locker source code. This third-party reporting as well as FBI analysis show that the ransomware targets ESXi servers and encrypts files located in /vmfs/volumes/ with the following extensions: .vmdk, .vmem, .vswp, .vmsd, .vmx, and .vmsn. A ransom note is also written to /vmfs/volumes/. See Figure 1 for targeted file system path and Figure 2 for targeted file extensions list. Figure 3 and Figure 4 include examples of ransom notes. Note that in the Figure 3 ransom note, Daixin actors misspell “Daixin” as “Daxin.”

Figure 1: Daixin Team – Ransomware Targeted File Path
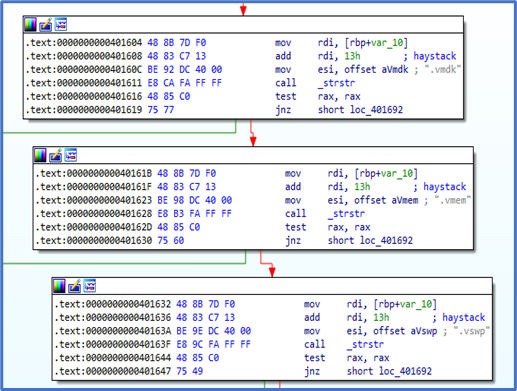
Figure 2: Daixin Team – Ransomware Targeted File Extensions
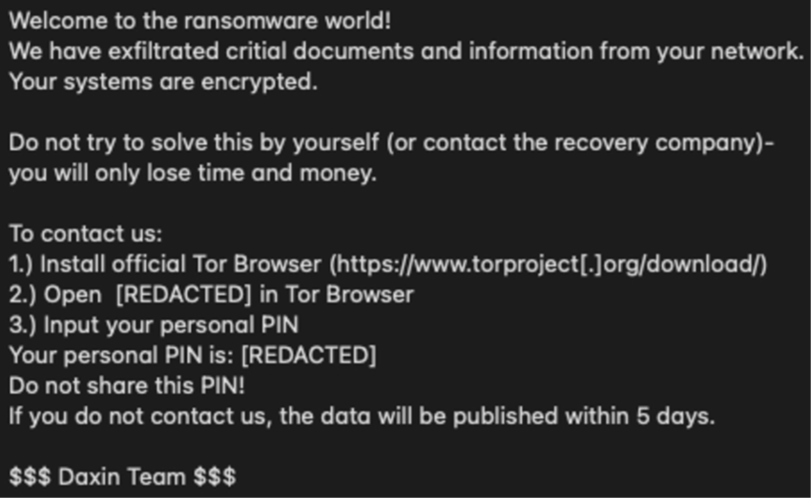
Figure 3: Example 1 of Daixin Team Ransomware Note
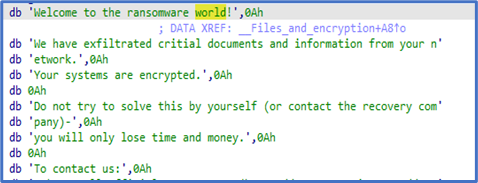
Figure 4: Example 2 of Daixin Team Ransomware Note
In addition to deploying ransomware, Daixin actors have exfiltrated data [TA0010] from victim systems. In one confirmed compromise, the actors used Rclone—an open-source program to manage files on cloud storage—to exfiltrate data to a dedicated virtual private server (VPS). In another compromise, the actors used Ngrok—a reverse proxy tool for proxying an internal service out onto an Ngrok domain—for data exfiltration [T1567].
MITRE ATT&CK TACTICS AND TECHNIQUES
See Table 1 for all referenced threat actor tactics and techniques included in this advisory.
Table 1: Daixin Actors’ ATT&CK Techniques for Enterprise
|
Reconnaissance
|
|
Technique Title
|
ID
|
Use
|
|
Phishing for Information: Spearphishing Attachment
|
T1598.002
|
Daixin actors have acquired the VPN credentials (later used for initial access) by a phishing email with a malicious attachment.
|
|
Initial Access
|
|
Technique Title
|
ID
|
Use
|
|
Exploit Public-Facing Application
|
T1190
|
Daixin actors exploited an unpatched vulnerability in a VPN server to gain initial access to a network.
|
|
Valid Accounts
|
T1078
|
Daixin actors use previously compromised credentials to access servers on the target network.
|
|
Persistence
|
|
Technique Title
|
ID
|
Use
|
|
Account Manipulation
|
T1098
|
Daixin actors have leveraged privileged accounts to reset account passwords for VMware ESXi servers in the compromised environment.
|
|
Credential Access
|
|
Technique Title
|
ID
|
Use
|
|
OS Credential Dumping
|
T1003
|
Daixin actors have sought to gain privileged account access through credential dumping.
|
|
Lateral Movement
|
|
Technique Title
|
ID
|
Use
|
|
Remote Service Session Hijacking: SSH Hijacking
|
T1563.001
|
Daixin actors use SSH and RDP to move laterally across a network.
|
|
Remote Service Session Hijacking: RDP Hijacking
|
T1563.002
|
Daixin actors use RDP to move laterally across a network.
|
|
Use Alternate Authentication Material: Pass the Hash
|
T1550.002
|
Daixin actors have sought to gain privileged account access through pass the hash.
|
|
Exfiltration
|
|
Technique Title
|
ID
|
Use
|
|
Exfiltration Over Web Service
|
T1567
|
Daixin Team members have used Ngrok for data exfiltration over web servers.
|
|
Impact
|
|
Technique Title
|
ID
|
Use
|
|
Data Encrypted for Impact
|
T1486
|
Daixin actors have encrypted data on target systems or on large numbers of systems in a network to interrupt availability to system and network resources.
|
INDICATORS OF COMPROMISE
See Table 2 for IOCs obtained from third-party reporting.
Table 2: Daixin Team IOCs – Rclone Associated SHA256 Hashes
|
File
|
SHA256
|
|
rclone-v1.59.2-windows-amd64git-log.txt
|
9E42E07073E03BDEA4CD978D9E7B44A9574972818593306BE1F3DCFDEE722238
|
|
rclone-v1.59.2-windows-amd64rclone.1
|
19ED36F063221E161D740651E6578D50E0D3CACEE89D27A6EBED4AB4272585BD
|
|
rclone-v1.59.2-windows-amd64rclone.exe
|
54E3B5A2521A84741DC15810E6FED9D739EB8083CB1FE097CB98B345AF24E939
|
|
rclone-v1.59.2-windows-amd64README.html
|
EC16E2DE3A55772F5DFAC8BF8F5A365600FAD40A244A574CBAB987515AA40CBF
|
|
rclone-v1.59.2-windows-amd64README.txt
|
475D6E80CF4EF70926A65DF5551F59E35B71A0E92F0FE4DD28559A9DEBA60C28
|
Mitigations
FBI, CISA, and HHS urge HPH Sector organizations to implement the following to protect against Daixin and related malicious activity:
- Install updates for operating systems, software, and firmware as soon as they are released. Prioritize patching VPN servers, remote access software, virtual machine software, and known exploited vulnerabilities. Consider leveraging a centralized patch management system to automate and expedite the process.
- Require phishing-resistant MFA for as many services as possible—particularly for webmail, VPNs, accounts that access critical systems, and privileged accounts that manage backups.
- If you use Remote Desktop Protocol (RDP), secure and monitor it.
- Limit access to resources over internal networks, especially by restricting RDP and using virtual desktop infrastructure. After assessing risks, if RDP is deemed operationally necessary, restrict the originating sources, and require multifactor authentication (MFA) to mitigate credential theft and reuse. If RDP must be available externally, use a virtual private network (VPN), virtual desktop infrastructure, or other means to authenticate and secure the connection before allowing RDP to connect to internal devices. Monitor remote access/RDP logs, enforce account lockouts after a specified number of attempts to block brute force campaigns, log RDP login attempts, and disable unused remote access/RDP ports.
- Ensure devices are properly configured and that security features are enabled. Disable ports and protocols that are not being used for business purposes (e.g., RDP Transmission Control Protocol Port 3389).
- Turn off SSH and other network device management interfaces such as Telnet, Winbox, and HTTP for wide area networks (WANs) and secure with strong passwords and encryption when enabled.
- Implement and enforce multi-layer network segmentation with the most critical communications and data resting on the most secure and reliable layer.
- Limit access to data by deploying public key infrastructure and digital certificates to authenticate connections with the network, Internet of Things (IoT) medical devices, and the electronic health record system, as well as to ensure data packages are not manipulated while in transit from man-in-the-middle attacks.
- Use standard user accounts on internal systems instead of administrative accounts, which allow for overarching administrative system privileges and do not ensure least privilege.
- Secure PII/PHI at collection points and encrypt the data at rest and in transit by using technologies such as Transport Layer Security (TPS). Only store personal patient data on internal systems that are protected by firewalls, and ensure extensive backups are available if data is ever compromised.
- Protect stored data by masking the permanent account number (PAN) when it is displayed and rendering it unreadable when it is stored—through cryptography, for example.
- Secure the collection, storage, and processing practices for PII and PHI, per regulations such as the Health Insurance Portability and Accountability Act of 1996 (HIPAA). Implementing HIPAA security measures can prevent the introduction of malware on the system.
- Use monitoring tools to observe whether IoT devices are behaving erratically due to a compromise.
- Create and regularly review internal policies that regulate the collection, storage, access, and monitoring of PII/PHI.
- In addition, the FBI, CISA, and HHS urge all organizations, including HPH Sector organizations, to apply the following recommendations to prepare for, mitigate/prevent, and respond to ransomware incidents.
Preparing for Ransomware
- Maintain offline (i.e., physically disconnected) backups of data, and regularly test backup and restoration. These practices safeguard an organization’s continuity of operations or at least minimize potential downtime from a ransomware incident and protect against data losses.
- Ensure all backup data is encrypted, immutable (i.e., cannot be altered or deleted), and covers the entire organization’s data infrastructure.
- Create, maintain, and exercise a basic cyber incident response plan and associated communications plan that includes response procedures for a ransomware incident.
- Organizations should also ensure their incident response and communications plans include response and notification procedures for data breach incidents. Ensure the notification procedures adhere to applicable state laws.
- Refer to applicable state data breach laws and consult legal counsel when necessary.
- For breaches involving electronic health information, you may need to notify the Federal Trade Commission (FTC) or the Department of Health and Human Services, and—in some cases—the media. Refer to the FTC’s Health Breach Notification Rule and U.S. Department of Health and Human Services’ Breach Notification Rule for more information.
- See CISA-Multi-State Information Sharing and Analysis Center (MS-ISAC) Joint Ransomware Guide and CISA Fact Sheet, Protecting Sensitive and Personal Information from Ransomware-Caused Data Breaches, for information on creating a ransomware response checklist and planning and responding to ransomware-caused data breaches.
Mitigating and Preventing Ransomware
- Restrict Server Message Block (SMB) Protocol within the network to only access servers that are necessary and remove or disable outdated versions of SMB (i.e., SMB version 1). Threat actors use SMB to propagate malware across organizations.
- Review the security posture of third-party vendors and those interconnected with your organization. Ensure all connections between third-party vendors and outside software or hardware are monitored and reviewed for suspicious activity.
- Implement listing policies for applications and remote access that only allow systems to execute known and permitted programs.
- Open document readers in protected viewing modes to help prevent active content from running.
- Implement user training program and phishing exercises to raise awareness among users about the risks of visiting suspicious websites, clicking on suspicious links, and opening suspicious attachments. Reinforce the appropriate user response to phishing and spearphishing emails.
- Use strong passwords and avoid reusing passwords for multiple accounts. See CISA Tip Choosing and Protecting Passwords and the National Institute of Standards and Technology’s (NIST’s) Special Publication 800-63B: Digital Identity Guidelines for more information.
- Require administrator credentials to install software.
- Audit user accounts with administrative or elevated privileges and configure access controls with least privilege in mind.
- Install and regularly update antivirus and antimalware software on all hosts.
- Only use secure networks and avoid using public Wi-Fi networks. Consider installing and using a VPN.
- Consider adding an email banner to messages coming from outside your organizations.
- Disable hyperlinks in received emails.
Responding to Ransomware Incidents
If a ransomware incident occurs at your organization:
- Follow your organization’s Ransomware Response Checklist (see Preparing for Ransomware section).
- Scan backups. If possible, scan backup data with an antivirus program to check that it is free of malware. This should be performed using an isolated, trusted system to avoid exposing backups to potential compromise.
- Follow the notification requirements as outlined in your cyber incident response plan.
- Report incidents to the FBI at a local FBI Field Office, CISA at cisa.gov/report, or the U.S. Secret Service (USSS) at a USSS Field Office.
- Apply incident response best practices found in the joint Cybersecurity Advisory, Technical Approaches to Uncovering and Remediating Malicious Activity, developed by CISA and the cybersecurity authorities of Australia, Canada, New Zealand, and the United Kingdom.
Note: FBI, CISA, and HHS strongly discourage paying ransoms as doing so does not guarantee files and records will be recovered. Furthermore, payment may also embolden adversaries to target additional organizations, encourage other criminal actors to engage in the distribution of ransomware, and/or fund illicit activities.
REFERENCES
- Stopransomware.gov is a whole-of-government approach that gives one central location for ransomware resources and alerts.
- Resource to mitigate a ransomware attack: CISA-Multi-State Information Sharing and Analysis Center (MS-ISAC) Joint Ransomware Guide.
- No-cost cyber hygiene services: Cyber Hygiene Services and Ransomware Readiness Assessment.
- Ongoing Threat Alerts and Sector alerts are produced by the Health Sector Cybersecurity Coordination Center (HC3) and can be found at hhs.gov/HC3
- For additional best practices for Healthcare cybersecurity issues see the HHS 405(d) Aligning Health Care Industry Security Approaches at 405d.hhs.gov
REPORTING
The FBI is seeking any information that can be shared, to include boundary logs showing communication to and from foreign IP addresses, a sample ransom note, communications with Daixin Group actors, Bitcoin wallet information, decryptor files, and/or a benign sample of an encrypted file. Regardless of whether you or your organization have decided to pay the ransom, the FBI, CISA, and HHS urge you to promptly report ransomware incidents to a local FBI Field Office, or CISA at cisa.gov/report.
ACKNOWLEDGEMENTS
FBI, CISA, and HHS would like to thank CrowdStrike and the Health Information Sharing and Analysis Center (Health-ISAC) for their contributions to this CSA.
DISCLAIMER
The information in this report is being provided “as is” for informational purposes only. FBI, CISA, and HHS do not endorse any commercial product or service, including any subjects of analysis. Any reference to specific commercial products, processes, or services by service mark, trademark, manufacturer, or otherwise, does not constitute or imply endorsement, recommendation, or favoring by FBI, CISA, or HHS.
Revisions
Initial Publication: October 21, 2022
This product is provided subject to this Notification and this Privacy & Use policy.
by Scott Muniz | Oct 20, 2022 | Security, Technology
This article is contributed. See the original author and article here.
CISA has added two vulnerabilities to its Known Exploited Vulnerabilities Catalog, based on evidence of active exploitation. These types of vulnerabilities are a frequent attack vector for malicious cyber actors and pose significant risk to the federal enterprise. Note: to view the newly added vulnerabilities in the catalog, click on the arrow in the “Date Added to Catalog” column, which will sort by descending dates.
Binding Operational Directive (BOD) 22-01: Reducing the Significant Risk of Known Exploited Vulnerabilities established the Known Exploited Vulnerabilities Catalog as a living list of known CVEs that carry significant risk to the federal enterprise. BOD 22-01 requires FCEB agencies to remediate identified vulnerabilities by the due date to protect FCEB networks against active threats. See the BOD 22-01 Fact Sheet for more information.
Although BOD 22-01 only applies to FCEB agencies, CISA strongly urges all organizations to reduce their exposure to cyberattacks by prioritizing timely remediation of Catalog vulnerabilities as part of their vulnerability management practice. CISA will continue to add vulnerabilities to the Catalog that meet the specified criteria.

by Contributed | Oct 20, 2022 | Technology
This article is contributed. See the original author and article here.
Table of Contents
Abstract
Introduction
Scenario
Azure NetApp Files backup preview enablement
Managing Resource Providers in Terraform
Terraform Configuration
Terraform AzAPI and AzureRM Providers
Declaring the Azure NetApp Files infrastructure
Azure NetApp Files backup policy creation
Assigning a backup policy to an Azure NetApp Files volume
AzAPI to AzureRM migration
Summary
Additional Information
Abstract
This article demonstrates how to enable the use of preview features in Azure NetApp Files in combination with Terraform Cloud and the AzAPI provider. In this example we enhance data protection with Azure NetApp Files backup (preview) by enabling and creating backup policies using the AzAPI Terraform provider and leveraging Terraform Cloud for the deployment.
Co-authors: John Alfaro (NetApp)
Introduction
As Azure NetApp Files development progresses new features are continuously being brought to market. Some of those features arrive in a typical Azure ‘preview’ fashion first. These features normally do not get included into Terraform before general availability (GA). A recent example of such a preview feature at the time of writing is Azure NetApp Files backup.
In addition to snapshots and cross-region replication, Azure NetApp Files data protection has extended to include backup vaulting of snapshots. Using Azure NetApp Files backup, you can create backups of your volumes based on volume snapshots for longer term retention. At the time of writing, Azure NetApp files backup is a preview feature, and has not yet been included in the Terraform AzureRM provider. For that reason, we decided to use the Terraform AzAPI provider to enable and manage this feature.
Azure NetApp Files backup provides fully managed backup solution for long-term recovery, archive, and compliance.
- Backups created by the service are stored in an Azure storage account independent of volume snapshots. The Azure storage account will be zone-redundant storage (ZRS) where availability zones are available or locally redundant storage (LRS) in regions without support for availability zones.
- Backups taken by the service can be restored to an Azure NetApp Files volume within the region.
- Azure NetApp Files backup supports both policy-based (scheduled) backups and manual (on-demand) backups. In this article, we will be focusing on policy-based backups.
For more information regarding this capability go to Azure NetApp Files backup documentation.
Scenario
In the following scenario, we will demonstrate how Azure NetApp Files backup can be enabled and managed using the Terraform AzAPI provider. To provide additional redundancy for our backups, we will backup our volumes in the Australia East region, taking advantage of zone-redundant storage (ZRS).

Azure NetApp Files backup preview enablement
To enable the preview feature for Azure NetApp Files, you need to enable the preview feature. In this case, this feature needs to be requested via the Public Preview request form. Once the feature is enabled, it will appear as ‘Registered’.
Get-AzProviderFeature -ProviderNamespace “Microsoft.NetApp” -Feature ANFBackupPreview

FeatureName      ProviderName     RegistrationState
———–      ————     —————–
ANFBackupPreview Microsoft.NetApp Registered
(!) Note
A ‘Pending’ status means that the feature needs to be enabled by Microsoft before it can be used.
|
Managing Resource Providers in Terraform
In case you manage resource providers and its features using Terraform you will find that registering the preview feature will fail with the below message, which is expected as it is a forms-based opt-in feature.
Resource “azurerm_resource_provider_registration” “anfa” {
   name     = “Microsoft.NetApp”
   feature {
     name       = “ANFSDNAppliance”
     registered = true
   }
   feature {
     name       = “ANFChownMode”
     registered = true
   }
   feature {
     name       = “ANFUnixPermissions”
     registered = true
   }
   feature {
     name = “ANFBackupPreview”
     registered = true
    }
 }

Terraform Configuration
We are deploying Azure NetApp Files using a module with the Terraform AzureRM provider and configuring the backup preview feature using the AzAPI provider.
Microsoft has recently released the Terraform AzAPI provider which helps to break the barrier in the infrastructure as code (IaC) development process by enabling us to deploy features that are not yet released in the AzureRM provider. The definition is quite clear and taken from the provider GitHub page.
The AzAPI provider is a very thin layer on top of the Azure ARM REST APIs. This new provider can be used to authenticate to and manage Azure resources and functionality using the Azure Resource Manager APIs directly.
The code structure we have used looks like the sample below. However, if using Terraform Cloud you use the private registry for module consumption. For this article, we are using local modules.
ANF Repo
        |_Modules
            |_ANF_Pool
        |       |_ main.tf
        |       |_ variables.tf
        |       |_ outputs.tf
        |   |_ ANF_Volume
        |       |_ main.tf
        |       |_ variables.tf
        |       |_ outputs.tf
        |_ main.tf
        |_ providers.tf
        |_ variables.tf
        |_ outputs.tf
Terraform AzAPI and AzureRM Providers
We have declared the Terraform providers configuration to be used as below.
 provider “azurerm” {
  skip_provider_registration = true
  features {}
}

provider “azapi” {
}

terraform {
  required_providers {
    azurerm = {
      source  = “hashicorp/azurerm”
      version = “~> 3.00”
    }

    azapi = {
      source = “azure/azapi”
    }
  }
}
Declaring the Azure NetApp Files infrastructure
To create the Azure NetApp Files infrastructure, we will be declaring and deploying the following resources:
- NetApp account
- capacity pool
- volume
- export policy which contains one or more export rules that provide client access rules
resource “azurerm_netapp_account” “analytics” {
  name                = “cero-netappaccount”
  location            = data.azurerm_resource_group.one.location
  resource_group_name = data.azurerm_resource_group.one.name
}

module “analytics_pools” {
  source   = “./modules/anf_pool”

  for_each = local.pools

  account_name        = azurerm_netapp_account.analytics.name
  resource_group_name =    azurerm_netapp_account.analytics.resource_group_name
  location            = azurerm_netapp_account.analytics.location
  volumes             = each.value
  tags                = var.tags
}
To configure Azure NetApp Files policy-based backups for a volume there are some requirements. For more info about these requirements, please check requirements and considerations for Azure NetApp Files backup.
- snapshot policy must be configured and enabled
- Azure NetApp Files backup is supported in the following regions. In this example we are using the Australia East region.
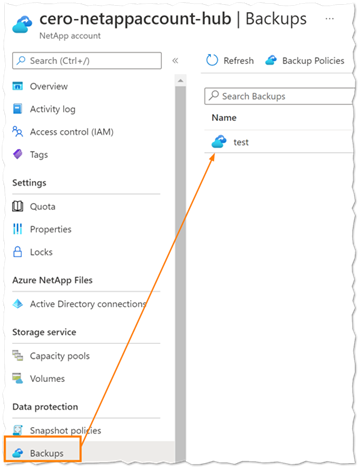
After deployment, you will be able to see the backup icon as part of the NetApp account as below.
Azure NetApp Files backup policy creation
The creation of the backup policy is similar to a snapshot policy and has its own Terraform resource. The backup policy is a child element of the NetApp account. You’ll need to use the ‘azapi_resource’ resource type with the latest API version.
(!) Note
It is helpful to install the Terraform AzAPI provider extension in VSCode, as it will make development easier with the IntelliSense completion.
|
The code looks like this:
resource “azapi_resource” “backup_policy” {
  type      = “Microsoft.NetApp/netAppAccounts/backupPolicies@2022-01-01”
  parent_id = azurerm_netapp_account.analytics.id
  name      = “test”
  location  = “australiaeast”

  body = jsonencode({
    properties = {
      enabled              = true
      dailyBackupsToKeep   = 1
      weeklyBackupsToKeep  = 0
      monthlyBackupsToKeep = 0
    }
  })
}
(!) Note
The ‘parent_id’ is the resource id of the NetApp account
|
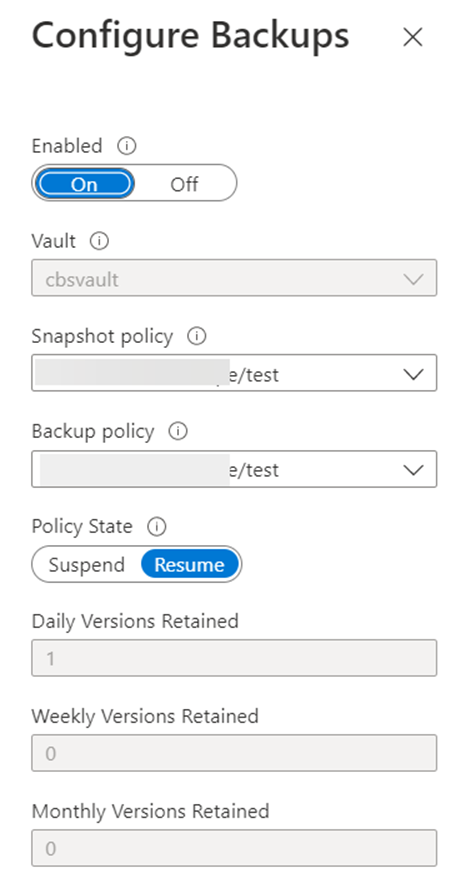
Because we are deploying this in the Australia East region, which has support for availability zones, the Azure storage account used will be configured with zone-redundant storage (ZRS), as documented under Requirements and considerations for Azure NetApp Files backup. In the Azure Portal, within the volume context, it will look like the following:
(!) Note
Currently Azure NetApp File backups supports backing up the daily, weekly, and monthly local snapshots created by the associated snapshot policy to the Azure Storage account.
|
The first snapshot created when the backup feature is enabled is called a baseline snapshot, and its name includes the prefix ‘snapmirror’.

Assigning a backup policy to an Azure NetApp Files volume
The next step in the process is to assign the backup policy to an Azure NetApp Files volume. Once again, as this is not yet supported by the AzureRM provider, we will use the `azapi_update_resource` as it allows us to manage the resource properties we need from the existing NetApp account. Additionally, it does use the same auth methods as the AzureRM provider. In this case, the configuration code looks like the following where the data protection block is added to the volume configuration.
resource “azapi_update_resource” “vol_backup” {
  type        = “Microsoft.NetApp/netAppAccounts/capacityPools/volumes@2021-10-01”
  resource_id = module.analytics_pools[“pool1”].volumes.volume1.volume.id
  body = jsonencode({
    properties = {
      dataProtection = {
        backup = {
          backupEnabled  = true
          backupPolicyId = azapi_resource.backup_policy.id
          policyEnforced = true
        }
      }
      unixPermissions = “0740”,
      exportPolicy = {
        rules = [{
          ruleIndex = 1,
          chownMode = “unRestricted” }
        ]
      }
    }
  })
}
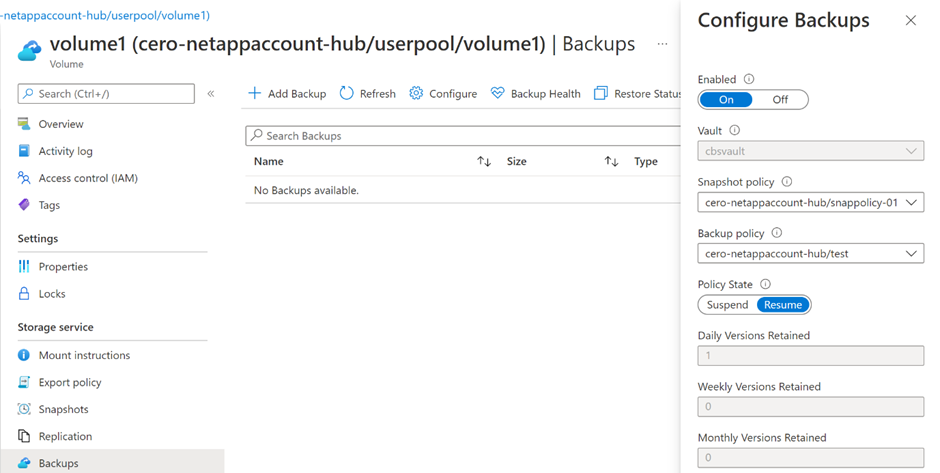
The data protection policy will look like the screenshot below indicating the specified volume is fully protected within the region.
AzAPI to AzureRM migration
At some point, the resources created using the AzAPI provider will become available in the AzureRM provider, which is the recommended way to provision infrastructure as code in Azure. To make code migration a bit easier, Microsoft has provided the AzAPI2AzureRM migration tool.
Summary
The Terraform AzAPI provider is a tool to deploy Azure features that have not yet been integrated in to the AzureRM Terraform provider. As we see more adoption of preview features in Azure NetApp Files this new functionality will give us deployment support to manage zero-day and preview features, such as Azure NetApp Files backup and more.
Additional Information
- https://learn.microsoft.com/azure/azure-netapp-files
- https://learn.microsoft.com/azure/azure-netapp-files/backup-introduction
- https://learn.microsoft.com/azure/azure-netapp-files/backup-requirements-considerations
- https://learn.microsoft.com/azure/developer/terraform/overview-azapi-provider#azapi2azurerm-migration-tool
- https://registry.terraform.io/providers/hashicorp/azurerm
- https://registry.terraform.io/providers/Azure/azapi
- https://github.com/Azure/terraform-provider-azapi

by Contributed | Oct 20, 2022 | Azure, Business, Dynamics 365, Microsoft 365, Technology
This article is contributed. See the original author and article here.
Commercial and public sector organizations continue to look for new ways to advance their goals, improve efficiencies, and create positive employee experiences. The rise of the digital workforce and the current economic environment compels organizations to utilize public cloud applications to benefit from efficiency and cost reduction.
The post Microsoft 365 expands data residency commitments and capabilities appeared first on Microsoft 365 Blog.
Brought to you by Dr. Ware, Microsoft Office 365 Silver Partner, Charleston SC.


Recent Comments