Business leaders: Take a 90-minute cloud journey, with Azure training created just for you

Business leaders: Take a 90-minute cloud journey, with Azure training created just for you

This article is contributed. See the original author and article here.

Like you, professionals around the world know that the cloud is transforming the business landscape for the better, while offering unparalleled opportunities for innovation and growth. As you look to the cloud to do more with less and to help support your organization’s goals and success, we’re confident that Azure can help you do exactly that—from saving money by migrating your apps and data to the cloud, to optimizing those cloud costs, and then reinvesting those savings to drive progress.


Knowing how critical these areas are, our mission is for Azure to be the world’s computer, so you can do what you do best—innovate, create, and differentiate your business. We also know that you need to focus on strategy and decision-making rather than on navigating the technical complexities of the cloud, even while you explore Azure costs and benefits, along with its ability to help solve your organization’s challenges.


So, where can you find an Azure overview?


We’re happy to introduce the new Get to know Microsoft Azure cloud platform: An overview for business professionals learning path on Microsoft Learn, crafted with you and your learning goals, needs, and preferences in mind. This free practical resource is designed to bridge the gap between cloud platform knowledge and business strategy—with no technical background required. Plus, you can complete it in about 90 minutes, which makes this an extremely time-efficient investment.


Created to help you quickly learn the advantages of Azure and how it can support your organization’s success, this learning path focuses on real-world examples across multiple industries. It demonstrates how cloud adoption can benefit your operations, drive cost savings, fuel growth, and more.


What can you expect to learn?


We know that business leaders want the innovation and agility that the cloud enables, but you need to learn at your own pace and on your own schedule. So we’ve distilled the essential aspects of Azure into concise modules, helping you to get the maximum value from your time. With practical insights and real-life case studies, we highlight the transformative power of cloud adoption, offering the inspiration and confidence to explore the possibilities of Azure in three modules:


  • Describe the basics of Azure cloud for business details what the cloud is, what Azure is, and how your business can grow and transform with Azure and cloud economics.

  • Describe the business benefits of Azure covers cost efficiency, innovation, agility, and security.

  • Transition your business to Azure examines the various decisions to anticipate as you move to the cloud. Review strategic considerations and best practices for migrating to Azure and look ahead to the Microsoft Cloud Adoption Framework.


Modules and lessons included in the “Get to know Microsoft Azure cloud platform: An overview for business professionals” learning pathModules and lessons included in the “Get to know Microsoft Azure cloud platform: An overview for business professionals” learning path


What other new learning paths are available for business leaders?


Like the cloud, AI has the power to change how organizations around the world operate, compete, and build value. And AI is ushering in a transformative era of innovation, efficiency, and unprecedented possibilities. We recently announced another new free educational series on Microsoft Learn, Transform Your Business with Microsoft AI, created to help you build your AI knowledge, insights, and skills.


This curriculum, which complements the new Azure overview for business leaders, explores:


  • The competitive advantage and potential of AI.

  • How to make informed decisions about its adoption.

  • Examples from the Microsoft AI journey.

  • Guidance from Microsoft experts and other industry leaders.


With an emphasis on responsible AI, including ethics, fairness, transparency, and accountability, this learning path aims to empower organizations of all sizes to harness the potential of AI. For more details, read AI for business leaders: Discover AI advantages in this Microsoft AI learning series.


Make the most of the new Azure training


When you take this 90-minute cloud journey, you gain insight into the transformative power of Azure, enhancing your cloud fluency and examining strategic decisions that can help drive your business forward. With Microsoft Azure as your trusted cloud provider, you get not only security and privacy but also a reliable business partner invested in your success. Embrace the benefits of cloud computing, explore how it can solve your challenges, and discover the potential savings it offers, with this new learning path for business leaders.




Top 5 “dos and don’ts” when you implement Dynamics 365 Field Service Mobile

Top 5 “dos and don’ts” when you implement Dynamics 365 Field Service Mobile

This article is contributed. See the original author and article here.

Dynamics 365 Field Service Mobile is a robust and scalable mobile application created for your frontline workers. With the capabilities of Microsoft Power Platform and Dataverse, you can customize and configure the mobile application to meet your unique business needs. In this post, we’ll explore the most important things you can do—and not do—to create the best possible experience for your frontline workers when you implement Field Service Mobile.

5 “Dos” when you implement Field Service Mobile

Do use “mobile offline for frontline workers

Frontline workers often perform tasks in areas with variable network connectivity. Online-only applications can experience slow performance when network connections are poor. Responses can be delayed or even fail when the network isn’t available.

Using offline-first mode with Field Service Mobile provides a consistent user experience for frontline workers regardless of network conditions. Even if the network is often available, offline mode has advantages for your organization.

  • The offline-enabled application stores and retrieves data from a local database on the device. App performance improves without the dependency on network calls to fetch data from the server.
  • When a network is available, the offline application automatically synchronizes data with the server. Without a network connection, the sync pauses until the device is back online. Frontline workers can focus on completing their tasks without worrying about network connectivity.
  • Frontline workers’ job progress is not delayed by long waits or networking errors in cases when they temporarily lose network access.

Learn more about offline mode:

Do keep the mobile workflow simple

When configuring Field Service Mobile, you have control over the precise layout of forms and fields. It’s important to keep core user scenarios in mind when defining the layout of your forms to create a streamlined experience. Focus your customizations on making the interface intuitive and efficient. This is especially useful for new employees to help them familiarize themselves with the necessary processes and steps to complete their work.

Here are some suggestions to simplify the application:

  • Use fields in a logical sequence. Avoid forcing users to move between forms.
  • Consider performance when you lay out form fields and tabs. Fields that are off-screen are loaded on a delay to avoid impacting the user accessing data that’s visible on the screen. However, sub-grids and charts are loaded with the initial form and can have an impact on performance if they’re added to the form’s default tab.
  • Use Work Order Service Tasks, Services, and Products. These out-of-the-box tables help guide frontline workers to complete a work order.

Do minimize customizations

Field Service Mobile provides much of the necessary app experience out of the box, but there are times when business requirements necessitate business logic unique to your organization.  When customizations are necessary, follow best practices and use common Power Platform capabilities. This enables your organization to get the latest new features and enhancements sooner. It also helps to improve supportability and lower maintenance costs.

We recommend documenting your customizations. This helps you to understand changes and set yourself up for success when making future revisions.

Do train users and use feedback for improvements

Training your users on how to use the app and any unique workflows leads to higher productivity and satisfaction. Training should include a feedback loop to assess user satisfaction and be responsive to misunderstandings or requested changes that will improve the frontline workers’ workflow.

Do take advantage of documentation and the Field Service community 

A wealth of information is available in Field Service documentation and learning sites. Help is also available in the community-driven Field Service forum. Use these resources to build solid understanding of Field Service, Dynamics 365, and the Power Platform.

General documentation:

Customization:

Community support and feature requests:

5 “Don’ts” when you implement Field Service Mobile

Don’t skip user acceptance testing 

Assessing the end-to-end application in real-world scenarios with your organization’s customizations and data is critical to a successful rollout. This can be a challenge when introducing diverse Field Service scenarios in addition to complex online and offline capabilities.

  • Focus testing on the “happy path” workflow through the application. Make sure frontline workers can complete that workflow without error in various situations.
  • Test with the same set of devices that users will have.
  • Test with the same security role and data access that users will have.
  • Test with production-level amounts of data.
  • Test offline mode in variable network conditions emulating real-world usage.
    • Strong network access: Wi-Fi or stable cellular networkNo network access: Device disconnected
    • Intermittent or ‘flaky’ network access: Weak or variable cellular signal or areas of high latency
  • Test customizations and make sure they work well on different devices with the network and in offline scenarios.
  • Enable a feedback loop with your tests. Listen closely to actual users who are taking part in user acceptance testing. Plan a phase to incorporate feedback, which will help users during the final rollout.

Don’t use low-performance hardware or outdated software 

Mobile devices evolve quickly, and it’s best to keep up to date by using recent hardware with sufficient memory and processing power. Using modern, high-performance mobile devices increases productivity through faster access to data and better battery life. Additionally, apps on modern devices are more reliable and less prone to slowdowns or crashes.  

Field Service Mobile recommends evaluating the device based on CPU benchmark scores as given in the system requirements documentation.  

Don’t implement offline mode without understanding data needs

It’s highly recommended that you use offline mode with Field Service Mobile. When implementing offline mode, plan based on your scenarios and data needs for a successful experience for your users.

Include only the required data. It’s important to take a minimal amount of data offline as required for frontline workers to perform their work. Reducing data helps with the sync time, cellular data usage, device battery usage, and device storage. It’s important to understand users’ true data needs and how security roles influence data access.

Minimize the number of relationships between tables to reduce query complexity. The amount of data isn’t the only factor to consider. Complex queries with multiple joins against large tables can also have a high impact on offline sync time.

Avoid frequent schema changes. Schema changes may force the redownload of tables that had changes, resulting in longer sync times.

Be aware of server-side business logic. The offline-enabled Field Server Mobile application syncs data from the server at regular intervals. If part of a workflow depends on interaction with the server, the response may take minutes to return to the client when the network is available and not at all if the user is truly offline. It’s recommended that you move as much business logic to the client as possible to reduce wait time and dependency on the network.

Understand limitations. There are limitations on the offline capabilities of the Power Platform.

Refer to the offline profile guidelines for more information.

Don’t design a workflow that includes switching applications or context 

Try to bring as much of the Field Service workflow into the Field Service Mobile application as possible so frontline workers don’t need to switch between multiple applications. Maintaining multiple applications is time-consuming and frustrating for the user and increases organizational overhead. Use the Power Apps Component Framework (PCF) to build custom experiences, bringing in other data sources when necessary.

If alternate applications are required, try to ease the burden of context switching by using deep links to navigate between the apps.

Don’t reuse web forms on mobile devices 

A benefit of working on the Power Platform is being able to reuse forms on both web and mobile. This capability can make development of your form more efficient, reduce maintenance, and provide a common user experience regardless of how the form is accessed.

However, a form intended for use on a larger-screen device may have information that’s not necessary for a technician using the mobile application. For this reason, we recommend creating mobile-specific forms in some cases to provide an optimized experience that contains only the data that’s necessary for the user.

Conclusion

Field Service Mobile is a powerful application that brings the robust capabilities of Dynamics 365 and the Power Platform into the field. Following these best practices and avoiding common mistakes will help you implement Field Service Mobile successfully.


Not yet a Dynamics 365 customer? Take a tour and get a free trial.

The post Top 5 “dos and don’ts” when you implement Dynamics 365 Field Service Mobile appeared first on Microsoft Dynamics 365 Blog.

Brought to you by Dr. Ware, Microsoft Office 365 Silver Partner, Charleston SC.

Introducing Restricted Management Administrative Units in Microsoft Entra ID

Introducing Restricted Management Administrative Units in Microsoft Entra ID

This article is contributed. See the original author and article here.

We’re excited to share the public preview of restricted management administrative units, a new role-based access control (RBAC) feature in Microsoft Entra ID. 


What you can do with restricted management administrative units 


With restricted management administrative units, you can now designate specific users, security groups, or devices in your Microsoft Entra ID tenant that you want to protect from modification by tenant-level administrators. 


Here are some situations in which this is useful: 


  • You want to protect sensitive user accounts, such as C-level executives, from being able to have their password or multifactor authentication settings changed by regular helpdesk administrators. 


  • You want to ensure that certain user accounts, security groups, or devices from a specific country can only be modified by designated administrators from that country.


  • You have specific security groups granting access to sensitive data and you want to restrict who can modify the membership only to a small set of administrators.


By placing your sensitive objects in a restricted management administrative unit, your tenant-level administrators will not be able to modify them.  Only the administrators you explicitly assign to the scope of the administrative unit itself will be able to make changes. 


Tenant-scoped and other admin unit-scoped administrators are blocked from resetting executives' account passwords.  Only the explicitly designated Executive admin can manage these accounts.Tenant-scoped and other admin unit-scoped administrators are blocked from resetting executives’ account passwords.  Only the explicitly designated Executive admin can manage these accounts.


This is a much easier way to protect your sensitive objects than having to identify and scope every single role assignment in the tenant just to your non-sensitive objects. 


How to use restricted management administrative units in your tenant 


Here’s a quick example of how restricted management administrative units make it a breeze to secure a few sensitive user accounts in your tenant: 


 1. Under Roles & admins, select Admin units and click Add to create a new administrative unit. 


SHDriggers_2-1688681956367.png


 2. Set the Restricted management administrative unit setting to “Yes” and click Next: Assign Roles 


SHDriggers_3-1688681956370.png


3. Add the designated administrator(s) who should be the helpdesk administrators for these sensitive accounts (these are the people who you do want to manage the accounts) and finish creating the administrative unit. 


SHDriggers_4-1688681956374.png


 4. Now, you can go ahead and add the sensitive user accounts to the restricted management administrative unit you just created (just like you would for any other administrative unit). 


SHDriggers_5-1688681956377.png


That’s it!  Now the sensitive user accounts can only be modified by the users you designated, regardless of how many other administrative roles may be assigned in your tenant. 


To learn more details about how restricted management administrative units can help you secure sensitive resources in your tenant, check out our product documentation! 


Best Regards, 


Stuart Kwan  


Partner Manager, Product Management 


Microsoft Identity Division 


Learn more about Microsoft identity: 


Purpose built Collaboration spaces in Viva Sales

Purpose built Collaboration spaces in Viva Sales

This article is contributed. See the original author and article here.

We are thrilled to announce the general availability of Collaboration spaces in Viva Sales, transforming the way sales teams collaborate. Collaboration is essential for sales success, yet many organizations struggle to stay organized and find the right digital tools to bring them together. In the pursuit of closing deals, sellers find themselves collaborating with an average of over 15 cross-functional teams within their organizations, while simultaneously serving their customers. This intricate web of interactions adds a significant layer of complexity to their already demanding work.

With Collaboration spaces, sellers now have an organized and effortlessly created space, tailored to their needs, where they can collaborate seamlessly with their colleagues and customers.

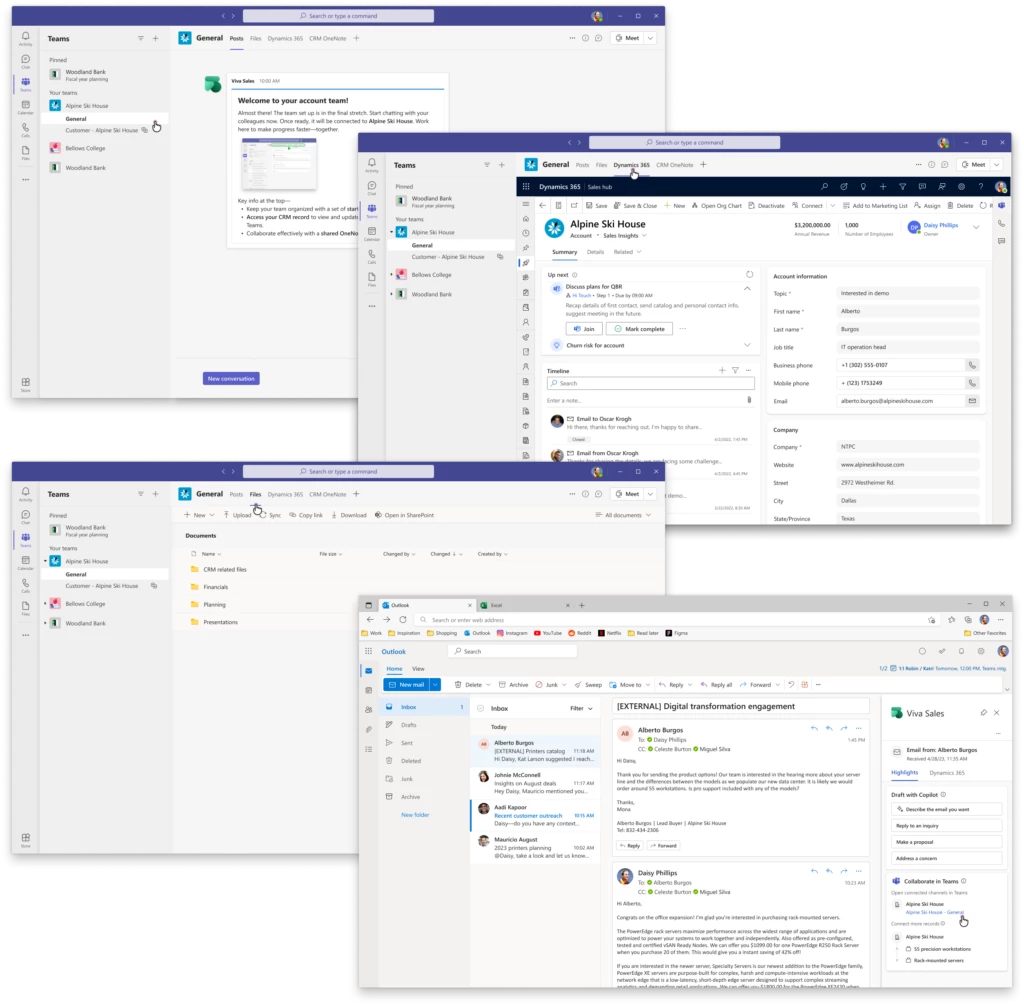
Collaboration space in Teams for an account team

Collaboration made easy with Sales templates

Sales templates in Viva Sales simplify the process of creating purpose-built Collaboration spaces in Microsoft Teams, directly linked to D365 or Salesforce accounts or opportunities. Collaboration spaces are set up with predefined channels and pinned apps, providing a ready-made environment for effective collaboration built on the secure and trustworthy framework provided by Teams.

Once set up, sales teams can conveniently access these Collaboration spaces from the Viva Sales app in Outlook or directly from the Sales app, within the context of their accounts or opportunities. This eliminates the hassle of searching for the right place to collaborate, saving valuable time for the sales team.

We are excited to offer two sales templates as part of this release:

1. Account team template: The Account team template is designed for seamless collaboration within account teams and with customers. Applied at the team level and linked to a CRM account, this template provides a comprehensive solution. It comes equipped with predefined channels and pre pinned apps, ensuring a smooth and efficient workflow for effective collaboration.

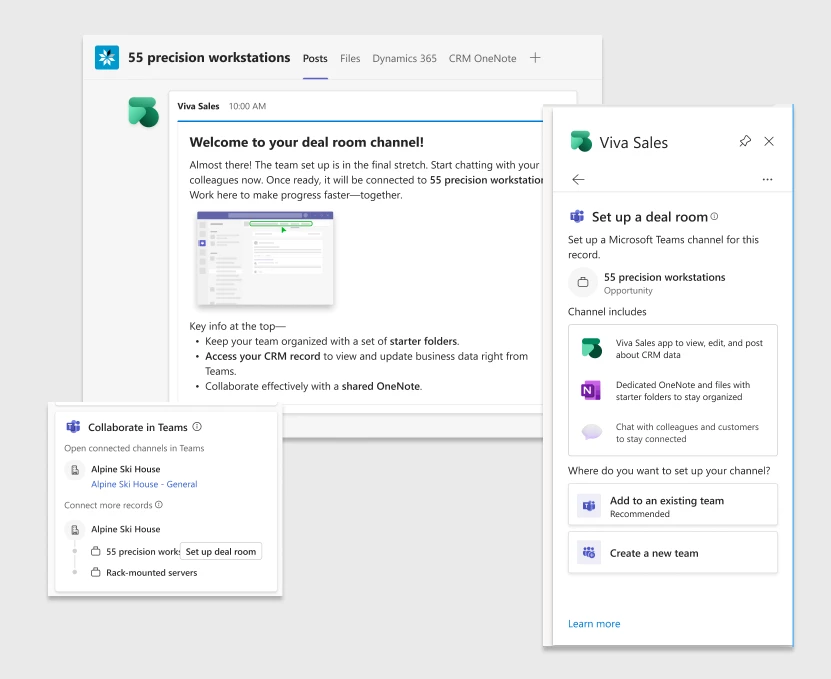
2. Deal room template: The Deal room template is tailored for focused collaboration on deal related activities. Applied at the channel level and linked to a CRM opportunity, this template provides a dedicated space for efficient teamwork. With predefined channels and pre pinned apps, it streamlines communication and enhances productivity, allowing sales teams to effectively collaborate and drive successful deal outcomes.

Deals rooms that help sellers collaborate effectively

Eliminate set-up overhead for effortless teamwork

Setting up a Collaboration space is now easier than ever. With just a few clicks, sellers can create their own space for collaboration. By clicking on the ‘Set up account team’ or ‘Set up deal rooms’ button from Collaborate in Teams card in Viva Sales app within Outlook, sellers can quickly get the set up going. The process involves three simple steps: choosing a new/existing team, reviewing default team/channel names, and adding recommended team members to new teams.

Simplified setup for account teams

Convenient access within sales workflows

Once set up, sales teams can conveniently access these Collaboration spaces from the Viva Sales app in Outlook or directly from the D365 Sales app, within the context of their accounts or opportunities. This eliminates the hassle of searching for the right place to collaborate, saving valuable time for the sales team.

Next steps

New to Viva Sales? Sign up here: Microsoft Viva Sales | Microsoft Viva
Learn more about Collaboration spaces: Introducing Collaboration spaces for sales teams

The post Purpose built Collaboration spaces in Viva Sales appeared first on Microsoft Dynamics 365 Blog.

Brought to you by Dr. Ware, Microsoft Office 365 Silver Partner, Charleston SC.

Lesson Learned #398: Recommended Automatic Indexes Are Excluded from BACPAC Data Export

Lesson Learned #398: Recommended Automatic Indexes Are Excluded from BACPAC Data Export

This article is contributed. See the original author and article here.

In the realm of database management, the BACPAC format is widely used for exporting and importing data between databases. However, we have found an interesting service request, where the recommended automatic indexes are not included in the exported data used by BACPAC


The Scenario:


During a remote session with a customer, a comparison between the source and target databases revealed a discrepancy in the indexes. Specifically, while the source database contained three types of indexes (PK_xxx, IX_xxx, and NCI_xxx), only the manually created PK_xxx and IX_xxx indexes were visible in the target database after restoration. The absence of NCI_xxx indexes prompted an investigation into the BACPAC export process.


Unveiling the Missing Indexes:


To shed light on the issue, the .BACPAC file extension was changed to .ZIP, allowing access to the model.xml file. By analyzing the file, a search for PK_xxx and IX_xxx indexes revealed their presence, but the NCI_xxx indexes were absent. Further examination of the sys.indexes view showed a significant distinction: the column auto_created held a value of 1 for NCI_xxx indexes, indicating that they were automatically created by Azure.


Jose_Manuel_Jurado_0-1689091317737.jpeg


Uncovering the Export Query Condition:


A test conducted in an on-premises environment using SQL Profiler provided valuable insights. The query responsible for exporting indexes contained a condition wherein auto_created = 0, thereby excluding automatically created indexes. This finding explains the root cause of the missing NCI_xxx indexes in the BACPAC export.


Enjoy!