Deep dive into the Surface IT Toolkit

Deep dive into the Surface IT Toolkit

This article is contributed. See the original author and article here.

If you’re an IT administrator who manages a fleet of devices, you know how important it is to have the right tools for deployment and management. You also know how challenging it can be to find and use those tools, especially when they are scattered across different locations and versions. That’s why we are excited to announce the Surface IT Toolkit, a modern desktop application that compiles essential commercial tools and streamlines the Surface device management experience for IT admins – all in a single application.


Surface IT Toolkit logo.png


Surface IT Toolkit is designed to provide simplified access to important tools that complement cloud and traditional management. You can follow step-by-step instructions to configure, update, or troubleshoot your devices. Not only does it provide a centralized location, the Surface IT Toolkit also ensures you are using the latest versions of our tools and installers. You don’t need to worry about outdated or incompatible versions, the app utilizes MSIX which automatically checks for updates and downloads them for you.


In this blog post, we’ll take a closer look at what’s included and what’s new with the Surface IT Toolkit.


Home


After your initial configuration, the first screen you’ll see when you open the toolkit is the home screen where you’ll find quick tasks and choose the managed devices in your fleet which helps optimize the UI of the app. You can also see the status of your tools and installers, and access the settings and feedback options.


Surface IT Toolkit home page.png


Data Eraser


Data Eraser removes data from a Surface device using a NIST [Special Publication 800-88 Revision 1 NVM Express] format command. Additionally, it allows for the creation of certificates of sanitization for record keeping and auditing purposes. This is useful when you need to repurpose, recycle, or retire a device and ensure that no sensitive data remains on it.


What’s new with Data Eraser:


  • You can easily generate a certificate of sanitization after the wiping of an SSD.

  • The tool now provides the ability to complete a disk verification post wipe.


Surface IT Toolkit Data Eraser.png


UEFI Configurator


UEFI Configurator lets organizations apply Surface Enterprise Management Mode (SEMM) UEFI configurations on supported devices and docks so IT staff can effectively control and deactivate components at the firmware level. This can help enhance security and compliance by preventing unauthorized changes to the device settings.


What’s new with UEFI Configurator:


  • In a single pass of the tool, you can create all packages needed for devices and docks (both configuration and reset).

  • We’re building parity between app UI and configurations historically only available to PowerShell, for example you now control USB-C ports through the UI, including USB-C Dynamic & Granular disablement.

  • For those utilizing PowerShell for SEMM deployment, sample PowerShell scripts are now built right into toolkit, so you quickly copy the samples into your script editor of choice and build a solution for your environment.


Surface IT Toolkit UEFI Configurator.png


Recovery Tool


Recovery Tool provides the ability to perform a device reset to revert a device back to a factory state for troubleshooting scenarios. It will also help manage previously downloaded factory images to assist in re-use. This can help you resolve common issues and restore the device to its original performance.


What’s new with Recovery Tool:


  • Guided processes that no longer require serial numbers and simplifies the steps for building a Bare Metal Recovery (BMR) USB.

  • The tool provides the ability to build new and build from an existing image that you’ve already downloaded so you don’t have to fuss with version control.

  • We’re also providing more insight into what’s included in the image itself like what version of Windows and Microsoft 365 Apps are included.


Surface IT Toolkit RecoveryTool.png


Tool Library


Tool Library stores the latest versions of additional tools and installers that can be deployed to end users and provides IT a description of their purpose and links to supporting documentation. These include Surface Asset Tag Tool, Surface Diagnostic Toolkit for Business, Surface Brightness Control Tool, and more.


What’s new with Tool Library:


  • Centralized location for our other installers and tools.

  • Installers and tools are always up-to-date.


Surface IT Toolkit Library.png


You can download the IT Toolkit as an MSIX package which is available from IT Pro Download Center here. You’ll also find the download link in the Surface Management and Support Suite under the Surface IT Tools section. You’ll also find the download link in the Surface Management and Support Suite under the Surface IT Tools section.


As always, be sure to check back here for more updates on managing and securing your Surface devices.


 

Join our Holistic Listening session at the Microsoft 365 Community Conference

This article is contributed. See the original author and article here.

I’m excited to attend the Microsoft 365 Community Conference next week, April 30 – May 2, in Orlando, Florida with Quentin Mackey, Global Product Manager of Viva Glint, delivering a session on Holistic Listening using Viva Glint, Viva Insights, and Viva Pulse. This session will help attendees understand how to seek and act on the many signals available in the employee experience to help people feel engaged, productive, and perform at their best. We’ll be sharing best practices, showcasing new technology, and highlighting a customer case study.  


There is also a track dedicated to HR professionals, communicators, and business stakeholders in employee experience empowering attendees to: 


  • Engage employees: Inspire employees to spark participation, contribution, and action toward cultural and business objectives. Accelerate innovation and drive a high-performance organization that is inclusive of everyone from the executive suite to the frontline. 

  • Modernize internal communications: Evolve strategies to achieve communications objectives with engaging content that reaches audiences where they work, while reducing noise & interruption. Leverage advanced analytics and AI to measure and improve effectiveness. 


You can learn more here about this conference track.  


Join us in person with over 175 Microsoft and community experts in one place by registering here. Note: use the MSCMTY discount code to save $100 USD. 


Do you want to learn more about the conference and more reasons to attend? Check out this blog to learn more about the conference.  


The Microsoft 365 Community Conference returns to Orlando, FL, April 30 – May 2, 2024 – with two pre-event and one post-event workshop days. It’s a wonderful event dedicated to Copilot and AI, SharePoint, Teams, OneDrive, Viva, Power Platform, and related Microsoft 365 apps and services. Plus, a full Transformation track for communicators, HR, and business stakeholders in workplace experience. 

Partner Case Study Series | DevOpsGroup: Migration to Azure DevOps

This article is contributed. See the original author and article here.

DevOpsGroup empowers organizations through IT modernization


DevOpsGroup is a Microsoft gold partner that empowers enterprises and scale-up organizations to achieve more in the digital economy by modernizing IT. The Cardiff, Wales, UK-based company’s team is 90 members strong, and its cloud and DevOps engineers have vast experience working with cloud platforms and DevOps toolchains.


SureView Systems, a multinational software company with headquarters in Tampa, Florida, and Swansea, Wales, specializes in physical security monitoring software for central stations and command centers. The company’s flagship product, Immix, integrates with more than 500 security products and systems. SureView Systems wanted to move Immix from TFS to Azure DevOps to accelerate software delivery and move toward a Software-as-a-Service (SaaS) model. Azure DevOps enables collaboration and modern DevOps services via its boards, pipelines, repositories, testing tools, and extensions marketplace.


“A key driver for the migration to Azure DevOps was the need to keep pace with the latest development and deployment tools as we migrated toward a continuous delivery/continuous integration DevOps model,” said Simon Morgan, Chief Technology Officer, SureView Systems.


Continue reading here


**Explore all case studies or submit your own**

Streamlining Shipment Processes with Automatic re-allocation of non-allocated shipment lines.   

Streamlining Shipment Processes with Automatic re-allocation of non-allocated shipment lines.   

This article is contributed. See the original author and article here.

Editor: Denis Conway

Introduction:

The introduction of the Automatic re-waving of shipment lines failed to be allocated is solving issue where failed lines needed to be handled manually in the “Maintain shipments” form. This feature empowers warehouse managers to schedule checks for incomplete shipments to be re-waved and completed. In the past, this would have been a manual task for a warehouse manager to manage, actively going through a list of incomplete shipment lines and manually reprocessing them for the shipments to be completed. This process was time-consuming every time an exception happened, and lines did not manage to allocate inventory.  
A scenario where this could occur would be if inventory levels in a specific picking location were not available. If that was the case, the system would previously add that failed shipment to a list of incomplete shipments, which a warehouse manager would then have to manually manage.  

 With the Auto Add to Shipments feature, failed shipment lines will be automatically re-added to a new wave, ending the need for manual exception handling.  
Warehouse administrators have the flexibility to configure this as a batch job. This type of exception management allows our outbound processes to continue even when unforeseen accidents or events occur, without need for hours of manual labor spent on reprocessing the failed waves.  

Image: Warehouse Manager reviewing inventory

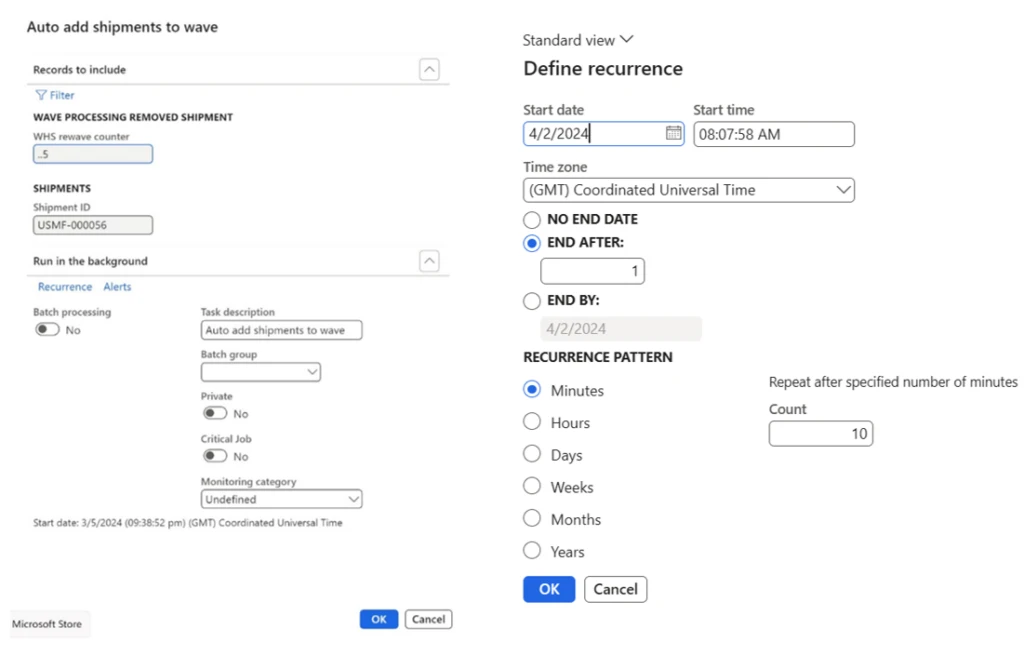
In this image, we get a screenshot of the Auto add shipments to wave menu, where the user can do a variety of things, but most importantly we can set up the recurrence for how often we want our failed shipments to be re-run.  

Product Screen Shot  Left image: Auto add shipments to wave menu.
Right image: Define Auto add shipments to wave Recurrence menu.
Left image: Auto add shipments to wave menu.
Right image: Define Auto add shipments to wave Recurrence menu.

As we can see on the Auto add shipments to wave menu, there is a field named WHS rewave counter and has a default setting of 5. This means that we will only be able to re-wave our shipments a maximum of 5 times. If there is a scenario where we would like this shipment to be re-waved even after the fifth attempt, users can add a shipment ID manually through this page, which enables these previously failed shipment lines for another five re-wave attempts.  

 We can see on the image below that in the form “WHSWaveProcessingRemovedShipment” that one shipment line has failed, and we receive an error message that gives us a hint on why this happened. As we can see, the Shipment status is still “open”, which means the shipment will not be removed from the table. In the WHS rewave counter column there is a 0, which tells us we have not yet tried to re-run that shipment. In the Wave ID field, we can also see the Wave that was affected.

Image: Wave processing removed shipment line form in FnO.

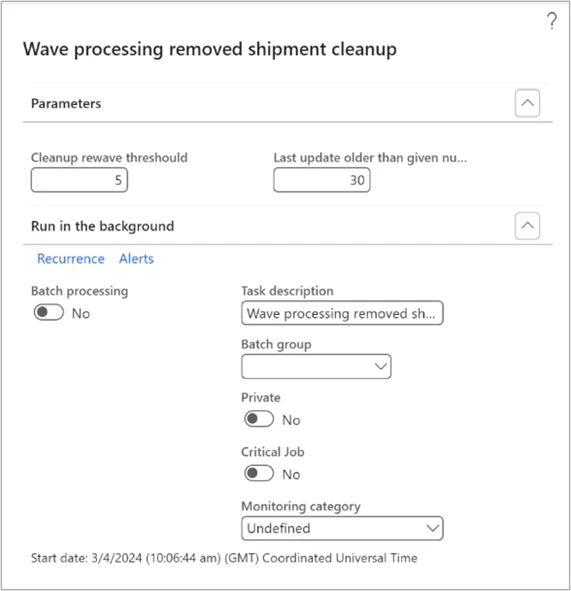
In the image below, we get a snapshot of what the set up for the removal of re-waved shipment lines from the earlier mentioned form looks like. On this screen, users can set up when and how often the re-waving cleanup job should run.

Image: Wave processing removed shipment cleanup menu.

How does the cleanup job work?

The cleanup job was introduced to this feature to avoid failed shipment lines being stuck in the “WHSWaveProcessingRemovedShipmentCleanup” form if they could not be re-waved. Users do not have to set up a cleanup job for the Auto add to shipments feature, however, that means that the staging form will hold lots of shipment lines that have not been re-waved successfully after the maximum number of attempts. The cleanup job will remove lines from the form either via the Cleanup wave threshold field or the Last update older than given number field. This allows users to choose whether they want to remove that line from the form either through a re-wave threshold or after a certain number of days have passed.

In the Cleanup rewave threshold field, users can select how many times they want their shipment lines to be re-waved before they are removed from the ‘WHSWaveProcessingRemovedShipment‘ form.
That means, even as we have the default setting of five attempted re-waves, the cleanup job can remove shipments from the ‘WHSWaveProcessingRemovedShipment’ form earlier than after 5 attempts, by selecting a number lower than 5.
This can be useful if you would only like failed shipment lines to be re-waved a maximum of let’s say 3 times, before they are removed from the ‘WHSWaveProcessingRemovedShipment‘ form.

In the Last update older than given number field, users can select to remove failed shipment lines based on this criterion as well. Setting this to 30 means cleanup job will run and remove all failed shipment lines with the last update being older than the given number. This means, if we select 30 as our number, if we have a shipment line that was last updated 31 days ago, when the cleanup job runs, that line will be removed from the ‘WHSWaveProcessingRemovedShipment‘ form.

Areas of use:

Conceptually, this feature is suited for all kinds of industries, and can aid your outbound processes in more ways, but primarily focuses on scenarios that require exception management related to failed allocation of inventory from a picking zone. This mainly occurs when we allow inventory reservations for e.g., sales orders that are not stored in a picking location or your inventory due that inbound receiving and put-away has not been completed yet, or that production facility has reported inventory after production has been completed but not yet conducted finished goods put-away.

By enabling the re-waving feature for Dynamics 365 Warehouse Management, users reduce time consumption by handling uncompleted shipments, avoiding manual exception handling, and making sure that all shipment lines not allocated will be automatically re-waved and not forgotten.

Take your warehouse to the next level and achieve more with Microsoft Dynamics 365!

More details

Learning articles can be found at: Automatic rewaving of nonallocated shipment lines – Supply Chain Management | Dynamics 365 | Microsoft Learn

Welcome to join Yammer group at: Dynamics 365 and Power Platform Preview Programs : Dynamics AX WHS TMS  

Dynamics 365 Supply Chain Management capabilities

Modernize your supply chain to enhance visibility, improve planning, streamline procurement, and optimize fulfilment – Learn More


The post Streamlining Shipment Processes with Automatic re-allocation of non-allocated shipment lines.    appeared first on Microsoft Dynamics 365 Blog.

Brought to you by Dr. Ware, Microsoft Office 365 Silver Partner, Charleston SC.

Announcing configurable Copilot summaries in Field Service

Announcing configurable Copilot summaries in Field Service

This article is contributed. See the original author and article here.

We are excited to announce that summary configuration for work order recap with Copilot in Dynamics 365 Field Service is now available in public preview. It builds on the work order recap feature released last year, which provides an AI-generated summary of the work order for service managers and technicians.

What is summary configuration?

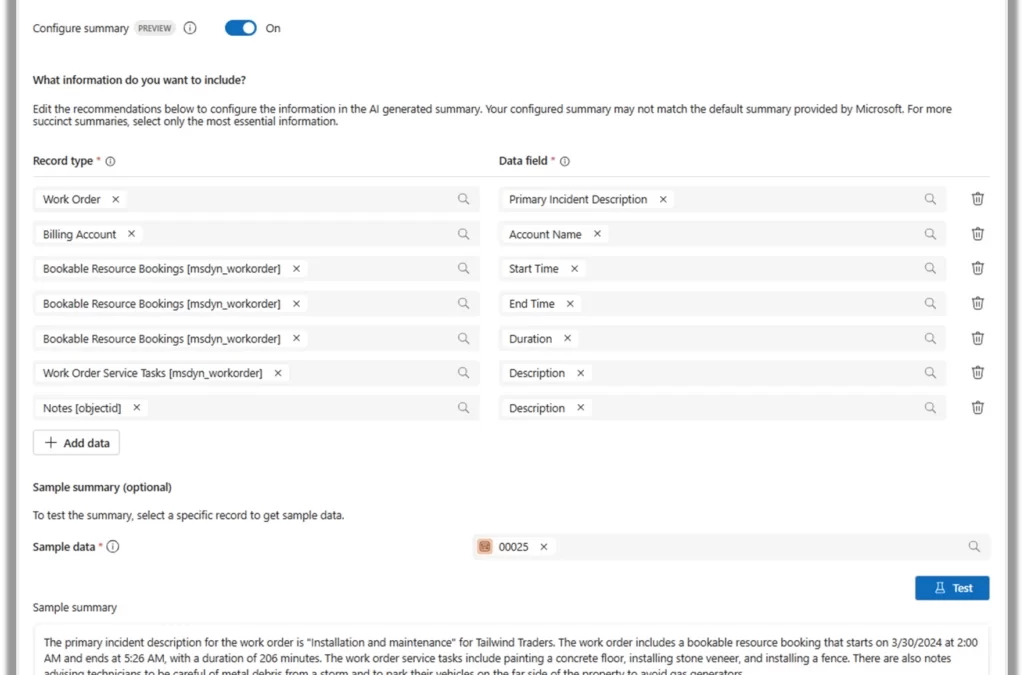
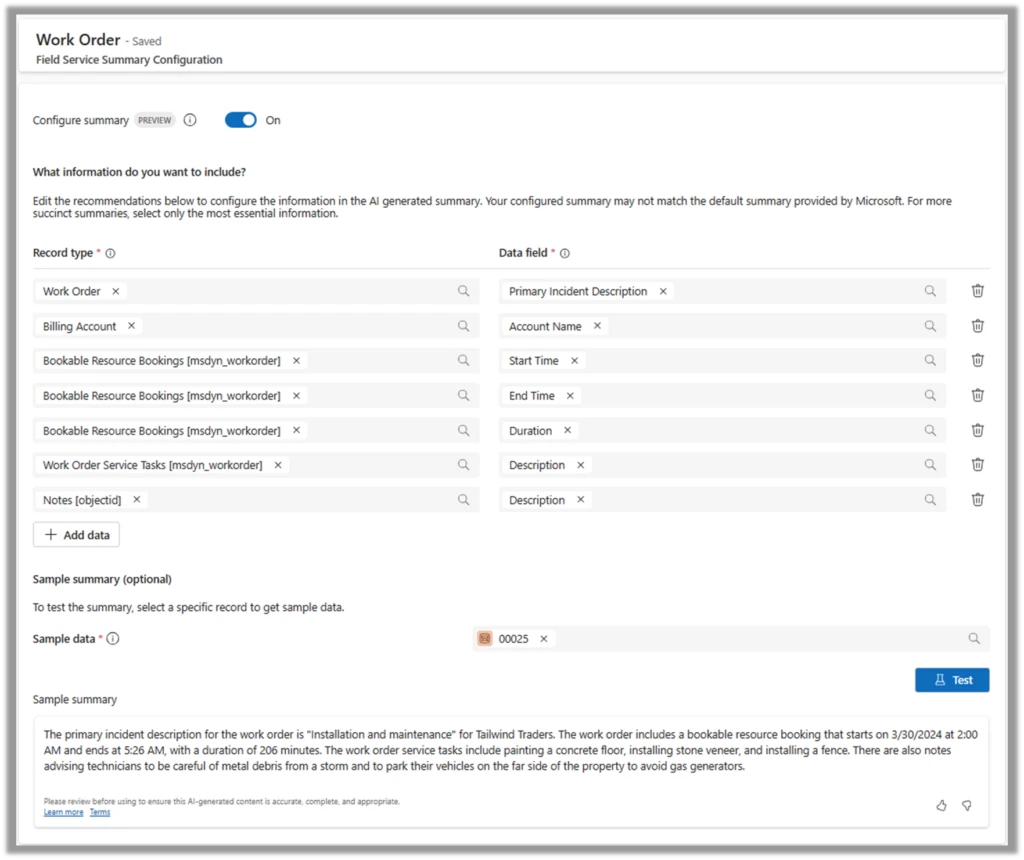
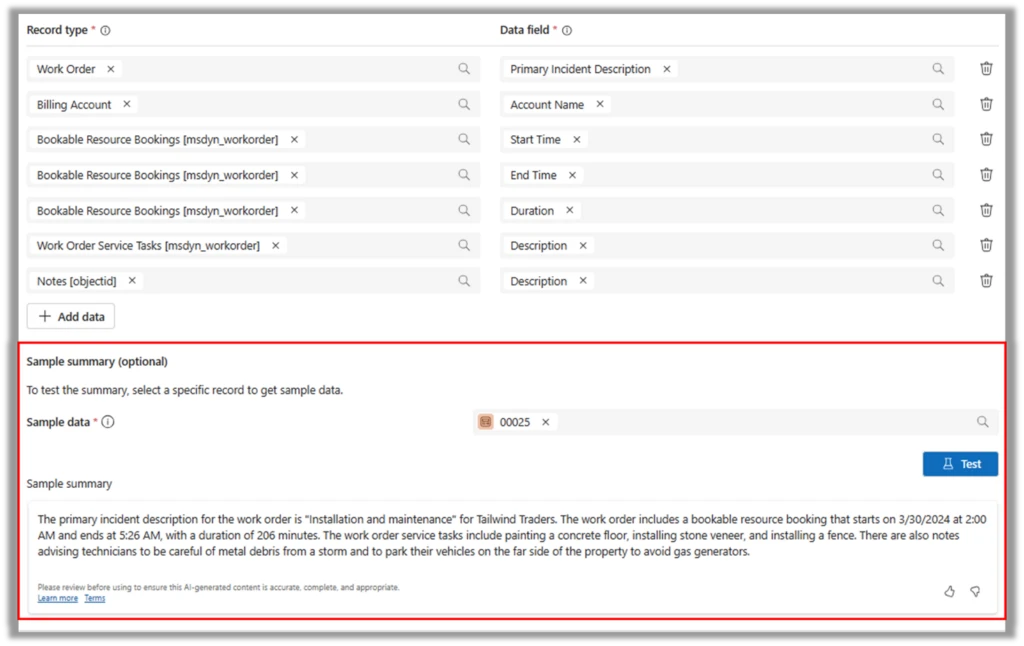
Customers loved our work order recap feature and wanted to configure the summary to reflect their business-critical information. With summary configuration, admins can now specify the data used by Copilot in Field Service, whether in web or mobile. They can select specific columns from the base or related tables based on their organization’s business needs. You can also preview the summary using real data from Dataverse to ensure that it contains the right information.

Enable the summary configuration

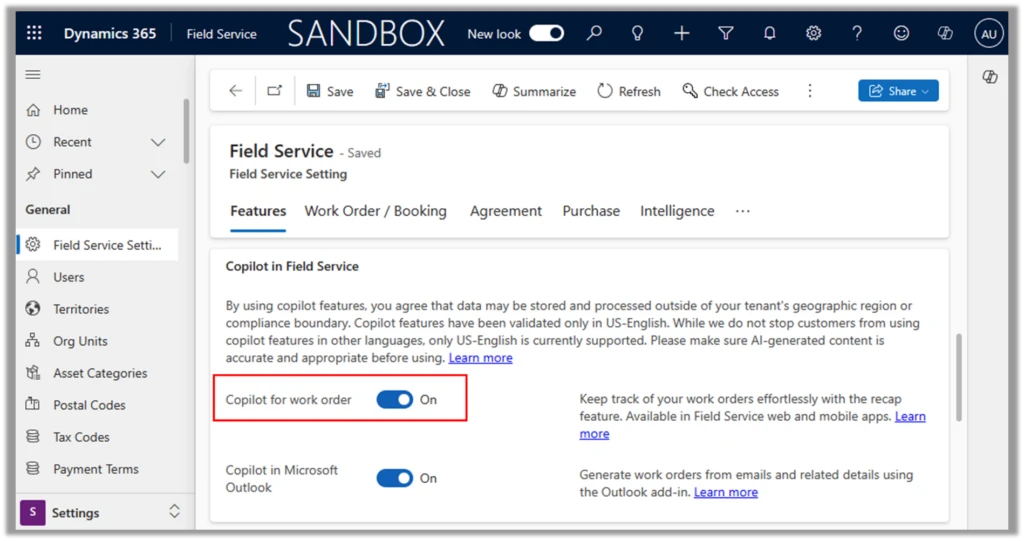
To use the summary configuration, you need to be an administrator of the environment, and have the Work Order Summary feature enabled in your Dynamics 365 Field Service settings. Go to Field Service > Settings > Field Service Settings > Features. Find the Copilot in Field Service section, then turn on Copilot for work order.

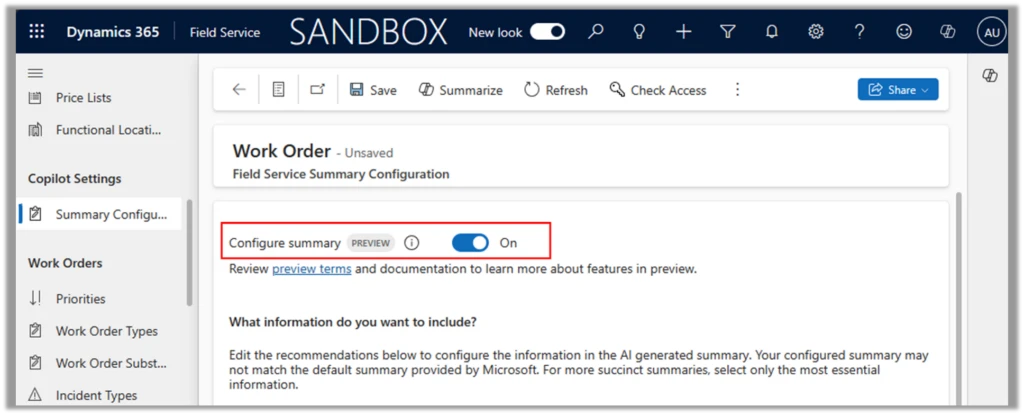
Then, navigate to Summary Configuration on the site map. In public preview, you can choose between Work Order summary and Bookable Resource Booking summary. After selecting the table, turn on the Configure summary toggle to start configuring the table and columns to include in the summary.

Add columns to the summary

Now we are ready to start adding columns. For example, you want to add Primary Incident to the Work Order summary.

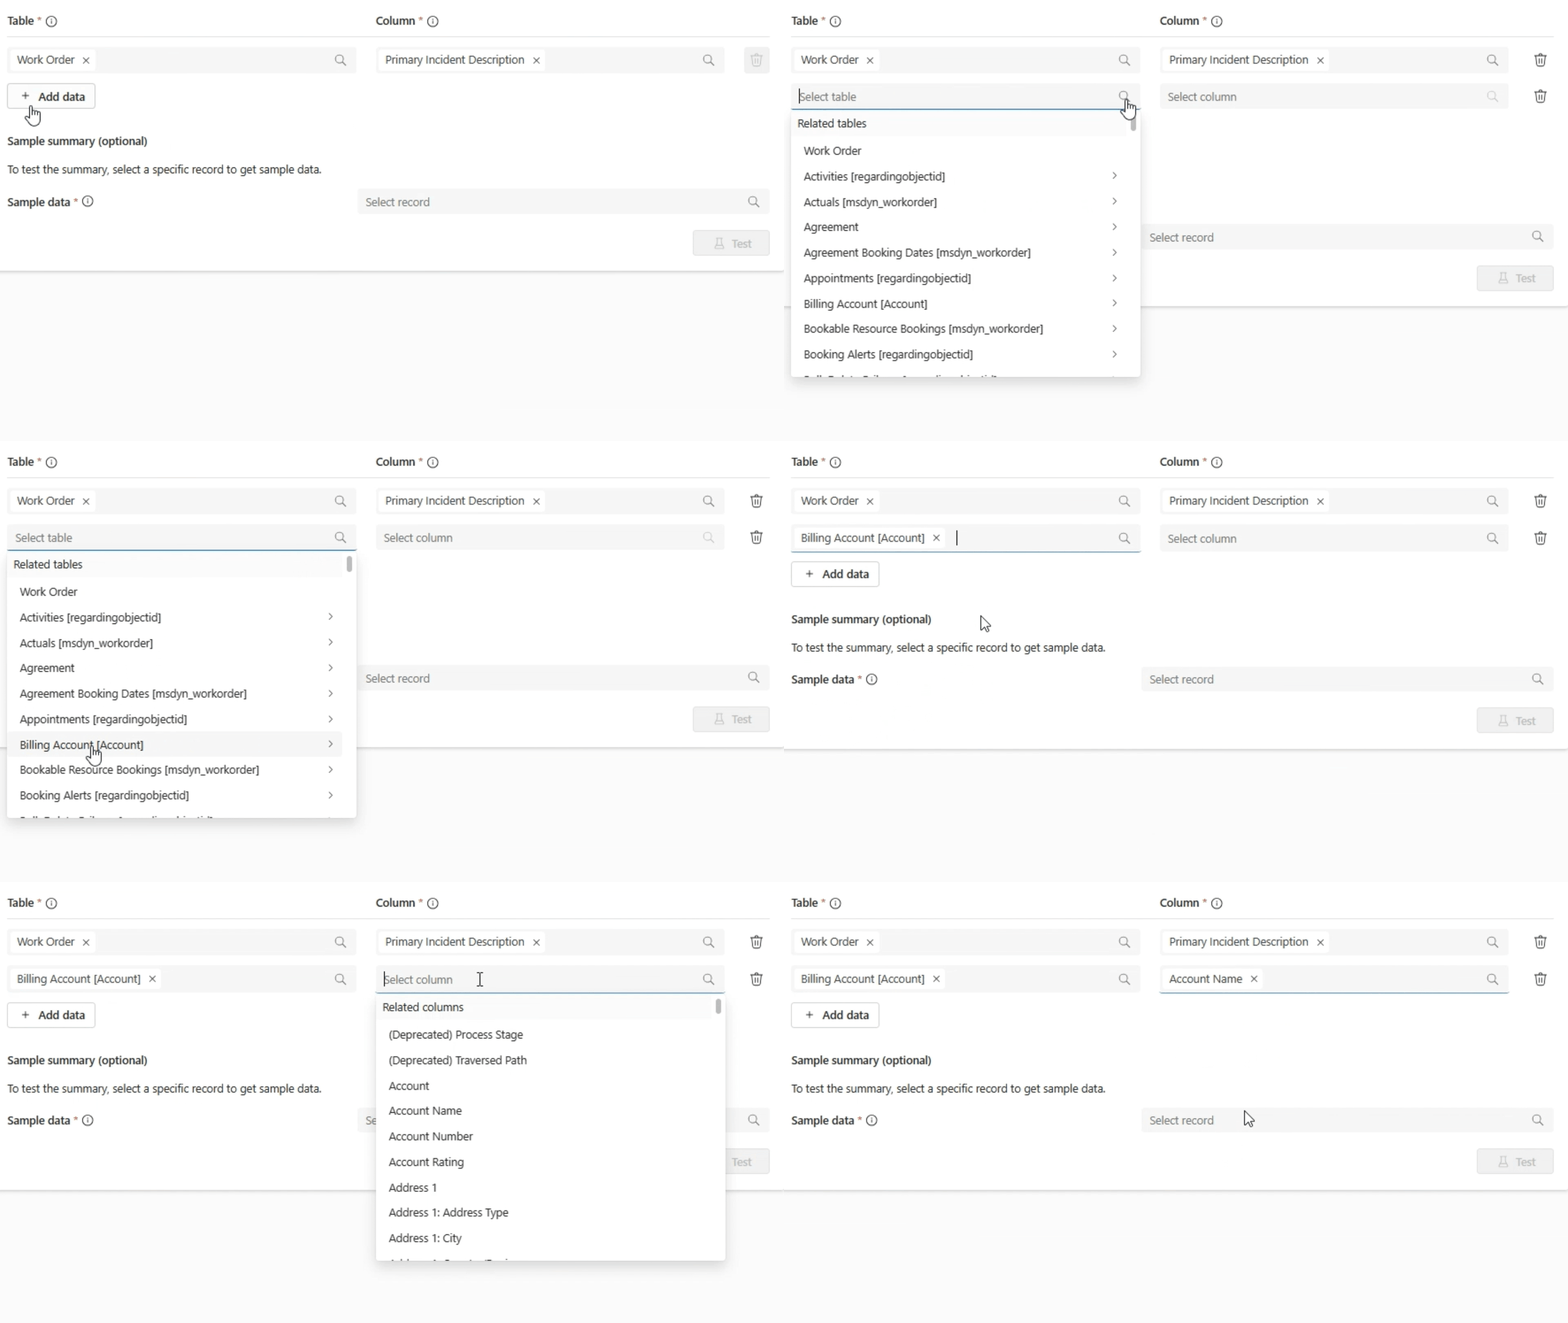
  1. Open the Table list.
  2. Select the Work Order table.
  3. Go to the Column list and select Primary Incident Description.

You can also add a field from a related table. For example, in the Work Order summary, you want to include the Account Name column from the Billing Account associated with the Work Order.

  1. Select + Add data to add a new row.
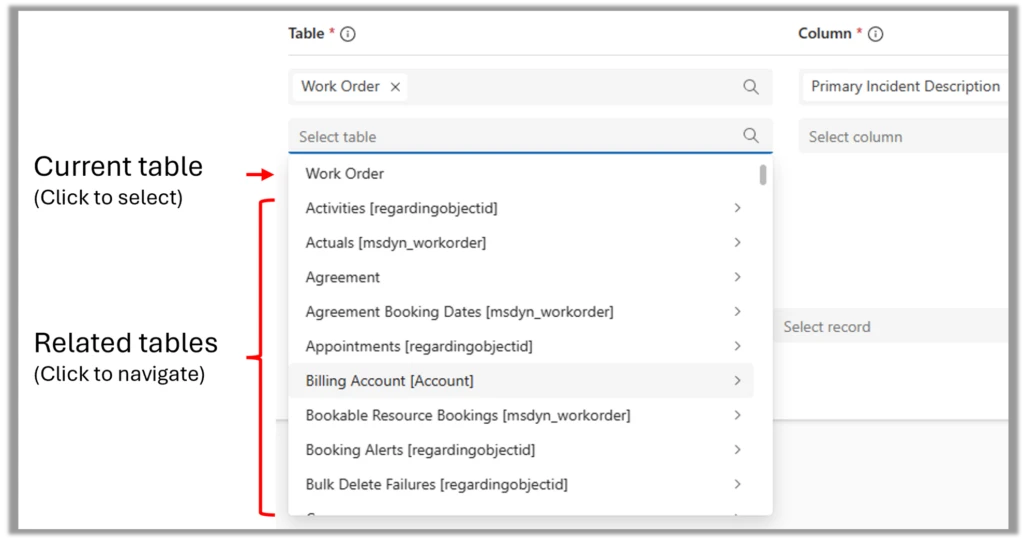
  2. Open the Table list. Related tables are marked with chevrons (>).
    • Either type in the search box or scroll down to find the Billing Account table and select it.
    • Once it becomes the current table (first item in the list), select it.
  3. Then go to the Column list and select Account Name.

Preview the summary

When you are done configuring, you can test your configuration using any record from Dataverse and preview the summary that Copilot would generate for that record. You can be confident that your service managers and technicians will have the relevant information in the summary to perform their job.

Once you have finished testing, select Save to publish this summary configuration.

Enable this feature today and learn more about it through the feature documentation and FAQ. We’re looking forward to hearing your feedback.

The post Announcing configurable Copilot summaries in Field Service appeared first on Microsoft Dynamics 365 Blog.

Brought to you by Dr. Ware, Microsoft Office 365 Silver Partner, Charleston SC.