This article is contributed. See the original author and article here.
Let’s take a look at how you can design Adaptive Cards for Outlook and get response from Outlook users to process using Power Automate.
Scenario
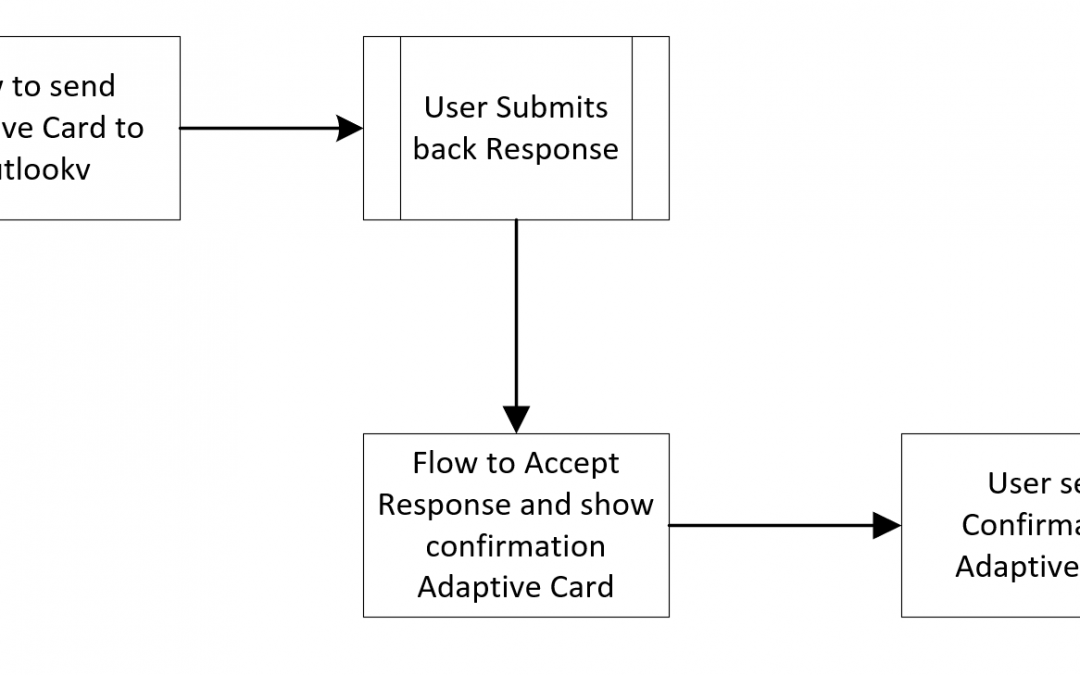
Let’s say I wanted to send an Adaptive Card to an Outlook user on their Email and ask some comment, example – A descriptive feedback and read their response back and send them a confirmation Adaptive Card.
In this post, I’ll simply read the Response in the Flow and send a Confirmation-like Adaptive Card so that you can then further decide to take required action for it based on your use case.
Adaptive Cards Designer – Initial Card Layout
You can logon to https://adaptivecards.io/designer/ i.e. the Adaptive Card designer and start building your card. Below are the high-level steps:
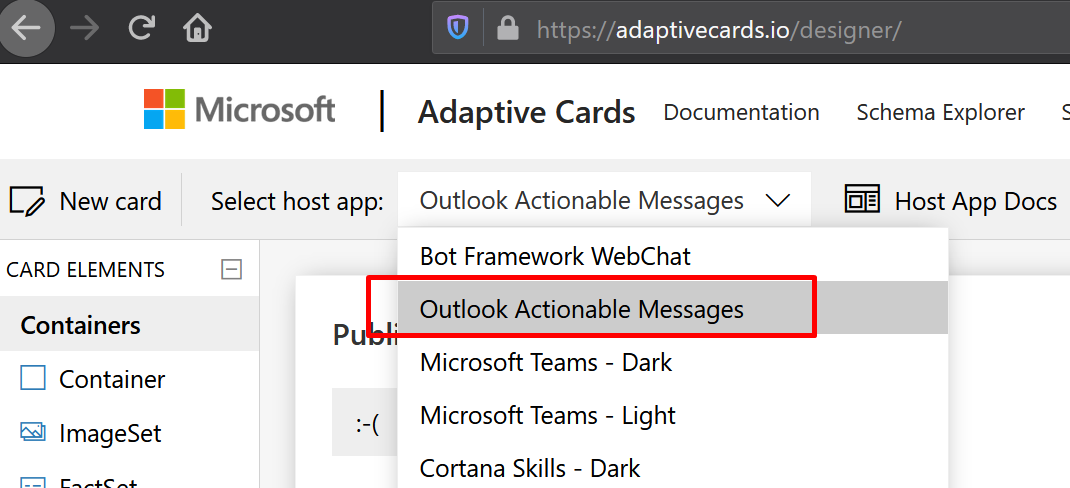
- Once you are in the Adaptive Cards Designer, make sure you select the host app as “Outlook Actionable Messages“
You’ll see a sample already created for you which you can start working off of –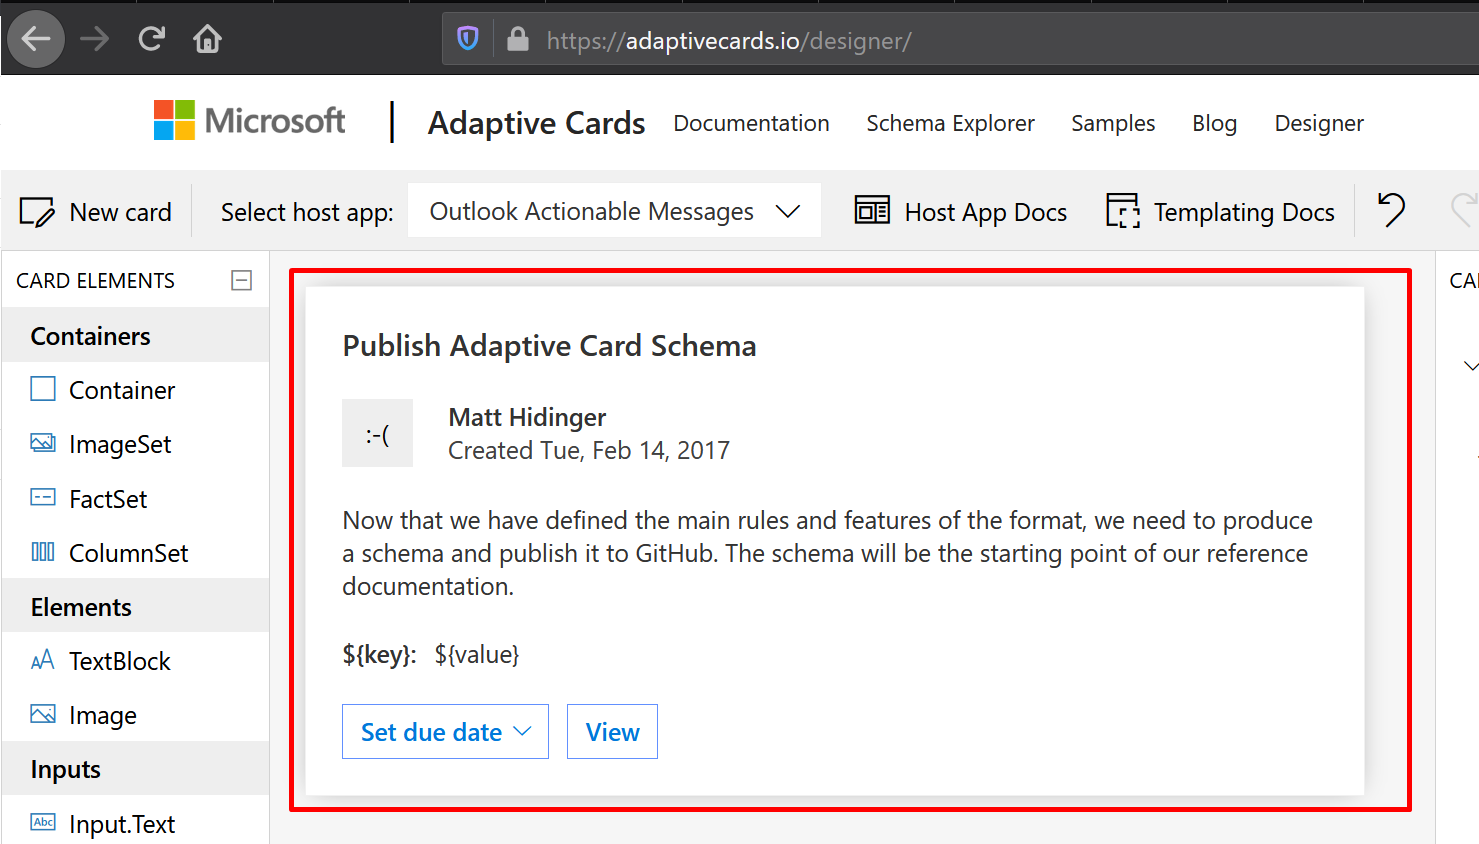
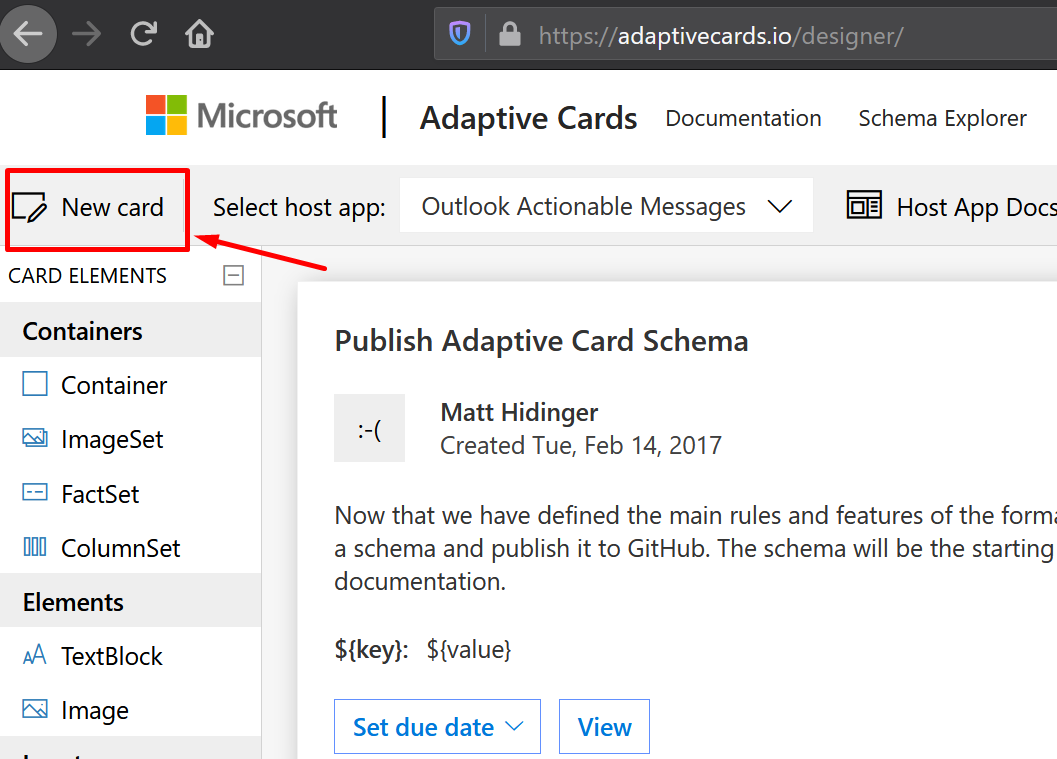
- Since I want to start from the beginning, I’ll select New Card option as shown below
- Now, I’ll start to design my card with the use of some TextBlock, an Input.Text to capture a response. In your case, you can choose the type of input(s) you want. (I’m trying to keep it simple for now
 )
)
These controls works like a drag-and-drop behavior, just drop whatever you need.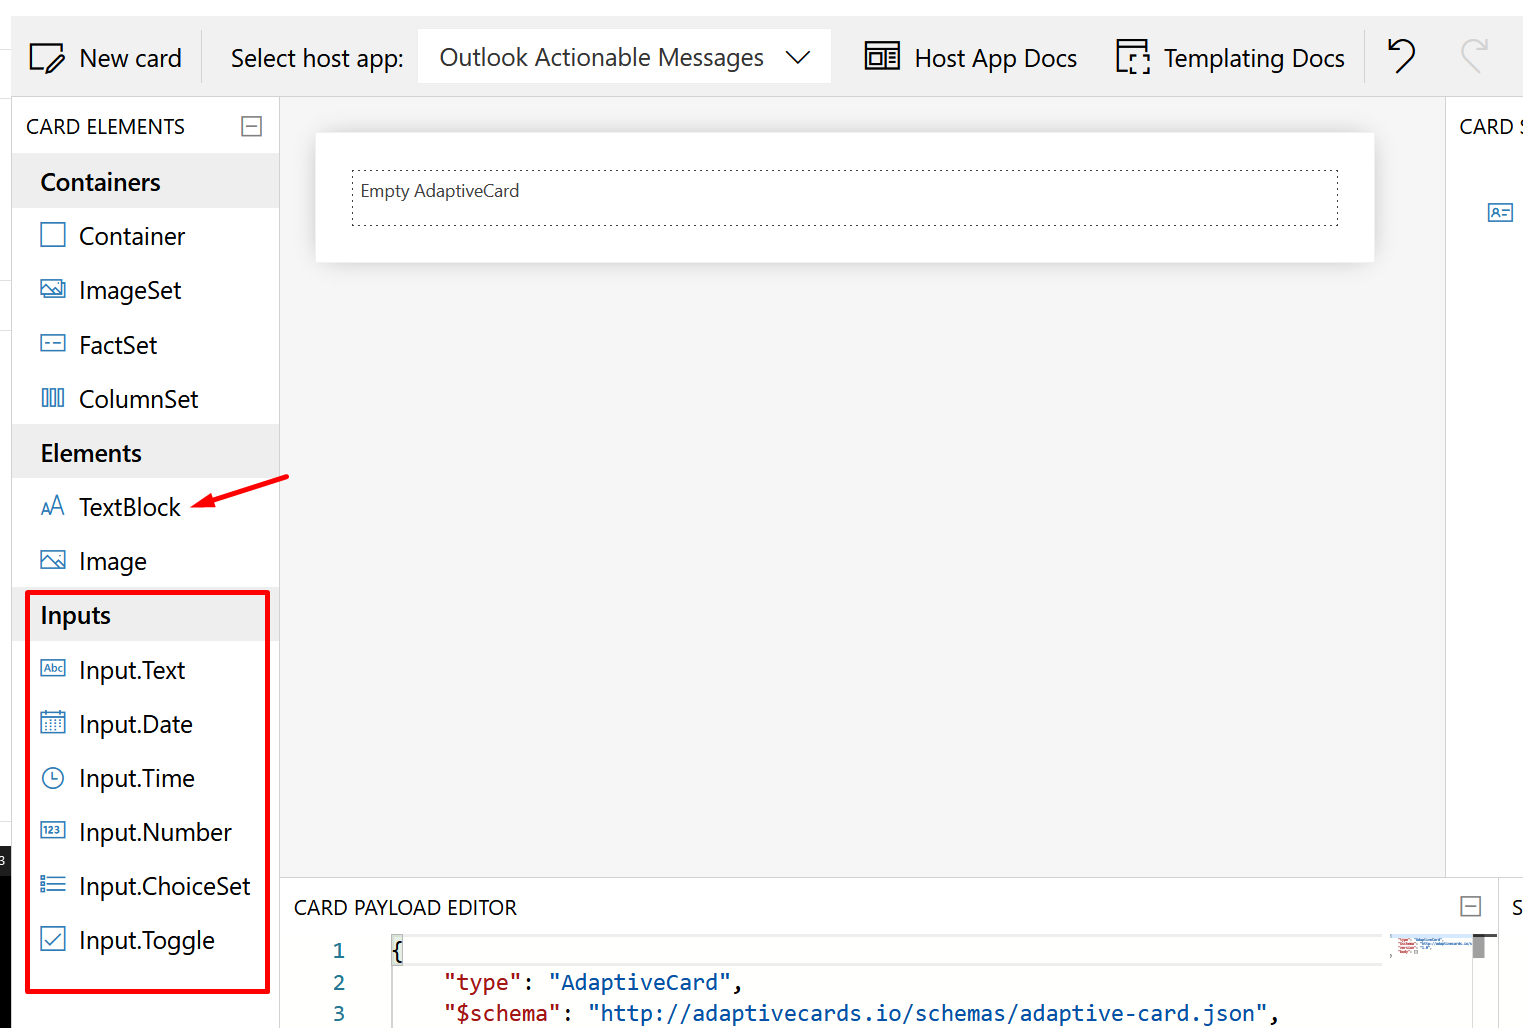
So, I did the following, I added a TextBlock to add the title I want to show on the card and a Multi-line Input.Text to capture a response of the user I’ll send the card to in their Email.

- For the Input.Text, I’ve added an id ‘answer‘. We’ll need this when we capture responses back.
Also, to make the Input.Text control as multi-line, Multi-Line option should be selected as I did below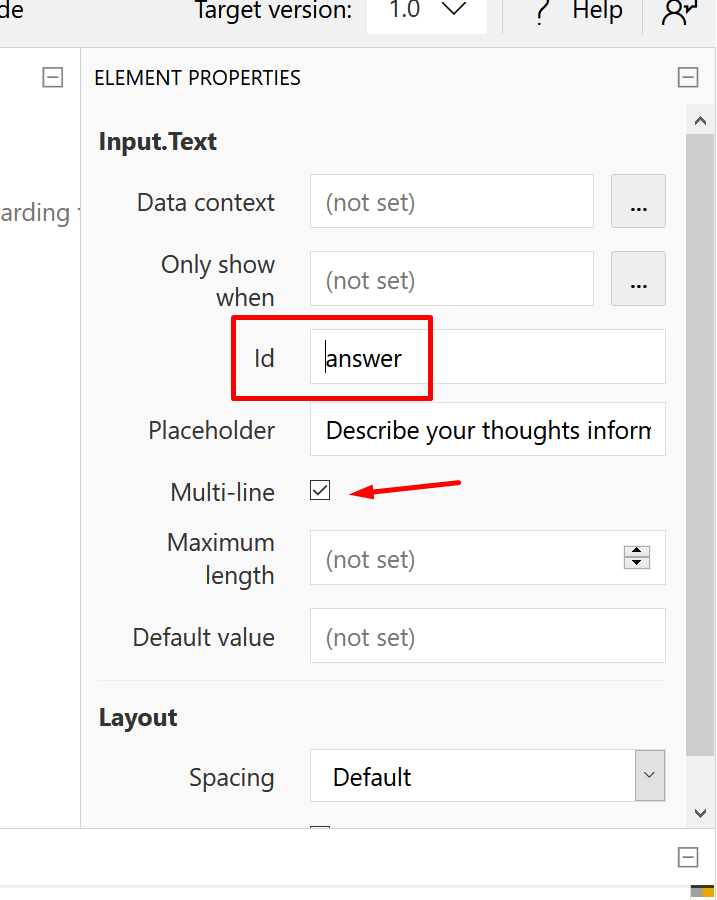
- At this point, our Adaptive Card’s layout is ready. Before we proceed we must first, create a Flow that will capture an HTTP Response and then we’ll come back here.
Flow to Capture Response
Adaptive Cards for Outlook Actionable Messages work off of the HTTP mechanism and that’s why you need a URL where you can capture the responses and send back a confirmation response back.
Let’s call this Flow as “Accept Feedback Response“
- To do so, first create a Flow that Accepts an HTTP Request. You can refer my other post in order to understand how you can capture HTTP Responses – Accept HTTP Requests in a Flow and send Response back | Power Automate
Once once you save a Flow that has a trigger of HTTP Response, you’ll get a URL generated, copy it.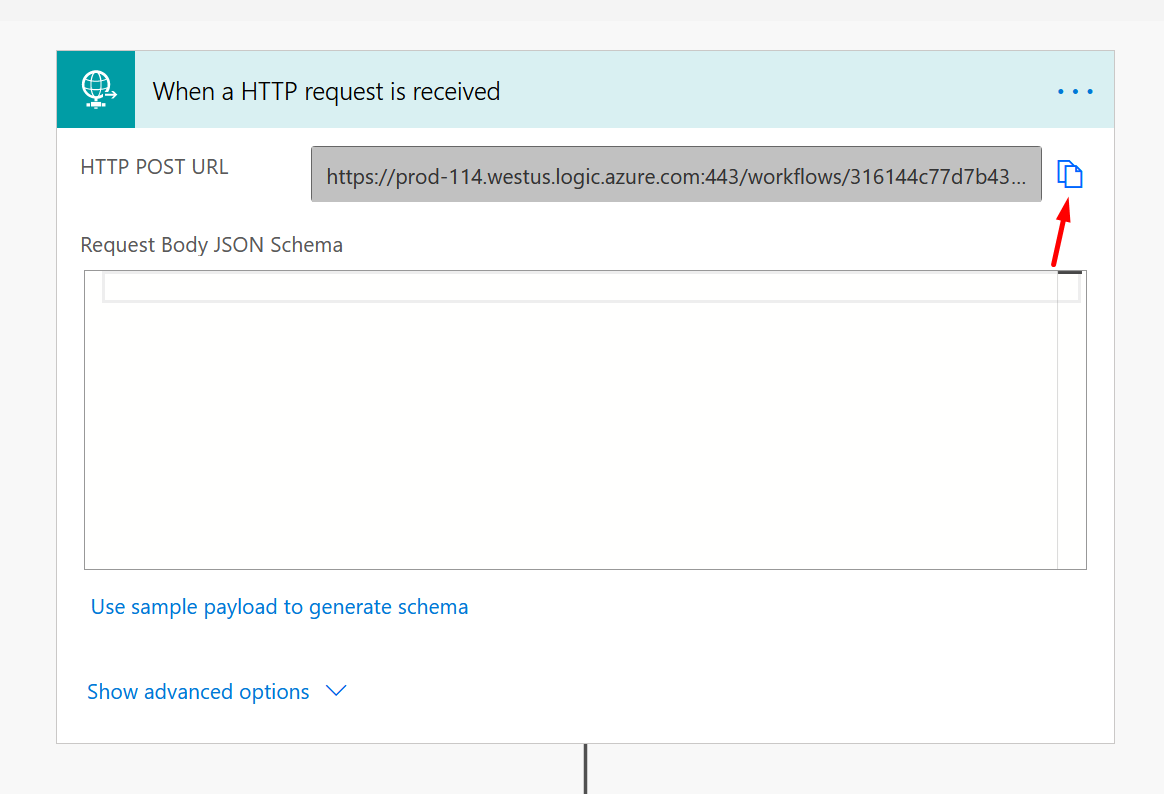
- Next, I’ll enter the schema by clicking on Use sample payload to generate schema button on the first step above and enter the following schema since I know that’s what is to be expected from the User when they fill in the Text and submit back.
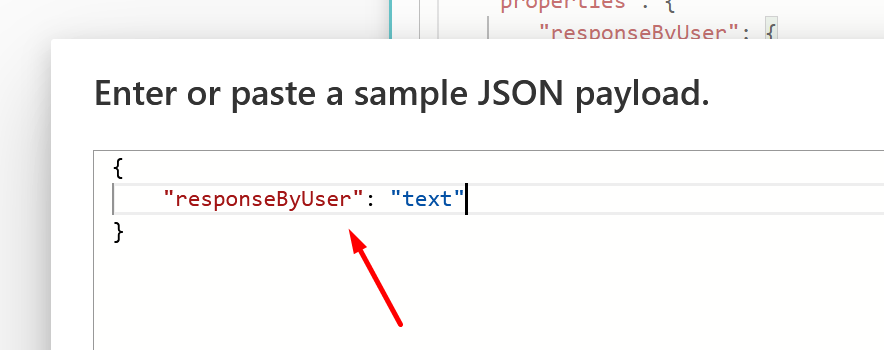
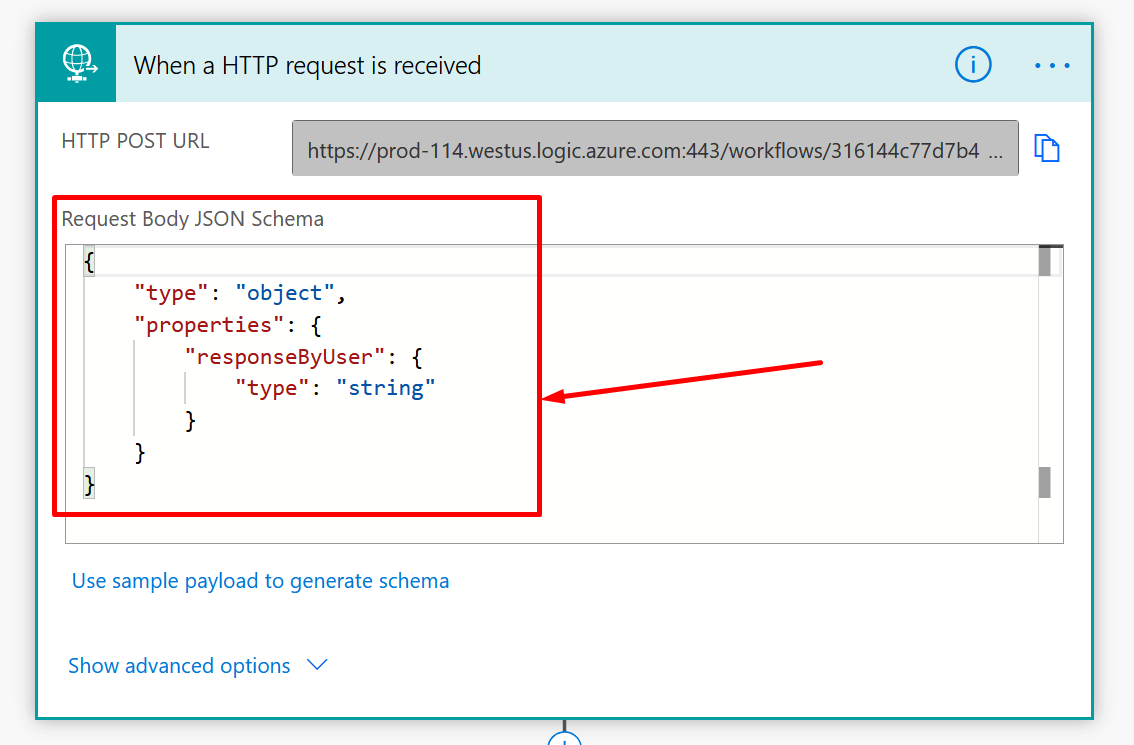
- Once you click OK, your schema will look like this.
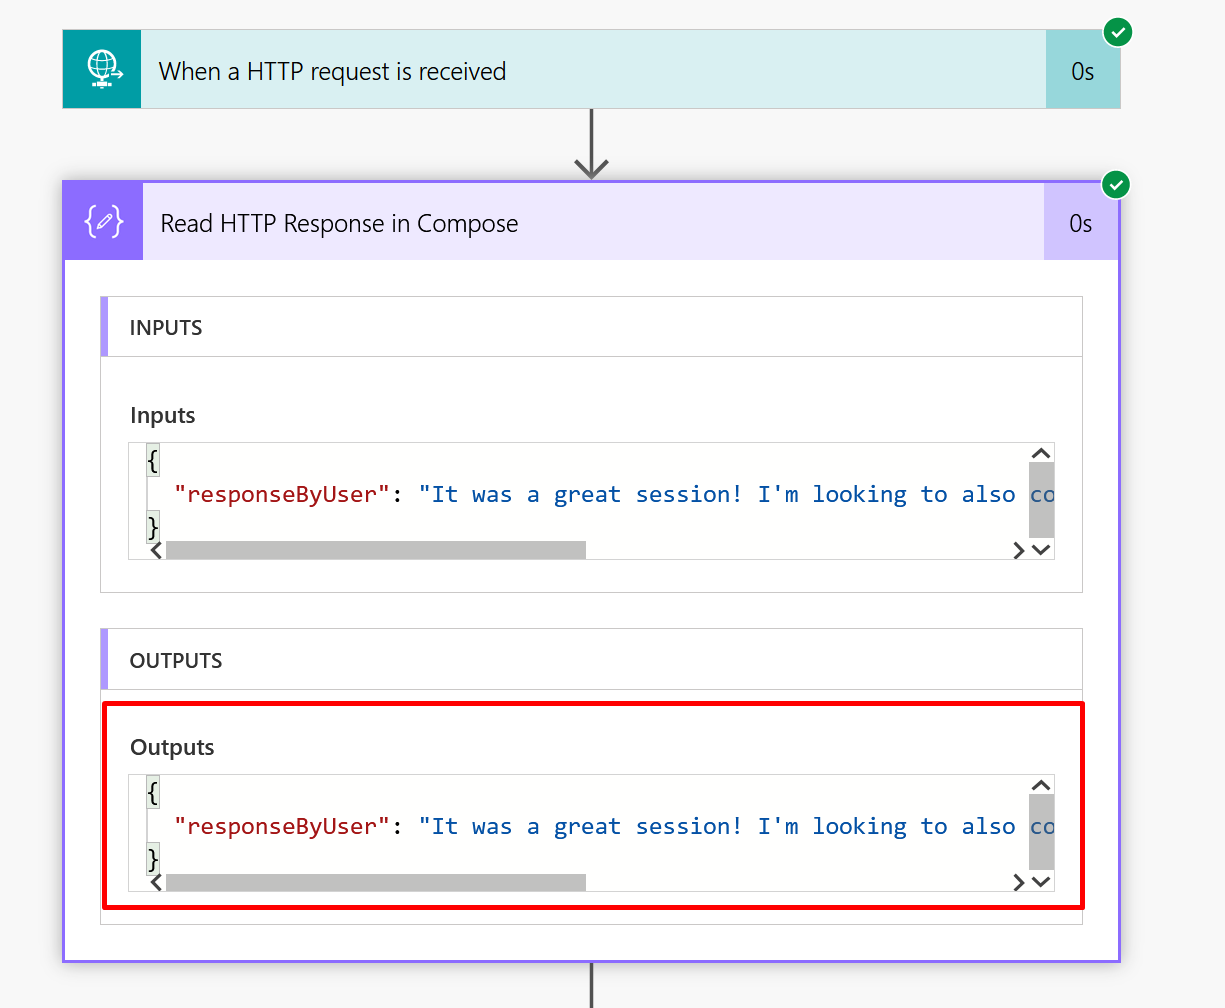
- Collect the result of the above trigger in the Compose so that you can save the Flow with at least 1 Action. (We’ll come back to it later)
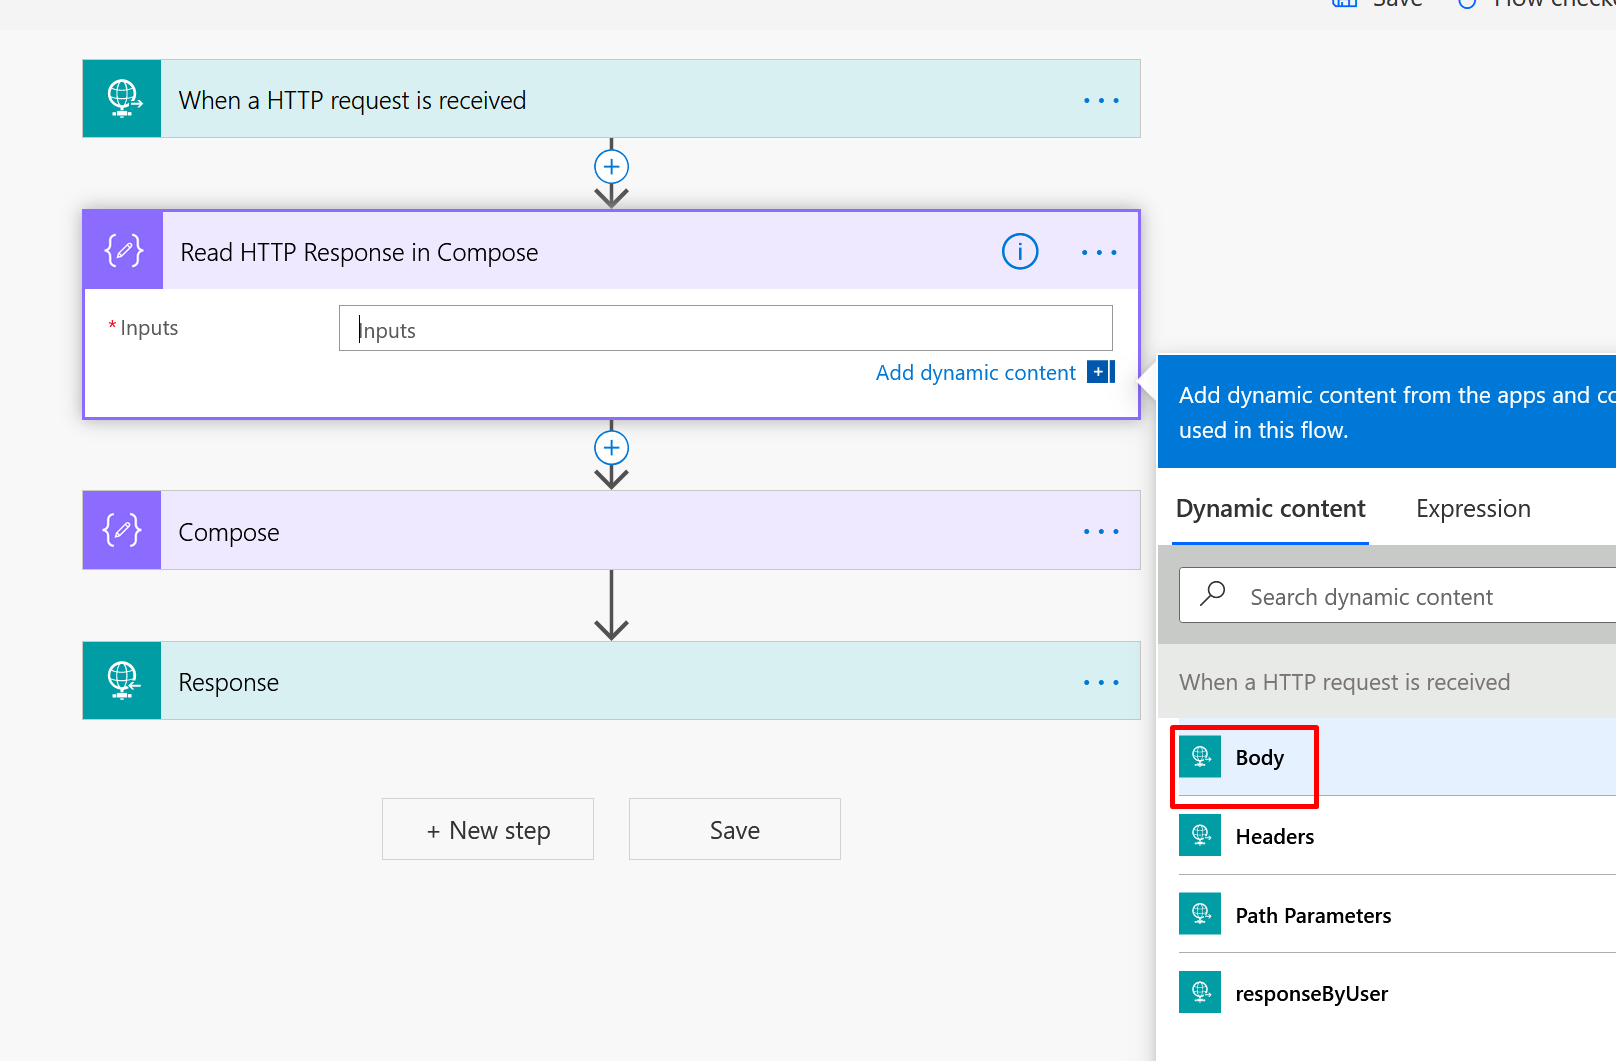
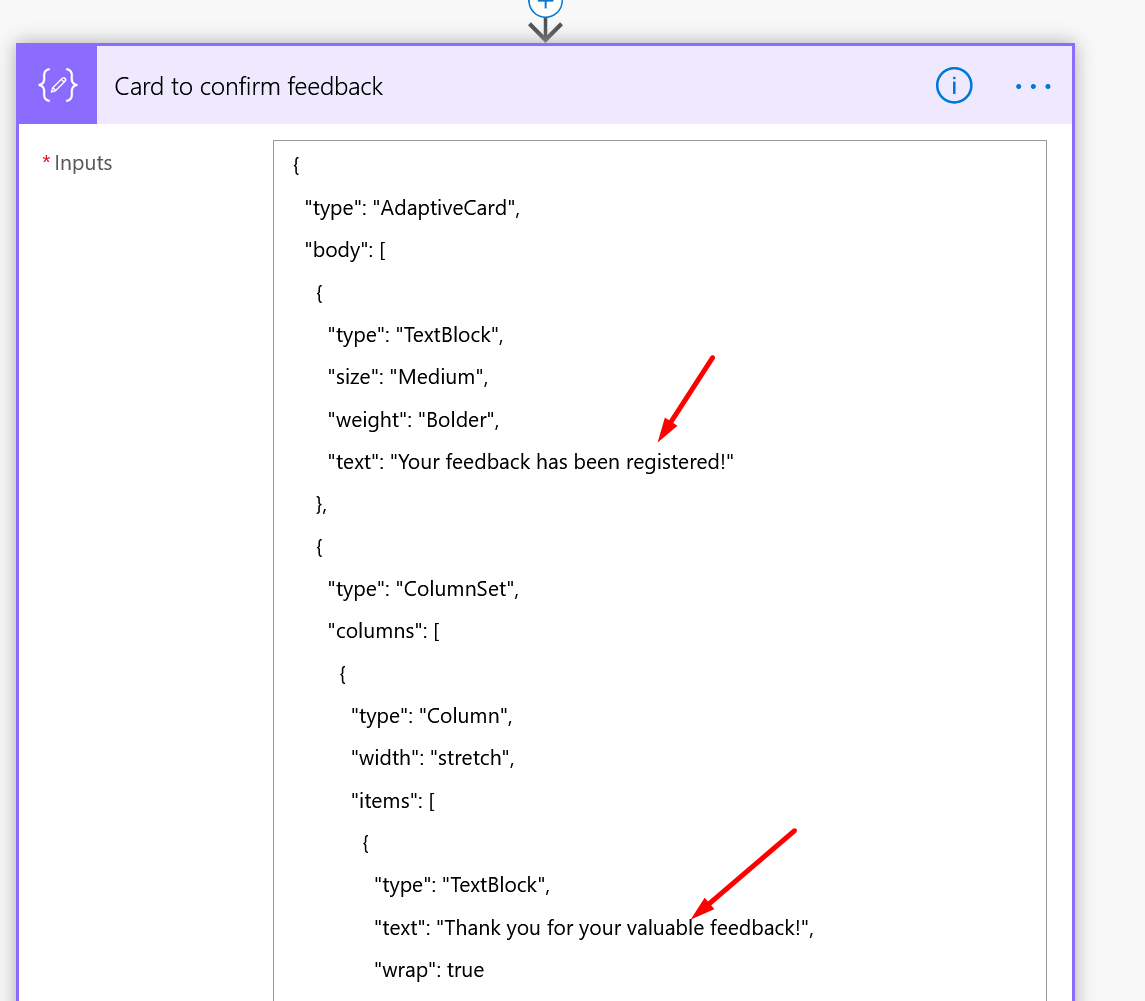
- Next up, we will also need to setup a response Adaptive Card. This is something that the users will see when they Submit their responses.
- It is mandatory to send the response back to the caller i.e. the Outlook in this case. Hence, we’ll send a Response back using Response action in HTTP and send the status code as 200 and header CARD-UPDATE-IN-BODY as true.
The Body will have the Adaptive Card which we created in step #5 above i.e. the Adaptive Card we have to send as confirmation.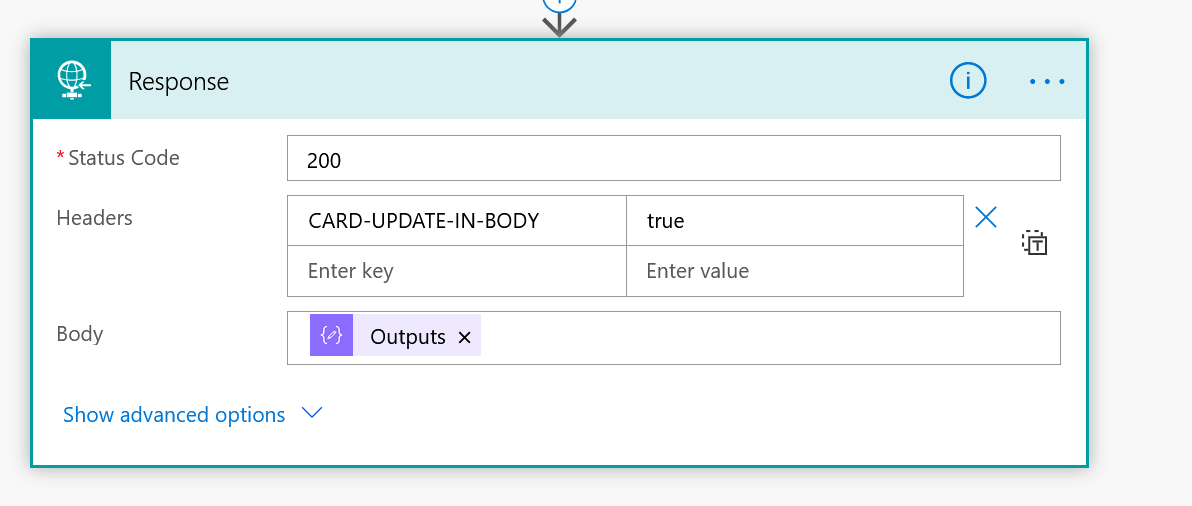
Here are the details of Refreshing Cards when you send back a response to the client (Outlook user in this case): https://docs.microsoft.com/en-us/outlook/actionable-messages/adaptive-card#refresh-cards?WT.mc_id=DX-MVP-5003911
Complete your Adaptive Card – Add Action
Once your Flow to capture the response is ready, let’s complete the Adaptive Card to add an Action to the same.
- Select the card body, you’ll see a button to Add an action
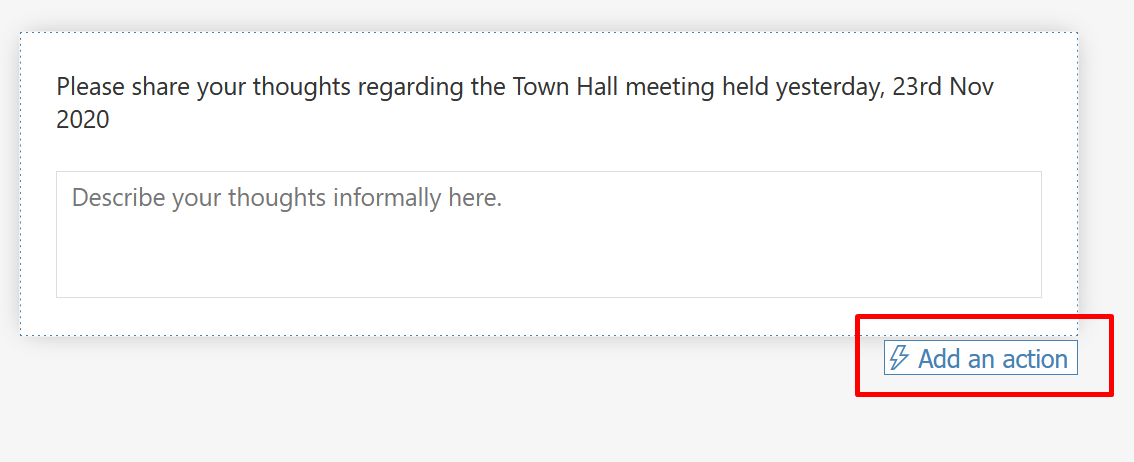
You’ll need to select Action.Http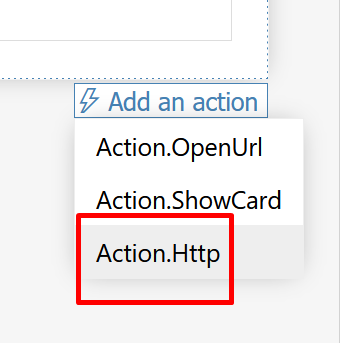
- Once you select the Action.Http type of Action, look at the Element Properties, you’ll need to enter the URL we got from the Flow we created to capture responses above.
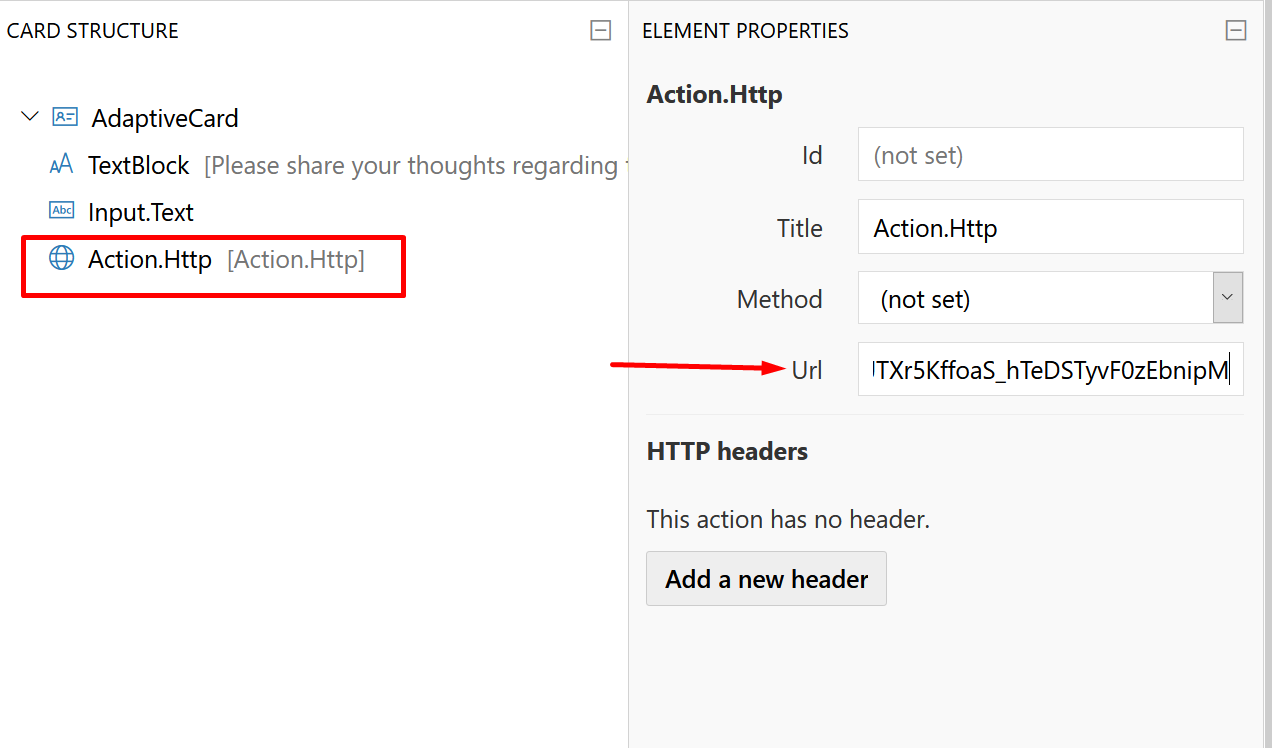
Here why we chose Action.Http – https://docs.microsoft.com/en-us/outlook/actionable-messages/adaptive-card#outlook-specific-adaptive-card-properties-and-features?WT.mc_id=DX-MVP-5003911 - Next, set the title of the Action (it appears as a button). I’ll name it Submit.
Also, select what kind of Method is to be used for the HTTP Request.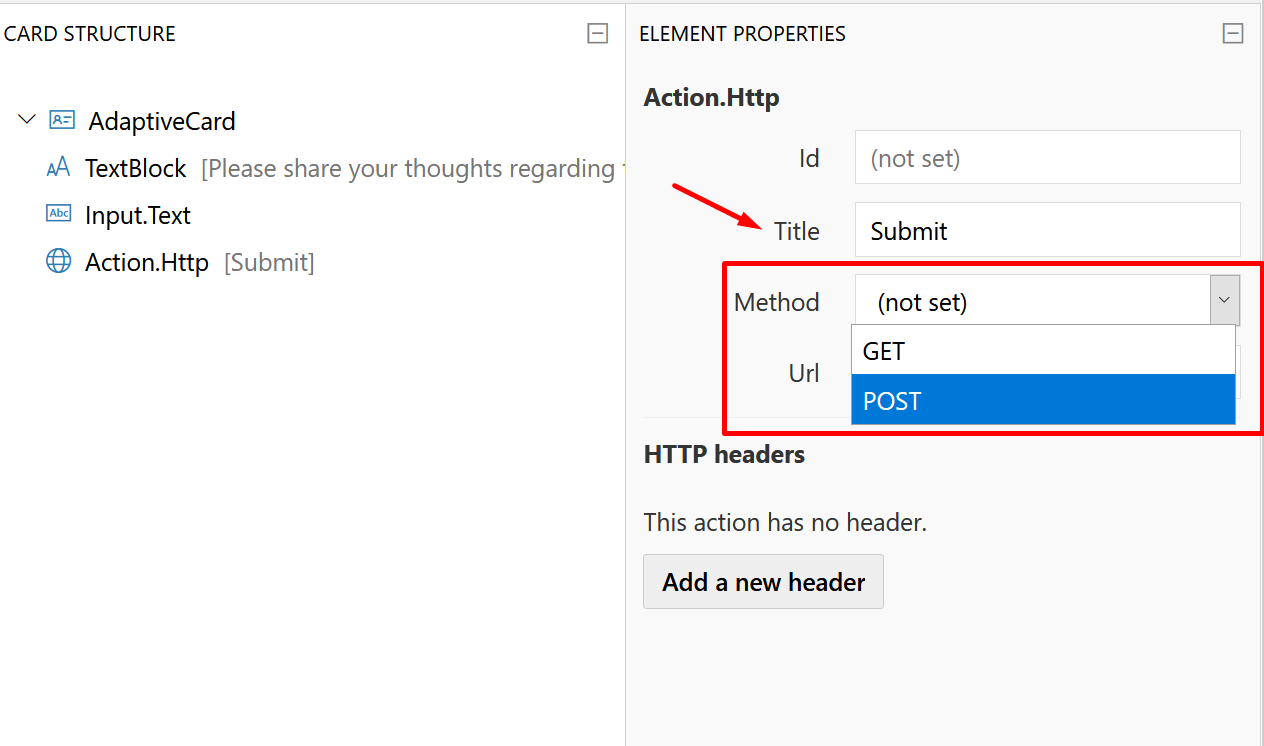
- Now, since you’ve selected POST method, you will need to pass the Body. This will be the response which the user will send and which the Flow above will read it as a Response to process the information further.
Once you select POST, a Body element property will be added where you need to enter the schema and what ID of the element that information belongs to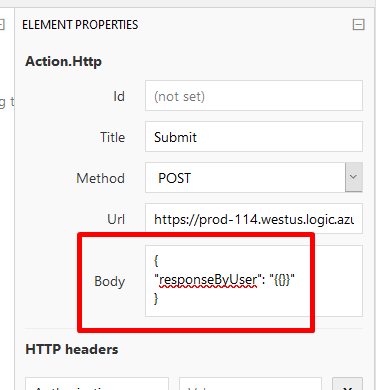
- Remember, the ID for the Input.Text was set as “answer”, we’ll put that here and then it’s Value property. These values should be enclosed in double curly brackets {{ }}.

- And also, you’ll need to pass along the Header for Authorization. Read this post by Microsoft – https://docs.microsoft.com/en-us/outlook/actionable-messages/security-requirements#action-authorization-header?WT.mc_id=DX-MVP-5003911
Add Header as shown below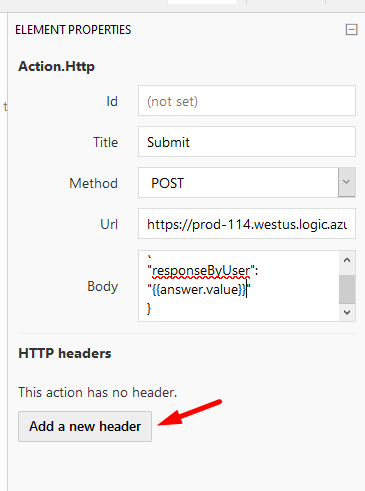
Now, as mentioned in the above post, we need to pass the property as Authorization header and leave it blank and Content-Type as application/json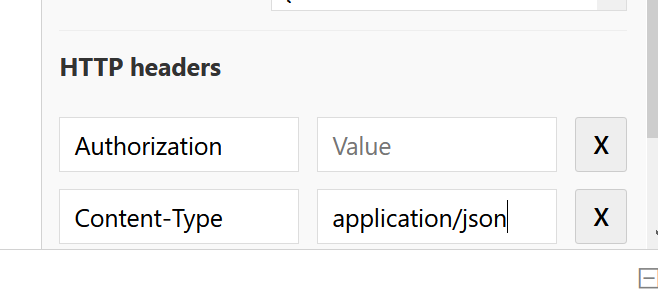
- Once all this is done, it’ll look like below in the card payload for the Action.Http part.
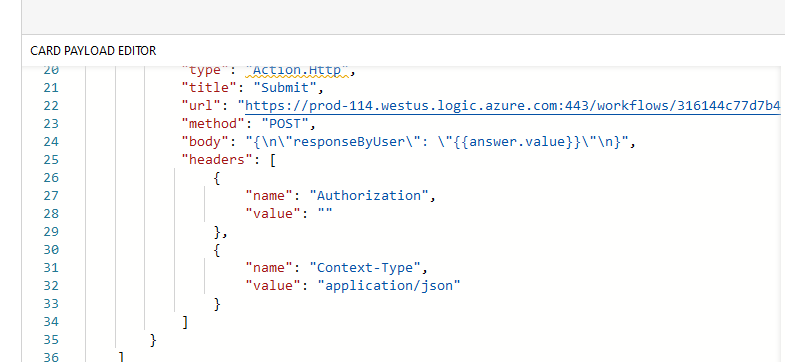
- Now copy the entire Payload from the Editor and we’ll create a new Flow that will be used to send the Adaptive Card to the user.
Flow to Send the Adaptive Card in Email
I’m creating a Flow here which will be used to send the Adaptive Card. To keep it simple, I’m just triggering it using a button on-demand. Your use-case will vary.
Let’s call this Flow as “Send Feedback Request“
- Wherever you need to create the Adaptive Card, you’ll need to paste the entire Payload copied from the step above in a Compose step
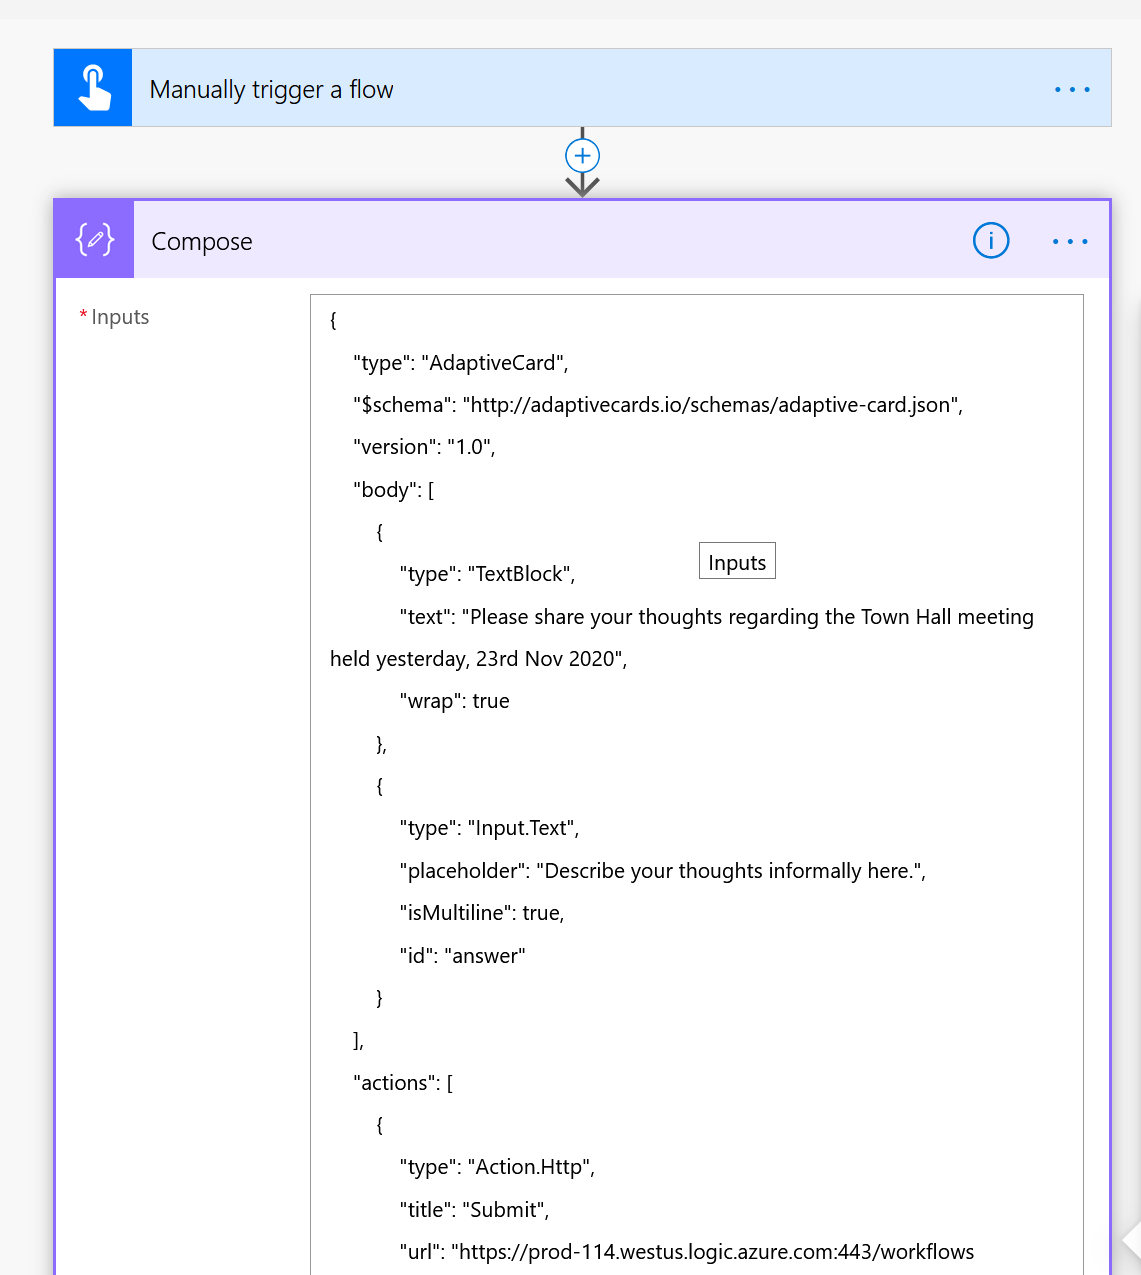
- I’ll add a step to send an Email directly using Send Email and make sure you enable the </> part for the body.
Make sure the Outputs of the Compose we pasted above in Step #2 are enclosed in
<script type="application/adaptivecard+json">
</script>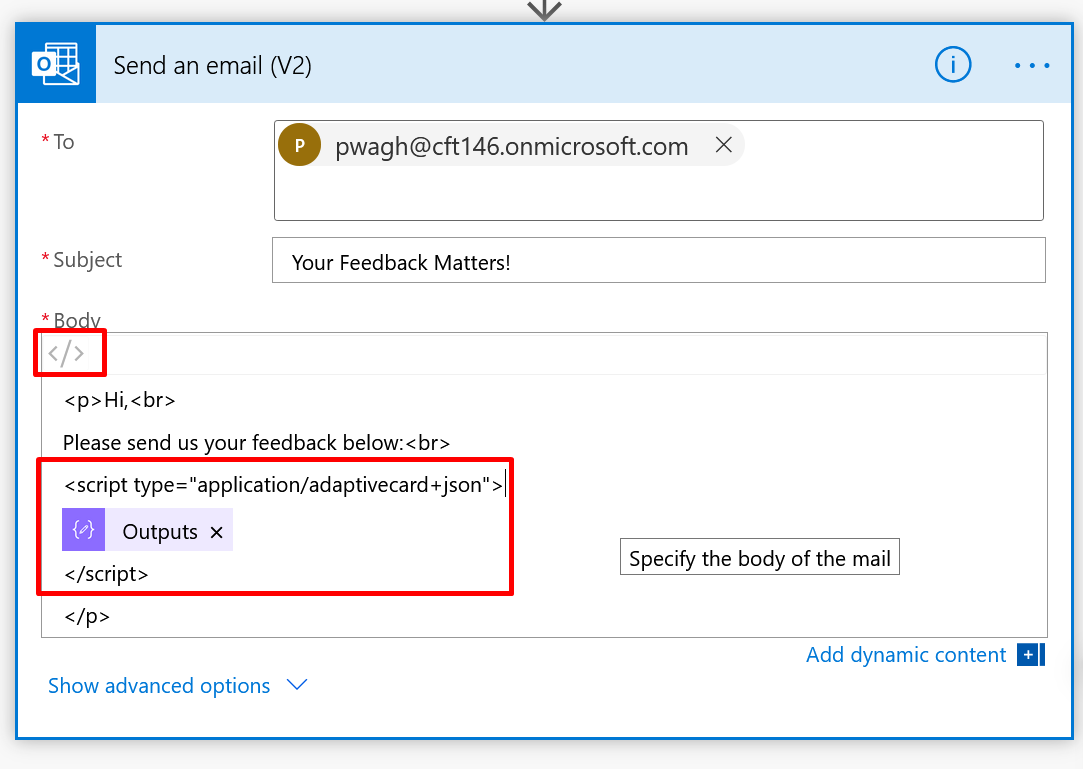
Working
Let’s look at how this will turn out!!
- Let me just Run the Flow as is so that the Adaptive Card is generated and sent to the user I intend to in the Email.
- They’ll receive an email like this
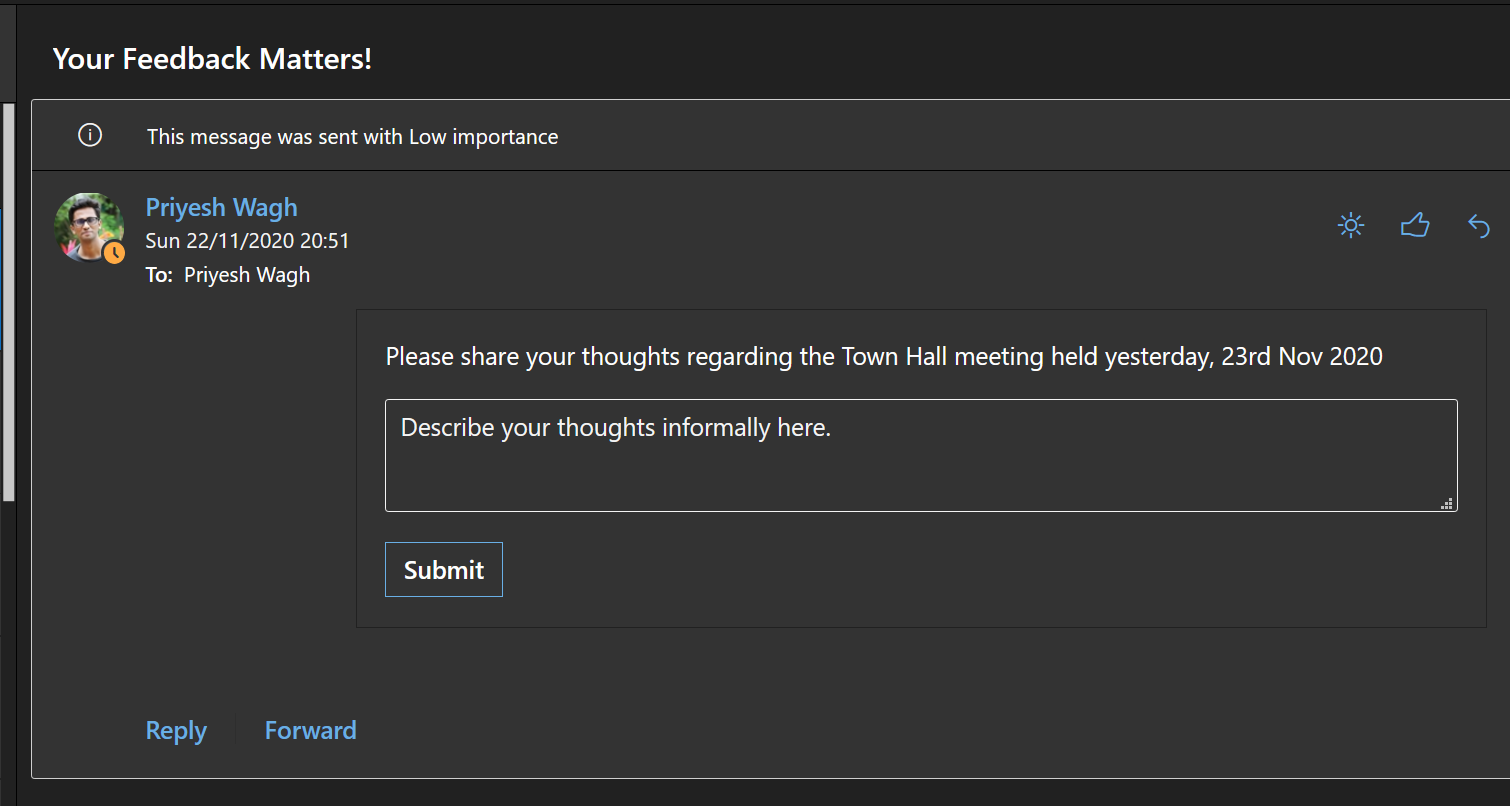
- And the user will submit the answer in the text box and submit.
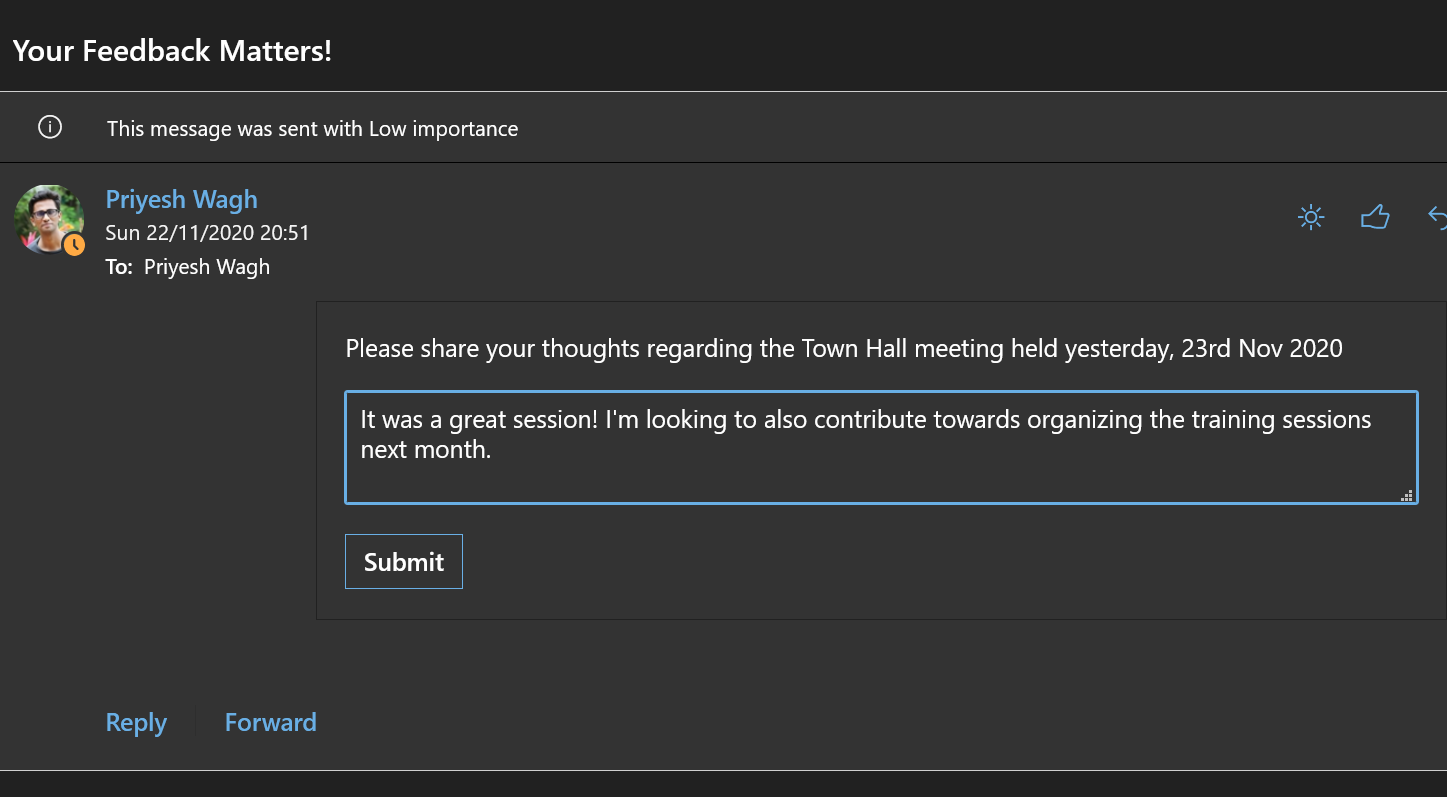
- Once they submit, the Accept Feedback Response Flow we created will be triggered
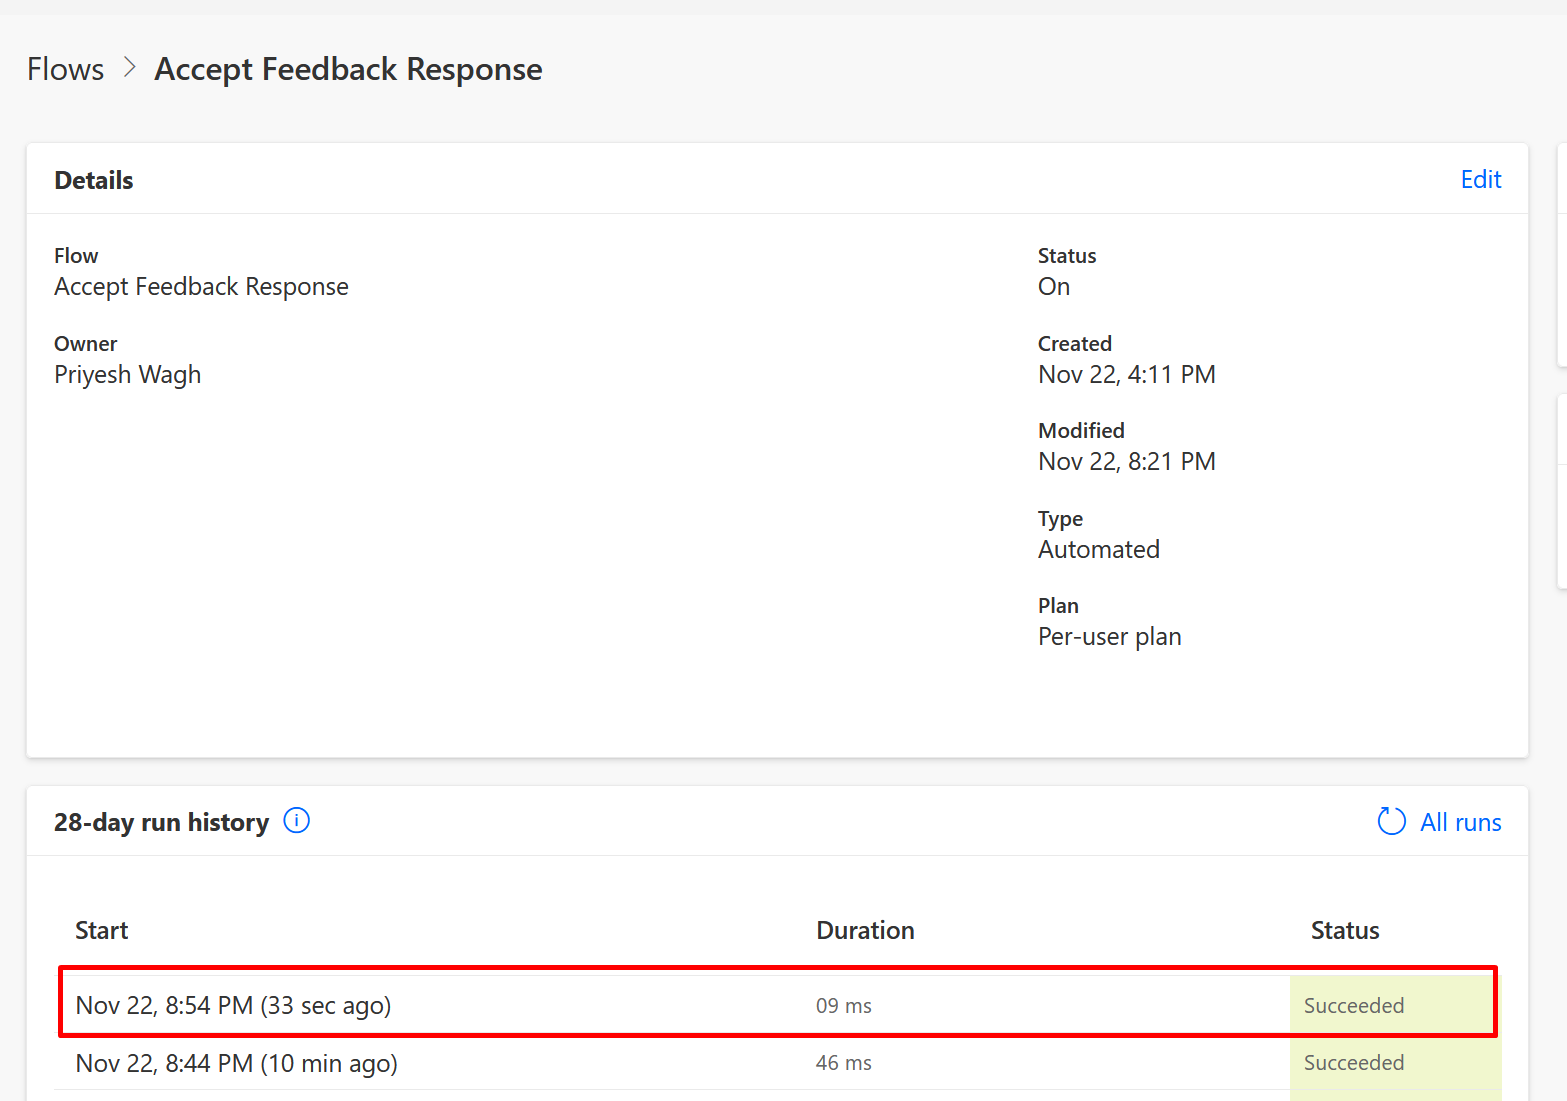
- And the response is available to be read and processed further in the Compose step we created to collect it with the defined schema.
- The Adaptive Card we had created to send back as confirmation (which looks as below) will be sent

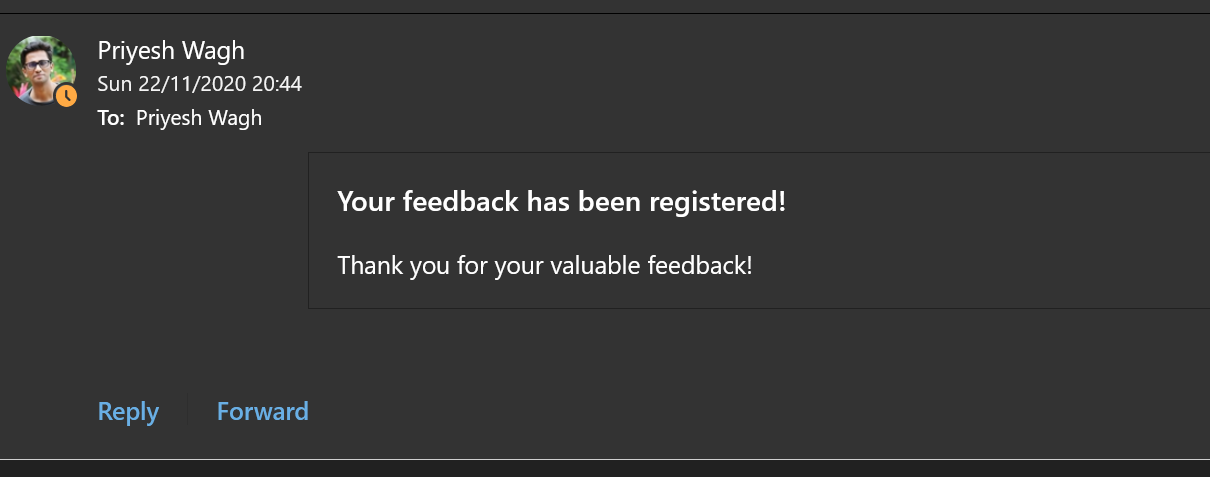
- Once the user submits, they’ll get the below Adaptive Card as a confirmation that their feedback has been taken.
And that’s how you can make your Adaptive Cards to function with Outlook!! Hope this was helpful.
Here are some superb posts on Adaptive Cards –
- Microsoft Message Cards – The Ultimate Guide by Thomas Poszytek – https://poszytek.eu/en/microsoft-en/microsoft-message-cards-the-ultimate-guide/
- Multi line Approvals with Adaptive Cards, Outlook and Power Automate by Yash Agarwal – https://www.bythedevs.com/post/multi-line-approvals-with-adaptive-cards-outlook-and-power-automate
- Custom Actionable Messages with Microsoft Flow series by Rik-de Koning (3 posts) – https://www.about365.nl/category/blog-series/custom-actionable-messages-with-microsoft-flow/
Here are some more Power Automate / Adaptive Cards posts you might want to look at –
- Adaptive Cards for Teams to collect data from users using Power Automate | SharePoint Lists
- Task Completion reminder using Flow Bot in Microsoft Teams | Power Automate
- Make On-Demand Flow to show up in Dynamics 365 | Power Automate
- Run As context in CDS (Current Environment) Flow Trigger | Power Automate
- Using triggerBody() / triggerOutput() to read CDS trigger metadata attributes in a Flow | Power Automate
- Terminate a Flow with Failed/Cancelled status | Power Automate
- Call HTTP Request from a Canvas Power App using Flow and get back Response | Power Automate
- Setting Retry Policy for an HTTP request in a Flow | Power Automate
- Send a Power App Push Notification using Flow to open a record in Canvas App | Power Automate
- ChildFlowUnsupportedForInvokerConnections error while using Child Flows [SOLVED] | Power Automate
- BPF Flow Step as a Trigger in CDS (Current Environment) connector | Power Automate
- Pause a Flow using Delay and Delay Until | Power Automate
Thank you!! 
Brought to you by Dr. Ware, Microsoft Office 365 Silver Partner, Charleston SC.


Recent Comments