2025 release wave 2 plans for Microsoft Dynamics 365, Microsoft Power Platform, and Role-based Microsoft Copilot offerings
This article is contributed. See the original author and article here.
We’re entering the age of AI agents, a transformative moment reshaping the landscape of business applications and platforms. AI agents aren’t just making incremental improvements, they’re helping to redefine productivity and can fundamentally change how work gets done.
Published today, the 2025 release wave 2 for Microsoft Dynamics 365, Microsoft Power Platform, and Copilot offerings introduces new and improved capabilities that help organizations to harness the full potential of this new era. These plans compile new capabilities slated for release between October 2025 and March 2026.
Integral to the wave 2 plans, AI assistants and agents not only help humans with day-to-day tasks, but also act as proactive partners to drive better business outcomes. Our upcoming release brings that vision to life, helping to make AI not just accessible but an essential component in daily operations. Whether it’s enabling sellers to close deals faster, providing service teams real-time trusted knowledge, or empowering finance professionals with AI-driven reconciliation and analysis, these enhancements can be transformative to the way we all work.
Be sure to stay updated on the latest features and create your personalized release plan using the release planner.
Highlights from Dynamics 365
The 2025 release wave 2 for Dynamics 365 brings new innovation to transform functions across your business.
Microsoft Dynamics 365 Customer Insights – Data enhances Microsoft Copilot and agents with real-time, unified customer profiles, enabling teams to act on insights within their workflow. With enriched data, seamless platform integration, and faster processing, businesses can deliver timely, personalized experiences that boost engagement and conversions.
Microsoft Dynamics 365 Customer Insights – Journeys empowers businesses to craft personalized, AI-driven customer experiences across all touchpoints. With Copilot, agents, and enhanced orchestration tools, teams can engage the right audiences at scale, streamline lead generation, and accelerate growth.
Microsoft Dynamics 365 Sales brings the power of AI to help sellers achieve their targets and automate busywork. Microsoft Copilot delivers actionable insights in the flow of work, while AI agents research and engage leads, drive purchase intent, and proactively bring key insights and emergent deal risks—helping sellers close more deals faster. A reimagined interface reorients sellers from data to insights. Watch this video to discover the new and enhanced features in this release wave for Dynamics 365 Sales.
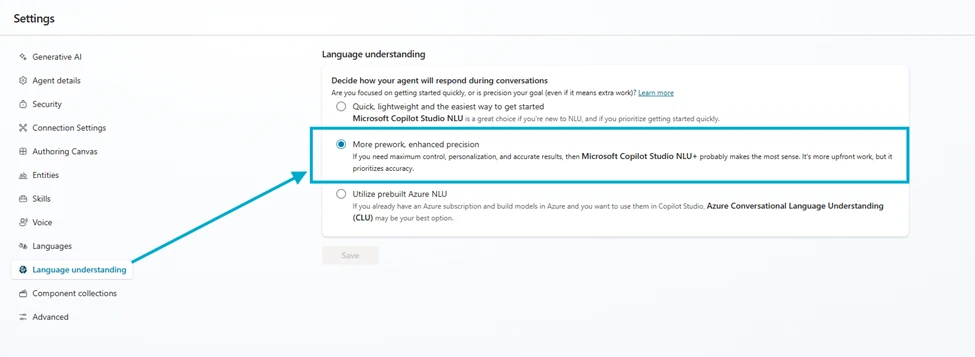
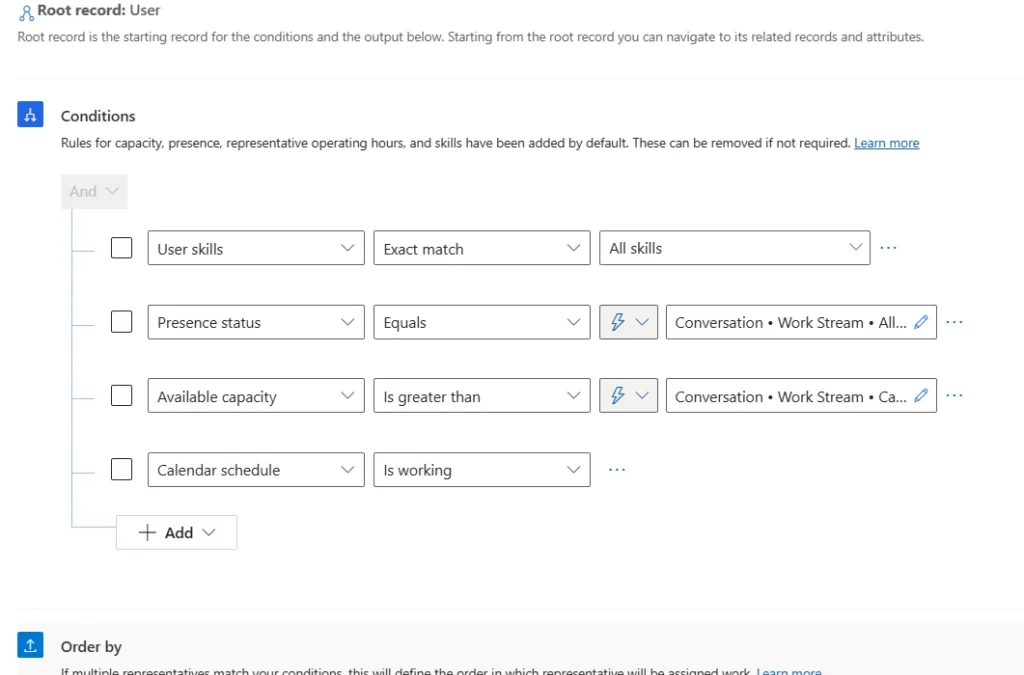
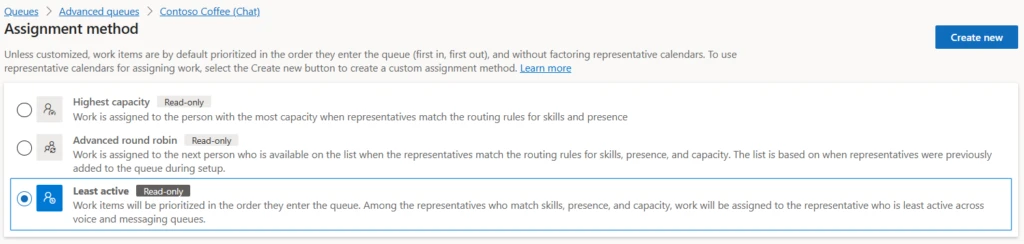
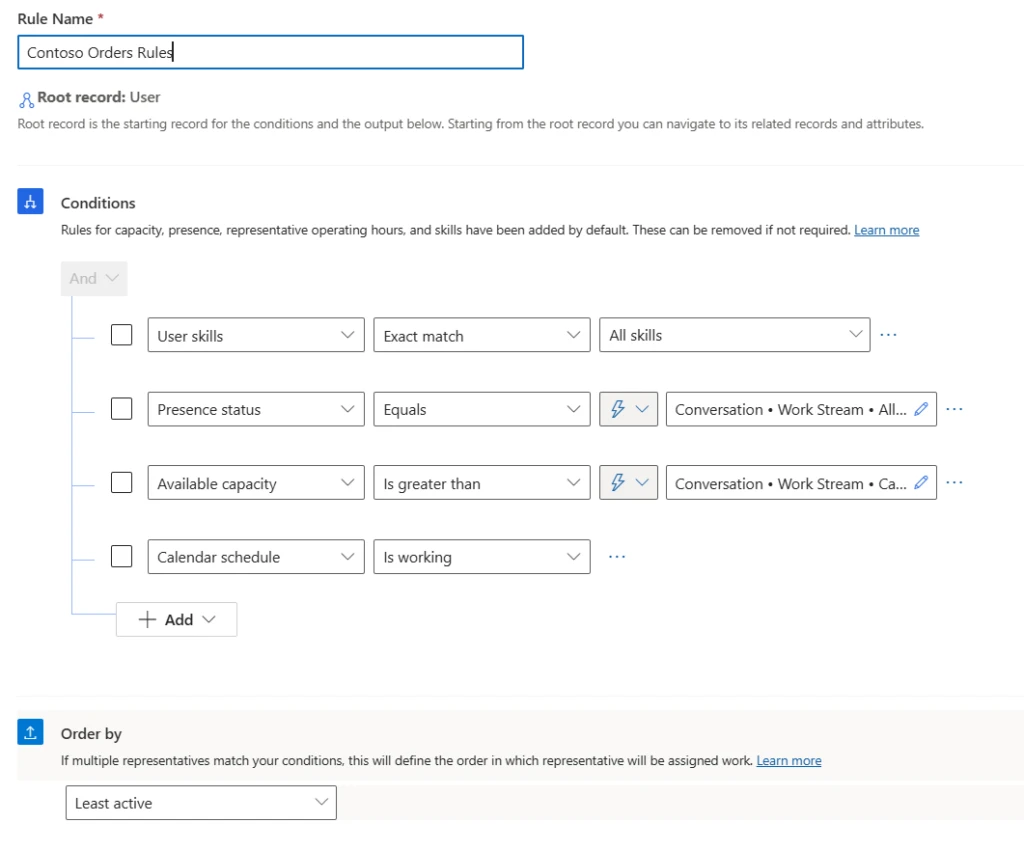
Microsoft Dynamics 365 Customer Service continues to enhance agentic and Copilot capabilities for case and knowledge management, as well as AI-driven routing.
Microsoft Dynamics 365 Contact Center continues to enhance agentic and Copilot capabilities to automate the service journey across digital and voice channels, along with the introduction of new omnichannel and supervisor capabilities in the 2025 release wave 2.
Microsoft Dynamics 365 Field Service will deliver AI agents, enhanced scheduling tools, mobile usability improvements, and deeper Microsoft 365 integration in the upcoming release wave. With innovations across inspections, vendor coordination, and connectivity with Microsoft Dynamics 365 Project Operations, Field Service empowers organizations to deliver smarter, faster, and more seamless service at scale.
Microsoft Dynamics 365 Finance brings global-scale finance and agentic operations to our customers, including agents that can lead to faster financial close, and provide additional automation and optimization across large scale operations, as well as enhancements to business performance analytics and planning solutions.
Microsoft Dynamics 365 Supply Chain Management can enhance demand planning with event and promotion forecasting, and help improve quality management for sample handling; and the Supplier Communications Agent will automate vendor interactions. New supplier engagement tools and warehouse app upgrades will also be introduced to further streamline operations and boost efficiency.
Microsoft Dynamics 365 Project Operations will continue to deliver powerful enhancements across the project lifecycle. These include improved mobile and browser experiences for time and expense, better project planning with enterprise custom fields, streamlined billing and invoicing workflows, and expanded support for stocked items, investment projects, and migrations to the modern architecture.
Microsoft Dynamics 365 Human Resources can enhance the hire-to-retire journey with Microsoft Entra ID and Microsoft Viva Connections integration to help reduce duplication. New agentic capabilities will be introduced to streamline onboarding with guided experiences and automation. Recruiter assist will also now support job description generation and interview assistance, helping to improve efficiency across hiring and onboarding.
Microsoft Dynamics 365 Commerce advances in-store experiences by providing a mobile-first point-of-sale that provides business continuity even during a business outage. Improvements to the Adyen payment connector allows modern payments like Pay by Link across channels, offering more purchasing options for omnichannel customers. Additionally, omnichannel unified pricing enables retailers to establish more intricate pricing structures, helping them remain competitive.
Microsoft Dynamics 365 Business Central introduces AI agents to enhance efficiency and automation in the 2025 release wave 2. These agents seamlessly integrate to execute complex tasks, generate reports, automate processes, and optimize order creation using natural language processing. Additionally, this release focuses on quality management, subcontracting, sustainability, and e-document capabilities.
Highlights from Microsoft Power Platform and Microsoft Copilot Studio
2025 release wave 2 updates for Microsoft Power Platform bring new and updated ways for organizations to analyze, act on, and automate data to digitally transform their businesses.
Microsoft Copilot Studio continues its journey to make agent creation and operation even easier and more powerful with autonomous agents in Microsoft 365 Copilot, the ability to build complete teams of agents that work seamlessly together, and improved governance for enterprise scalability. Copilot Studio will offer even deeper integration with Azure AI Foundry and the Microsoft Graph, helping to ensure your agents can use the latest AI technology in coordination with your data in Microsoft Graph. Watch this video to discover how the latest enhancements to Copilot Studio can benefit your business.
Microsoft Power Apps enhances human and agent collaboration with a new agent feed to supervise the work of agents and extensible built-in agents for common tasks like enter, explore, visualize, and summarize data. Bring business problems to Plan Designer and a team of agents will help you build enterprise solutions, including apps, agents, Microsoft Power BI reports, and more. Vibe code with the App Agent to create data-connected experiences—just describe what you need or provide an image, and it can be done.
Microsoft Power Pages enables businesses to build secure, data-driven portals effortlessly. In this wave, we will further expedite site building for low-code makers and pro developers to help build intelligent sites for your employees, customers, and partners. The introduction of enhanced security agent features will further empower low-code makers, pro developers, and admins with actionable insights and abilities for securing their websites.
Microsoft Power Automate is transforming how enterprises automate complex business processes through new human-in-the-loop experiences, such as advanced approvals and AI-native capabilities, such as generative actions and intelligent document processing. To manage complex automations at scale, a comprehensive suite of governance, observability, and security controls will be introduced to the Automation Center and Power Platform admin center.
Microsoft Dataverse continues to serve as a trusted low-code data platform, enabling the creation of scalable agents, Copilot applications, and automations. This update introduces enhancements to core agentic capabilities, including Dataverse for Agents and Dataverse Search to support smarter, AI-ready experiences. New features such as Dataverse Model Context Protocol (MCP) Server and AI-powered business logic tools further expand the ability to build dynamic, intelligent solutions grounded in enterprise data.
Microsoft Power Platform governance and administration will become the unified governance hub for managing intelligent agents, agent-driven apps, and automated workflows across the Microsoft ecosystem in this release wave. This will provide a secure, governable, reliable platform for agent development.
Updates to Copilot offerings
Agents for Microsoft 365 Copilot help maximize business impact across sales, service, and finance. Learn more about the 2025 release wave 2 updates for Copilot offerings. Agent updates for sales will help sellers work smarter, engage strategically, and close deals faster. Agent updates for service will expand CRM connectivity and enhance email insights and drafting—all within the tools reps use daily. Updates for finance will offer easily customizable agents that can be launched from familiar tools like Excel, boosting efficiency and insight.
Early access period
Starting August 4, 2025, customers and partners can validate the latest features in a non-production environment. These updates include user experience enhancements that will be automatically enabled in production environments by October 2025. Take advantage of the early access period to test these updates and effectively plan for your customer rollout. Explore the 2025 release wave 2 early access features for Dynamics 365 and Microsoft Power Platform or visit the early access FAQ page for more information.
For a complete list of new capabilities, please refer to the Dynamics 365 2025 release wave 2 plan, the Microsoft Power Platform 2025 release wave 2 plan, and Copilot offerings 2025 release wave 2. We also encourage you to share your feedback in the community forums for Dynamics 365 and Microsoft Power Platform.
The post 2025 release wave 2 plans for Microsoft Dynamics 365, Microsoft Power Platform, and Role-based Microsoft Copilot offerings appeared first on Microsoft Dynamics 365 Blog.
Brought to you by Dr. Ware, Microsoft Office 365 Silver Partner, Charleston SC.


Recent Comments