This article is contributed. See the original author and article here.
GitHub and Microsoftare helping you to boost your tech career with the Get Certified with GitHub livestream series!Starts from June 5th until June 26th. These sessions are designed to help you get certified on the GitHub Foundation Certificationand to help you explore essential tools like GitHub Copilot and GitHub Codespaces. Plus, you’ll have the chance to earn a free certification voucher for the GitHub Foundation Certification*
* At the end of the session, you may even receive a free GitHub certification voucher, on a first-come, first-served basis.
Offer good only while supplies last. Limit one GitHub voucher per person. This offer is non-transferable and cannot be combined with any other offer. This offer ends on June 27, 2024 or while supplies last, and is not redeemable for cash. Taxes, if any, are the sole responsibility of the recipient. Microsoft reserves the right to cancel, change, or suspend this offer at any time without notice.
Earning certification from GitHub is an excellent way to showcase your abilities, reputation, trust, and understanding of the tools and technologies used by over 100 million developers worldwide.
You’ll be interacting with Microsoft and GitHub Experts that will guide you during all these sessions about different topics related to the GitHub Foundation certification.
Also, by registering and attending the live sessions you may be able to receive a free certification voucher on a first-come, first-served basis
Earning a GitHub Certification gives you a competitive edge in the job market by allowing you to promote your skills in a specific GitHub domain.
These sessions will be full of tips, tricks, and practical exercises to help you build a great foundation for this certification. Whether you’re just starting out or looking to improve your skills, this is a must-see event for anyone interested in growing their career in tech.
All our sessions will take place in Pacific Time.
Session
Description
Building Automation with GitHub
June 5th – 11 am Pacific Time
Find out how you can create powerful automation on any software project using GitHub’s platform. This session will cover GitHub Actions, GitHub Copilot, and GitHub Codespaces
Securing projects on GitHub
June 12th – 11 am Pacific Time
Discover how to apply security features from GitHub Advanced Security to your own projects and protect it from security threats and vulnerabilities.
Faster development with GitHub Copilot
June 19th – 11 am Pacific Time
Learn how to leverage GitHub Copilot for automating repetitive tasks and increasing your development cycles. We’ll go through basic usage as well as newer features like interactive prompts and inline suggestions
Manage your project with the GitHub Platform
June 26th – 11 am Pacific Time
Use GitHub’s powerful project features to manage your software development process. We’ll cover project management with issues, pull requests, and tracking changes.
With the GitHub Foundations certificate, you can highlight your understanding of the foundational topics and concepts of collaborating, contributing, and working on GitHub. This exam covers:
The GitHub Challenge is a 30-day learning adventure on Microsoft Learn! It’s completely free, super fun, with dynamic exercises. Dive in to master GitHub Copilot! Plus, you’ll create interesting adventures with Python and JavaScript while using GitHub Codespaces and create real-world projects with GitHub Copilot —just in time for Microsoft Build!This challenge starts on May 21st and ends on June 21st 2024.
We want to support you in developing and upgrading your abilities! Prepare to take on this exciting challenge and level up. This learning journey has been designed to increase your understanding of AI and make you a GitHub Copilot expert! This challenge will help you prepare for the GitHub Foundations certification exam by covering a few topics that may appear on the test.
The GitHub Challenge is available every day at any time on Microsoft Learn. You can learn whenever it’s convenient for you and at your own speed.
By completing this challenge before June 21st 2024, you will receive a special and distinctive digital badge on your Microsoft Learn profile for finishing this learning experience. You can share your badge on your LinkedIn!
This badge is only available during Microsoft Build, our largest developer event of the year.
We have a comprehensive, free, dynamic exercise guide to help you prepare for this certification. You can read all the information you need, here: aka.ms/InfoGuideGitHub
The voucher code will be entered manually during the checkout process. Below are the registration and scheduling steps:
Log into the exam registration site and choose the desired certification. This will redirect you to the registration page.
Click on “Schedule/take exam” to proceed.
Complete the registration form and select “Schedule exam” at the bottom.
This action will transmit your eligibility details to our testing vendor, PSI.
Upon submitting the registration form, you’ll be directed to the PSI testing site to finalize the scheduling of your exam.
During the checkout process on the PSI testing site, you’ll encounter a designated field where you can enter the voucher code to zero the balance.
This article is contributed. See the original author and article here.
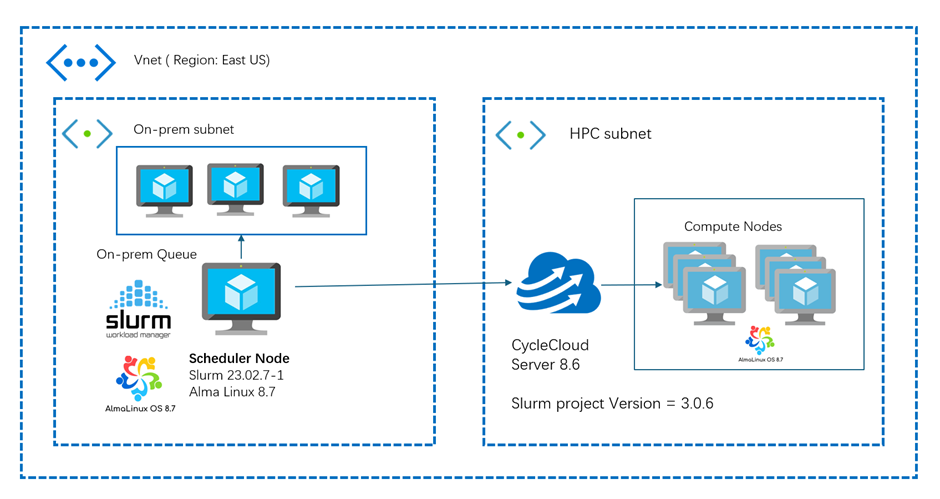
Azure CycleCloud is an enterprise-friendly tool for orchestrating and managing High-Performance Computing (HPC) environments on Azure. With CycleCloud, users can provision infrastructure for HPC systems, deploy familiar HPC schedulers, and automatically scale the infrastructure to run jobs efficiently at any scale.
Slurm is a widely used open-source HPC scheduler that can manage workloads across clusters of compute nodes. Slurm can also be configured to interact with cloud resources, such as Azure CycleCloud, to dynamically add or remove nodes based on the demand of the jobs. This allows users to optimize their resource utilization and cost efficiency, as well as to access the scalability and flexibility of the cloud.
In this blog post, we are discussing how to integrate an external Slurm Scheduler to send jobs to CycleCloud for cloud bursting (Enabling on-premises workloads to be sent to the cloud for processing, known as “cloud bursting”) or hybrid HPC scenarios. For demonstration purposes, we are creating a Slurm Scheduler node in Azure as an external Slurm Scheduler in a different VNET and the execute nodes are in CycleCloud in a separate VNET. We are not discussing the complexities of networking involved in Hybrid scenarios.
Prerequisites
Before we start, we need to have the following items ready:
An Azure subscription
CycleCloud Version: 8.6.0-3223
OS version in Scheduler and execute nodes: Alma Linux release 8.7 (almalinux:almalinux-hpc:8_7-hpc-gen2:latest)
Slurm Version: 23.02.7-1
cyclecloud-slurm Project: 3.0.6
An external Slurm Scheduler node in Azure or on-premises. in this example we are using Azure VM running with Alma Linux 8.7.
A network connection between the external Slurm Scheduler node and the CycleCloud cluster. You can use Azure Virtual Network peering, VPN gateway, ExpressRoute, or other methods to establish the connection. In this example, we are using a very basic network setup.
A shared file system between the external Slurm Scheduler node and the CycleCloud cluster. You can use Azure NetApp Files, Azure Files, NFS, or other methods to mount the same file system on both sides. In this example, we are using a Scheduler VM as a NFS server.
Steps
After we have the prerequisites ready, we can follow these steps to integrate the external Slurm Scheduler node with the CycleCloud cluster:
1. On CycleCloud VM:
Ensure CycleCloud 8.6 VM is running and accessible viacyclecloudCLI.
Clone this repository and import a cluster using the provided CycleCloud template (slurm-headless.txt).
We are importing a cluster named hpc1using theslurm-headless.txt template.
[vinil@cc86 ~]$ cyclecloud import_cluster hpc1 -c Slurm-HL -f slurm-cloud-bursting-using-cyclecloud/cyclecloud-template/slurm-headless.txt
Importing cluster Slurm-HL and creating cluster hpc1....
----------
hpc1 : off
----------
Resource group:
Cluster nodes:
Total nodes: 0
2. Preparing Scheduler VM:
Deploy a VM using the specified AlmaLinux image (If you have an existing Slurm Scheduler, you can skip this).
Run the Slurm scheduler installation script (slurm-scheduler-builder.sh) and provide the cluster name (hpc1) when prompted.
This script will install and configure Slurm Scheduler.
git clone https://github.com/vinil-v/slurm-cloud-bursting-using-cyclecloud.git
cd slurm-cloud-bursting-using-cyclecloud/scripts
sh slurm-scheduler-builder.sh
Output:
------------------------------------------------------------------------------------------------------------------------------
Building Slurm scheduler for cloud bursting with Azure CycleCloud
------------------------------------------------------------------------------------------------------------------------------

Enter Cluster Name: hpc1
------------------------------------------------------------------------------------------------------------------------------

Summary of entered details:
Cluster Name: hpc1
Scheduler Hostname: masternode2
NFSServer IP Address: 10.222.1.26
3. CycleCloud UI:
Access the CycleCloud UI, edit thehpc1cluster settings, and configure VM SKUs and networking settings.
Enter the NFS server IP address for/schedand/sharedmounts in the Network Attached Storage section.
Save & Starthpc1cluster
4. On Slurm Scheduler Node:
Integrate External Slurm Scheduler with CycleCloud using thecyclecloud-integrator.shscript.
Provide CycleCloud details (username, password, and URL) when prompted. (Try entering the details manually instead of copy and paste. The copy & paste might contain some whitespaces and it might create issues in building the connection.)
cd slurm-cloud-bursting-using-cyclecloud/scripts
sh cyclecloud-integrator.sh
Output:
[root@masternode2 scripts]# sh cyclecloud-integrator.sh
Please enter the CycleCloud details to integrate with the Slurm scheduler

Enter Cluster Name: hpc1
Enter CycleCloud Username: vinil
Enter CycleCloud Password:
Enter CycleCloud URL (e.g., https://10.222.1.19): https://10.222.1.19
------------------------------------------------------------------------------------------------------------------------------

Summary of entered details:
Cluster Name: hpc1
CycleCloud Username: vinil
CycleCloud URL: https://10.222.1.19

------------------------------------------------------------------------------------------------------------------------------
5. User and Group Setup:
Ensure consistent user and group IDs across all nodes.
Better to use a centralized User Management system like LDAP to ensure the UID and GID are consistent across all the nodes.
In this example we are using theusers.shscript to create a test userviniland group for job submission. (Uservinilexists in CycleCloud)
cd slurm-cloud-bursting-using-cyclecloud/scripts
sh users.sh
6. Testing & Job Submission:
Log in as a test user (vinilin this example) on the Scheduler node.
Submit a test job to verify the setup.
su - vinil
srun hostname &
Output:
[root@masternode2 scripts]# su - vinil
Last login: Tue May 14 04:54:51 UTC 2024 on pts/0
[vinil@masternode2 ~]$ srun hostname &
[1] 43448
[vinil@masternode2 ~]$ squeue
             JOBID PARTITION     NAME     USER ST       TIME  NODES NODELIST(REASON)
                 1       hpc hostname    vinil CF       0:04      1 hpc1-hpc-1
[vinil@masternode2 ~]$ hpc1-hpc-1
You will see a new node getting created in hpc1 cluster.
Congratulations! You have successfully set up Slurm bursting with CycleCloud on Azure.
Conclusion
In this blog post, we have shown how to integrate an external Slurm Scheduler node with Azure CycleCloud for cloud bursting or hybrid HPC scenarios. This enables users to leverage the power and flexibility of the cloud for their HPC workloads, while maintaining their existing Slurm workflows and tools. We hope this guide helps you to get started with your HPC journey on Azure.
This article is contributed. See the original author and article here.
Microsoft Support is excited to continue the blog series that will demystify how Microsoft 365 email protection works. In this fifth and final part of the series, we will cover the different overrides, why you may need them, and why it isn’t a good idea to keep them permanently.
Email security is a critical aspect of modern business operations, and Microsoft 365 provides a robust set of tools to keep your communications safe. But what should you do when legitimate emails are blocked? This is where submissions and overrides come into play. As we have covered in part 2 of this series, Submissions help you learn more about why email was junked or quarantined and allow you to notify Microsoft if the filters got it wrong. (It happens.) Overrides are special settings that allow certain emails to bypass the usual security filters, ensuring important communications reach their destination.
A closer look at email overrides
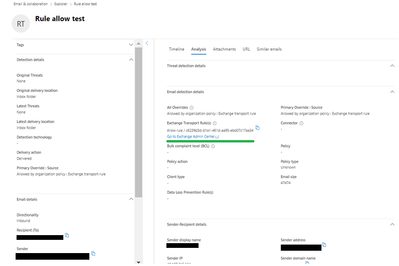
Overrides are not one-size-fits-all; they come in different forms to suit various needs. Use Explorer email summary flyout and email entity pages to learn more about why a message was delivered to a certain location, and if overrides played a role in delivery. Note, since messages can have multiple allow or block overrides as identified in the column Override source, the override that ultimately allowed or blocked the message is identified in Primary override source in Explorer.
Tenant Allow Block List (TABL): Ideal for creating temporary and safe exceptions. Based on your submission, Microsoft will analyze the exact part of the email deemed malicious (sender, domain, URL, file hash, spoof, or impersonation). TABL is the preferred choice for maintaining security: “Allows” eventually expire, and until they do, the system learns from your submissions to allow emails with similar elements. Both easy for you to manage, and useful for service filter adjustments. A win-win!
Exchange Mail Flow Rules (Exchange Transport Rules or ETRs): ETRs provide the most flexibility but come with increased risk. They should be used sparingly and thoughtfully. Safer ETR overrides use conditions for email authentication checks passing before allowing anything (see an example). The Analysis tab of the email entity page in Explorer will help you verify which ETR acted on a message, and the anti-spam message headers will include SFV:SKN if an ETR override is detected.
Figure 1: “Allowed by organization policy: Exchange transport rule” override source on the Email Entity page in Microsoft Defender XDR
Outlook Safe Senders (User Overrides): Users can mark their own trusted senders in Outlook, affecting only their individual mailbox. The screenshot below demonstrates the detailed information from the email entity page in Microsoft Defender XDR, and the anti-spam message headers will include SFV:SFE if a user override is detected.
Figure 2: “Allowed by user policy: Sender address list” override source on the Email Entity page in Microsoft Defender XDR
Certain user allows “win” over tenant configurations and provide the end-users the ability to manage their own exceptions, so make sure to review the “User and tenant settings conflict” section to learn what to expect at Order and precedence of email protection.
Tip:List all overrides for a user or all users in your organization using the PowerShell cmdlet. For full syntax and examples, see Get-MailboxJunkEmailConfiguration.
IP Allow List (Connection Filtering): This allows emails from specified IP addresses to bypass filters as part of connection filtering. One risk here is if an IP you believe is trusted becomes compromised, the entire email filtering stack except Secure by default is bypassed. Another risk is adding IP overrides for shared IP addresses or ranges. If bad actors use the same sender infrastructure for malicious purposes, you will allow bad messages along with good ones. In short: exercise caution, review regularly, keep IP allows to a minimum. The anti-spam message headers will include IPV:CAL if an IP override is detected, and the Explorer email entity page will look like this:
Figure 3: “Allowed by organization policy: Connection policy” override source on the Email Entity page in Microsoft Defender XDR
Anti-Phishing Policy Overrides: Aimed at combating domain, user and mailbox impersonation phishing threats, these overrides will target false positives with UIMP, DIMP, GIMP verdicts only. They are relatively safer as the rest of the protection scans take place, but it’s still a good idea to make sure from time to time any trusted senders and domains are still necessary, as they never expire.
Tip:You can also use Tenant Allow/Block List for impersonation overrides, just note that the allow entry isn’t created in the Tenant Allow/Block List. Instead, the domain or sender is added to the Trusted senders and domains section in the anti-phishing policy that detected the message and it does not expire.
Example The company CEO, John Smith (johnsmith@contoso.com) is a prime target for impersonation attacks, so your SecOps team adds his address to trusted users to protect in the anti-phishing policy. However, the CEO sometimes sends email to his team from his personal account (johnsmith@outlook.com). After the service flags this correctly as user impersonation, you add the CEO’s personal address to trusted senders, for his emails to get through to recipient inboxes. (Of course, after you educate the CEO about the risks tied to this practice, you remove this entry.)
Figure 4: Add trusted senders part of the anti-phishing policy in Microsoft Defender XDR
Anti-Spam Policy Overrides: used to override spam, bulk, spoofing and low-confidence phishing verdicts (SPM, HSPM, PHISH, SPOOF and BULK), anti-spam policy senders and/or domains allows also override the anti-phishing stack, and they do not expire. Overly broad (domain) allows are particularly risky and known to be a leading cause for letting bad email into your inboxes. Best practice, review your policies periodically and trim/clear these lists. The Analysis tab of the email entity page in Explorer will help you verify if a policy that acted on a message, and the anti-spam message headers will include SFV:SKA if a policy override is detected.
Tip:You can also export an extended report (message trace) for the email in question. The AGENTINFO event in the resulting csv file contains the CustomData field with additional details, such as the GUID of the policy that acted on the message. For example:
S:PCFA=SUM|tact=5|di=SQ|tactcat=SPM|hctfp=191b78dc-9221-4a2c-b51c-208a186e931a; SQ means the message was routed to Spam Quarantine, and hctfp stands for Hosted Content Filter Policy. Find the policy name by running the cmdlet Get-HostedContentFilteringPolicy in Exchange Online PowerShell.
While most of this article is about allow overrides, you can use Anti-Spam policies to block email, as well. For example, filter messages containing geographies and languages you would not expect to be working with. Learn how toconfigure spam filter policies.
Secure by Default
Microsoft 365 Secure by Default stance ensures that the system starts with the highest security settings. Notably, verdicts for malware (MALW) and high-confidence phishing (HPHISH) cannot be overridden by ETRs if the MX record points to Office 365. This policy is in place to protect users from the most severe threats automatically.
Why would I ever override Secure by Default?
There are specific instances where an override may be necessary. It is highly recommended to configure the Advanced delivery policy to handle these uses cases securely.
Phishing Simulations: To test their defenses, organizations might run controlled phishing simulations. To ensure these tests reach inboxes when they’re sent over email, overrides are essential.
SecOps Mailboxes: Security teams sometimes need to examine malicious emails for analysis and learning. Access to such emails requires an override to allow them through.
What if the MX record for my domain does not point to Exchange Online Protection?
Secure by default applies only when the MX record for your domain points to Microsoft 365 (contoso-com.mail.protection.outlook.com). If the MX record points to another service or device, it’s possible to override high-confidence phishing verdicts using an Exchange mail flow rule to bypass spam filtering (malware verdicts cannot be overridden). But although it’s technically possible, consider the benefits of defense-in-depth of your filtering solution paired with Microsoft Defender for Office 365. Use Enhanced Filtering for Connectors to skip the last known IP address(es) of your service, and to infer the email authentication information from the original sender IP. In addition, if your filtering solution supports ARC, configure to trust the ARC sealer in Microsoft Defender XDR settings. These configurations will allow you to keep the extra layer of Microsoft protection even when using third party protections.
While overrides are useful tools, they must be implemented wisely. Incorrect usage can inadvertently open your company to threats. It’s essential to take the following precautions:
Only allow emails from verified and trustworthy sources. And even when you trust the source, consider that it may become compromised, and you would inadvertently allow unwanted phishing or spam.
Use Advanced Hunting in Microsoft Defender XDR to help you discover top overrides sources and remove the unnecessary ones.
Regularly review your overrides to ensure they remain relevant and secure.
Never put domains that you own onto the Allow and blocklists. If you own Contoso, do not add contoso.com to your allow lists.
Never put common domains, such as microsoft.com and office.com, onto the Allow and blocklists.
We hope that by understanding and applying email overrides correctly, you can ensure your organization’s email is both secure and functional, allowing the right messages to get through while keeping the bad ones out.
Do you have questions or feedback about Microsoft Defender for Office 365? Engage with the community and Microsoft experts in theDefender for Office 365 forum.
Click hereto view additional posts in this series.
This article is contributed. See the original author and article here.
Dynamics 365 Project Operations has made significant improvements to consistently apply tax calculations and expanded support for scenarios including sales tax across the application. This new functionality standardizes behavior and establishes common rules to simplify how taxes are calculated and ensures consistency in how cost price, sales price, and taxes interact together. Read on for more information.
Streamline cost price and sales price calculations
With the 10.0.32 release, the Streamline cost price and sales price calculations feature is available to be enabled in your Dynamics 365 environment. With this change, improvements have been made to project-related scenarios in the following areas:
Purchase orders and vendor invoices created in combination with the general ledger parameter for applying taxation rules
Purchase orders and vendor invoices in combination with posting with amounts including sales tax
Tax involving use tax
Funding source limits
Committed costs
Purchase order corrections
Adds support for “amount include sales tax” in the Purchase Order header
Let’s dive into the basics of how sales and costs interact. This feature and scenarios are targeting the Dynamics 365 Project Operations for production/stocked deployment model. For any project expense type transaction, Dynamics 365 can modify the sales price dynamically based on one of several factors defined in the sales price – expense form. One of the commonly used methods is to apply a charges percentage markup, to mark up all costs by a set amount. For example, a 5% markup on all expenses which makes a $1000 expense invoiceable at $1050 by defaulting that sales price in the vendor invoice which will later transfer to our customer invoice.
Next, we want to understand how taxes impact costs. The two scenarios below are situations where taxes should be included in the project cost.
Legal entities with the sales tax parameter Sales taxation rules is enabled. Typically, this is US-based legal entities.
Legal entities with non-deductible tax percentages. This non-deductible tax is always included in the project cost.
Let’s look at some specific examples to understand how prices and taxes are calculated. For these examples, the tax percentage is set to 5% and there is a sales price 5% markup on cost price. We will follow the document flow of a purchase order through to a vendor invoice and review the financial impact in the posted project transactions form.
Apply sales taxation rules
Amounts including Sales Tax
Non-Deductible %
Cost Price in Document
Sales Price in Document
Posted Project Cost
Posted Project Sales Price
Notes
No
No
0
1000
1050
1000
1000 x 1.05 markup = 1050
Yes
No
0
1000
1050
1000 + 50 tax = 1050
1000 x 1.05 markup x 1.05 tax = 1102.50
No
No
20
1000
1050
1000 + 10 tax – 1010
1000 x 1.05 markup x 1.01 tax = 1060.50
5% tax multiplied by 20% non-deductible = 1%. 20% of 50 tax amount = 10.
This table shows a variety of configuration options where amounts do not include sales tax and the results of how taxes and prices are calculated.
Similarly, these same rules apply when determining the project cost and sales price when entering a purchase order with an amount that already includes sales tax. In the case of the purchase order or vendor invoice, there is an option in the header that prices include sales tax to indicate the amount entered should be inclusive of tax and the base amount and tax need to be calculated from the entered amount. Since the actual cost and sales price may include a markup of tax, the amounts entered for sales price and cost will be recalculated and different values will be posted in the final voucher. Consider the examples below with the same 5% tax rate and 5% markup described earlier:
Apply sales taxation rules
Amounts including Sales Tax
Non-Deductible %
Cost Price in Document
Sales Price in Document
Posted Project Cost
Posted Project Sales Price
Notes
No
Yes
0
1000
1050
1000 / 1.05 = 952.38
952.38 x 1.05 markup = 1000
Divide the original amount by 1 + tax rate for cost without tax.
Yes
Yes
0
1000
1050
1000 / 1.05 = 952.38 + 47.62 tax = 1000
952.38 x 1.05 markup x 1.05 tax = 1050
Divide the original amount by 1 + tax rate for cost without tax.
No
Yes
20
1000
1050
1000/ 1.05 = 952.38 + 9.52 tax = 961.9
952.38 * 1.05 markup x 1.01 tax = 1010
5% tax multiplied by 20% non-deductible = 1%. 20% of 47.62 tax amount = 9.52.
This table shows a variety of configuration options where amounts do include sales tax and the results of how taxes and prices are calculated.
Check it out for yourself
In conclusion, this new feature is available in Dynamics 365 10.0.32 and later releases. Enable the Streamline sales tax calculations with project cost and sales price feature in your test environment and look for yourself.

.png")
.png")
.png")
.png")

.png")
.png")


Recent Comments