Automatic Scaling: Azure Web Apps Unleash Their Hidden Potential

Automatic Scaling: Azure Web Apps Unleash Their Hidden Potential

This article is contributed. See the original author and article here.

Scale your Azure Web App automatically using Azure App Service Automatic Scaling


In this article we will focus on scaling azure web apps and how the new automatic scaling feature of azure app service, which allows it to scale out and in, in response to HTTP web traffic against your web app is a great feature which further enhances cost savings and improves the availability and resiliency of your web application under conditions of load.


We will also try to understand how automatic scaling is different (and at times based on scenarios better) than rule scaling, how to better understand and configure scaling limits and how it impacts scaling of different web applications sharing the same app service plan.


A look at existing options to scale an Azure Web App


  1. Manual scale: This is the simplest form of scaling where you decide on a fixed number of instances that you code needs to execute. This may seem similar to deploying an application to a virtual machine, but it has many advantages such as deploying code only once, no management of underlying hardware and as your needs change you can always change the number of instances running without having to deploy the code again. 

  2. Rule based auto scale: This has been the most used scale option on azure web apps. This is further sub classified in two options.

    1. Scale based on a schedule: Let’s say your application is used by your users in a predictable manner, for instance an intranet application used by office employees will most likely see traffic consistently during the working days or a payroll application will see traffic once or twice a month (depending how you get your paycheck) for a period of 3-5 days, customers have traditionally been creating these schedules to scale an application out (and in: let’s forget to scale an application back in) using configurations as shown in example below, which allows the web application to run specific number of instances during the specific period of time during the specified days.


    2. Scale based on a metric: This has been the most advanced and a complex scaling condition to set. It allows you to configure the web application to scale in response to how a metric such as CPU Percentage or Memory Percentage of the underlying existing hosts changes during the load conditions. The way this is configured is how we configure an azure monitor metric alert and in response to it, in addition to firing an optional notification, the platform allows you to automatically scale out or in by adding or removing one or more instances of a fresh worker that can cater to your end user application traffic.

      Although it works well but I have seen users having their fair share of challenges while setting this up with the common ones, I have faced, being


      1.  Which metric should I use to scale? If your application has adopted message or event-based mechanisms, then it is an even more special case to consider the queue depth etc.

      2.  Metrics are always aggregated over a period and if your application sees short bursts of load also referred to a transient spike, chances are high that by the time the scale out logic triggers your application may have already passed its peak demand and the scale out operation may not really help. You can try to keep evaluating your rule on a smaller duration and then match it with a smaller cool down period associated with aggressive scale out (meaning you add more instances quickly) and controlled scale in (meaning you scale back in smaller decrements over a longer duration) to cover for any next transient spike. You will see when you try it that it takes several attempts and good proactive monitoring before you get this balance working and the cost savings are less than optimal with a cohort of users complaining about slow response times often.

      3. You forget to create a scale in rule, and you only realize this at the end of the month when you get your invoice, and you are billed for a much higher number of web app instances than what you had planned for.


Automatic Scaling


With Automatic Scaling, instead of us choosing a metric or configuring a schedule, the app service platform continues to monitor the HTTP traffic as soon as your application starts receiving it. Automatic Scaling periodically checks the /admin/host/ping endpoint along with other health check mechanisms inherent to the platform. These checks are specifically implemented features, with worker health assessments occurring at least once every few seconds. If the system detects increased load on the application, health checks become more frequent. In the event of deteriorating workers’ health and slowing requests, additional instances are requested. Once the load subsides, the platform initiates a review for potential scaling in. This process typically begins approximately 5-10 minutes after the load stops increasing. During scaling in, instances are removed at a maximum rate of one every few seconds to a minute.


As you dig in, you will realize that automatic scaling is very similar to the Elastic Premium plan that was introduced a while back for Azure Function Apps. If you are already familiar with Elastic Premium plans and are using them, then you will find the below section as a refresher to the concepts and you can choose to skip it.


Few terms to understand before we get into more details


  • Pre-warmed instances: Consider this as an additional buffer worker that is ready to receive your applications traffic at moment’s notice. Using pre-warmed instances helps greatly reduce the time it takes to perform a scale-out operation. The default prewarmed instance count is 1 and, for most scenarios, this value should remain as 1. Currently, it is not possible to modify this setting to a higher number using the portal experience, but you can use the CLI, if you want to play around. Be mindful that you are charged for pre-warmed instances so unless you have tested that the default value of 1 does not work for you, do not change it.

  • Maximum burst: Number of instances this plan can scale out under load. Value should be greater than or equal to current instances for this plan. This value is set at the level of the app service plan and in case you have multiple app services sharing the same plan and you want to see them scale independently then set the “Maximum scale limit” which is a setting that limits the number of instances a specific app under the app service plan can scale up to. All apps combined under the app service plan will be limited to this maximum burst value.

  • Maximum scale limit: The maximum number of instances this web app can scale out to. As highlighted in the above point this is the setting which controls how much each individual app in the same app service plan can scale up to in terms of number of instances. If you have only one single web app in the same app service plan, then there is no point in configuring this value.


Load Testing the Metric based scaling vs Automatic Scaling


Web App Setup: The Azure web app is a Linux App Service set to Premium V3 P0V3 and 1 single instance set to the “Always Ready” instance.


The code deployed is the eShopOnWeb solution found on GitHub.
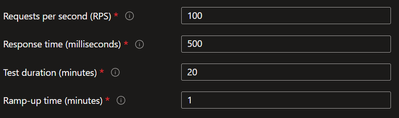

Load Test Setup


saurabhseth_0-1714759781909.png


Note: Automatic Scaling takes precedence over custom auto scale settings. In case you have configured custom auto scale and want to switch to Automatic Scaling, I suggest you first switch to manual scale and disable the rule scale settings. Then enable and configure automatic scaling. As part of my tests, I observed some random behavior when switching between automatic scaling and rule-based scale with metrics back and forth without moving to manual scaling in between. This is also documented.


Rule based scaling:


As you can see, I configure the web app to scale based on the CpuPercentage metric by an instance count of 1.


saurabhseth_1-1714759781922.png


As a result of the configuration, we observe a consistent scale out and in during the load testing and the graph is consistent in repeated runs.


saurabhseth_2-1714759781927.png


Automatic Scaling:


For automatic scale setting shown below


saurabhseth_3-1714759781932.png


under the same load the observed automatic scaling behavior is captured below along with the request rate and HttpResponseTime observed.


saurabhseth_4-1714759781939.png


saurabhseth_5-1714759781942.png


saurabhseth_6-1714759781947.png


Key observations:


  • What we are measuring is the maximum of a metric introduced as part of automatic scaling called automatic scaling instance count.

  • We see the scaling out is very quick as the health checks being performed by the automatic scaling setup are being done continuously and if you read the documentation, it states that as the load increases the health checks become more frequent to keep up with the demand.

  • Quick scale out ensures that the average response time does not stay at peak for a long time and is quickly brought down and remains consistent around a few ms.

  • As the load varies the instances keep getting added and removed. The pace at which this happens is not always consistent. This is evident from a different set of graphs showing the automatic scale instance count metric for 2 runs of the same load test.

  • The scaling in also happens quickly as the load decreases. As per documentation, the   in starts to happen 5 minutes after the load reduced but I observed a more aggressive scale in which is much nicer as it helps me keep my costs down.

  • It is safe to say that with automatic scaling the scale behavior is aggressive.

  • My test load ran for 20 minutes. Comparing the total time, it takes for the scale operation to happen between the two scenarios, it is essentially 22 minutes approximately in case of automatic scale and 35 minutes in the custom scale with rules.

  • Based on these observations, it is easy to see how automatic scaling brings function app kind of scaling capabilities to azure web app under the new premium plans. However, do note that both are inherently different implementations internally which is why you cannot share a plan with automatic scaling between a function app and an azure web app.


How to understand the billing with automatic scaling


Let’s use my setup as an example. I have only 1 always ready instance, so this is the instance that I am always being billed at. The platform will keep 1 pre-warmed instance handy.


When I am not running my load tests my web application is idle and the pre-warmed instance does not come in to play and hence there are no charges for the same. The moment my web application starts receiving traffic the pre-warmed instance is allocated and the billing for it starts. This is because I had only 1 always ready instance.


Assume, I had 2 or 3 always ready instances so unless all my existing instances had been activated and were receiving a steady stream of traffic the pre-warmed instance will not be activated and hence not billed.


The speed at which instances are added varies based on the individual application’s load pattern and startup time. The only way to keep track is to continue to monitor the automatic scaling instance count metric which is also used internally to come up with the billing which is done on a per second basis with automatic scaling configured. I found “Max” to be a better aggregation as compared to average for this metric so that you are safe with your cost projections.


Sample monthly cost projection, considering 1 single always ready instance at P0V3 and a maximum of 5 scaled instances running for 300 hours a month in east US = 73.73 + 300*0.101 = 104.03 USD. The actual cost will be less because my application is not peaking at 5 instances consistently (look at the graphs).


Automatic Scaling with multiple web apps in the same plan


To test how well different web applications will scale under the same app service plan, I deployed a simple Hello World template for an asp.net core web application you get in visual studio.


The first thing that you will notice is that the new web application also has the automatic scaling turned out as it is sharing the same app service plan.


To make sure that both apps make good use of the available resources and scale without impacting on the performance of the other app sharing the same plan we need to configure the scale out limit.


I kept that as 2 for the Hello World app and 3 for the eShopOnWeb app with the maximum burst set to 5.


There is nothing that prevents us from setting the maximum scale limit as 5 for both the applications and not even enforcing this limit in which case both the web applications will be competing for the 5 maximum burst instances.


My second sample application is just a simple web page with a 5 second delay so I will not be observing its response times for my analysis.


Running the same load test for both the applications


without limits set for each individual web application


saurabhseth_7-1714759781952.png


saurabhseth_8-1714759781955.png


With limits set


saurabhseth_9-1714759781957.png


saurabhseth_10-1714759781961.png


Observations


  • When no limits are set both web applications try to scale to the maximum burst limit set at the level of the app service plan. This causes a bit of a race for the available resources initially but soon the web applications can scale to the number of required instances to meet the demand generated by the load.

  • The average response time is much lower when no limits are set on individual web applications but when we ran the same load with limits of 2 and 3 instances set respectively the same eShopOnWeb application resulted in a much higher average response time.

  • In this case the load test was run simultaneously but even when the same test was run with a delay of 5 minutes and no limits were set, the resources were distributed to both the web applications despite the first web application having a lead time to scale to more instances. Based on the one run, I executed in this manner having the first web application scaling out and the instances already in place allowed the second web application to scale even faster but my applications are simple so we should not generalize this.


Final Thoughts


Automatic scaling is a great addition to the azure web application service. Being able to scale a web application against web traffic and not just measured metrics has been an ask from customers for a long time and they can now do so by using this feature.


I have seen a lot of customers looking to containerize their web UI to achieve faster scalability against incoming traffic and with automatic scaling they can leverage the azure web application to host the web UI, while using AKS to host their backend API’s and scale the components independently.


It is quite adept in addressing the common challenges highlighted earlier with rule-based scaling by ensuring that setting up scaling is simple to just a couple of radio buttons and a slider, scale in happens as quickly as possible so that cost is optimized as much as possible.


I am sure this feature will see more improvements in the coming months. While the current concept adapts from how function app premium plans work, it will be great to see if the teams can adapt to scaling features akin to Kubernetes, without making it as complex as Kubernetes.


Ref:


https://learn.microsoft.com/en-us/azure/app-service/manage-automatic-scaling?tabs=azure-portal


https://learn.microsoft.com/en-us/azure/azure-functions/functions-premium-plan?tabs=portal


https://learn.microsoft.com/en-us/azure/azure-monitor/autoscale/autoscale-get-started

Startup Showcase: 3-2-1-GoCheck

Startup Showcase: 3-2-1-GoCheck

This article is contributed. See the original author and article here.


Using AI for Digital Background Checking


LeeStott_0-1714548648012.png


3-2-1 Go Check, a global background checking startup, and has revolutionized its services by leveraging the Microsoft Founders Hub program. The company offers its comprehensive background checking solutions as a Software as a Service (SaaS), and Founders’ Hub benefits have enhanced its accessibility and efficiency.


Founders Hub Benefits


What benefits have they been using? Power Platform, M365 & Azure


Use of Microsoft 365:
3-2-1 Go Check has a global team located in Hungary, UK, Czech Republic, Australia, Canada, India, and Germany and they are under one calendar and mailbox.


All of their company documents are on OneDrive, which is allowing the, to use PowerAutomate to automate their sales campaigns using Dynamics. The integration with Microsoft Dynamics and Power Automate stands out, enabling 321 Go Check to establish a repeatable sales pipeline. This integration ensures secure management of solutions and synergizes with other Microsoft products to provide a cohesive user experience.


Use of Azure: Hosting and managing the 3-2-1-Go Check global background checking solution using Static Web App, and Azure Functions so that they can scale and be secure. This facilitated seamless deployment of their SaaS solutions, particularly for enterprise clients, ensuring a higher level of service. Additionally, they have integrated platform products like OpenAI, Various API Services to make their product available in the MS ecosystem.


Czech Republic: www.321gocheck.cz


Connect with Nurup Namji, co-founder 3-2-1 Check


Join Microsoft for Startups Founders’ Hub today!


Interested in taking your startup to the next level? The Microsoft for Startups Founders Hub unlocks a world of possibilities for budding entrepreneurs, offering complimentary access to advanced AI technologies via Azure. Participants can benefit from up to $150,000 in Azure credits, personalized mentorship from seasoned Microsoft professionals, and a wealth of additional resources. This initiative is designed to be inclusive, welcoming individuals with a vision to innovate, without the prerequisite of prior funding.


For more information and skilling resources to take your startup to the next level visit https://aka.ms/StartupsAssembleCollection

Extend Copilot capabilities with plugins   

Extend Copilot capabilities with plugins   

This article is contributed. See the original author and article here.

In Dynamics 365 Customer Service, agents use Copilot to resolve issues based on the corpus of data in their organization’s knowledge base or SharePoint. Additionally, we are introducing prompt plugins, enabling agents to securely access Dataverse data such as customers, products, and cases, through Copilot. This enables agents to gain a better understanding of customer needs, preferences, and history, which empowers them to provide more personalized and effective support. 

With Copilot Studio, we enable customers to build and manage their prompt plugins to address various types of customer scenarios based on the organization’s needs. Plugins reduce the need for customer service representatives to switch to other tabs and tools to do their work. The result is improved resolution time and customer satisfaction. Organizations can build a single plugin and use that plugin in all copilots. So, regardless of where an agent asks a service-related question, they benefit from a consistent experience. 

Create prompt plugins

You can create a prompt plugin using Copilot Studio and choose the data from Dataverse based on your needs.  

graphical user interface, application, email

Once you generate prompt plugins, the Customer Service administrator can manage plugins in the Customer Service admin center.

Administrators have the following capabilities:

  • Turn on and turn off the plugins
  • Provide access to all Copilot users or manage user access by roles
  • Map data field input parameters for the plugin, reducing how much context agents have to manually add to the prompt during plugin use
  • Manage the plugin data storage in Dataverse

Use prompt plugins

Empower agents to access solutions from multiple entities through Copilot, offering unified and enlightening experience. Agents can use targeted phrases in Copilot to get responses from plugins to quickly gather information about a case.

Copilot automatically identifies the plugin based on the agent’s question. With deep understanding of the user’s intent, Copilot can select the right plugin to help the agent, resulting in better experience for customers who have their issues addressed faster.

When the agent clicks Check sources, they can see the plugin used to generate the response. They can also click the Learn about plugins documentation link to understand how plugins work and their use in Copilot.

If Copilot didn’t identify a plugin, it falls back to the knowledge source to create a response to the agent.

graphical user interface, text, application

Coming soon: Other types of plugins

Connector plugins extend Copilot’s value by connecting to a variety of external data sources and applications that agents rely on to answer customer queries. The plugins let your agents securely access data from those systems through Copilot without juggling multiple different systems to deliver service. For example, the agents can retrieve information like purchase orders and shipping details via Copilot without logging in to order management systems. The agents simply ask for what they need, and Copilot responds, resulting in decreased time to resolution.

Learn more

Below are the detailed steps to create and configure prompt plugins for your organization.

  1. Create prompt plugins in Copilot Studio
  2. Configure plugins in Customer Service admin center
  3. Use plugins in Copilot in Dynamics 365 Customer Service

The post Extend Copilot capabilities with plugins    appeared first on Microsoft Dynamics 365 Blog.

Brought to you by Dr. Ware, Microsoft Office 365 Silver Partner, Charleston SC.

Extend Copilot capabilities with plugins   

Extend Copilot capabilities with plugins   

This article is contributed. See the original author and article here.

In Dynamics 365 Customer Service, agents use Copilot to resolve issues based on the corpus of data in their organization’s knowledge base or SharePoint. Additionally, we are introducing prompt plugins, enabling agents to securely access Dataverse data such as customers, products, and cases, through Copilot. This enables agents to gain a better understanding of customer needs, preferences, and history, which empowers them to provide more personalized and effective support. 

With Copilot Studio, we enable customers to build and manage their prompt plugins to address various types of customer scenarios based on the organization’s needs. Plugins reduce the need for customer service representatives to switch to other tabs and tools to do their work. The result is improved resolution time and customer satisfaction. Organizations can build a single plugin and use that plugin in all copilots. So, regardless of where an agent asks a service-related question, they benefit from a consistent experience. 

Create prompt plugins

You can create a prompt plugin using Copilot Studio and choose the data from Dataverse based on your needs.  

graphical user interface, application, email

Once you generate prompt plugins, the Customer Service administrator can manage plugins in the Customer Service admin center.

Administrators have the following capabilities:

  • Turn on and turn off the plugins
  • Provide access to all Copilot users or manage user access by roles
  • Map data field input parameters for the plugin, reducing how much context agents have to manually add to the prompt during plugin use
  • Manage the plugin data storage in Dataverse

Use prompt plugins

Empower agents to access solutions from multiple entities through Copilot, offering unified and enlightening experience. Agents can use targeted phrases in Copilot to get responses from plugins to quickly gather information about a case.

Copilot automatically identifies the plugin based on the agent’s question. With deep understanding of the user’s intent, Copilot can select the right plugin to help the agent, resulting in better experience for customers who have their issues addressed faster.

When the agent clicks Check sources, they can see the plugin used to generate the response. They can also click the Learn about plugins documentation link to understand how plugins work and their use in Copilot.

If Copilot didn’t identify a plugin, it falls back to the knowledge source to create a response to the agent.

graphical user interface, text, application

Coming soon: Other types of plugins

Connector plugins extend Copilot’s value by connecting to a variety of external data sources and applications that agents rely on to answer customer queries. The plugins let your agents securely access data from those systems through Copilot without juggling multiple different systems to deliver service. For example, the agents can retrieve information like purchase orders and shipping details via Copilot without logging in to order management systems. The agents simply ask for what they need, and Copilot responds, resulting in decreased time to resolution.

Learn more

Below are the detailed steps to create and configure prompt plugins for your organization.

  1. Create prompt plugins in Copilot Studio
  2. Configure plugins in Customer Service admin center
  3. Use plugins in Copilot in Dynamics 365 Customer Service

The post Extend Copilot capabilities with plugins    appeared first on Microsoft Dynamics 365 Blog.

Brought to you by Dr. Ware, Microsoft Office 365 Silver Partner, Charleston SC.

Have a safe coffee chat with your documentation using Azure AI Services | JavaScript Day 2024

Have a safe coffee chat with your documentation using Azure AI Services | JavaScript Day 2024

This article is contributed. See the original author and article here.

image.png


In the Azure Developers JavaScript Day 2024, Maya Shavin a Senior Software Engineer at Microsoft, presented a session called “Have a safe coffee chat with your documentation using Azure AI Services”. And she introduced innovative approaches for integrating AI technologies to ensure the safety of document-based Q&A systems.


Let’s dive into the content!


What was covered during the session?


Now let’s talk about what was covered during the session! If you wish, you can watch the video of the session at the link below:


Introduction to AI-Powered Safety in Documentation


Maya opened her presentation by introducing her background in Microsoft’s industrial AI division, where she focuses on incorporating AI technologies into industry-specific applications. With over a decade of experience in both Front-End and Back-End development, she also highlighted her contributions to the Tech Community as an author and Community Organizer.


Concept of Document Q&A Assistant


Maya described the document Q&A assistant as a straightforward interaction system where an AI, not a human, responds to user queries. The system processes in two primary phases:


  1. Injection Phase: here, documents are uploaded, segmented, indexed with metadata and stored in a searchable database.

  2. Query Phase: the phase where the AI retrieves and summarizes relevant document sections in response to user queries.


querying-injection.png


The Importance of Content Moderation


A significant portion of her talk focused on content moderation, crucial for preventing inappropriate or harmful content from undermining the AI system’s integrity. She explained how AI responses could potentially reflect, or be influenced by, the offensive content within user inputs. To combat this, Microsoft promotes responsible AI practices structured around in:


  • Fairness: AI systems should treat all people fairly.

  • Reliability and safety: AI systems should perform reliably and safely.

  • Privacy and security: AI systems should be secure and respect privacy.

  • Inclusiveness: AI systems should empower everyone and engage people.

  • Transparency: AI systems should be understandable.

  • Accountability: People should be accountable for AI systems.


For more information on Microsoft’s Responsible AI Practices, visit the link.


Azure AI Content Safety


Maya introduced Azure AI Content Safety, a pivotal service for detecting harmful content in both user inputs and AI-generated responses. This service supports multiple programming languages and offers a studio experience for testing various content sensitivity levels. Its primary features include:


  • Text Analysis API: Scans text for sexual content, violence, hate, and self-harm with multi-severity levels.


  • Image Analysis API: Scans images for sexual content, violence, hate, and self-harm with multi-severity levels.


  • Text Blocklist Management APIs: The default AI classifiers are sufficient for most content safety needs; however, you might need to screen for terms that are specific to your use case. You can create blocklists of terms to use with the Text API.


To understand how Azure AI Content Safety works, there’s a video below about the service:


Demonstrating Azure AI Content Safety in Action


Maya demonstrated how to integrate Azure AI Content Safety into a JavaScript project. She showcased a function that analyzes content and adjusts responses based on predefined sensitivity levels, thus preventing the system from providing harmful output.


This function works by categorizing content into several types of sensitive material—like hate speech, sexual content, and violence—and filtering them accordingly.


She also mentioned the use of the Azure AI Content Safety SDK for JavaScript/TypeScript, which you can find at the link


Comparing Azure AI Content Safety and Azure OpenAI Content Filters


Maya also compared the Azure AI Content Safety with OpenAI’s content filtering features. She highlighted that while Azure AI Content Safety is versatile and can be integrated into various AI workflows, OpenAI’s content filtering is bundled with their services and might not incur additional costs.


However, Azure AI Content Safety offers more control over the moderation process and supports more languages.


Final Thoughts and Steps Forward


Concluding her talk, Maya stressed the ongoing need for manual oversight in content moderation to ensure that AI interactions remain appropriate and effective. She encouraged attendees to implement Azure AI content safety in their projects to enhance the security layers of their AI applications.


Maya Shavin’s session provided valuable insights into the mechanisms of safeguarding AI-driven document assistants, ensuring that they operate within the realms of safety and ethics dictated by modern AI standards.


Azure Developers JavaScript Day Cloud Skills Challenge


Don’t forget to participate in the Azure Developers JavaScript Day Cloud Skills Challenge to test your knowledge and skills in a series of learn modules and learn more about Azure services and tools. As I mentioned in the previous articles, besides the challenge is over, you can still access the content and learn more about the topics covered during the event.


image-6.png


Link to the challenge: JavaScript and Azure Cloud Skills Challenge


Additional Resources


If you want to learn more about Azure AI Content Safety Services, especially if you’re JavaScript Developer, you can access the following resources:


Stay Tuned!


If you wish, you can follow what happened during the two days of the event via the playlist on YouTube. The event was full of interesting content and insights for JavaScript developers!


If you are a JavaScript/TypeScript developer, follow me on Twitter or LinkedIn Glaucia Lemos for more news about the development and technology world! Especially if you are interested in how to integrate JavaScript/TypeScript applications with the Azure, Artificial Intelligence, Web Development, and more!


And see you in the next article!