by Scott Muniz | Mar 3, 2021 | Security, Technology
This article is contributed. See the original author and article here.
Microsoft has released out-of-band security updates to address four vulnerabilities in Exchange Server:
It is possible for an attacker, once authenticated to the Exchange server, to gain access to the Active Directory environment and download the Active Directory Database.
Tactics, Techniques and Procedures
The majority of the TTPs in this section are sourced from a blog post from Volexity, a third party cybersecurity firm. Note: the United States Government does not endorse any commercial product or service, including any subjects of analysis. Any reference to specific commercial products, processes, or services by service mark, trademark, manufacturer, or otherwise, does not constitute or imply their endorsement, recommendation, or favoring by the United States Government.
Volexity has observed the following files as targets of HTTP POST requests:
/owa/auth/Current/themes/resources/logon.css/owa/auth/Current/themes/resources/owafont_ja.css/owa/auth/Current/themes/resources/lgnbotl.gif/owa/auth/Current/themes/resources/owafont_ko.css/owa/auth/Current/themes/resources/SegoeUI-SemiBold.eot/owa/auth/Current/themes/resources/SegoeUI-SemiLight.ttf/owa/auth/Current/themes/resources/lgnbotl.gif
Administrators should search the ECP server logs for the following string (or something similar):
S:CMD=Set-OabVirtualDirectory.ExternalUrl='
The logs can be found at <exchange install path>LoggingECPServer.
To determine possible webshell activity, administrators should search for aspx files in the following paths:
inetpubwwwrootaspnet_client (any .aspx file under this folder or sub folders)<exchange install path>FrontEndHttpProxyecpauth (any file besides TimeoutLogoff.aspx)<exchange install path>FrontEndHttpProxyowaauth (any file or modified file that is not part of a standard install)<exchange install path>FrontEndHttpProxyowaauthCurrent (any aspx file in this folder or subfolders)<exchange install path>FrontEndHttpProxyowaauth<folder with version number> (any aspx file in this folder or subfolders)
Administrators should search in the /owa/auth/Current directory for the following non-standard web log user-agents. These agents may be useful for incident responders to look at to determine if further investigation is necessary.
These should not be taken as definitive IOCs:
DuckDuckBot/1.0;+(+http://duckduckgo.com/duckduckbot.html)facebookexternalhit/1.1+(+http://www.facebook.com/externalhit_uatext.php)Mozilla/5.0+(compatible;+Baiduspider/2.0;++http://www.baidu.com/search/spider.html)Mozilla/5.0+(compatible;+Bingbot/2.0;++http://www.bing.com/bingbot.htm)Mozilla/5.0+(compatible;+Googlebot/2.1;++http://www.google.com/bot.htmlMozilla/5.0+(compatible;+Konqueror/3.5;+Linux)+KHTML/3.5.5+(like+Gecko)+(Exabot-Thumbnails)Mozilla/5.0+(compatible;+Yahoo!+Slurp;+http://help.yahoo.com/help/us/ysearch/slurp)Mozilla/5.0+(compatible;+YandexBot/3.0;++http://yandex.com/bots)Mozilla/5.0+(X11;+Linux+x86_64)+AppleWebKit/537.36+(KHTML,+like+Gecko)+Chrome/51.0.2704.103+Safari/537.36
Veloxity observed these user-agents in conjunction with exploitation to /ecp/ URLs:
ExchangeServicesClient/0.0.0.0python-requests/2.19.1python-requests/2.25.1
These user-agents were also observed having connections to post-exploitation web-shell access:
antSword/v2.1Googlebot/2.1+(+http://www.googlebot.com/bot.html)Mozilla/5.0+(compatible;+Baiduspider/2.0;++http://www.baidu.com/search/spider.html)
As with the non-standard user-agents, responders can examine internet information services (IIS) logs from Exchange Servers to identify possible historical activity. Also, as with the non-standard user agents, these should not be taken as definitive IOCs:
POST /owa/auth/Current/POST /ecp/default.fltPOST /ecp/main.cssPOST /ecp/<single char>.js
Volexity has seen attackers leverage the following IP addresses. Although these are tied to virtual private servers (VPSs) servers and virtual private networks (VPNs), responders should investigate these IP addresses on their networks and act accordingly:
103.77.192.219104.140.114.110104.250.191.110108.61.246.56149.28.14.163157.230.221.198167.99.168.251185.250.151.72192.81.208.169203.160.69.66211.56.98.1465.254.43.185.2.69.1480.92.205.8191.192.103.43
Volexity has also provided the following YARA signatures that can be run within your network to assist in finding signs of a compromise.
rule webshell_aspx_simpleseesharp : Webshell Unclassified
{
meta:
author = “threatintel@volexity.com”
date = “2021-03-01”
description = “A simple ASPX Webshell that allows an attacker to write further files to disk.”
hash = “893cd3583b49cb706b3e55ecb2ed0757b977a21f5c72e041392d1256f31166e2”
strings:
$header = “<%@ Page Language=”C#” %>”
$body = “<% HttpPostedFile thisFile = Request.Files[0];thisFile.SaveAs(Path.Combine”
condition:
$header at 0 and
$body and
filesize < 1KB
}
2.
rule webshell_aspx_reGeorgTunnel : Webshell Commodity
{
meta:
author = “threatintel@volexity.com”
date = “2021-03-01”
description = “A variation on the reGeorg tunnel webshell”
hash = “406b680edc9a1bb0e2c7c451c56904857848b5f15570401450b73b232ff38928”
reference = “https://github.com/sensepost/reGeorg/blob/master/tunnel.aspx”
strings:
$s1 = “System.Net.Sockets”
$s2 = “System.Text.Encoding.Default.GetString(Convert.FromBase64String(StrTr(Request.Headers.Get”
// a bit more experimental
$t1 = “.Split(‘|’)”
$t2 = “Request.Headers.Get”
$t3 = “.Substring(“
$t4 = “new Socket(“
$t5 = “IPAddress ip;”
condition:
all of ($s*) or
all of ($t*)
}
3
rule webshell_aspx_sportsball : Webshell Unclassified
{
meta:
author = “threatintel@volexity.com”
date = “2021-03-01”
description = “The SPORTSBALL webshell allows attackers to upload files or execute commands on the system.”
hash = “2fa06333188795110bba14a482020699a96f76fb1ceb80cbfa2df9d3008b5b0a”
strings:
$uniq1 = “HttpCookie newcook = new HttpCookie(”fqrspt”, HttpContext.Current.Request.Form”
$uniq2 = “ZN2aDAB4rXsszEvCLrzgcvQ4oi5J1TuiRULlQbYwldE=”
$var1 = “Result.InnerText = string.Empty;”
$var2 = “newcook.Expires = DateTime.Now.AddDays(”
$var3 = “System.Diagnostics.Process process = new System.Diagnostics.Process();”
$var4 = “process.StandardInput.WriteLine(HttpContext.Current.Request.Form[””
$var5 = “else if (!string.IsNullOrEmpty(HttpContext.Current.Request.Form[””
$var6 = “<input type=”submit” value=”Upload” />”
condition:
any of ($uniq*) or
all of ($var*)
}
A list of web shell hashes have also been provided by Microsoft:
b75f163ca9b9240bf4b37ad92bc7556b40a17e27c2b8ed5c8991385fe07d17d0097549cf7d0f76f0d99edf8b2d91c60977fd6a96e4b8c3c94b0b1733dc026d3e2b6f1ebb2208e93ade4a6424555d6a8341fd6d9f60c25e44afe11008f5c1aad165149e036fff06026d80ac9ad4d156332822dc93142cf1a122b1841ec8de34b5511df0e2df9bfa5521b588cc4bb5f8c5a321801b803394ebc493db1ef3c78fa14edc7770464a14f54d17f36dc9d0fe854f68b346b27b35a6f5839adf1f13f8ea811157f9c7003ba8d17b45eb3cf09bef2cecd2701cedb675274949296a6a183d1631a90eb5395c4e19c7dbcbf611bbe6444ff312eb7937e286e4637cb9e72944
Note: this is not an all-inclusive list of indicators of compromise and threat actors have been known to use short-term leased IP addresses that change very frequently. Organizations that do not locate any of the IOCs in this Alert within your network traffic, may nevertheless have been compromised. CISA recommendations following the guidance located in the Microsoft Advisory to check your servers for any signs of a compromise.
Conduct Forensic Analysis
Should your organization see evidence of compromise, your incident response should begin with conducting forensic analysis to collect artifacts and perform triage. Please see the following list of recommendations on how to conduct forensic analysis using various tools.
Although the following free tools are not endorsed by the Federal Government, incident responders commonly use them to perform forensics.
While collecting artifacts to perform triage, use processes and tools that minimize the alteration of the data being collected and that minimize impact to the operating system itself.
Ideally, during data collection, store the data on removable/external media and, when possible, run the artifact collection tools from the same media.
Key artifacts for triage that should be collected:
- Memory
- All registry hives
- All windows event logs
- All web logs
Memory can be collected with a variety of open source tools (e.g., FTK Imager by AccessData, Ram Capture by Belkasoft).
Registry and Windows Event logs can be collected with a variety of open source tools as well (e.g., FTK_Imager, Kroll Artifact Parser And Extractor [KAPE]).
Web logs can also be collected with a variety of open source tools (e.g. FTK Imager).
Windows Artifact Collection Guide
Execute the following steps in order.
1) Download the latest FTK Imager from https://accessdata.com/product-download/.
- Note: Ensure your review of and compliance with the applicable license associated with the product referenced, which can be found in the product’s User Guide. The United States Government does not endorse any commercial product or service, including any subjects of analysis. Any reference to specific commercial products, processes, or services by service mark, trademark, manufacturer, or otherwise, does not constitute or imply their endorsement, recommendation, or favoring by the United States Government.
2) Collect memory from live system using FTK Imager. See Memory Capture with FTK Imager.pdf for instructions. Note: Download and copy “FTK Imager” folder to an external drive. Run FTK Imager.exe from the FTK Imager folder from external drive. Wait until memory collect is complete before proceeding to step 2.
3) Collect important system artifacts using KAPE. See KAPE Collection Procedure. Note: Download KAPE from a separate system; do not download KAPE to the target system. Run KAPE from external drive.
4) Collect disk image using FTK Imager. See Live Image with FTK Imager.pdf for instructions. Note: Run FTK Imager.exe from the “FTK Imager” folder from external drive.
Memory Capture with FTK Imager
1) Open FTK Imager. Log into the system with Administrator privileges and launch “FTK Imager.”
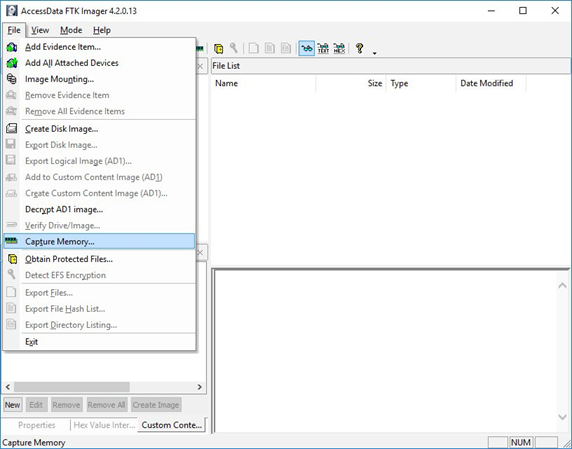
2) Open “Capture Memory.” Select “Capture Memory…” from the File menu.
Figure 1: FTK Imager – Capture Memory Command
3) Select Path and Filenames. On the window that appears, use the “Browse” button to identify the destination of the memory capture. Save the memory capture to an external device and not the main hard drive of the system. Doing so will prevent the saved file from overwriting any dataspace on the system.
- Name the destination file with a descriptive name (i.e., hostname of the system).
- Select the box “Include pagefile” and provide a name of the pagefile that is descriptive of the system.
- Do not select “Create AD1 file.”
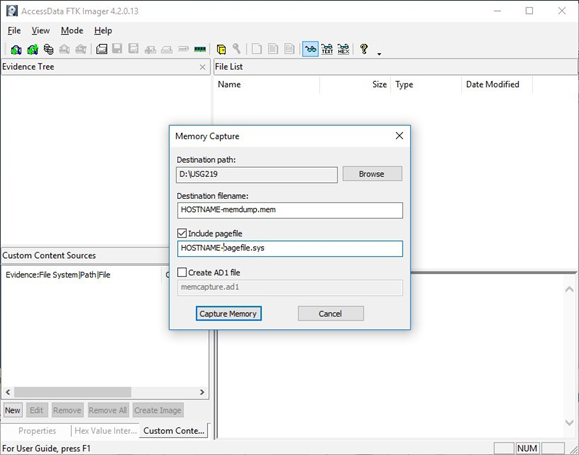
Figure 2: FTK Imager – Memory Capture
4) Capture Memory. Click on “Capture Memory” to begin the capture process. The process will take several minutes depending on the size of the pagefile and the amount of memory on the system.
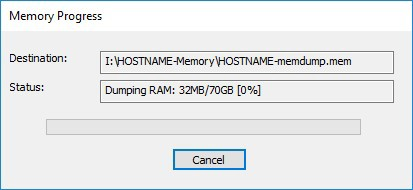
Figure 3: FTK Imager – Memory Capture
KAPE Collection Procedure [1]
1) Download KAPE from https://www.kroll.com/en/services/cyber-risk/investigate-and-respond/kroll-artifact-parser-extractor-kape.
2) Disable any antivirus or host protection mechanisms that prevent execution from removable media, or data loss prevention (DLP) mechanisms that restrict utilization of removable media.
- Enable antivirus and host protection once this process is completed.
3) Unzip Kape.zip and run gkape.exe as admin from your removable media
4) Target source should be the drive on which the OS resides, typically C:.
5) Target destination should be an external drive folder, not the same drive as the Target source. If available, use an external hard drive or flash drive.
- A KAPE execution with these parameters will typically produce output artifacts with a total size of 1-25 GB.
- If you are going to be running KAPE on different machines and want to save to the same drive, ensure the Target destination folder is unique for each execution of KAPE.
6) Uncheck Flush checkbox (it is checked natively).
7) Check Add %d and Add %m checkboxes.
8) Select ALL checkboxes to ensure KAPE will target all available data that it is capable of targeting. This takes some time; use the down arrow and space bar to move through the list quickly.
9) Check Process VSCs checkbox.
10) Select Zip radio button and add Base name TargetOutput.
11) Ensure Deduplicate checkbox is checked (it is checked natively).
- At the bottom you should now see a large Current command line, similar to:
.kape.exe –tsource C: –tdest E:%d%m –tflush –target !BasicCollection,!SANS_Triage,Avast,AviraAVLogs,Bitdefender,ComboFix,ESET,FSecure,HitmanPro,Malwarebytes, McAfee,McAfee_ePO,RogueKiller,SentinelOne,Sophos,SUPERAntiSpyware,Symantec_AV_Logs,TrendMicro,VIPRE, Webroot,WindowsDefender,Ammyy,AsperaConnect,BoxDrive,CiscoJabber,CloudStorage,ConfluenceLogs,Discord, Dropbox, Exchange,ExchangeClientAccess,ExchangeTransport,FileZilla,GoogleDrive,iTunesBackup,JavaWebCache,Kaseya,LogMeIn,Notepad++, OneDrive,OutlookPSTOST,ScreenConnect,Skype,TeamViewerLogs,TeraCopy,VNCLogs, Chrome,ChromeExtensions,Edge,Firefox,InternetExplorer,WebBrowsers,ApacheAccessLog,IISLogFiles,ManageEngineLogs, MSSQLErrorLog,NGINXLogs,PowerShellConsole,KapeTriage,MiniTimelineCollection,RemoteAdmin, VirtualDisks, Gigatribe,TorrentClients,Torrents,$Boot,$J,$LogFile,$MFT,$SDS,$T,Amcache,ApplicationEvents,BCD,CombinedLogs, EncapsulationLogging,EventLogs,EventLogs-RDP,EventTraceLogs, EvidenceOfExecution,FileSystem,GroupPolicy,LinuxOnWindowsProfileFiles,LnkFilesAndJumpLists,LogFiles,MemoryFiles, MOF,OfficeAutosave,OfficeDocumentCache,Prefetch,RDPCache,RDPLogs,RecentFileCache,Recycle, RecycleBin, RecycleBinContent,RecycleBinMetadata,RegistryHives,RegistryHivesSystem,RegistryHivesUser,ScheduledTasks,SDB, SignatureCatalog,SRUM,StartupInfo,Syscache,ThumbCache,USBDevicesLogs,WBEM,WER,WindowsFirewall, WindowsIndexSearch,WindowsNotifcationsDB,WindowsTimeline,XPRestorePoints –vss –zip TargetOutput –gui
- In the bottom right corner hit the Execute! Button.
- Screenshot below shows
gkape.exe during execution, you will also see a command window execute. Note: KAPE usually takes less than 20 minutes to complete on a workstation; if it is taking significantly longer there may be an issue.
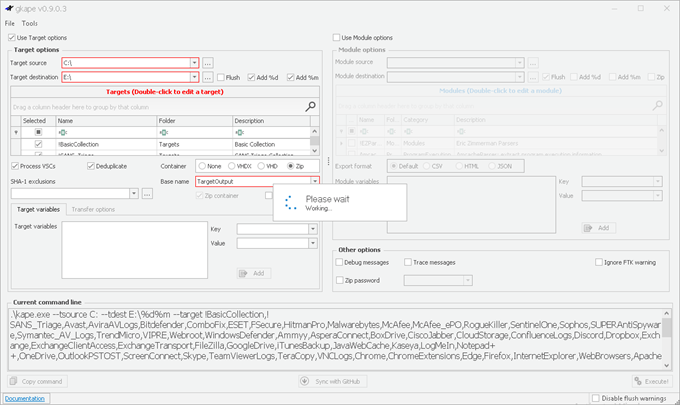
Figure 4: gkape.exe screenshot


Recent Comments