This article is contributed. See the original author and article here.
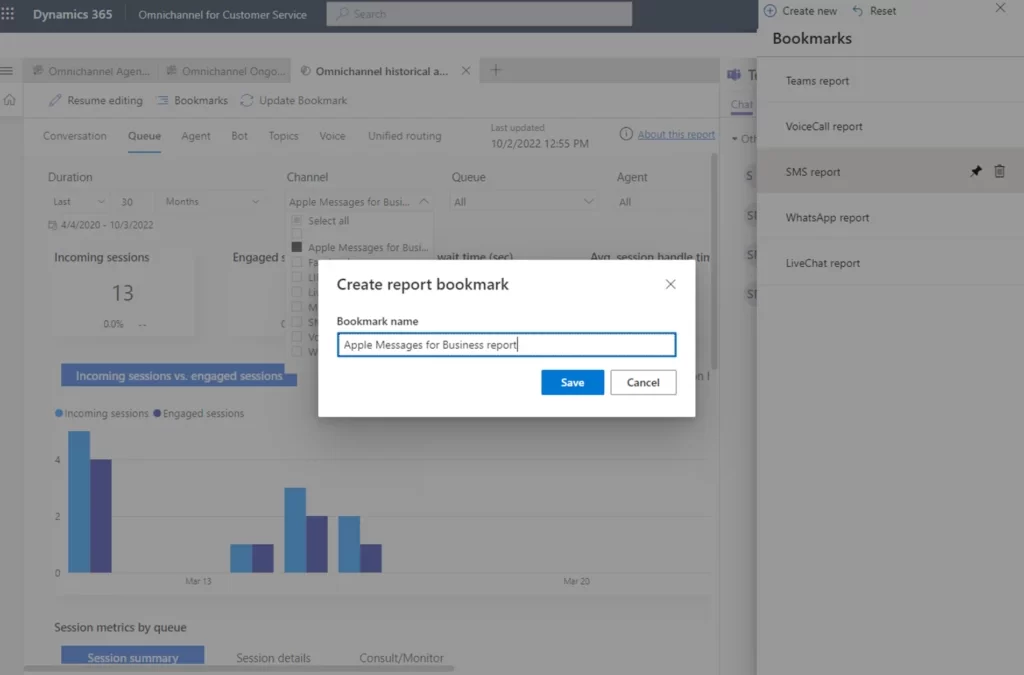
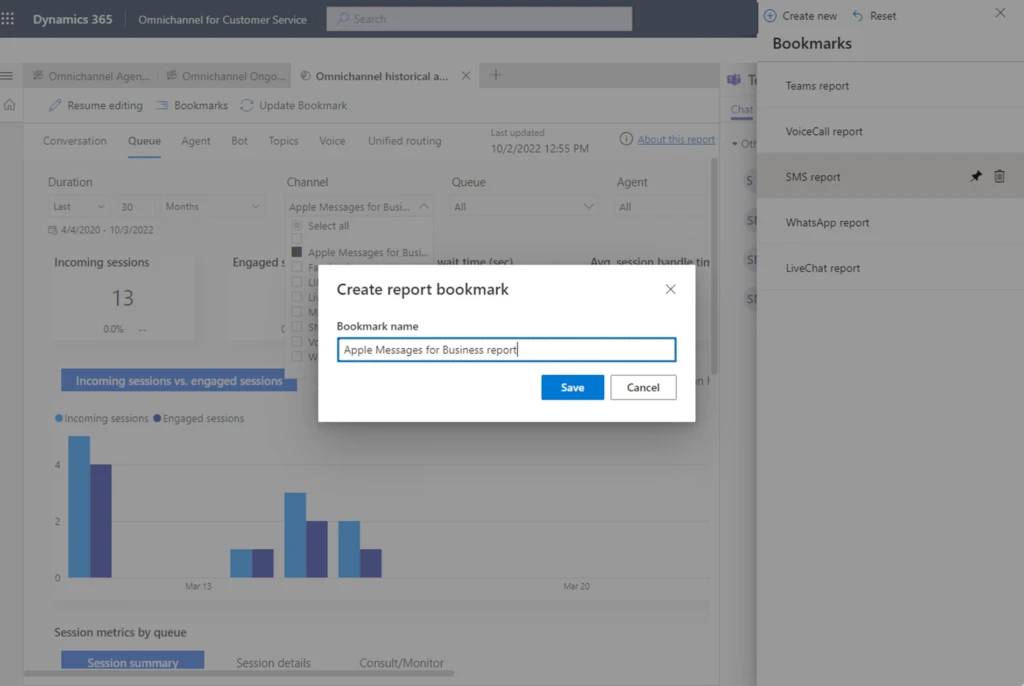
With Microsoft Dynamics 365 Customer Service 2022 release wave 2, we’ve supercharged the humble bookmark. Now you can save views as report bookmarks. Get back to your personalized, filtered reports faster than a speeding bullet, no cape needed.
Leap tall buildings in a single bound
You likely have at least one dashboard you visit regularly to monitor reports, charts, and other visual breakdowns of your Customer Service KPIs and insights. Chances are, you apply the same filters every time you visit.
Stop wasting all that effort. Adjust the report filters as you likejust onceand save the filtered view as a named bookmark.
The next time you want to check that same view, let your report bookmark do the heavy lifting. With a single bounder, click, the dashboard opens just the way you want it to.
Manage your report bookmarks just as easily
After you’ve created some report bookmarks, you won’t need abilities far beyond those of mortal men to keep them up to date. Need to change a filter value or add a whole new filter? No problem. Adjust the report filters to your liking, then select Bookmarks > Update Bookmark. If you don’t want to keep the change, one click resets everything back to the way it was. It’s that easy. If you no longer need a bookmark, delete it.
It’s just as easy to switch between your saved views using the new Bookmarks panel. You can even set a report bookmark as your personal default view every time you visit.
Bookmarks are available in historical analytics reports and knowledge analytics reports.
We plan to add more features, like bookmark groups, the ability to create a slideshow out of your bookmarks, and more. Stay tuned for the next exciting chapter!
This article is contributed. See the original author and article here.
Issue
A backend compatibility issue was encountered recently when the creation of a non-clustered index on a partitioned table of a hyper-scale Azure SQL DB failed with the error 666. The table in question had almost 3.5 Billion records and already had a clustered Index & 3 other non-clustered indexes present. You may receive an error as shown below:
Error
In addition to the error above- here is the error text Msg 666, Level 16, State 2, Line 25 The maximum system-generated unique value for a duplicate group was exceeded for the index with partition ID. Dropping and re-creating the index may resolve this; otherwise, use another clustering key.;
Workaround/Mitigation
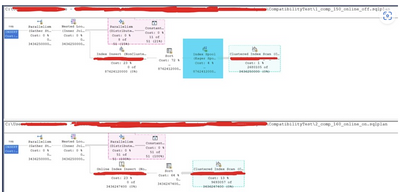
Customers hitting this problem often are recommended to try running the index creation process at compatibility level 160 (instead of the current compatibility level) as the compatibility level 150 or below might use a spool that is directly associated with uniqueifier identifiers that have a max limit of 2,147,483,648. If this limit is reached the index creation fails with the error mentioned above. (Please note that compatibility level could be just one of the factors that may govern the use of a spool) Here is the difference in explain plans when we use compatibility level 160 vs compatibility level 150 (In the current case), notice the index spool (Highlighted in blue)
For database tables having billions of rows even using compatibility level, 160 may not be sufficient as the index creation process may not encounter the error 666 mentioned above but can eventually time out if the create index transaction exceeds 1 TB in the generated transaction log.
The workaround for the same is to make index creation Online & resumable by specifying ONLINE=ON, RESUMABLE=ON. With this, the operation will use many smaller transactions, and it will be possible to resume it from the failure point if it fails for any other reason. Using resumable operations is one of the best practices with large tables. It should also be noted that the database scoped configuration ELEVATE_ONLINE is set to OFF during the index creation process (The default value of ELEVATE_ONLINE is OFF).
In some cases, if the customer has concerns about changing the compatibility level to 160 for the database, we can also recommend them to change the compatibility level of the DB to 160 just before the index creation process, then trigger the create Index statement and then change the compatibility level of the DB back to 150 (After verifying the Index creation process has started successfully).
Other issues related to similar error
Please note that resuming a failed index creation is a manual operation. You can do that by re-executing the original CREATE INDEX command, it will pick up from the point where it failed. Note that by default, paused resumable operations time out after 24 hours. You can control that using the PAUSED_RESUMABLE_INDEX_ABORT_DURATION_MINUTES database-scoped configuration.
It is worthwhile keeping in mind, that for some Big partitioned tables, the rate of progress of the index creation process could be slow if the table has fewer populated partitions. In the test case seen above, the table only had 2 populated partitions & the current plan was running with parallelism (DOP 8), allocating one thread per partition for a total of 8 (plus one coordinator). But there were only two partitions and since one of them is smaller, it had already been processed. So effectively this was running single-threaded now, reading data from the single remaining partition. The index creation process is usually faster if the data is less skewed in partitions in which case the process could even be made faster by adding MAXDOP=16 to the create index statement.
Monitoring the error
It is always recommended to monitor such index creation processes periodically to ensure they are progressing well and are not being blocked by any other processes. Here are some of the DMVs that can help monitoring such an index creation process:
It is always recommended to Check resource utilization in sys.dm_db_resource_stats a few minutes after starting to create the index. If anything (other than memory and log IO) is above 80%, you may want to increase cores even higher.
The progress of the Index creation can be tracked via sys.index_resumable_operations. A sample output looks like this:
More info on waits can be obtained by querying the DMV sys.dm_exec_session_wait_stats
The DMV sys.dm_exec_requests indicates if the create Index statement is blocked.
If we want to check on any wait types and blocking, the DMV sys.dm_os_waiting_tasks can be very helpful.
This article is contributed. See the original author and article here.
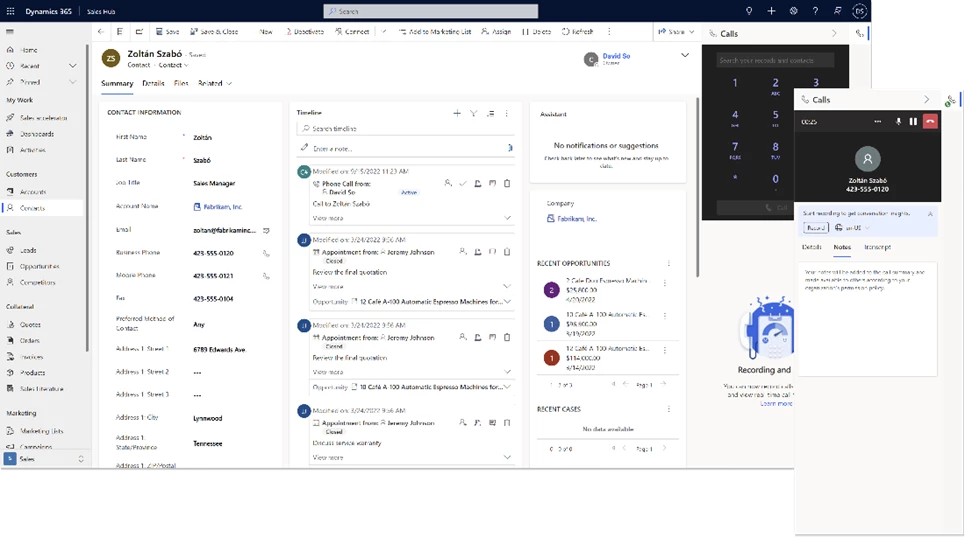
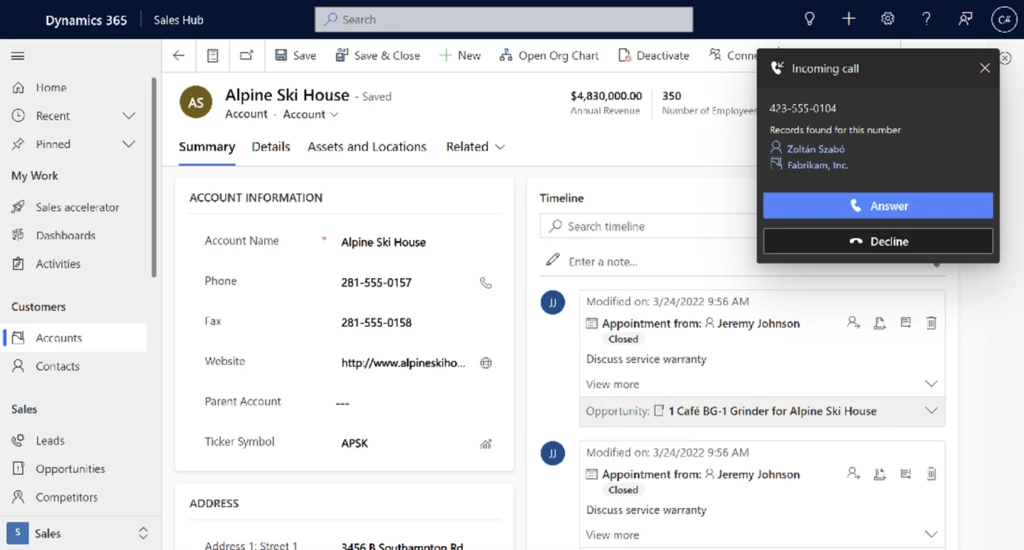
In today’s business environment, efficiency is paramount for seller productivity. Sales teams must achieve more with less. Sellers are looking for tools to reduce the time-stealing work that gets in the way of engaging with customers. They need to keep focused and move from one call to the next with ease. Now Microsoft Dynamics 365 Sales can help. We are delighted to announce the general availability of the embedded Teams phone dialer to support outbound and inbound calls. The new phone dialer even automates note capture, improving data quality and ensuring sellers don’t miss a follow-up action. Sellers can take this a step further with optional conversation intelligence to get AI-generated analytics, meeting summaries, and follow-up actions.
Seller productivity benefits from an embedded Teams dialer
Sellers build customer relationships by capturing every nugget of insight they can from a call. With the embedded Teams dialer for Dynamics 365, sellers can make phone calls using the dial pad in the side panel or by selecting a phone number anywhere in Dynamics 365.
Digital selling teams using the sales accelerator can view all their upcoming actions and suggestions. Now they can easily call prospects from the same screen. Results are automatically tracked and summarized in the timeline, reducing the need for manual data input after each call.
The embedded dialing feature uses your organization’s existing Teams telephony service, supporting either a Teams call plan, direct routing, or operator connect.
Get real-time assistance from conversation intelligence
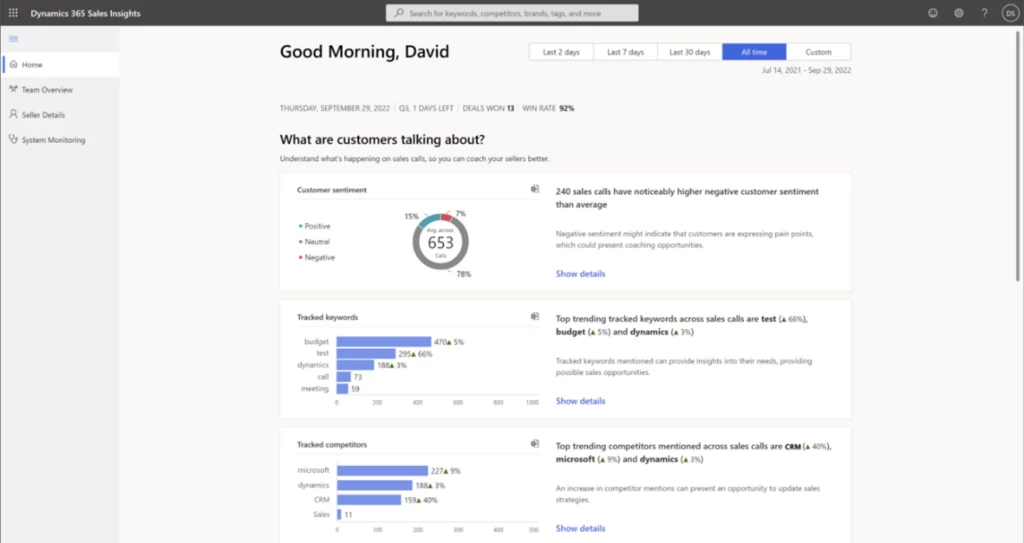
With Dynamics 365 AI-powered conversation intelligence, sellers get real-time assistance during sales calls. They can focus on building relationships and forget about forgetting. Sellers and managers can view aggregate statistics across the team. Reports highlight customer trends, help them understand the competition, and provide insights to coach sellers on best practices.
Let’s look at the capabilities and options available to help sellers stay focused on their best next actions.
Connect with customers right in Dynamics 365
With the Microsoft Teams dialer for Dynamics 365, sellers are more focused and efficient. Calling a customer is simple. Sellers can use any phone number recorded in Dynamics 365 to place a call. A built-in search tool makes finding contacts easier. Call activity is automatically logged with all essential details, sparing them tedious manual entry after the call and immediately increasing seller productivity.
The embedded Teams dialer also supports incoming calls. When sellers receive a call, the dialer searches Dynamics 365 for a potential matching record. Sellers can quickly open the relevant record, review the information, and be ready to answer the call with maximum context. If the search returns multiple matches, sellers can review the options in the incoming call notification and select the right one. If there are no matches, sellers can manually associate the contact with a new record that’s created automatically.
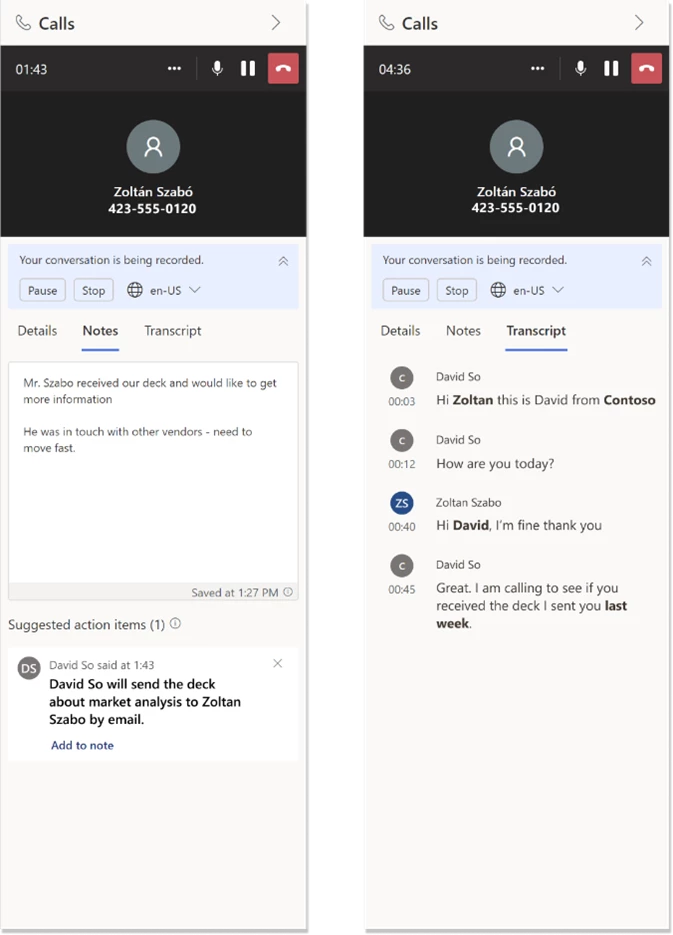
On top of improving seller preparation before the call, we are also supporting sellers during their sales calls by including a built-in notepad in the embedded dialer. Sellers can take notes during their calls without having to navigate elsewhere. The notes are automatically saved to the phone call’s activity timeline.
Easily enable calls to boost your seller productivity
Setting up the dialer experience is easy. Settings control how you enable it, for what types of calls, where, and for which security roles. Configure what works best for your business needs.
For example, you can enable the dialer for outbound calls only or both inbound and outbound depending on your teams’ work habits. You can enable it for inbound calls from external numbers only to help your sellers focus on customer engagement when they are in the Dynamics 365 environment. By default, the dialer displays in the Sales Hub, our default sales experience optimized for sellers. However, the dialer also supports custom apps. You decide which security roles you’d like to enable the experience for, making sure access is available only to those who need it.
Supercharge seller productivity with conversation intelligence
Seller productivity is at the core of a successful sales operation. With AI-powered conversation intelligence, sellers can focus on their conversations with customers, not on taking notes. With call recording enabled, conversation intelligence acts as an assistant right in the dialer’s side panel.
Sellers can view a real-time call transcription with business-critical insights such as key questions asked, detected action items, intelligent notes, and a call summary. The call summary provides a jump start to quality follow-up notes in the moment rather than piled up at the end of a week.
Managers have the tools they need to spot trends and better understand their customers and any patterns that need addressing.
Post-call analysis: Just a few seconds after a call ends, managers can access a rich call summary. The summary includes sentiment analysis, automatic call segmentation, call playback, and a transcript, where they can leave messages for their team members. Conversation intelligence also automatically tags calls, so managers know on which calls they should focus.
Better understand customers with advanced insights and interactions styles: Managers get a wide perspective of customers’ needs and interests in real time. They can use aggregated data to analyze market trends, rising competitors, and overall sentiment, and can dive into the details where needed.
Control conversation intelligence usage to support your sales team
We recognize that not all sales calls need to be treated equally. We made sure you can precisely control the usage of conversation intelligence capabilities across different locations and specialties.
For example, you can enable the capabilities based on security roles so that only the right people have access. Ensure compliance to any internal, external, or government policies by controlling:
whether calls are recorded
the way calls are recorded (manually or automatically)
who is being recorded (only sellers, or both sellers and customers)
where the analyzed data is stored
the data retention policy
You also control which languages are available for analysis. Decide the number of conversation intelligence processing hours available through the dialer experience to keep track of usage, spend, and adoption.
Help your sellers take back those lost hours of manual actions and keep on top of their growing customer relationships!
This article is contributed. See the original author and article here.
Notification
This report is provided “as is” for informational purposes only. The Department of Homeland Security (DHS) does not provide any warranties of any kind regarding any information contained herein. The DHS does not endorse any commercial product or service referenced in this bulletin or otherwise.
This document is marked TLP:CLEAR–Disclosure is not limited. Sources may use TLP:CLEAR when information carries minimal or no foreseeable risk of misuse, in accordance with applicable rules and procedures for public release. Subject to standard copyright rules, TLP:CLEAR information may be distributed without restriction. For more information on the Traffic Light Protocol (TLP), see http://www.cisa.gov/tlp.
Summary
Description
CISA received 3 Java Server Pages (JSP) webshells for analysis from an organization where cyber actors exploited vulnerabilities against Zimbra Collaboration Suite (ZCS). Four CVEs are currently being leveraged against ZCS: CVE-2022-24682, CVE-2022-27924, CVE-2022-27925 chained with CVE-2022-37042, and CVE-2022-30333. The files are server side code that allow clients to remotely send commands to be executed on the victim web server.
rule CISA_10401765_01 : webshell backdoor { meta: Author = “CISA Code & Media Analysis” Incident = “10401765” Date = “2022-09-02” Last_Modified = “20220916_2100” Actor = “n/a” Category = “Webshell Backdoor” Family = “n/a” Description = “Detects JSP webshell samples” MD5_1 = “91de296c801db00a24a2832b5e12d345” SHA256_1 = “bc5b1f588cd506a69c03a7980a363846fa474b78e6946fa90e58d735c65f2bb6” strings: $s1 = { 70 61 67 65 20 69 6d 70 6f 72 74 3d 22 6a 61 76 61 2e 69 6f 2e 2a 2c 20 6a 61 76 61 2e 75 74 69 6c 2e 2a 2c 20 6a 61 76 61 78 2e 78 6d 6c 2e 62 69 6e 64 2e 2a 2c 20 6a 61 76 61 2e 6e 65 74 2e 2a } $s2 = { 65 76 61 6c 28 77 69 6e 64 6f 77 2e 6c 6f 63 61 6c 53 74 6f 72 61 67 65 2e 65 6d 62 65 64 29 } $s3 = { 70 3d 52 75 6e 74 69 6d 65 2e 67 65 74 52 75 6e 74 69 6d 65 28 29 2e 65 78 65 63 28 67 29 } $s4 = { 69 3d 6e 65 77 20 44 61 74 61 49 6e 70 75 74 53 74 72 65 61 6d 28 70 2e 67 65 74 49 6e 70 75 74 53 74 72 65 61 6d 28 29 29 } $s5 = { 72 3d 6e 65 77 20 44 61 74 61 49 6e 70 75 74 53 74 72 65 61 6d 28 72 65 71 75 65 73 74 2e 67 65 74 49 6e 70 75 74 53 74 72 65 61 6d 28 29 29 } $s6 = { 6c 3d 72 2e 72 65 61 64 4c 69 6e 65 28 29 29 21 3d 6e 75 6c 6c 29 } $s7 = { 62 3d 64 2e 69 6e 64 65 78 4f 66 28 22 62 3d 22 29 } $s8 = { 6e 3d 64 2e 69 6e 64 65 78 4f 66 28 22 6e 3d 22 29 } $s9 = { 6d 3d 44 61 74 61 74 79 70 65 43 6f 6e 76 65 72 74 65 72 2e 70 61 72 73 65 42 61 73 65 36 34 42 69 6e 61 72 79 } $s10 = { 6f 75 74 2e 70 72 69 6e 74 28 22 3c 70 72 65 3e 22 29 } $s11 = { 73 3d 69 2e 72 65 61 64 4c 69 6e 65 28 29 29 21 3d 6e 75 6c 6c 29 } $s12 = { 66 3d 76 28 64 2e 73 75 62 73 74 72 69 6e 67 28 32 2c 6e 2d 31 29 29 2b 46 69 6c 65 2e 73 65 70 61 72 61 74 6f 72 2b 76 28 64 2e 73 75 62 73 74 72 69 6e 67 28 6e 2b 32 2c 62 2d 31 29 29 } $s13 = { 73 74 72 65 61 6d 3d 6e 65 77 20 46 69 6c 65 4f 75 74 70 75 74 53 74 72 65 61 6d 28 } $s14 = { 78 3d 55 52 4c 44 65 63 6f 64 65 72 2e 64 65 63 6f 64 65 28 77 2c 22 55 54 46 2d 38 22 29 } $s15 = { 6f 3d 22 55 70 6c 6f 61 64 65 64 3a 20 22 2b 66 } condition: filesize < 5KB and all of them }
ssdeep Matches
No matches found.
Description
This file is a JSP webshell that also allows file upload to the victim web server. If the client request body contains “c=”, the script reads the contents of the body starting from the third character and executes it as a command in a separate process. The output from that command is sent back to the client.
If the client request body does not contain “c=” and is not an empty string, the script will attempt to write a file on the victim web server. The script assumes that the request body is in the following format and parses its contents accordingly: “{file directory} n={filename} b={data encoded in base64}”. The script decodes the base64 encoded data, and writes it to the location specified by the file directory and filename values obtained from the client request body. If the file upload was successful, confirmation is sent back to the client.
Screenshots
Figure 1 – The snippet of code that parses the client request body for the command to execute on the victim web server.
Figure 2 – The snippet of code that parses the contents of the client request body to upload a file onto the victim web server.
This file is a JSP webshell. It reads the value of the parameter named “raw” in the client request, which ends up being the shell command that gets run. Based on the file separator character, the script detects whether the operating system (OS) is Windows or Linux. If the value of “raw” is not null and the OS is Windows, it starts a new process with the command “cmd /C {value of raw}”. If the value of “raw” is not null and the OS is Linux, it starts a new process with the command “/bin/bash -c {value of raw}”. Since the client sends in the value of “raw”, it controls what gets run in the shell. Lastly, the output of the command gets printed on the webpage for the client to see.
Screenshots
Figure 3 – A snippet of code that takes the data the client sent and uses ProcessBuilder to execute the data as shell commands.
This file is a JSP webshell. When initially loaded, there will be a text box and a button named “Send”. The client can type anything in the text box. Clicking the “Send” button will submit the form and send the request to the web server. The string in the text box is sent over in the request parameter “cmd”. If the “cmd” parameter is not null when the web server receives the request, the script will detect the OS type. If the OS is Windows, it starts a new process with the command “cmd /C {value of cmd}”. If the OS is Linux, it starts a new process with the command “{value of cmd}”. Since the client determines the value of “cmd”, it controls what gets run in the shell. Lastly, the command that ran and the output of that command gets printed on the webpage for the client to see.
Screenshots
Figure 4 – This is what the resulting webpage looks like when the “cmd” parameter in the client request was “echo hello”.
Recommendations
CISA recommends that users and administrators consider using the following best practices to strengthen the security posture of their organization’s systems. Any configuration changes should be reviewed by system owners and administrators prior to implementation to avoid unwanted impacts.
Maintain up-to-date antivirus signatures and engines.
Keep operating system patches up-to-date.
Disable File and Printer sharing services. If these services are required, use strong passwords or Active Directory authentication.
Restrict users’ ability (permissions) to install and run unwanted software applications. Do not add users to the local administrators group unless required.
Enforce a strong password policy and implement regular password changes.
Exercise caution when opening e-mail attachments even if the attachment is expected and the sender appears to be known.
Enable a personal firewall on agency workstations, configured to deny unsolicited connection requests.
Disable unnecessary services on agency workstations and servers.
Scan for and remove suspicious e-mail attachments; ensure the scanned attachment is its “true file type” (i.e., the extension matches the file header).
Monitor users’ web browsing habits; restrict access to sites with unfavorable content.
Exercise caution when using removable media (e.g., USB thumb drives, external drives, CDs, etc.).
Scan all software downloaded from the Internet prior to executing.
Maintain situational awareness of the latest threats and implement appropriate Access Control Lists (ACLs).
Additional information on malware incident prevention and handling can be found in National Institute of Standards and Technology (NIST) Special Publication 800-83, “Guide to Malware Incident Prevention & Handling for Desktops and Laptops”.
Contact Information
CISA continuously strives to improve its products and services. You can help by answering a very short series of questions about this product at the following URL: https://us-cert.cisa.gov/forms/feedback/
Document FAQ
What is a MIFR? A Malware Initial Findings Report (MIFR) is intended to provide organizations with malware analysis in a timely manner. In most instances this report will provide initial indicators for computer and network defense. To request additional analysis, please contact CISA and provide information regarding the level of desired analysis.
What is a MAR? A Malware Analysis Report (MAR) is intended to provide organizations with more detailed malware analysis acquired via manual reverse engineering. To request additional analysis, please contact CISA and provide information regarding the level of desired analysis.
Can I edit this document? This document is not to be edited in any way by recipients. All comments or questions related to this document should be directed to the CISA at 1-888-282-0870 or CISA Service Desk.
Can I submit malware to CISA? Malware samples can be submitted via three methods:
CISA encourages you to report any suspicious activity, including cybersecurity incidents, possible malicious code, software vulnerabilities, and phishing-related scams. Reporting forms can be found on CISA’s homepage at www.cisa.gov.
This article is contributed. See the original author and article here.
In May 2020, we announced plans to have more granular privacy controls within Microsoft products. This is part of Microsoft’s continued commitment to providing products, information and controls that lets you choose how your data is collected and used. After this announcement, several controls have been released. Now we would like to announce the release of peopleInsights admin controls.
The hundreds of millions of users of Microsoft 365 cloud services form part of the core of Microsoft Graph. The users’ data is carefully managed, protected, and with proper authorization, made available by Microsoft Graph services to drive productivity and creativity in businesses.
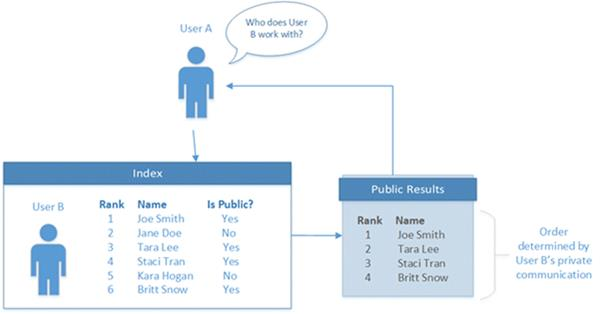
As ubiquitous the user’s data is in Microsoft Graph, data derived from the user’s interactions is particularly interesting. It provides intelligent insights that can be used to build smarter apps. The people API returns people ordered by relevance to a user, based on that user’s contacts, organization directory, and recent public communications on email.
For a person to be included as relevant to or “working with” a profile owner in Office Delve, to be displayed in the owner’s profile card, or to be returned by the people API, there must be a public relationship between the person and the profile owner. The following illustration shows a User A, an index of relationships with other users (User B), and a public profile showing a subset of user relationships.
We are pleased to announce new privacy controls which provide you with the ability to configure the visibility of the list of relevant people, also called Working-with or peopleInsights. The controls will give administrators the ability to disable the controls for all users by using “isEnabledInOrganization” parameter in Microsoft Graph. Alternatively, they can disable the feature on admin center by checking the “Allow your organization to use People Insights” checkbox shown below.
If an organization only needs to disable the feature for a group of people, they have the option of using the “disableForGroup” parameter. They will need to provide the id of an Azure AD group. The group should have all affected users. Note, only one group can be disabled. The alternative is using admin center page and adding the name of the group to be disabled for in the text field as shown above. The controls above respect the existing Office Delve settings already in place.
We are working on releasing user level controls as well in the future to ensure that at user level people have control over their own privacy.
This article is contributed. See the original author and article here.
Today CISA published its guide on Stakeholder-Specific Vulnerability Categorization (SSVC), a vulnerability management methodology that assesses vulnerabilities and prioritizes remediation efforts based on exploitation status, impacts to safety, and prevalence of the affected product in a singular system.
As stated in Executive Assistant Director (EAD) Eric Goldstein’s blog post Transforming the Vulnerability Management Landscape, implementing a methodology, such as SSVC, is a critical step to advancing the vulnerability management ecosystem. Additionally, the blog details advances—including
CISA’s Known Exploited Vulnerabilities (KEV) catalog, Common Security Advisory Framework (CSAF) machine-readable security advisories, and the Vulnerability Exploitability eXchange (VEX)—that, used in conjunction with SSVC, will reduce the window cyber threat actors have to exploit networks.
CISA encourages organizations to read EAD Goldstein’s blog post and to use the following resources on the SSVC webpage to strengthen their vulnerability management processes:
CISA’s SSVC decision tree
SSVC Guide on using SSVC and the SSVC decision tree
SSVC Calculator for prioritizing vulnerability responses in an organization’s respective environment
This article is contributed. See the original author and article here.
Cisco has released security updates to address vulnerabilities in multiple Cisco products. A remote attacker could exploit some of these vulnerabilities to take control of an affected system. For updates addressing lower severity vulnerabilities, see the Cisco Security Advisories page.
CISA encourages users and administrators to review the following advisories and apply the necessary updates:
• Cisco Adaptive Security Appliance Software and Firepower Threat Defense Software SSL/TLS Client Denial of Service Vulnerability cisco-sa-ssl-client-dos-cCrQPkA • Cisco Secure Firewall 3100 Series Secure Boot Bypass Vulnerability cisco-sa-fw3100-secure-boot-5M8mUh26 • Cisco Firepower Threat Defense Software Generic Routing Encapsulation Denial of Service Vulnerability cisco-sa-ftd-gre-dos-hmedHQPM • Cisco FirePOWER Software for ASA FirePOWER Module, Firepower Management Center Software, and NGIPS Software SNMP Default Credential Vulnerability cisco-sa-fmcsfr-snmp-access-6gqgtJ4S • Cisco Firepower Management Center and Firepower Threat Defense Software SSH Denial of Service Vulnerability cisco-sa-fmc-dos-OwEunWJN • Cisco Adaptive Security Appliance Software and Firepower Threat Defense Software SNMP Denial of Service Vulnerability cisco-sa-asaftd-snmp-dos-qsqBNM6x • Cisco Adaptive Security Appliance Software and Firepower Threat Defense Software Dynamic Access Policies Denial of Service Vulnerability cisco-sa-asa-ftd-dap-dos-GhYZBxDU
This article is contributed. See the original author and article here.
CISA and the Multi-State Information Sharing & Analysis Center (MS-ISAC) have updated joint Cybersecurity Advisory AA22-228A: Threat Actors Exploiting Multiple CVEs Against Zimbra Collaboration Suite, originally released August 16, 2022. The advisory has been updated to include an additional Malware Analysis Report containing new indicators of compromise.
CISA encourages organizations to review the latest update to AA22-228A and apply the recommended mitigations.


Recent Comments