This article is contributed. See the original author and article here.
About Me

My name is Chak Koppula https://ckoppula199.github.io/ and I’m a 3rd year Computer Science student at University College London and have been working alongside Microsoft’s Project 15 team to help in creating a system to reduce the poaching of elephants.
Project Aims and Goals
The overall aim of the project is to create a system that utilises the Project 15 platform to identify and track the movement of elephants. The African elephant population has reduced by 20% in the past decade due to poaching meaning keeping track of them has become vital in preventing their numbers from further decreasing.
To help in the development of this system I made three tools:
- A short script that takes videos of surveillance footage from Azure cloud storage and passes them to Azure Video Indexer to obtain quick insights into a video.
- A camera trap simulator to make the development and prototyping of solutions using camera traps easier and quicker
A set of Machine Learning models to identify elephants from an image. The models vary from image classification to object detection with some made using TensorFlow and other using Azure Custom Vision
Source Code
ckoppula199/UCL-Microsoft-IXN-Final-Year-Project (github.com)
Video Indexer Analysis Script
The following Python script that takes videos of surveillance footage from Azure cloud storage and passes them to Azure Video Indexer to obtain quick insights into a video.
import requests
import os
import io
import json
import time

from azure.storage.blob import (
    ContentSettings,
    BlobBlock,
    BlockListType,
    BlockBlobService
)


# Load details from config file
with open('config.json', 'r') as config_file:
        config = json.load(config_file)

storage_account_name = config["storage_account_name"]
storage_account_key = config["storage_account_key"]
storage_container_name = config["storage_container_name"]

video_indexer_account_id = config["video_indexer_account_id"]
video_indexer_api_key = config["video_indexer_api_key"]
video_indexer_api_region = config["video_indexer_api_region"]

file_name = config["file_name"]

confidence_threshold = config["confidence_threshold"]

print('Blob Storage: Account: {}, Container: {}.'.format(storage_account_name,storage_container_name))

# Get File content from blob
block_blob_service = BlockBlobService(account_name=storage_account_name, account_key=storage_account_key)
audio_blob = block_blob_service.get_blob_to_bytes(storage_container_name, file_name)
audio_file = io.BytesIO(audio_blob.content).read()

print('Blob Storage: Blob {} loaded.'.format(file_name))

# Authorize against Video Indexer API
auth_uri = 'https://api.videoindexer.ai/auth/{}/Accounts/{}/AccessToken'.format(video_indexer_api_region,video_indexer_account_id)
auth_params = {'allowEdit':'true'}
auth_header = {'Ocp-Apim-Subscription-Key': video_indexer_api_key}
auth_token = requests.get(auth_uri,headers=auth_header,params=auth_params).text.replace('"','')

print('Video Indexer API: Authorization Complete.')
print('Video Indexer API: Uploading file: ',file_name)

# Upload Video to Video Indexer API
upload_uri = 'https://api.videoindexer.ai/{}/Accounts/{}/Videos'.format(video_indexer_api_region,video_indexer_account_id)
upload_header = {'Content-Type': 'multipart/form-data'}
upload_params = {
    'name':file_name,
    'accessToken':auth_token,
    'streamingPreset':'Default',
    'fileName':file_name,
    'description': '#testfile',
    'privacy': 'Private',
    'indexingPreset': 'Default',
    'sendSuccessEmail': 'False'}

files= {'file': (file_name, audio_file)}
r = requests.post(upload_uri,params=upload_params, files=files)
response_body = r.json()

print('Video Indexer API: Upload Completed.')
print('Video Indexer API: File Id: {}.'.format(response_body.get('id')))
video_id = response_body.get('id')

# Check if video is done processing
video_index_uri = 'https://api.videoindexer.ai/{}/Accounts/{}/Videos/{}/Index'.format(video_indexer_api_region, video_indexer_account_id, video_id)
video_index_params = {
    'accessToken': auth_token,
    'reTranslate': 'False',
    'includeStreamingUrls': 'True'
}
r = requests.get(video_index_uri, params=video_index_params)
response_body = r.json()

while response_body.get('state') != 'Processed':
    time.sleep(10)
    r = requests.get(video_index_uri, params=video_index_params)
    response_body = r.json()
    print(response_body.get('state'))

print("Done")

output_response = []
item_index = 1
for item in response_body.get('videos')[0]['insights']['labels']:
    reformatted_item = {}
    instances = []
    reformatted_item['id'] = item_index
    reformatted_item['label'] = item['name']
    for instance in item['instances']:
        reformatted_instance = {}
        if instance['confidence'] > confidence_threshold:
            reformatted_instance['confidence'] = instance['confidence']
            reformatted_instance['start'] = instance['start']
            reformatted_instance['end'] = instance['end']
            instances.append(reformatted_instance)
    if len(instances) > 0:
        item_index += 1
        reformatted_item['instances'] = instances
        output_response.append(reformatted_item)

#Print response given by the script
print(json.dumps(output_response, indent=4))
Demo
Camera Trap Simulator
The camera trap simulator allows users to simulate a real camera trap on their own computers and can even be run on devices such as a Raspberry Pi. It takes in a video feed and then uses a detection method over that video feed. If the detection method is triggered then it will send a message to Azure IoT hub. Once the data is in the cloud the user can test out their cloud paths and solutions as if the data had come from a real camera trap.
The camera trap can operate over both a live video feed such as a webcam or it can be used with a pre-recorded video feed. A video of the intended deployment area can be provided to the simulator to make the simulation more realistic, but for projects who don’t have access to videos of their deployment area, a live video feed may be fine for testing and development purposes.
The camera trap can use motion based detection or can utilise a Machine Learning model to more accurately identify points of interest within a video frame. Use of an ML model will reduce the number of false positives the systems gives and will be a more accurate.

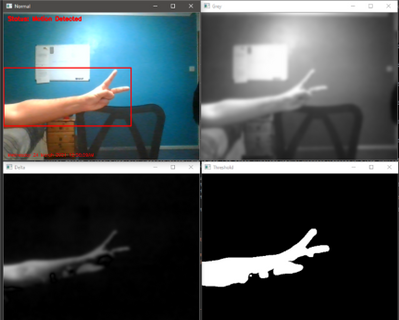
Above is an image showing the motion detection software running. It uses a method of motion detection known as foreground detection. The top left is the normal video feed, the top right is a greyscaled and blurred version of the video feed, the bottom left is the difference between the current frame and the reference frame and the bottom right is the final result showing any moving object in white.simulation but if an ML model isn’t available then motion detection can be used for testing and development purposes.
Demo
Machine Learning Models
When creating the models there was difficulty in collecting a suitable dataset. Initially the plan was to use our own devices in the deployment area to create our own dataset of images to use for training purposes but due to time constraints and various blockers I ended up having to utilise a public dataset called Animals-10 from Kaggle which contained images of elephants among other animals.
I then created a set of image classification models using Python with TensorFlow and also created a set of object detection models using Azure Custom Vision services.
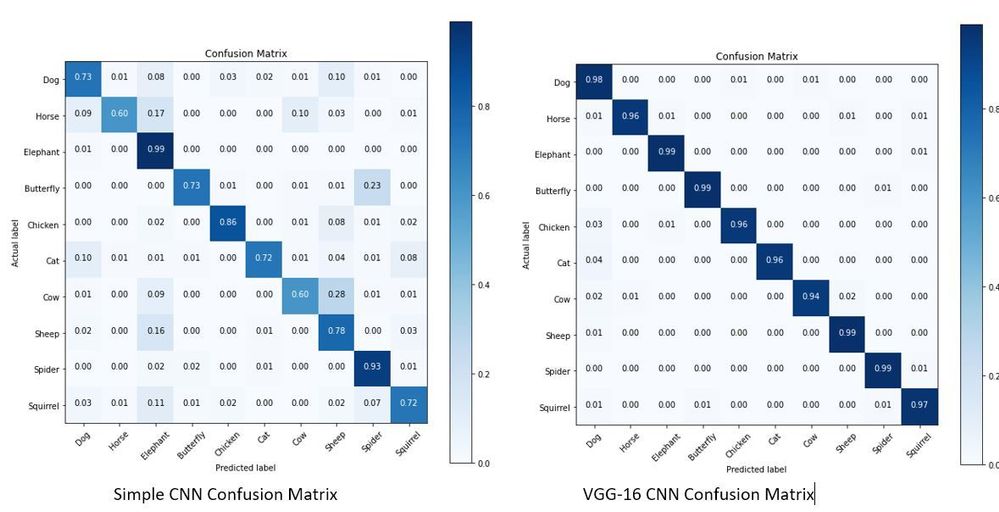
The first image classification model that was made used a very simple Convolutional Neural Network and achieved an accuracy of 77% on a test set. The second image classification model used a CNN architecture known as VGG-16 which performed much better with an accuracy of 97% on the test set. The confusion matrices for these two models can be seen below.

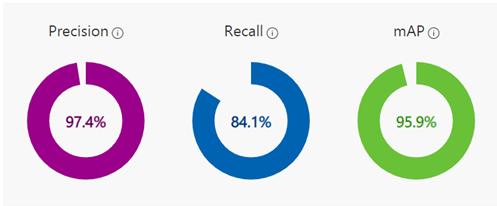
The object detection models made using Azure Custom Vision also achieved quite high results as shown below.

The object detection model was only trained using around 130 images of elephants and managed to achieve the above metrics. More images weren’t used since when providing images for the object detection models to train on, you have to tag every occurrence of every object you want to model to identify which can be quite time consuming.

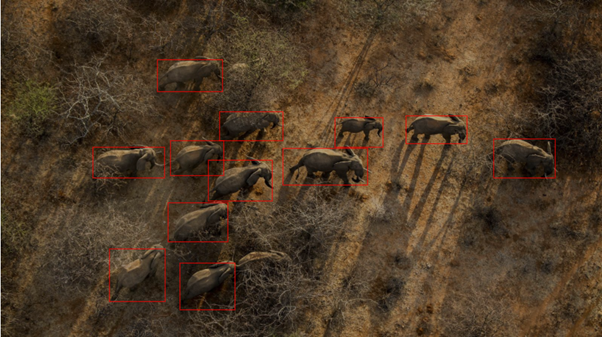
The object detection model ended up being able to identify most elephants in an image, struggling on in cases where elephants were obscured. In the above image you can see in the bottom middle of the image there is a single elephant hidden by bush the model didn’t quite manage to identify.
The conclusion that was reached was that for our use case object detection should be used. This is due to it not only saying if an image is of an elephant, but it providing the additional information of how many elephants are in the image and where in the image they are. This extra information that can’t be provided by image classification allows for more uses case to be fulfilled by the system later on. Azure custom vision was also chosen as the method to use as while TensorFlow is an incredible library allowing users to specify the exact architecture and hyperparameters that they want to use, it can take a long time to find the optimal setup and also requires more data to train on to achieve the same level of results produced by Azure Custom Vision. The ease of use and its ability to seamlessly work with other Azure services being used in the Project 15 platform make Azure Custom Vision the best choice for this project.
Demo
Summary
Overall, the process of learning about cloud services and machine learning tools has been extremely enjoyable and getting the opportunity to apply what I learnt to a real world project like this has been an incredible experience. So if your interested in building a project to support Project 15 see Project 15 Open Platform for Conservation and Ecological Sustainability Solutions or if your new to this see the amazing resources to help get your started at Microsoft Learn.
Brought to you by Dr. Ware, Microsoft Office 365 Silver Partner, Charleston SC.


Recent Comments