by Scott Muniz | Jul 22, 2020 | Alerts, Microsoft, Technology, Uncategorized
This article is contributed. See the original author and article here.
`Invoke-AzRestMethod` is a new Azure PowerShell cmdlet. It allows you to make custom HTTP requests to the Azure Resource Management (ARM) endpoint using the Az context.
This cmdlet is useful when you want to manage Azure services for features that aren’t yet available in the Az PowerShell modules.
How to use Invoke-AzRestMethod?
As an example, you can allow access to Azure Container Registry (ACR) only for specific networks or deny public access. This feature isn’t available yet in the Az.ContainerRegistry PowerShell module. However, it can be managed in the interim with `Invoke-AzRestMethod`.
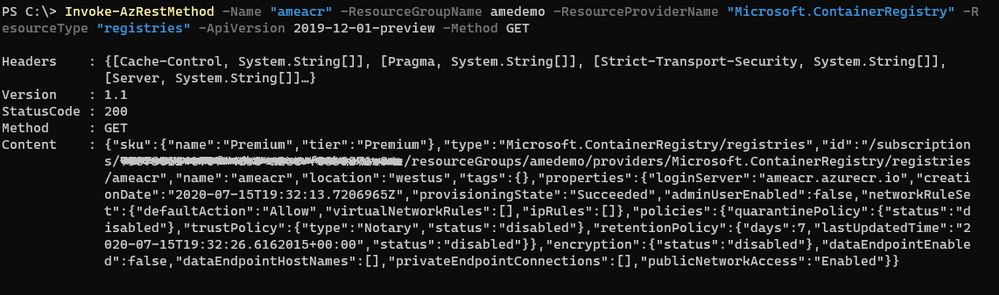
We want to disable public access to the existing ACR named `ameacr` in the `amedemo` resource group. Let’s start by understanding how the cmdlet works with a GET operation:
Invoke-AzRestMethod
-ResourceGroupName “amedemo”
-ResourceProviderName "Microsoft.ContainerRegistry"
-ResourceType “registries”
-Name “ameacr”
-ApiVersion 2019-12-01-preview
-Method GET

To allow maximum flexibility, most of the parameters are optional. However, when you’re managing resources within a resource group, you’ll most likely need to provide either the full ID to the resource or parameters like resource group, resource provider and resource type.
The ‘ResourceType‘ and ‘Name‘ parameters can take multiple values when targeting resources that require more than one name. For example, to manipulate a saved search in a Log Analytics workspace, the parameters look like the following:
‘-ResourceType @(‘workspaces’, ‘savedsearches’) -Name @(‘ame-la’, ‘ame-search’)’
Using a mapping based on the position in the array, the cmdlet constructs the following resource Id:‘/workspaces/yabo-test-la/savedsearches/ame-search’.
The ‘APIVersion’ parameter allows you to use a specific API, including preview ones as it is the case here. The supported API versions for Azure Resource providers can be found in the following repository: https://github.com/Azure/azure-rest-api-specs
You can find the definition for the 2019-12-01-preview version of ACR at the following location: https://github.com/Azure/azure-rest-api-specs/tree/master/specification/containerregistry/resource-manager/Microsoft.ContainerRegistry/preview
To disable the public network access, we need to make a PATCH call to the API that changes the value of the “publicNetwokAccess” parameter:
Invoke-AzRestMethod
  -ResourceGroupName amedemo
  -Name "ameacr"
  -ResourceProviderName "Microsoft.ContainerRegistry"
  -ResourceType "registries"
  -ApiVersion 2019-12-01-preview
  -Payload '{ "properties": {
     "publicNetworkAccess": "Disabled"
     } }'
  -Method PATCH
The Payload property is a JSON string that shows the path of the property to be modified.

All the parameters for this API are described in the rest-api-spec file associated with this API. More specifically, the definition for the publicNetworkAccess parameter can be found in the following JSON file: https://github.com/Azure/azure-rest-api-specs/blob/2a9da9a79d0a7b74089567ec4f0289f3e0f31bec/specification/containerregistry/resource-manager/Microsoft.ContainerRegistry/preview/2019-12-01-preview/containerregistry.json
To only allow access to the registry from a specific IP address, the payload needs to be adjusted as follows:
Invoke-AzRestMethod
  -ResourceGroupName amedemo
  -Name "ameacr"
  -ResourceProviderName "Microsoft.ContainerRegistry"
  -ResourceType "registries"
  -ApiVersion 2019-12-01-preview
  -Payload '{ "properties": {
      "networkRuleSet": {
      "defaultAction": "Deny",
      "ipRules": [ {
         "action": "Allow",
         "value": "24.22.123.123"
         } ]
      }
  } }'
  -Method PATCH

How does this compare to the (New|Get|Set)-AzResource?
The *-AzResource cmdlets allow you to customize the REST API call to Azure by specifying the resource type, the API version, and the properties to be updated. However, the properties need to be a PSObject which can easily become complicated to create.
With `Invoke-AzRestMethod`, we wanted to offer a simpler way to manage Azure resources. In the previous example, you can see that the payload is a JSON string. You don’t have to struggle with the conversion between JSON and PSObjects.
If you’re already familiar with the *-AzResource cmdlets, you can continue using them. We have no plans to stop supporting them. With `Invoke-AzRestMethod`, we have added a new cmdlet to the family.
Feedback
As always, we value your feedback and welcome issues and contributions on our GitHub repo: https://github.com/Azure/azure-powershell
We’re also conducting a survey until August 15th about the PowerShell modules for Azure. Please take some time to provide your feedback on how we’re doing, it shapes our strategy:
https://microsoft.qualtrics.com/jfe/form/SV_bK37YHU5FBZepcF?Q_CHL=blog
by Scott Muniz | Jul 22, 2020 | Alerts, Microsoft, Technology, Uncategorized
This article is contributed. See the original author and article here.
Managed identity is a feature that enables you to authenticate to Azure resources securely without needing to insert credentials into your code. Managed identities are automatically managed by Azure and enable you to authenticate to services that support Azure Active Directory authentication, like Azure Database for PostgreSQL – Single Server.
Today we’ll create a managed identity for an Azure Function app and connect to an Azure Database for PostgreSQL server. (We also have a tutorial for connecting from a VM with managed identity).
In this blog, we’ll be going through the following steps:
- Step 1: Configure Azure AD Authentication for PostgreSQL
- Step 2: Enable managed identity for the Function app
- Step 3: Use the managed identity ID to create a user in Postgres
- Step 4: Write code for function app
- Step 5: Test the function app and connect to Postgres
Step 1: Configure Azure AD Authentication for Azure Database for PostgreSQL – Single Server
First, we need to make sure that our Azure Database for PostgreSQL server is configured for Azure Active Directory authentication. The Use Azure Active Directory for authentication with PostgreSQL walkthrough shows you how to do so.
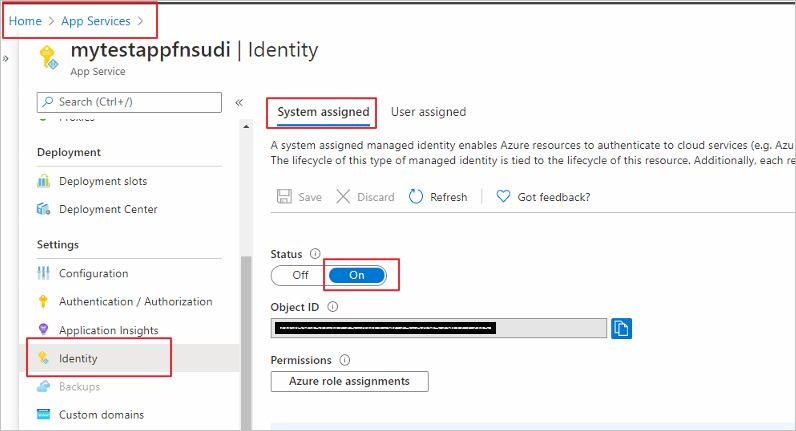
Step 2: Enable a managed identity for the Function app
Next is to enable a system-assigned managed identify for the Azure Function app. A system-assigned managed identity is an Active Directory identity that’s created by Azure for a specific resource.
Sign in to the Azure portal and select the Function app you’d like to use. Select Identity under Settings. In the System assigned tab, set Status to On.

Step 3: Use the managed identity ID to create a user in Postgres
Now we will create a Postgres user for your managed identity. For this we need to get the application’s ID. Search and open Azure Active Directory in the Azure portal. Select Enterprise Applications.

Select your Function app and copy its Application ID.

Now, connect to your Azure Database for PostgreSQL server using your Azure AD administrator user (from Step 1). Run the following in Postgres, substituting in your application ID:
SET aad_validate_oids_in_tenant = off;
CREATE ROLE myuser WITH LOGIN PASSWORD '<APPLICATION_ID>' IN ROLE azure_ad_user;
The managed identity now has access when authenticating to Postgres with the username myuser.
Step 4: Write code for the Function app
Next let’s see how to get an access token using the Function app’s system-managed identity. We’ll use that token to call Azure Database for PostgreSQL. Azure Database for PostgreSQL – Single Server natively supports Azure AD authentication, so it can directly accept access tokens obtained using managed identities for Azure resources. When creating a connection to PostgreSQL, you pass the access token in the password field.
Here’s a .NET code example of opening a connection to PostgreSQL using an access token. This code must run on the Function app to access the system-assigned managed identity’s endpoint. .NET Framework 4.6 or higher or .NET Core 2.2 or higher is required to use the access token method.
Replace the values of Servername, User, and Database to match yours.
using System;
using System.IO;
using System.Threading.Tasks;
using Microsoft.AspNetCore.Mvc;
using Microsoft.Azure.WebJobs;
using Microsoft.Azure.WebJobs.Extensions.Http;
using Microsoft.AspNetCore.Http;
using Microsoft.Extensions.Logging;
using Newtonsoft.Json;
using Npgsql;
using Microsoft.Azure.Services.AppAuthentication;
namespace myfunctionappsudi
{
    public static class Function1
    {
        /*Declare Database Details*/
        private static string Host = "<Servername>.postgres.database.azure.com";/*Database FQDN*/
        private static string User = "myuser@<Servername>"; /*User Created with managed identity*/
        private static string DBname = "<DB Name>";/*Database Name*/
        private static string Port = "5432";/*Database Port*/
        static string responsemsg;
        [FunctionName("Function1")]
        public static async Task<IActionResult> Run(
            [HttpTrigger(AuthorizationLevel.Function, "get", "post", Route = null)] HttpRequest req,
            ILogger log)
        {
            log.LogInformation("C# HTTP trigger function processed a request.");
            /*Gettting the Token*/
            var sqlServerTokenProvider = new AzureServiceTokenProvider();
            var SqlAccessToken = await sqlServerTokenProvider.GetAccessTokenAsync("https://ossrdbms-aad.database.windows.net");
            //log.LogInformation (SqlAccessToken); /*For troubleshooting in case you need to print the token */
            log.LogInformation("Connecting to database.");
            string connString = String.Format(
                    "Server={0}; User Id={1}; Database={2}; Port={3}; Password={4};SSLMode=Prefer",
                    Host,
                    User,
                    DBname,
                    Port,
                    SqlAccessToken);
            /*Connecting to PostgreSQL*/
            using (var conn = new NpgsqlConnection(connString))
            {
                log.LogInformation("Opening connection");
                log.LogInformation(connString);
                conn.Open();
                log.LogInformation("Opening connection using access token....");
                /*Query the Database */
                    using (var command = new NpgsqlCommand("SELECT version()", conn))
                    {

                        var reader = command.ExecuteReader();
                        while (reader.Read())
                        {
                            log.LogInformation("nConnected!nnPostgres version: {0}", reader.GetString(0));
                          responsemsg = reader.GetString(0);
                        }
                    }
              }
             responsemsg = "The version of the Azure Database for PostgreSQL is : " + responsemsg;
            return new OkObjectResult(responsemsg);
        }
    }
}
Step 5: Test the Function app and connect to Postgres
Once you publish the Function app, you can test it. In the Azure portal, go to the Function app you published and select Functions.

Once the Function is selected you can choose Code+Test and then Test/Run

Select Run in the pop-up window.

You can see the function’s output in terminal for App Insights.

We can see that the function connected to the Postgres database with managed identity and could successfully run the query.
You no longer have to keep credentials in code
Managed identity sets you free from storing credentials in code or source control. If you’re interested in how to use managed identity to connect from an Azure VM to Azure Database for PostgreSQL – Single Server, check out our walkthrough.
by Scott Muniz | Jul 22, 2020 | Alerts, Microsoft, Technology, Uncategorized
This article is contributed. See the original author and article here.
This month we released a bi-weekly YouTube show dedicated to Azure Security Center. The guest for the first episode was Tal Rosler, from our Azure Security Center Engineering Team. Check it out the first episode where Tal talks about Threat Protection in Azure Security Center, including the new Alert Suppression feature:
The second episode, released today was about Secure Score and our guest was Miri Peer Landau. Make sure to watch this episode and see some updates in the Secure Score, including the new Secure Score PowerBI dashboard:
Make sure to subscribe to the new Microsoft Security Channel, and follow the show at https://aka.ms/ascinthefield
by Scott Muniz | Jul 22, 2020 | Alerts, Microsoft, Technology, Uncategorized
This article is contributed. See the original author and article here.
INTRODUCTION
While using Azure DevOps Continuous Integration and Continuous Delivery (CICD) pipelines, most of the documentation and articles show how to use Office 365 Command Line Interface (CLI) to upload, add and deploy the SPFx packages. It’s because Office 365 CLI is a cross-platform command line tool and thus you get the benefit of using either a Windows or a Linux machine as your build agent. To login with Office 365 CLI using username and password:
login --authType password --userName user@contoso.com --password pass@word1
There are ways to secure the password in Azure DevOps using variables or Azure Key Vault. However, enterprise organizations who are still not comfortable to use passwords and looking for other like certificates.
With this blog post I highlight two aspects:
- How to setup Office 365 CLI with Azure AD App and Certificate based authentication and
- How to login using O365 CLI and certificates in Azure DevOps YAML pipelines
You can find the documentation on how to use certificate to login using Office 365 CLI. This article goes into detailed steps complementing the documentation. I will also touch upon some issues that I faced while setting this up.
Note: Another advantage that you get from following these steps will be the ability to define fine grained permissions limited for the required for use case (Example: deploy to SPO app catalog).
CERTIFICATE GENERATION
- Create self-signed certificate of type Personal Information Exchange (PFX) or Privacy Enhanced Mail (PEM)
- For windows, install openssl client. I used: http://slproweb.com/products/Win32OpenSSL.html
Instructions are assuming openssl client is extracted to c:OpenSSL folder.
NOTE: After trying couple of openssl clients, I had success with this ssl client. I hope that saves some time for you in researching which client works. If you WSL enabled/configured, then this is a non-issue.
- Navigate to the OpenSSL bin directory.
- c:OpenSSLbin in our example.
- Right-click the openssl.exe file and select Run as administrator.
- Enter the following command to begin generating a certificate and private key
openssl req -x509 -sha256 -nodes -days 365 -newkey rsa:2048 -keyout privateKey.key -out certificate.cer
- You will then be prompted to enter applicable Distinguished Name (DN) information, totaling seven fields:
- Once completed, you will find the certificate.crt and privateKey.key files created under the OpenSSLbin directory.
- Create a new Personal Information Exchange (.PFX) file using the certificate and private key as inputs from above step.
openssl pkcs12 -export -out protected.pfx -inkey privateKey.key -in certificate.cer -password pass:pass@word1
NOTE: I’d would like to highlight and note that I spent many hours troubleshooting an issue related to this command. If you use double quotes for the password string as documented (Example: openssl pkcs12 -export -out protected.pfx -inkey privateKey.key -in certificate.cer -password pass:”pass@word1″ ), the quotes are also considered to be part of the password.
- At this point the protected.pfx file can be used to log in the Office 365 CLI. We will come back to this step later.
Artifacts from this section:
- Certificate.cer
- privateKey.key
- protected.pfx
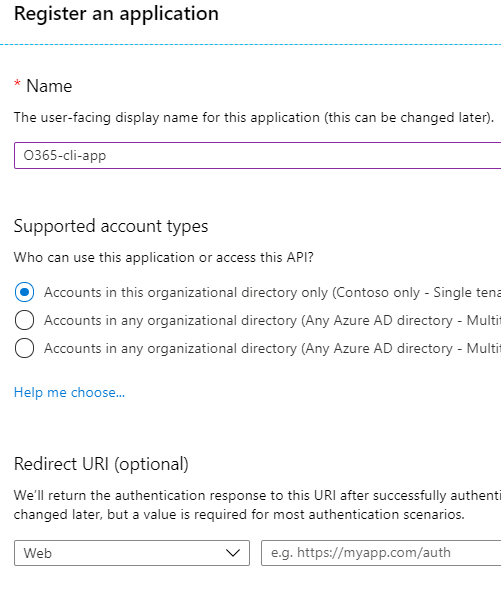
AZURE AD APPLICATION REGISTRATION
- Creating AAD app is well documented in many articles, so I sparsely documented it here. Also, please check out Garry Tinder’s post which goes into details on how to create AAD app to log in using Office 365 CLI.
- Create new Azure AD App with a valid name. Leave all other fields/options as-is.

- Save the app id and tenant id.

- Give below “application” permissions to the app

NOTE: Microsoft Graph permission is not a prerequisite. Ignore it.
- Make sure the Admin Consent is provided for all the permissions.
- Go to “Certificates & Secrets” and choose “Upload certificate” to upload the certificate.cer file created in step 7 in first section.

NOTE: Instead of upload certificate, it’s also possible to manually update the manifest file.
- Save the thumbprint to use later.
Artifacts from this section:
- App Id
- Tenant ID
- Thumbprint
TEST LOCALLY
- Before we can use these artifacts in Azure DevOps pipeline, lets test locally to ensure the certificate is usable with Office 365 CLI login. We need to make the AAD App ID and the Tenant ID available to Office 365 CLI using environment variables. If you are looking to script this or looking for steps to do in other operating systems, I’d refer to Garry Tinder’s blog post.
- Add below environment variables on your PC.
- OFFICE365CLI_AADAPPID = App Id
- OFFICE365CLI_TENANT = Tenant ID

- Test your certificate by trying to login using O365 CLI in terminal window (PS or Command Win)
login --authType certificate --certificateFile C:OpenSSL-Win64binprotected.pfx --thumbprint 5D500FE3BTRUNCATED563173009BC --password pass@word1
Note: Change the certificateFile, thumbprint, password as per your environment
- Run some sample commands. Example:
- Status
- Spo app list

USE CERTIFICATE IN AZURE DEVOPS PIPELINE
- In this section, we will configure Azure DevOps repository so that the pipelines can use the certificate when logging with Office 365 CLI. Here is a demo repository on GitHub that contains two files:
- SPFX Package file (sppkg file)
- This is a sample SPFx application customizer extension that adds Azure Application Insights to SPO sites. Note: It can be any other SPFx package file.
- Azure-pipelines.yml
- YAML pipeline that uses the certificate to login using Office 365 CLI. This pipeline takes the SPFx package, uploads, deploys to SharePoint Online App Catalog site.
- First, we need to upload the certificate to the repository. Open your Azure DevOps (ADO) project. Go to Pipelines > Library page.
- Select “Secure files” tab. Use the + Secure file button to upload the pfx file.

- Below you can see the sample entries (script tasks) that you can use in your YAML pipelines to access the certificate from the secure files store.
- script: echo Building!

    - task: DownloadSecureFile@1

      name: caCertificate

      displayName: 'Download CA certificate'

      inputs:

        secureFile: 'protected.pfx'

    - script: |

        echo Found cert at $(caCertificate.secureFilePath)

 ##

    ## login to Office 365 CLI

 ##

    - script: o365 login $(o365_app_catalog_site_url) --authType certificate --certificateFile $(caCertificate.secureFilePath) --thumbprint $(cert_thumbprint) --password pass@word1

      displayName: Login to Office365
- When the pipeline executes the first time, you will see a prompt to approve the usage of the certificate. See below screenshot:


SAMPLE PIPELINE
Below you can see the Azure pipeline in full. You can access this pipeline on GitHub here.
trigger:
  branches:
    include:
      - '*'

variables:
  OFFICE365CLI_AADAPPID: '80fdc955-8677-4251-8d49-050d02071c15'
  OFFICE365CLI_TENANT: '216e190d-67e4-4a6e-98bd-15b8468e5928'
  o365_app_catalog_site_url: 'https://YOURTENANT.sharepoint.com/sites/APPCATALOGSITENAME'
  o365cli_app_catalog_scope: 'tenant'
  node_version: '10.x'
  cert_thumbprint: '5D500FE3B7543FCC61D4DCFD0C164563173009BC'
  spfx-pkg: 'azure-app-insights.sppkg'

pool:
  vmImage: ubuntu-latest

stages:
- stage: Build
  jobs:
  - job: BuildJob
    steps:
    - script: echo Building!
    - task: DownloadSecureFile@1
      name: caCertificate
      displayName: 'Download CA certificate'
      inputs:
        secureFile: 'protected.pfx'
    - script: |
        echo Found cert at $(caCertificate.secureFilePath)
    ##
    ## specify which node version to use
    ##
    - task: UseNode@1
      displayName: Set to Node.js $(node_version)
      inputs:
        version: $(node_version)
      condition: ne('$(node_version)', '')

    ##
    ## install Office 365 CLI
    ##
    - script: sudo npm install --global @pnp/office365-cli
      displayName: Install Office365 CLI

    ##
    ## login to Office 365 CLI
    ##
    - script: o365 login $(o365_app_catalog_site_url) --authType certificate --certificateFile $(caCertificate.secureFilePath) --thumbprint $(cert_thumbprint) --password pass@word1
      displayName: Login to Office365

    ##
    ## upload *.sppkg to the target app catalog
    ##
    - script: o365 spo app add --filePath $(spfx_pkg) --appCatalogUrl $(o365_app_catalog_site_url) --scope tenant --overwrite
      displayName: Upload SharePoint package to Site Collection App Catalog

    ##
    ##deploy the package
    ##
    - script: o365 spo app deploy --name $(spfx_pkg) --appCatalogUrl $(o365_app_catalog_site_url) --scope tenant
      displayName: Deploy SharePoint package
Thanks for reading. I hope this helps you out.
Disclaimer
The sample scripts are not supported under any Microsoft standard support program or service. The sample scripts are provided AS IS without warranty of any kind. Microsoft further disclaims all implied warranties including, without limitation, any implied warranties of merchantability or of fitness for a particular purpose. The entire risk arising out of the use or performance of the sample scripts and documentation remains with you. In no event shall Microsoft, its authors, or anyone else involved in the creation, production, or delivery of the scripts be liable for any damages whatsoever (including, without limitation, damages for loss of business profits, business interruption, loss of business information, or other pecuniary loss) arising out of the use of or inability to use the sample scripts or documentation, even if Microsoft has been advised of the possibility of such damages.
by Scott Muniz | Jul 22, 2020 | Alerts, Microsoft, Technology, Uncategorized
This article is contributed. See the original author and article here.
Final Update: Wednesday, 22 July 2020 18:22 UTC
We’ve confirmed that all systems are back to normal with no customer impact as of M/D, HH:MM UTC. Our logs show the incident started on M/D, HH:MM UTC and that during the <duration of incident> hours that it took to resolve the issue X% of customers experienced <impact statement & metrics>.
- Root Cause: The failure was due to <provide a transparent failure statement but don’t mention specific technologies>.
- Lessons Learned: <if there is chance of re-occurrence talk to the specifics on how we’ll resolve and plan to monitor & respond while risk is active><Talk to the learning that we pulled out of this incident and will apply to avoid these failure types in the future>
- Incident Timeline: X Hours & X minutes – M/D, HH:MM UTC through M/D, HH:MM UTC
We understand that customers rely on Application Insights as a critical service and apologize for any impact this incident caused.
-Sindhu
Initial Update: Wednesday, 22 July 2020 18:21 UTC
We are aware of issues within Application Insights and are actively investigating. Some customers may experience Data Gaps.
- Work Around: <none or details>
- Next Update: Before 07/22 21:30 UTC
We are working hard to resolve this issue and apologize for any inconvenience.
-Sindhu
Update: Wednesday, 22 July 2020 18:21 UTC
We continue to investigate issues within Application Insights. Root cause is not fully understood at this time. Some customers continue to experience <impact statement from a user perspective>. We are working to establish the start time for the issue, initial findings indicate that the problem began at <MM/DD ~HH:MM UTC>. We currently have no estimate for resolution.
- Work Around: <none or details>
- Next Update: Before 07/22 21:30 UTC
-Sindhu
by Scott Muniz | Jul 22, 2020 | Alerts, Microsoft, Technology, Uncategorized
This article is contributed. See the original author and article here.
Here are the updates to the Azure portal this month:
Compute>Linux
Storage>Storage Account
All categories
Intune
Let’s look at each of these updates in greater detail.
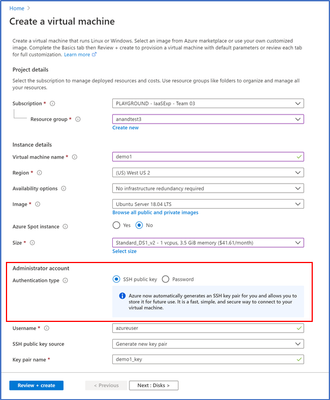
Compute>Linux
Simplification of the Linux + SSH Experience
In the VM create experience, SSH key is now the default authentication method instead of passwords for Linux images. Azure will now automatically generate a new SSH key pair for you instead of you having to use a third-party tool to create a key pair.

- Enter information to create your virtual machine, and after you click “create”, you will be prompted to download the private key pair, which you will need to connect to their VM via SSH

2. Go to the VM you created and select “SSH”, then open the SSH (terminal, PuTTy, etc.) client of your choice, making sure that you have read-only access to your private key.

3. Copy the file path where your private key is stored 4. Paste the command in your SSH client

When creating additional Linux VMs, you can reuse SSH key pairs as well instead of creating a new key each time.

Storage>Storage Account
Network Routing Preferences for Storage Accounts now in Public Preview
You can now configure a routing preference to direct network traffic for the default public endpoint of your Storage account using either the Microsoft global network or using the public internet.
- Optimize for premium network performance by using the Microsoft global network, which delivers low-latency path selection with high reliability and routes traffic through the point-of-presence closest to the client.
- Alternatively, route traffic through the point-of-presence closest to your storage account to lower network costs and minimize traversal over the Microsoft global network.
Routing configuration options for your Storage account also enable you to publish additional route-specific endpoints. Use these new public endpoints to override the routing preference specified for the default public endpoint by explicitly directing traffic over a desired path.
Routing preferences for Azure Storage is now available for preview in France South, North Central US, and the West Central US regions.
You can specify your routing preference for a storage account at Create time in the Networking tab.

You can also specify a routing preference for your storage account after creation in the Firewalls and Virtual Networks tab in Storage Account Manage.

Should you elect to public the individual route-specific endpoints, you can generate an SAS token that directs traffic along the network route you specify.

All Categories
New Dashboard Pinning Experience
Previously, users did not have the option to select a dashboard when pinning content. With the new pinning experience, users can now choose an existing dashboard or even create a new dashboard to pin their content to. This pinning experience can be invoked from any service that offers the pinning feature, as indicated by a pin icon.
- Go to any service that enables pinning. Take “All resources” for example.
- Click on the “pin” icon which opens the new pinning experience

3. From here you can pin to an existing dashboard (default) or create a new dashboard.
If you pin to an existing dashboard:
a. Select whether you want to pin to an existing private or shared dashboard in the “Type” section
b. Find the dashboard in dashboard dropdown – the default selection in the dropdown is your most recently accessed dashboard
c. Once you select the dashboard from the dropdown, click “Pin”

d, You will get a notification once the pinning has been completed. You can access the dashboard by clicking on the notification.
If you pin to a new dashboard:
a. Select “Create new”
b. Select whether you want to create a new private or shared dashboard
c. Fill in the required information

d. Once you’re done, click “Create and pin”. You will get a notification when the dashboard is successfully created and pinned to. You can access the dashboard by clicking on the notification. You can also access the pinned content by going to Dashboard in the left nav and finding the dashboard you’ve pinned the content to.
INTUNE
Updates to Microsoft Intune
The Microsoft Intune team has been hard at work on updates as well. You can find the full list of updates to Intune on the What’s new in Microsoft Intune page, including changes that affect your experience using Intune.
Azure portal “how to” video series
Have you checked out our Azure portal “how to” video series yet? The videos highlight specific aspects of the portal so you can be more efficient and productive while deploying your cloud workloads from the portal. Check out our most recently published video:
Next steps
The Azure portal has a large team of engineers that wants to hear from you, so please keep providing us your feedback in the comments section below or on Twitter @AzurePortal.
Sign in to the Azure portal now and see for yourself everything that’s new. Download the Azure mobile app to stay connected to your Azure resources anytime, anywhere.
See you next month!

Recent Comments