by Scott Muniz | Jul 22, 2020 | Alerts, Microsoft, Technology, Uncategorized
This article is contributed. See the original author and article here.
The Azure Sphere Security Service is an integral part of Azure Sphere and brokers trust for device-to-cloud communication. When a customer creates a new tenant, the Azure Sphere Security Service issues a tenant certificate authority (CA) certificate to the customer. The tenant CA certificate, in turn, issues device certificates that the device uses to get OS updates and to upload telemetry. Tenant CA certificates have a lifetime of two years, which starts from tenant creation. The Azure Sphere Security Service will automatically renew tenant CAs approximately 60 days prior to expiry. If you use Azure Sphere tenant CA certificates to register in Azure IoT hub, Azure IoT Central, and any other relying party, you must register the new certificate so they recognize and authenticate your devices.
Renewal process
Tenant CA certificates will be automatically renewed. Automated renewal process begins approximately 60 days before the current certificate expires.
- A new tenant CA certificate is generated within 60 days prior to the expiration of the current active certificate.
- Approximately 30 days after the creation date of the newly generated CA certificate, it becomes the new active CA certificate and the current active CA certificate becomes inactive and retired. Once a tenant CA certificate has been retired, Azure Sphere device certificates will be issued from the new active CA certificate.
- Once the new tenant CA certificate is issued, it is ready for download. Using new commands available in the Azure Sphere Developer Command prompt, you can:
- Download certificates and certificate chains for the current and new certificates
- Download proof of possession certificates to verify the tenant CA certificate in Azure IoT Central and/or IoT Hub
- Get a list of available certificates and their details for an Azure Sphere tenant.
- A tenant CA certificate status will be one of three possible values, listed below along with a brief explanation of what each status means for you:
| Certificate status |
Description |
What does this mean for you? |
| Revoked |
An untrusted certificate |
This will not be used by the Azure Sphere Security Service |
| Active |
Current active certificate for the tenant |
This tenant CA certificate will issue device certificates |
| Inactive |
This state could mean one of the following. The certificate could be:
- Newly created certificate if “End Date” displayed by the command or “notAfter” in the certificate is approximately two years in the future
- Retired certificate if “End Date” displayed by the command or “notAfter” in the certificate is one to 60 days in the future
- Expired certificate if the “End Date” displayed by the command or “notAfter” in the certificate is in the past
|
The newly created certificate will become active approximately 30 days after it is created. Register this tenant CA certificate in Azure IoT Hub or IoT Central or any other third-party resources |
What do you need to do?
The newly generated certificate is not automatically re-registered in IoT Hub, IoT Central, or any other third-party resource. First, this new certificate must be downloaded. When downloading the certificate, ensure that the newly generated certificate is downloaded and not the currently active certificate. You can use the thumbprint to verify if you are using the correct certificate.
In Azure IoT hub and Azure IoT Central, registering the certificate involves a few simple steps:
- Tenant CA certificate must be first uploaded in the certificates section of IoT Hub or IoT Central.
- In the enrollments section of IoT Hub or IoT Central, the uploaded certificate can be configured as either the primary or secondary certificate. Do not remove any certificates that have not expired.
- The proof of possession certificate can be downloaded using the verification code generated by IoT Hub or IoT Central. Proof of possession certificate must then be uploaded in IoT Hub or IoT Central to complete the certificate registration process.
To avoid any interruption in service, you will have 30 days to register the new certificate in Azure IoT Hub, IoT Central, or any other third-party resource before the newly generated certificate becomes the active certificate.
NOTE: These steps require the 20.07 SDK, which is currently scheduled for release on the afternoon of July 29, 2020 (PST). We will update this post with links to documentation once the 20.07 SDK has been released.
Questions:
Q: Will my devices be updated even after the certificate auto renewal?
A: Your tenant CA certificates are auto renewed to ensure that your devices will continue to receive updates and uploading telemetry.
Q: Help! Rollover has happened to new cert, and my devices are now failing to connect to my services, how do I resolve?
A: You can still register the new certificate. The Azure Sphere Security Services may already be using the new certificate. Relying partners such as IoT central or IoT hub will fail to authenticate your device till the new tenant CA certificate is registered with them.
Q: Oh no! My tenant CA certificate has expired, and I didn’t realize I had to register the new certificate? What do I do?
A: Register your new certificate ASAP. The Azure Sphere Security Service will already be using the new certificate. Relying partners such as IoT central or IoT hub will fail to authenticate your device till the new tenant CA certificate is registered with them.
Documentation Resources:
by Scott Muniz | Jul 22, 2020 | Alerts, Microsoft, Technology, Uncategorized
This article is contributed. See the original author and article here.
This tutorial walks you through the process on how to load data from Always Encrypted enabled Azure SQL database using SQL Server Integration Services (SSIS) in Azure Data Factory.
Azure-SSIS integration runtime has built-in Microsoft ODBC Driver 13 for SQL Server. In this tutorial, we use SSIS ODBC source with Microsoft ODBC Driver 13 to load data from Azure SQL database. Details about ODBC driver setup, refer to using Always Encrypted with the ODBC Driver for SQL Server via Azure Key Vault built-in keystore provider.
- Follow the steps to configure Always Encrypted by using Azure Key Vault , Column Master Key (CMK) is now stored in Azure Key Vault.
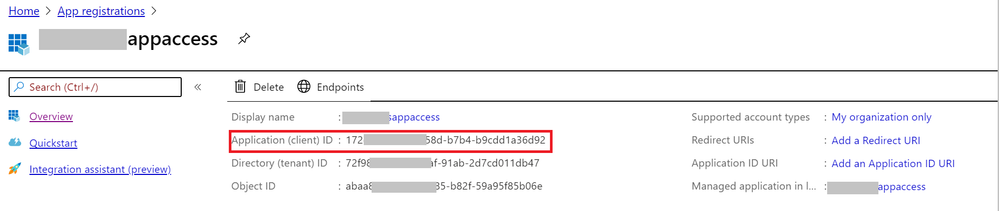
- Enable client application access to get the Application (client) ID and client secrete.


3. Grant the client application proper permissions (get, unwrapKey, and verify) in the Azure Key Vault.

- Create simple SSIS package in Visual Studio 2017 that uses an ODBC source and a flexible file destination. Configure connection string like below:
DRIVER={ODBC Driver 13 for SQL Server};SERVER= <EnterYourServer.database.windows.net>;uid=<myuser>; DATABASE=<mydatabase>;ColumnEncryption=Enabled;KeyStoreAuthentication=KeyVaultClientSecret; KeyStorePrincipalId=<Application (client) ID>;KeyStoreSecret=<client secrete>
Note:
Surround the value with { } when there are [ ] { ( ) , ; ? * = ! @ characters in the client secrete, and manually escape the interior } with a second }.
Example:
keystoresecret={)#|;_=&*{+>*-.&)$8?%}}|S|_^?|*=?.;o==_#-QA=&%};

- Execute package successfully in Visual Studio.
- Deploy project to SSIS in Azure Data Factory.

7. Author data factory pipeline with execute SSIS package activity, input password in connection manager parameter.

8. Execute data factory pipeline.
by Scott Muniz | Jul 21, 2020 | Alerts, Microsoft, Technology, Uncategorized
This article is contributed. See the original author and article here.
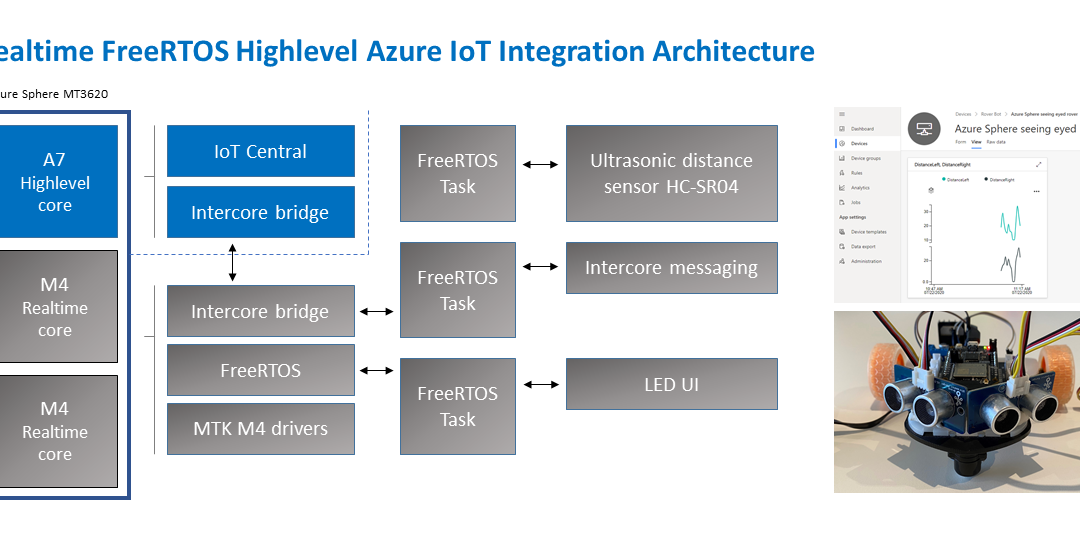
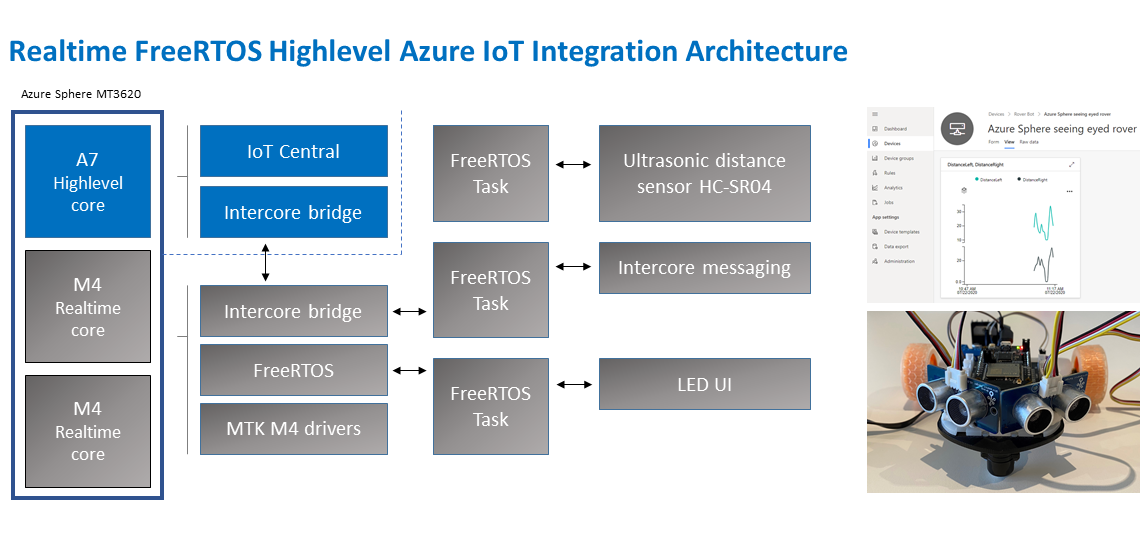
Build a Rover combining the best of Azure Sphere security with FreeRTOS
What you will learn
You will learn how to integrate a Real-time FreeRTOS application responsible for running a timing-sensitive ultrasonic distance sensor with the security and cloud connectivity of Azure Sphere.
#JulyOT
This is part of the #JulyOT IoT Tech Community series, a collection of blog posts, hands-on-labs, and videos designed to demonstrate and teach developers how to build projects with Azure Internet of Things (IoT) services. Please also follow #JulyOT on Twitter.
Source code and learning resources
Source code: Azure Sphere seeing eyed rover Real-time FreeRTOS sensors and Azure IoT.
Learning resources: Azure Sphere Developer Learning Path.
Learn more about Azure Sphere
Azure Sphere is a comprehensive IoT security solution – including hardware, OS, and cloud components – to actively protect your devices, your business, and your customers.
Application architecture
The application running on the Azure Sphere consists of two parts.
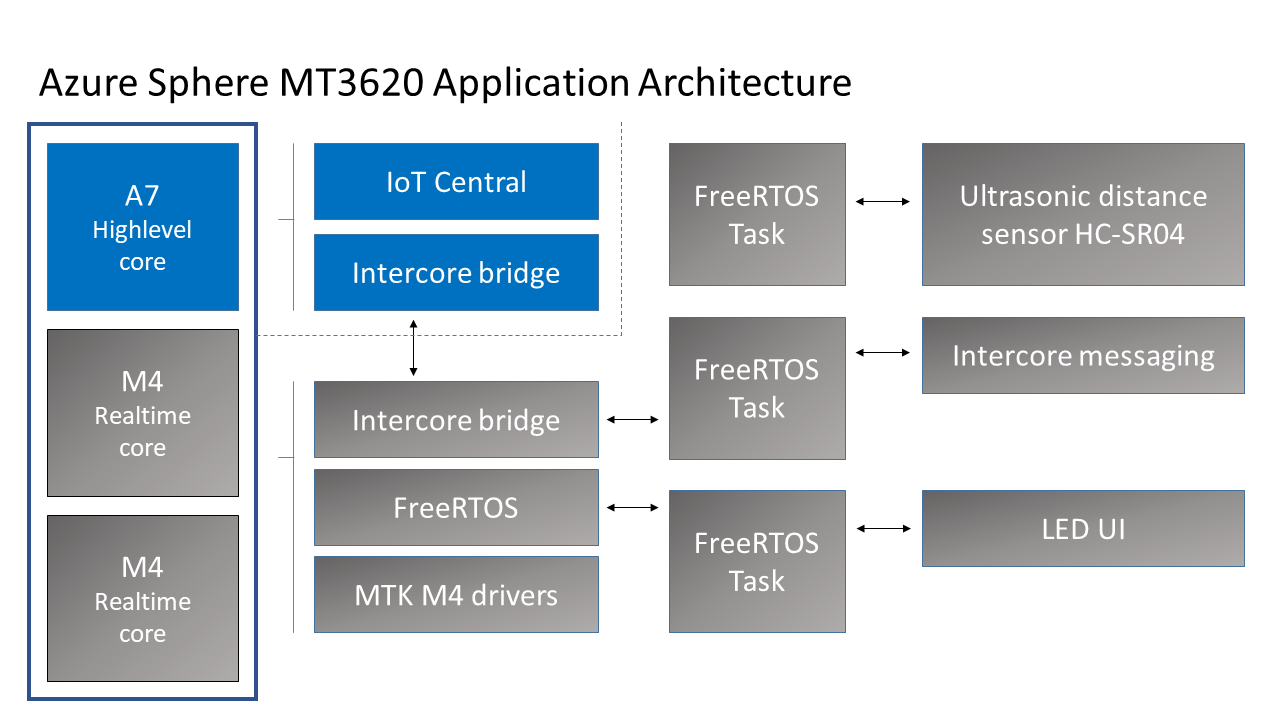
Real-time FreeRTOS Application
- The Real-time FreeRTOS application running on one of the M4 cores that is responsible for running the timing-sensitive HC-SR04 ultrasonic distance sensor.
- Distance is measured every 100 milliseconds so the rover can decide the best route.
- The sensor requires precise microsecond timing to trigger the distance measurement process, so it is a perfect candidate for running on the Real-time core as a FreeRTOS Task.
- Every 5 seconds a FreeRTOS Task sends distance telemetry to the Azure Sphere A7 High-level application.
Azure IoT High-level Application
- The application running on the Azure Sphere A7 High-level application core is responsible for less timing-sensitive tasks such as establishing WiFi/Network connectivity, negotiating security and connecting with Azure IoT Central, updating the device twin and send telemetry messages.
Extending
- I am thinking about extending this solution with a local TinyML module for smarter navigation.
Parts list

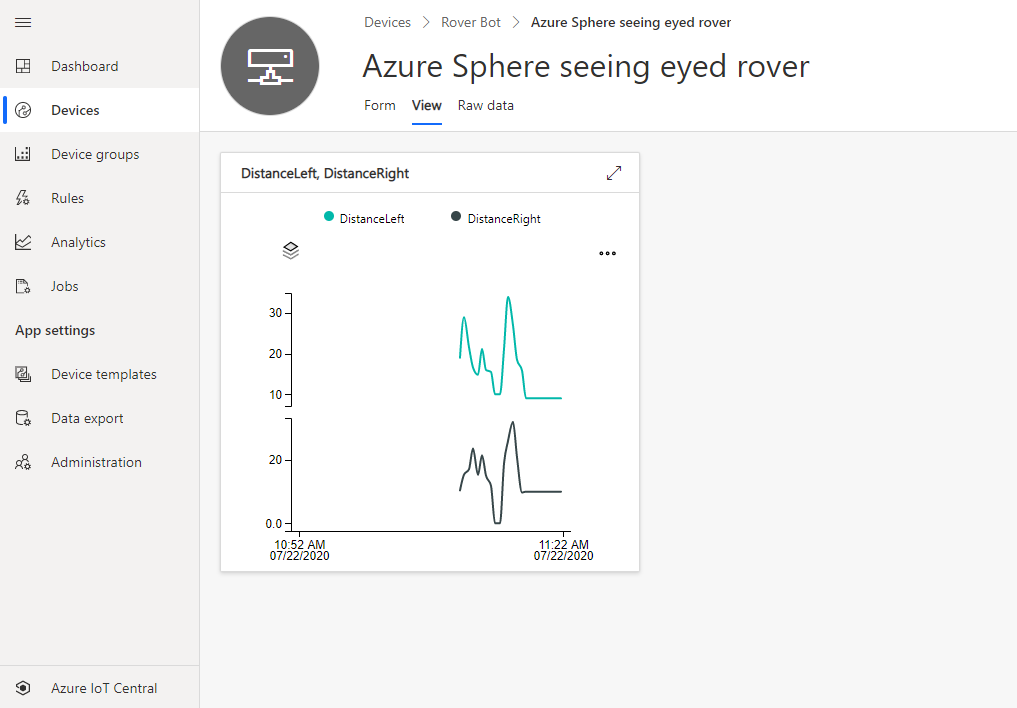
Azure IoT Central
Azure IoT Central provides an easy way to connect, monitor, and manage your Internet of Things (IoT) assets at scale.
I created a free trial of Azure IoT Central and in no time I had the rover distance sensor charted and available for deeper analysis. By the way, you can continue to connect two devices for free to IoT Central after the trial period expires.
Extend and integrate Azure IoT Central applications with other cloud services
Azure IoT Central is also extensible using rules and workflows. For more information, review Use workflows to integrate your Azure IoT Central application with other cloud services
How to build the solution
- Set up your Azure Sphere development environment.
- Review Integrate FreeRTOS Real-time room sensors with Azure IoT.
- Learn how to connect and Azure Sphere to Azure IoT Central or Azure IoT Hub.
- The IoT Central Device Template Capabilities Model JSON file for this solution is included in the iot_central directory of this repo.
Have fun and stay safe and be sure to follow us on #JulyOT.
by Scott Muniz | Jul 21, 2020 | Alerts, Microsoft, Technology, Uncategorized
This article is contributed. See the original author and article here.
As companies continue their cloud journey, they are more and more adopting a microservice architecture as part of their application modernization. In this blog post, we have Walter Oliver (@walterov) who is a Program Manager in the Azure Stack Hub team to explore how Azure API Management Gateway on Azure Stack Hub can help in the hybrid strategy for these services.
While some of the applications are being deployed on Azure, companies face challenges with operational consistency when it comes to those apps that must remain on premises. That is one of the scenarios where Azure Stack Hub (ASH) can provide the platform where to host their on-premises applications, while keeping operational consistency. Enterprises are increasingly using Kubernetes on Azure Stack Hub as their choice for their microservices, as they seek increased autonomy for their development teams, flexibility, and modularity. But the process of decoupling single tier monolithic applications into smaller API services brings new problems: how do you know what are these services? Do they meet the security requirements? How are they accessed and monitored?
Azure API Management (APIM) helps address these issues. APIM is part of the Microsoft hybrid strategy, it will help you in:
- Publishing a catalog of APIs available and control access to them
- Preventing DOS attacks for externally available APIs
- Implementing security policies
- Onboarding the ISV partner ecosystem
- Supporting your microservices program with a robust internal API program
Challenges to API Management on Premises
However, since the Azure API Management service is on the cloud, utilizing it implies a round trip to the cloud and then to the on-premises service to service every call. In some cases, this is acceptable, but in many it is not (figure 1).

Figure 1. API Management without self-hosted gateway
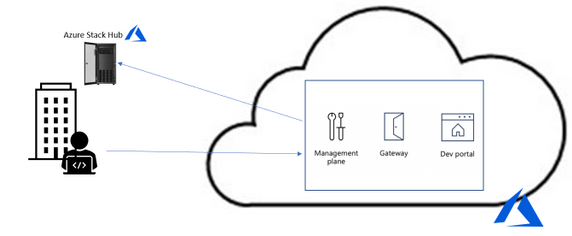
To solve it the Azure APIM team created the API Management self-hosted gateway. The self-hosted gateway, as the name implied, can be hosted locally in your data center (figure 2).

Figure 2. API Management with self-hosted gateway
Running the Self-hosted Gateway in Azure Stack
The APIM’s self-hosted gateway feature enables Azure Stack Hub customers (and customers in general) to manage their on-premises microservices APIs on a central portal in Azure. The self-hosted gateway is a containerized, functionally equivalent version of the managed gateway deployed to Azure as part of every API Management service.
Now you can deploy it inside Azure Stack Hub as a Linux -based Docker container from the Microsoft Container Registry. This means that you can hosted inside the AKS-engine-deployed Kubernetes cluster inside ASH. In cases where you have microservices APIs exposed to applications inside the Kubernetes cluster all the calls happen locally with minimal latency and no extra data transfer costs. More importantly, it also ensures that compliance is maintained since there are not round trips to Azure. Yet, all the benefits of utilizing APIM from Azure remain: single point of management, observability, and discovery of all APIs within the organization.
For complete documentation on AIPM self-hosted gateway see the overview here. To provision the gateway in APIM in Azure follow the instructions here. To deploy the gateway containers in Kubernetes follow the instructions here.
Considerations when running the gateway in Azure Stack Hub
- A common question is whether there is a need for opening ports for inbound connectivity, the answer is no. Self-hosted gateway only requires outbound TCP/IP connectivity to Azure on port 443, it follows a pull model, not a push model for communication. Connectivity is required so that information such as health reporting, updates, events, logs, and metrics can be transferred. This also implies that when there is no communication with Azure, the data does not flow, yet the gateway continues to operate as expected.
- When running the gateway container in your Kubernetes cluster with the configuration backup option, you will notice an extra managed disk being created in the cluster, this is the disk where the configuration backup is stored. This is particularly useful in case that connection to Azure can become unavailable. Notice that the gateway container is not meant to be run on an ASH stamp that will be disconnected from the internet or is planned to be disconnected most of the time. In fact, if the stamp is disconnected temporarily and for some reason the gateway container is stopped, Kubernetes will try to restart it but if the option of running with backup configuration was off, it will fail. In those cases, you need to ensure that connectivity to Azure is restored.
- Another question is whether that Gateway container automatically discovers the available APIs. The answer is that they are not, you must explicitly go to the Azure APIM portal and register the APIs you need to manage.
- In the case that you have APIs in another Kubernetes cluster (or anywhere in your data center) that you would like to manage you can publish them via the same gateway container or provision and deploy another gateway instance
- Deploying a new microservice and publishing its API or applying changes to an existing one is something that is better formalized in a CI/CD Pipeline. Getting familiarized with the available operations will be useful, see the reference here. For a guide on how to architect a CI/CD pipeline with corresponding repo see this blog.
Summary
Azure’s API Management service is very helpful for managing large microservices deployments, now the self-hosted APIM Gateway makes it very appealing for including APIs deployed on premises. The documentation provided online in Azure covers the basic concepts, provisioning, and deploying of self-hosted gateways, the summary provided above is an introduction to the subject tailored to Azure Stack Hub customers. Subsequent posts will include a sample deployment of an API and its publishing through APIM on Azure.
by Scott Muniz | Jul 21, 2020 | Alerts, Microsoft, Technology, Uncategorized
This article is contributed. See the original author and article here.
I’ve done a few posts recently around using GraphQL, especially with Azure Static Web Apps, and also on some recent streams. This has led to some questions coming my way around the best way to use GraphQL with Azure.
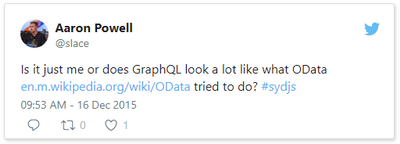
Let me start by saying that I’m by no means a GraphQL expert. In fact, I’ve been quite skeptical of GraphQL over the years.

This tweet here was my initial observation when I first saw it presented back in 2015 (and now I use it to poke fun at friends now) and I still this there are some metis in the comparison, even if it’s not 100% valid.
So, I am by no means a GraphQL expert, meaning that in this series I want to share what my perspective is as I come to looking at how to be do GraphQL with Azure, and in this post we’ll look at how to get started with it.
Running GraphQL on Azure
This question has come my way a few times, “how do you run GraphQL on Azure?” and like any good problem, the answer to it is a solid it depends.
When I’ve started to unpack the problem with people it comes down to wanting to find a service on Azure that does GraphQL, in the same way that you can use something like AWS Amplify to create a GraphQL endpoint for an application. Presently, Azure doesn’t have this as a service offering, and to have GraphQL as a service sounds is a tricky proposition to me because GraphQL defines how you interface as a client to your backend, but not how your backend works. This is an important thing to understand because the way you’d implement GraphQL would depend on what your underlying data store is, is it Azure SQL or CosmosDB? maybe it’s Table Storage, or a combination of several storage models.
So for me the question is really about how you run a GraphQL server and in my mind this leaves two types of projects; one is that it’s a completely new system you’re building with no relationship to any existing databases or backends that you’ve got* or two you’re looking at how to expose your existing backend in a way other than REST.
*I want to point out that I’m somewhat stretching the example here. Even in a completely new system it’s unlikely you’d have zero integrations to existing systems, I’m more point out the two different ends of the spectrum.
If you’re in the first bucket, the world is your oyster, but you have the potential of choice paralysis, there’s no single thing to choose from in Azure, meaning you have to make a lot of decisions to get up and running with GraphQL. This is where having a service that provides you a GraphQL interface over a predefined data source would work really nicely and if you’re looking for this solution I’d love to chat more to provide that feedback to our product teams (you’ll find my contact info on my About page). Whereas if you’re in the second, the flexibility of not having to conform to an existing service design means it’s easier to integrate into. What this means is that you need some way to host a GraphQL server, because when it comes down to it, that’s the core piece of infrastructure you’re going to need, the rest is just plumbing between the queries/mutations/subscriptions and where your data lives.
Hosting a GraphQL Server
There are implementations of GraphQL for lots of languages so whether you’re a .NET or JavaScript dev, Python or PHP, there’s going to be an option for you do implement a GraphQL server in whatever language you desire.
Let’s take a look at the options that we have available to us in Azure.
Azure Virtual Machines
Azure Virtual Machines are a natural first step, they give us a really flexible hosting option, you are responsible for the infrastructure so you can run whatever you need to run on it. Ultimately though, a VM has some drawbacks, you’re responsible for the infrastructure security like patching the host OS, locking down firewalls and ports, etc..
Personally, I would skip a VM as the management overhead outweighs the flexibility.
Container Solutions
The next option to look at is deploying a GraphQL server within a Docker container. Azure Kubernetes Service (AKS) would be where you’d want to look if you’re looking to include GraphQL within a larger Kubernetes solution or wanting to use Kubernetes as a management platform for your server. This might be a bit of an overkill if it’s a standalone server, but worthwhile if it’s part of a broader solution.
My preferred container option would be Azure Web Apps for Containers. This is an alternative to the standard App Service (or App Service on Linux) but useful if you’re runtime isn’t one of the supported ones (runtimes like .NET, Node, PHP, etc.). App Service is a great platform to host on, it gives you plenty of management over the environment that you’re running in, but keeps it very much in a PaaS (Platform as a Service) model, so you don’t have to worry about patching the host OS, runtime upgrades, etc., you just consume it. You have the benefit of being able to scale both up (bigger machines) and out (more machines), building on top of an backend system allows for a lot of scale in the right way.
Azure Functions
App Service isn’t the only way to run a Node.js GraphQL service, and this leads to my preference, Azure Functions with Apollo Server. The reason I like Functions for GraphQL is that I feel GraphQL fits nicely in the Serverless design model nicely (not to say it doesn’t fit others) and thus Functions is the right platform for it. If the kinds of use cases that you’re designing your API around fit with the notion of the on-demand scale that Serverless provides, but you do have a risk of performance impact due to cold start delays (which can be addressed with Always On plans).
Summary
We’re just getting started on our journey into running GraphQL on Azure. In this post we touched on the underlying services that we might want to look at when it comes to looking to host a GraphQL server, with my pick being Azure Functions if you’re doing a JavaScript implementation, App Service and App Service for Containers for everything else.
As we progress through the series we’ll look at each piece that’s important when it comes to hosting GraphQL on Azure, and if there’s something specific you want me to drill down into in more details, please let me know.
This post was originally posted on www.aaron-powell.com.
by Scott Muniz | Jul 21, 2020 | Alerts, Microsoft, Technology, Uncategorized
This article is contributed. See the original author and article here.
Azure Monitor for SAP Solutions builds on native Azure capabilities like Log Analytics and Workbooks to meet the monitoring needs for the teams managing the SAP on Azure estate. The solution also allows for easy creation of custom visualisations and custom alerting, Azure Monitor for SAP Solutions ships with default Workbooks than can either be used out of the box or extended to meet your requirements.
Today Service Providers often have credentials in the customers environments (Tenants) which they use to logon and manage the customers infrastructure, the consequence of this is that in order to manage another customers environment the service provider’s technician will need to re-authenticate with the credentials they are given to the new customer. With Azure Lighthouse it is possible to reduce the context switching by providing delegated access to the customer environment using the Service Provider’s credentials and not the customer specified credentials.
Combining Azure Monitor for SAP Solutions with Azure Lighthouse a service provider can monitor the metrics of their SAP Solution using native Azure tooling and aggregate that across tenants.
For more information on how to use these two technologies together please read the attached whitepaper

Recent Comments