by Contributed | Nov 23, 2020 | Azure, Microsoft, Technology
This article is contributed. See the original author and article here.
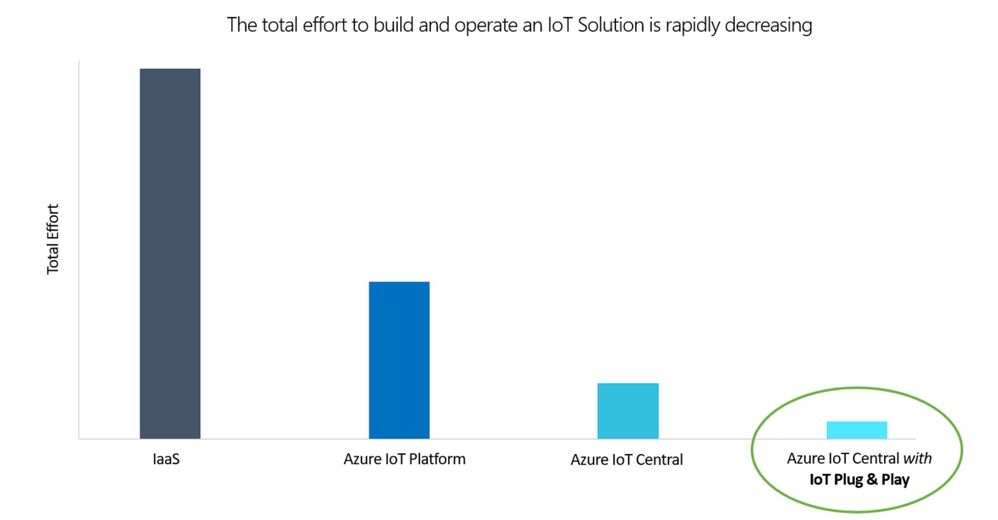
Democratizing IoT for mainstream adoption is a core mission of Microsoft Azure IoT. While Azure IoT Central already simplifies IoT solution development, the recent addition of support for IoT Plug and Play and the introduction of a new Azure IoT Central pricing tier allows for the streamlined integration of devices into IoT solutions with an expanded set of scenarios.

Common IoT solution development challenges
IoT solution development typically starts by defining the device capabilities required for a solution. These are often solution specific and involve custom development on both the device and in the cloud. Device developers write code specific to the requirements, while cloud developers build corresponding cloud software to process and visualize the device data specific to the solution. This tight coupling (between device and cloud software) often results in little or no code reuse, preventing solutions from being future proof and generating cross dependencies that require close collaboration between device and cloud developers. In addition to software development challenges, hardware sourcing, integration, and ramping to production can take months, leading to long and expensive timelines.
IoT Plug and Play offers new approach to solution development
IoT Plug and Play introduces a new approach to building IoT solutions by decoupling the software on the device and solution in the cloud. With IoT Plug and Play, device developers describe the device capabilities using a declarative model. The type and shape of data the devices send to the cloud, as well as the interaction patterns for cloud to device communications, are modeled with the Digital Twin Definition Language (DTDL), an open-source language for describing models for IoT digital twins. The device model serves as a contract between the device and the IoT solution. Device developers can now build their device software independently of solutions. While solution developers can now build standard visualizations and experiences that can be reused across solutions. And as new IoT Plug and Play devices become available, these devices are easy to connect to existing solutions without any additional development
IoT Plug and Play support in Azure IoT Central
With IoT Plug and Play now supported in Azure IoT Central, solution builders can build end-to-end production-grade IoT solutions without having to write new code on the cloud or the device. Start by selecting/buying ready-to-use devices found in the Azure Certified Device Catalog. These devices can be provisioned in Azure IoT Central in minutes as their capabilities are described in the catalog and programmatically understood.

It gets even easier, as solution developers can start using simulated devices complete with rich dashboards and visualizations derived from the DTDL device model. Once devices are added, it’s just a few clicks to add monitoring, alerting, device management jobs, and more. Additionally, ISVs and partners building Line of Business (LOB) applications can easily package devices into turnkey solutions for specific verticals—e.g., retail, health, manufacturing, smart buildings, energy—by pairing Azure IoT Central solution templates with IoT Plug and Play-enabled devices, making it easy to scale to multiple deployments.

IoT Plug and Play accelerates solution development by pairing ready to use IoT Plug and Play-certified devices with ready to use IoT platforms like Azure IoT Central, eliminating the need to write embedded code and reducing the overall integration time from weeks/months to days/hours. As a result, IoT becomes easier, faster and more predictable when you start with IoT Plug and Play in Azure IoT Central.
$1 per year per device
Additionally, we’re excited to be announcing the introduction of a new pricing tier for Azure IoT Central. Customers have made it clear that Azure IoT Central’s simplified pricing model is a fantastic way to streamline budgeting for large deployments and deliver predictable monthly costs for IoT solutions. However, the existing pricing tiers don’t meet the needs of devices sending just a few messages per day. To address this, we are introducing a new pricing tier in December 2020 at less than $1 per year per device. This new tier, named ST0, is designed for devices sending messages as frequently as every two hours. This new flexibility enables new scenarios such as fleet management, smart metering, smart appliances, smart buildings, as well as the breadth of asset and condition monitoring or predictive maintenance. Look for details to show up on Azure IoT Central pricing in the week ahead.
|
Standard Tier 0
|
Standard Tier 1
|
Standard Tier 2
|
Use case
|
For devices sending a few messages per day
|
For devices sending a few messages per hour
|
For devices sending a message every few minutes
|
Price per device per month
|
$0.08
|
$0.40
|
$0.70
|
Monthly device message allocation
|
400
|
5,000
|
30,000
|
Include free quantities per application
|
2 free devices (800 included messages)
|
2 free devices (10,000 included messages)
|
2 free devices (60,000 included messages)
|
Overage pricing per 1K messages
|
$0.070
|
$0.015
|
$0.015
|
Additional resources include
by Contributed | Nov 23, 2020 | Azure, Microsoft, Technology
This article is contributed. See the original author and article here.
Azure Databricks supports Azure Active Directory (AAD) tokens (GA) to authenticate to REST API 2.0. The AAD tokens support enables us to provide a more secure authentication mechanism leveraging Azure Data Factory’s System-assigned Managed Identity while integrating with Azure Databricks.
Benefits of using Managed identity authentication:
- Managed identities eliminate the need for data engineers having to manage credentials by providing an identity for the Azure resource in Azure AD and using it to obtain Azure Active Directory (Azure AD) tokens. In our case, Data Factory obtains the tokens using it’s Managed Identity and accesses the Databricks REST APIs.
- It lets you provide fine-grained access control to particular Data Factory instances using Azure AD.
- It helps prevent usage of Databricks Personal Access Tokens, which acts as a password and needs to be treated with care, adding additional responsibility on data engineers on securing it.
Earlier, you could access the Databricks Personal Access Token through Key-Vault using Manage Identity. Now, you can directly use Managed Identity in Databricks Linked Service, hence completely removing the usage of Personal Access Tokens.
High-level steps on getting started:
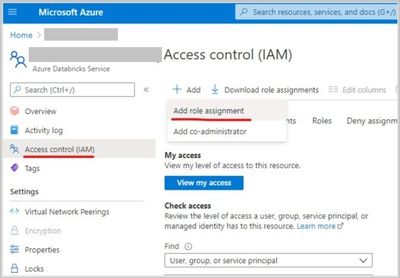
- Grant the Data Factory instance ‘Contributor’ permissions in Azure Databricks Access Control.


- Create a new ‘Azure Databricks’ linked service in Data Factory UI, select the databricks workspace (in step 1) and select ‘Managed service identity’ under authentication type.

Spoiler (Highlight to read)
Note: Please toggle between the cluster types if you do not see any dropdowns being populated under ‘workspace id’, even after you have successfully granted the permissions (Step 1).
Note: Please toggle between the cluster types if you do not see any dropdowns being populated under ‘workspace id’, even after you have successfully granted the permissions (Step 1).
Sample Linked Service payload:
{
    "name": "AzureDatabricks_ls",
    "type": "Microsoft.DataFactory/factories/linkedservices",
    "properties": {
        "annotations": [],
        "type": "AzureDatabricks",
        "typeProperties": {
            "domain": "https://adb-***.*.azuredatabricks.net",
            "authentication": "MSI",
            "workspaceResourceId": "/subscriptions/******-3ab0-48f2-b171-0f50ec******/resourceGroups/work-rg/providers/Microsoft.Databricks/workspaces/databricks-****",
            "existingClusterId": "****-030259-dent495"
        }
    }
}
Spoiler (Highlight to read)
Note: There are no secrets or personal access tokens in the linked service definitions!
Note: There are no secrets or personal access tokens in the linked service definitions!
by Contributed | Nov 23, 2020 | Azure, Microsoft, Technology
This article is contributed. See the original author and article here.
Contributed by @Orin Thomas
At the moment, a Windows Admin Center (WAC) add-in for the Azure Portal is in preview. Unfortunately at the time of writing, the preview is over subscribed and you might be waiting for a while before the feature becomes generally available.
You could go through the effort of deploying a VM in Azure, installing WAC on it, then configuring all the necessary Network Security Groups and Firewall Rules to allow you to interact with that instance. But another option is to spin up a WAC gateway server instance on a local VM, configure Windows Server’s built in Azure Network Adapter as a VPN connection (between your on-premises server and the VNet that hosts your Windows Server VMs in Azure), and then add connections from the WAC gateway server to your Windows Server VMs in Azure.
1. The first step you need to take is to install Windows Admin Center on a local Windows Server instance and configure it as a gateway server. You’ll be connecting from your privileged access workstation (remember that you should avoid doing important secure admin stuff from the same system that you use to surf the web) to this gateway server instance.
If you need a reminder on the steps required to install Windows Admin Center, consult the Windows Admin Center installation documentation.
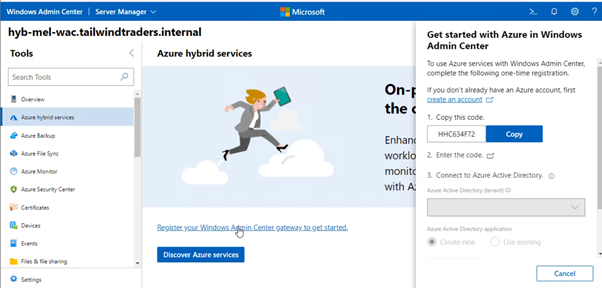
2. Once you’ve completed this installation, you’ll need to connect the gateway server to the Azure Subscription that you want to mange. You do this by selecting the Azure Hybrid Services node and registering your WAC instance with Azure.

Find the steps at Register your gateway with Azure.
3. Once you’ve registered the WAC gateway server instance with Azure, you’ll need to set up the Azure Network Adapter. You do this on the Networks node of WAC when connected to the gateway server instance, specifying the details of the virtual network you wish to connect to.

When you do this, all the point-to-site VPN infrastructure required to connect the on-premises WAC instance to Azure is created and configured and your WAC instance will now have its own connection into the VNet that hosts your Windows Server Azure VMs.
4. The only preparation you need to do for your Windows Server VMs in Azure is to create a firewall rule that allows WINRM-HTTP traffic from the gateway subnet. You can do this with the command:
Set-NetFirewallRule -Name WINRM-HTTP-In-TCP-PUBLIC -RemoteAddress x.x.x.x/YY
(where x.x.x.x/YY is the address space of the VNet that hosts the VMs)
5. Once this connection is established, you’ll be able to add Windows Server Azure VMs to WAC. The easiest way to do this is to use the Windows Server Azure VM’s internal IP address on the Azure VNet.

6. Then with the connection established, you’ll be able to manage Windows Servers on your on-premises network as well as Windows Servers running in Azure, using the same WAC gateway server!
Learn more:
Windows Admin Center product page
Windows Admin Center frequently asked questions
Windows Admin Center documentation
Microsoft Learn – Explore Azure networking services
Microsoft Learn – Architect network infrastructure in Azure
by Contributed | Nov 22, 2020 | Azure, Microsoft, Technology
This article is contributed. See the original author and article here.
Final Update: Sunday, 22 November 2020 11:11 UTC
We’ve confirmed that all systems are back to normal with no customer impact as of 11/22, 07:57 UTC. Our logs show the incident started on 11/22, 07:14 UTC and that during the 43 minutes that it took to resolve the issue some of the customers using Azure Alerts may have experienced missed or delayed alerts and notifications in China Gov Cloud and US gov Cloud.
- Root Cause: The failure was due to an issue with dependent backend service.
- Incident Timeline: 43 minutes – 11/22, 07:14 UTC through 11/22, 07:57 UTC
We understand that customers rely on Application Insights as a critical service and apologize for any impact this incident caused.
-Harshita
by Contributed | Nov 22, 2020 | Azure, Microsoft, Technology
This article is contributed. See the original author and article here.
Logic Apps connectors provide quick access from Logic Apps to events, data, and actions across other apps, services, systems, protocols, and platforms. By using connectors in your logic apps, you expand the capabilities for your cloud and on-premises apps to perform tasks with the data that you create and already have. Azure Logic Apps connectors are powered by the connector infrastructure that runs in Azure. A workflow running on the new runtime can use these connectors by creating a connection, an Azure resource that provides access to these connectors.
A key capability in the redesigned Logic Apps runtime introduces the extensibility to add built-in connectors. These built-in connectors are hosted in the same process as the Logic App runtime and it provides higher throughput, low latency, and local connectivity. The connection definition file also contains the required configuration information for connecting through these built-in connectors. The preview release comes with the built-in connectors for Azure Service Bus, Azure Event Hub and SQL Server. The extensibility framework that these connectors are built on can be used to build custom built-in connectors to any other service that you need.
In this blog post, I am showing how we can leverage this extensibility framework to create a built-in CosmosDB connector with a trigger and no actions. In this example, whenever the new document is added in the lease collection or container of Cosmos DB, the Logic Apps trigger will fire and execute the Logic App with the input payload as Cosmos document. This built-in connector leverages the functionality of Azure function capability for Cosmos DB trigger based upon the Azure Function trigger binding. In general, you can add any action or function trigger as part of your own built-in connectors. Currently trigger capabilities are limited to Azure Function specific triggers only, in future the Logic app will support non-Azure function triggers also.
Built-in connector plugin model
The Logic Apps built-in connector extensibility model leverages the Azure Functions extensibility model to enable adding built-in connector implementations like Azure Functions extensions. This allows developers to write their connectors as Azure Functions extensions, build and package them as a NuGet for anyone to consume.
There are mainly two operation parts that a developer would need to implement:
Operation descriptions are metadata about the operations that the custom built-in connector implements. These are primarily used by the Logic Apps designer to drive the authoring and monitoring experience related to these connectors’ operations. For example, designer uses operation descriptions to understand the input parameters required for a given operation as well as facilitate the generation of outputs property tokens based on the schema of the output of an operation.
Logic Apps runtime will use these implementations at runtime to invoke the specified operation in the workflow definition.
In order to hook up with function runtime the new built-in connector extension need to be registered with the Azure Function runtime extensions. The details are discussed later in this blog.
CosmosDB Built-in Connector
Here in this sample connector, I am developing the CosmosDB built-in custom connector which has only one trigger and no actions are available. The details of the operations are described below:
Logic App Operation
|
Operation details
|
Description
|
Trigger
|
Receive Document
|
The trigger is invoked when there are inserts or updates in the specified database and collection of CosmosDB.
|
Action
|
–
|
No action operation are defined for this connector
|
To develop your own built-in connector, you need to add the work flow webjob extension package. , I am creating the .NET Core 3.1 class library project in visual studio and added the Microsoft.Azure.Workflows.Webjobs.Extension package as Nuget reference to the project. The Service provider interface is implemented to provide the operations of the CosmosDB connector.
Service Provider interface implementation
The webjob extension Nuget package which was added to the class library project provides the service provider interface IServiceOperationsTriggerProvider which needs to be implemented.
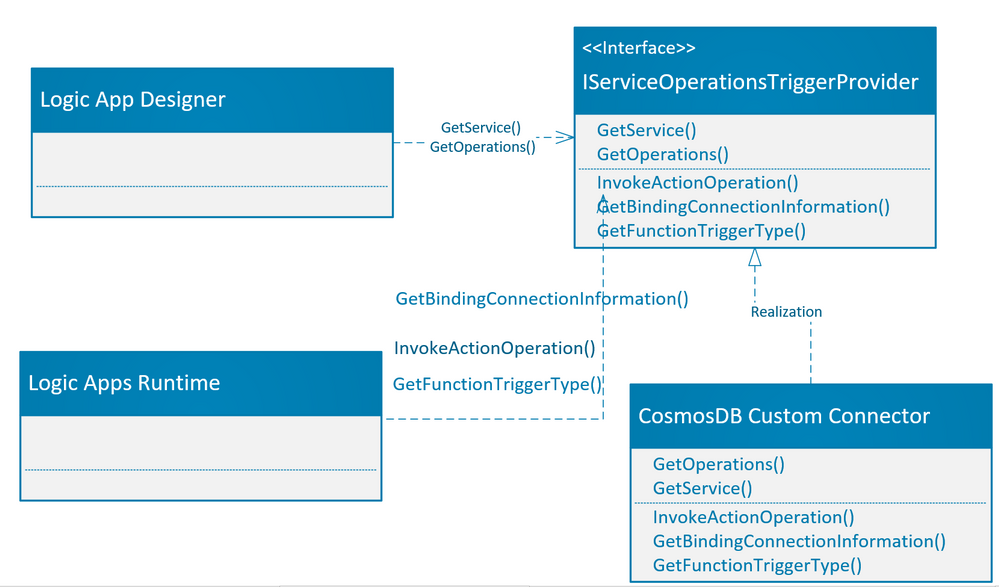
As part of operation description, the IServiceOperationsTriggerProvider interface provides methods GetService() and GetOperations() which are required to be implemented by the custom built-in connector. These operations are used by the logic app designer to describe the actions/triggers by the custom built-in connector on the logic app designer surface. Please note that the GetService() method also specifies the connection parameters needed by the Logic app designer.
For action operation, you need to implement the InvokeActionOperation() method, which is invoked during the action execution. If you would like to use the Azure function binding for azure triggers, then you need to provide connection information and trigger bindings as needed by Azure function. There are two methods which need to be implemented for Azure function binding, GetBindingConnectionInformation() method which provides the connection information to the Azure function binding and GetTriggerType() which is same as “type” binding parameter for Azure function.
The picture below shows the implementation of methods as required by the Logic app designer and Logic app runtime.

The details of the methods which are required to be implemented are tabulated below:
Operation Methods
|
Comments
|
Example
|
GetService()
|
This is needed by Logic app designer. This is the high-level description of your service, which includes the service descriptions, brand color, Icon URL, connection parameters and capabilities etc.
|
public ServiceOperationApi GetService()
{
  return this.CosmosDBApis.ServiceOperationServiceApi;
}
|
GetOperations()
|
This is needed by Logic app designer, to get the list of operations that your service has implemented. This is based upon a swagger schema.
|
public IEnumerable<ServiceOperation> GetOperations(bool expandManifest)
{
  return expandManifest ? serviceOperationsList : GetApiOperations();
}
|
InvokeActionOperation()
|
This is invoked for every action operation during runtime. Here you can use any client (FTPClient, HTTPCLient etc..) as needed by your custom built-in connector actions. If you are just implementing the trigger as in this case, then you do not need to implement this method.
|
using (var client = new HttpClient())
{
  response = client.SendAsync(httpRequestMessage).ConfigureAwait(false).ToJObject();
 }
 return new ServiceOperationResponse(body: response);
|
GetBindingConnectionInformation()
|
These are the required connection parameters by trigger binding in case you are using the Azure function trigger type.
|
return ServiceOperationsProviderUtilities
                    .GetRequiredParameterValue(
                        serviceId: ServiceId,
                        operationId: operationId,
                        parameterName: "connectionString",
                        parameters: connectionParameters)?
                    .ToValue<string>();
|
GetFunctionTriggerType()
|
If you are using the Azure function built-in triggers as Logic App trigger, then you need to return the string which is same as type in Azure function trigger binding.
“type”: “cosmosDBTrigger”,
|
public string GetFunctionTriggerType(){
  return "CosmosDBTrigger";
}
|
Function Extensions and registration:
The function extension registration needs to be added as a startup job and register the service provider as part of service provider list, so that the built-in connector extension can be loaded during the function runtime start process.
Adding the converter is optional depending upon the type of data you need as an input to the built-in trigger. In this example I am converting the Document data type for Cosmos DB Documents to JObject array.
- Create startup job: To register the custom built-in connector as function extension, you need to create a startup class using [assembly:WebJobsStartup] assembly attribute and implementing IWebJobsStartup interface, refer the function registration for more details. In the configure method you need to register the extension and inject the service provider as shown below:
    public class CosmosDbTriggerStartup : IWebJobsStartup
    {
        public void Configure(IWebJobsBuilder builder)
        {
            // Registering and extension
            builder.AddExtension<CosmosDbServiceProvider>();

            // DI the trigger service operation provider.
            builder.Services.TryAddSingleton<CosmosDbTriggerServiceOperationProvider>();
        }
    }
- Register service provider: We need to register the service provider implementation as function extension. We are using the built-in Azure function Cosmos DB Trigger as a new trigger. Here in this example, we register the new Cosmos DB service provider for an existing list of service providers which are already part of Logic App extension.
   [Extension("CosmosDbServiceProvider", configurationSection: "CosmosDbServiceProvider")]
   public class CosmosDbServiceProvider : IExtensionConfigProvider
   {
       public CosmosDbServiceProvider(ServiceOperationsProvider serviceOperationsProvider, CosmosDbTriggerServiceOperationProvider operationsProvider)
      {
            serviceOperationsProvider.RegisterService(ServiceName, ServiceId, operationsProvider);
      }
      public void Initialize(ExtensionConfigContext context)
      {
            // Converts Cosmos Document list to JObject array.
            context.AddConverter<IReadOnlyList<Document>, JObject[]>(ConvertDocumentToJObject);
      }
   }
- Add Converter: Logic app has implemented the generic way to handle any function built-in trigger using the JObject array, we may need (optional) to add a converter to convert the read only list of Azure Cosmos DB document into JObject array. Once the converter is ready as shown in above example, we need to register the converter as part of ExtensionConfigContext.
// Converts Cosmos Document list to JObject array.
context.AddConverter<IReadOnlyList<Document>, JObject[]>(ConvertDocumentToJObject);
The complete implementation of all three classes as mentioned above are given in the following code map diagram.

Testing the built-in connector:
You need to update the extensions.json in extension bundle to add the above NuGet reference. You can refer the deploy.ps1 script.
Update the extension bundle to include the custom built-in connector.
Create the Logic App project and install the extension package given below:
dotnet add package ServiceProviders.CosmosDb.Extensions --version 1.0.0 --source <ServiceProviders.CosmosDb.Extensions package path>
Once you open the workflow in designer (make sure you close any func.exe process in case if it already running before opening the designer), you should be able to see the newly added connector.

You can now add connection string of Azure cosmos DB and add new document in the database under collection or lease collection to test the trigger by creating a simple logic app using the CosmosDB trigger.
Specifying the connection string.

Specify the database name and collection name for the trigger.

Execute F5 in VS code and invoke trigger by adding a new item using data explorer of your CosmosDB account as shown below to trigger the workflow.

The sample code can be downloaded from the repository. https://github.com/praveensri/LogicAppCustomConnector/tree/main/ServiceProviders.CosmosDb.Extensions
by Contributed | Nov 20, 2020 | Azure, Microsoft, Technology
This article is contributed. See the original author and article here.
General
- Move resources from a resource group to another region
- Filter pills update
Intune
- Updates to Microsoft Intune
Let’s look at each of these updates in greater detail.
General
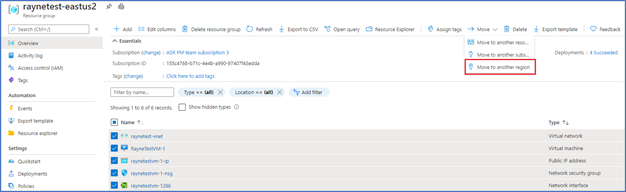
Move resources from a resource group to another region
You can now navigate to a resource group and start the journey to move resources to another region. You will then be guided to the Azure resource Mover hub upon clicking a notification, where you can add missing dependencies, customize destination properties and track the progress of your moves. The experience also provides the ability for you to test the move by using the ‘discard’ option.
- In the Azure portal, open the relevant resource group.
- In the resource group page, select the resources that you want to move.
- Select Move > Move to another region.

- In Source + destination, select the target region to which you want to move the resources. Then select Next.
- In Resources to move, select Next.
- In Select resources, select resource you want to move. You can only add resources supported for move. Then select Done.
- In Move resources, select Next at the bottom of the screen.
- In Review + Add, check the source and target details.
- Select Proceed to begin adding the resources.
General
Filter pills update
To bring consistency to the filtering experience while also making it fully accessible and WCAG 2.1 compliant, we have enhanced the filter pills to now open dialogs. This new experience provides a consistent, intuitive approach for filtering as well as accessibility for all our users.
- Navigate to “All resources” and select “Location” filter

- Set “Operator” as “Contains” and Value as “US”, then select “Apply”

- The table is now updated to reflect the new filter (only locations with US in the name)
INTUNE
Updates to Microsoft Intune
The Microsoft Intune team has been hard at work on updates as well. You can find the full list of updates to Intune on the What’s new in Microsoft Intune page, including changes that affect your experience using Intune.
Azure portal “how to” video series
Have you checked out our Azure portal “how to” video series yet? The videos highlight specific aspects of the portal so you can be more efficient and productive while deploying your cloud workloads from the portal. Check out our most recently published video:
Next steps
The Azure portal has a large team of engineers that wants to hear from you, so please keep providing us your feedback in the comments section below or on Twitter @AzurePortal.
Sign in to the Azure portal now and see for yourself everything that’s new. Download the Azure mobile app to stay connected to your Azure resources anytime, anywhere. See you next month!

Recent Comments