This is a guest post by Obinna Ekwuno, software engineer at Gatsby and Marcy Sutton, freelance web developer and accessibility specialist. Read more about Obinna and Marcy at the end of this article. Accessibility has become a buzz word for making sure that disabled users get a fair experience when interfacing with platforms on the web or on mobile.
Use Microsoft Graph Toolkit to build a solution for Microsoft Teams that will track daily calendar, tasks and e-mails in a Teams Tab as one productivity hub. – OfficeDev/M365Bootcamp-TeamsOneProductivityHub
Mobile app development is both a huge opportunity and a constant challenge. In this talk we’ll look at the mobile development landscape – from native apps to multi-platform development and mobile web. We’ll talk about design challenges and personalizing user experiences to match diverse contexts. And we’ll look at emerging paradigms in dual-screen and multi-posture devices (e.g., Surface Duo) and talk about how we can leverage these technological advances to rethink the modern mobile app.
What is infrastructure as code? Microsoft Azure provides you with a number of options to deploy your infrastructure. In the One Dev Question series, Cloud Developer Advocate Abel Wang explains how Azure DevOps provides developer services to support teams to plan work…
Mark Simos, lead Cyber security architect for Microsoft, explored the lessons learned from protecting both Microsoft’s own technology environments and the responsibility we have to our customers, and shares the top 10 (+1!) recommendations for Azure security best practices.
The Azure Hybrid Benefit can help you save move when you are running your workloads within Azure by leveraging your on prem licenses, find out more in this blog post.
The Roguelike Celebration conference has been running for five years, but two weeks ago marks our fir… Tagged with streaming, events, conferences, twitch.
This post shows how to generate an SSL certificate through Let’s Encrypt API and bind the certificate to the custom APEX domain on Azure Functions app.
Lots to share in the world of Microsoft services this week. News includes Microsoft 365 Apps Admin Center’s new inventory & monthly servicing feature currently in preview, Azure Cognitive Services has achieved human parity in image captioning, Azure Site Recovery TLS Certificate Changes, Static Web App PR Workflow for Azure App Service using Azure DevOps, and of course the Microsoft Learn Module of the week.
You might have heard of Microsoft Teams, Outlook, or SharePoint. But did you know that next to being some of the most popular applications from Microsoft, they are a part of a highly extensible development platform with a rich partner ecosystem?
This article is contributed. See the original author and article here.
Oftentimes data scientists and other users working on smaller data sets in Azure Databricks explore data and build machine learning (ML) models using single-machine python and R libraries. This exploration and modeling doesn’t always require the distributed computing power of the Delta Engine and Apache Spark offered in Azure Databricks. Doing this type of work on a traditional multi-node cluster often results in wasted/underutilized compute resources on worker machines which results in unnecessary cost.
Single Node clusters is a new cluster mode that allows users to use their favorite libraries like Pandas, Scikit-learn, PyTorch, etc. without wasting unnecessary compute/cost associated with traditional multi-node clusters. Single Node clusters also support running Spark operations if needed, where the single node will host both the driver and executors spread across the available cores on the node. This provides the ability to load and save data using the efficient Spark APIs (with security features such as User Credential Passthrough) and also doing efficient exploration and ML using the most popular single-machine libraries.
If/when a data scientist wants to use distributed compute to do things like hyperparameter tuning and AutoML or work with larger datasets, they can simply switch over to a standard cluster with more nodes.
When the Single Node capability is combined with other capabilities like:
This article is contributed. See the original author and article here.
Like any cloud service, the Azure portal itself also gets functionality updates and changes. So how do you keep up with what’s new?
Azure portal update blog
The Azure portal product team maintain a blog where, on a monthly basis, they post a summary of what’s in the latest update. Visit the Azure portal blog and follow them for notifications via Tech Community or via RSS feed.
Did you know that Cosmos DB now has a Serverless capacity model, for consumption based billing (in public preview)? That was in the October 2020 update!
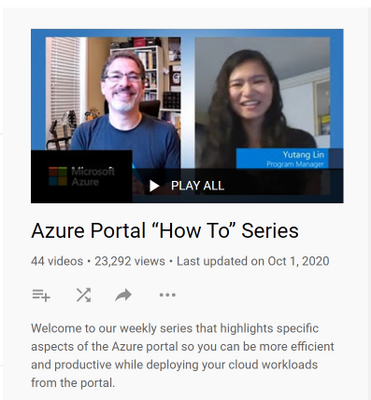
Azure portal “How To” Video Series
The Azure portal team also publishes short “how to” videos on YouTube, under the Microsoft Azure channel.
Here are some of my favorites:
Improvements to the Linux Virtual Machine experience
How to monitor Azure Functions
How to connect to a storage account using private link
This article is contributed. See the original author and article here.
On the 20th October at 1PM PDT, 9PM BST,Mustafa Saifee, a Microsoft Learn Student Ambassador fromSVKM Institute of Technology, India andDave Glover, a Cloud Advocate from Microsoft will livestream an in-depth walkthrough of how to develop a secure IoT solution with Azure Sphere and IoT Central nLearn TV.
You can follow along with us live on October 20th, or join the Microsoft IoT Cloud Advocates in our IoT TechCommunitythroughout October to ask your questions about IoT Edge development.
Meet the presenters
Mustafa Saifee
Microsoft Learn Student Ambassador
SVKM Institute of Technology
Dave Glover Senior Cloud Advocate, Microsoft
IoT and Cloud Specialist
Session details
In this session Dave and Mustafa will deploy an Azure Sphere application to monitor ambient conditions for laboratory conditions. The application will monitor the room environment conditions, connect to IoT Hub, and send telemetry data from the device to the cloud. You’ll control cloud to device communications and undertake actions as needed.
Learning Objectives
In this module, you will:
Create an IoT Central Application
Configure your Azure Sphere application to IoT Central
Build and deploy the Azure Sphere application
Display the environment telemetry in the IoT Central Dashboard
Control an Azure Sphere application using Azure IoT Central properties and commands
Ready to go
Our Livestream will be shown live on thispageand at MicrosoftLearn TVon Tuesday 20th October 2020 or early morning of Wednesday 21th October in APAC time zone.
This article is contributed. See the original author and article here.
Throughout this series, I’m going to show how an Azure Functions instance can map APEX domains, add an SSL certificate and update its public inbound IP address to DNS.
APEX Domains to Azure Functions in 3 Ways
Let’s Encrypt SSL Certificate to Azure Functions
Updating DNS A Record for Azure Functions Automatically
Deploying Azure Functions via GitHub Actions without Publish Profile
In my previous post, I discussed how to map a root domain or APEX domain with an Azure Functions instance. Let’s bind an SSL certificate to the custom domain, which is generated by Let’s Encrypt so that we can enable HTTPS connection through the custom domain.
Let’s Encrypt
Let’s Encrypt is a non-profit organisation that issues free SSL certificate. Although it’s free, it’s widely accepted and backed by many tech companies. There are a few limitations, though. It’s valid only for three months. In other words, we MUST renew the SSL certificate issued by Let’s Encrypt for every three months. But you know, we’ve got automation! So, don’t worry about the certificate renewal as long as we’ve got the automation process for it.
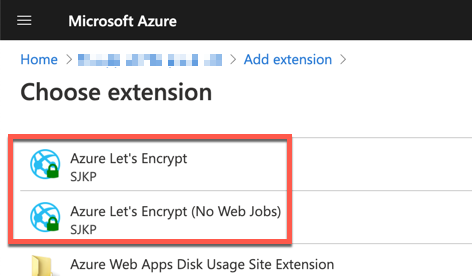
Azure App Service Site Extension
Azure App Service provides the site extension feature. One of the extensions is the Let’s Encrypt Site Extension. It’s written as the Azure WebJob style so that the WebJob runs every three months to renew the certificate automatically. It’s a pretty useful extension.
However, this extension has a few critical drawbacks as well.
It only runs on Windows-based App Service instances (including Azure Functions) because WebJob basically relies on the Windows platform. No Linux-based App Service, unfortunately.
It shares the runtime environment with the App Service instance. Therefore, whenever we deploy a new App Service instance, we MUST always deploy the extension and configure it.
If we deploy an application with the “delete all files before deployment” option, the WebJob will get deleted.
It doesn’t seem to be a way for production use. What else can we take to bind the SSL certificate for free?
Azure Functions App Only for SSL Certificate Management
We’re lucky enough to have Shibayan who publishes an excellent Azure Function app that manages Let’s Encrypt SSL Certificate with no dependency on the App Service instances. Through the application, we can quickly generate and renew as many SSL certificates as we can and store them to Azure Key Vault. The stored SSL certificates are directly bound to Azure Functions instances. How fantastic!
First of all, run the ARM template below to provision an Azure Functions app and Key Vault instance. But, if you like, you can write your own ARM template and run it.
The provisioned Azure Functions app instance got the Managed Identity feature enabled so the app can directly access to the Key Vault instance to store SSL certificates. Once all relevant resources are provisioned, follow the process below.
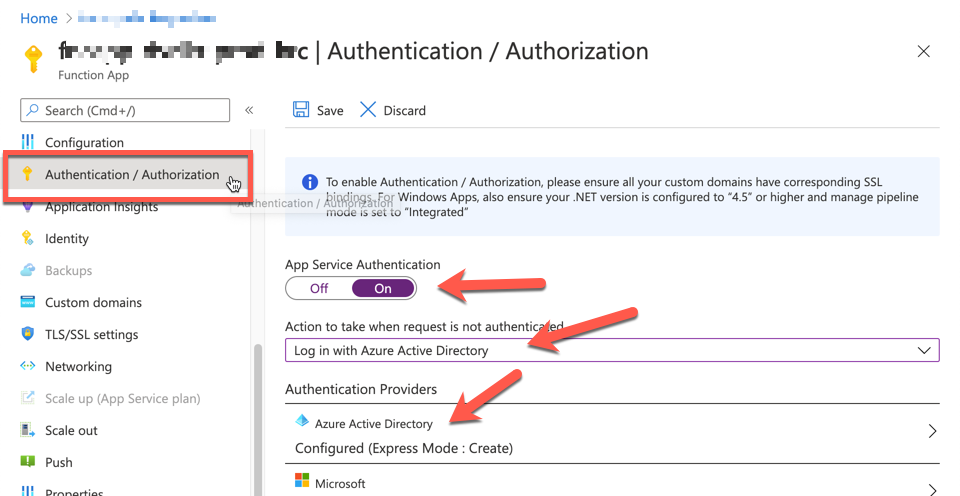
The provisioned Azure Functions app includes an admin UI which is only accessible through authentication. Therefore, activate the Authentiation / Authorisation feature like below:
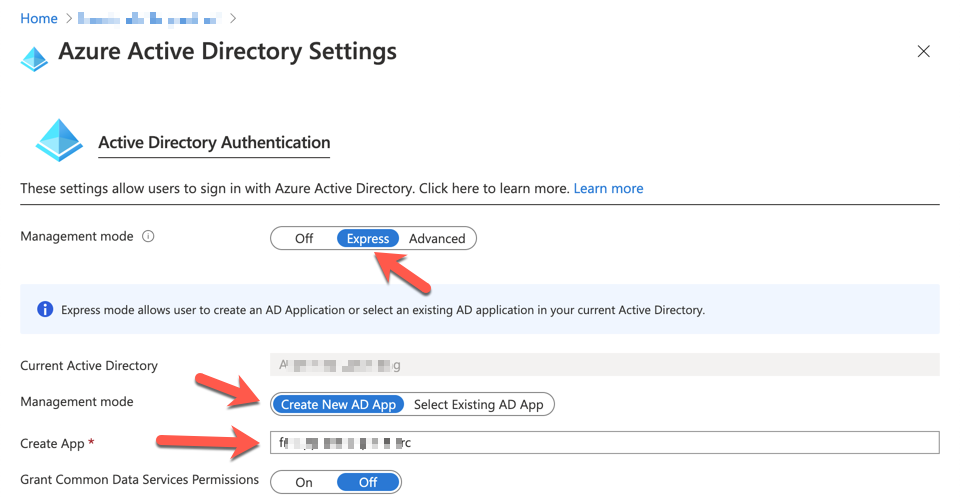
Then, configure the Azure Active Directory for authentication. We use the account registered to Azure Active Directory. Set the management mode to Express and put the app name. The default value of the app name is the Function app name. We don’t need to change it.
Now, we got the Azure Functions app configured for SSL certificate management.
Azure DNS Configuration
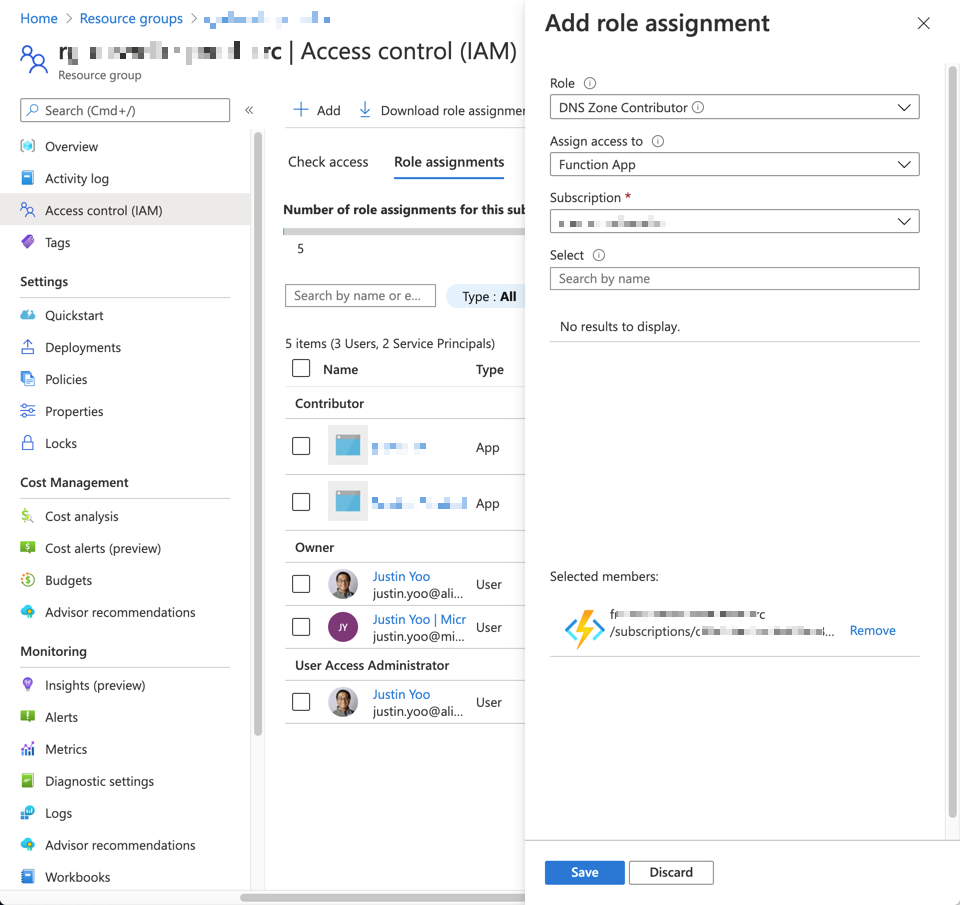
I’m assuming that we use Azure DNS for domain management. Go to the resource group where the Azure DNS instance is provisioned and select Access control (IAM) blade, then assign a role to the Azure Functions app for SSL certificate management.
Role: DNS Zone Contributor
Assign access to: Function App
Selected members: Azure Functions app for SSL certificate management. Only apps that Managed Identity feature enabled appear here.
SSL Certificate Generation
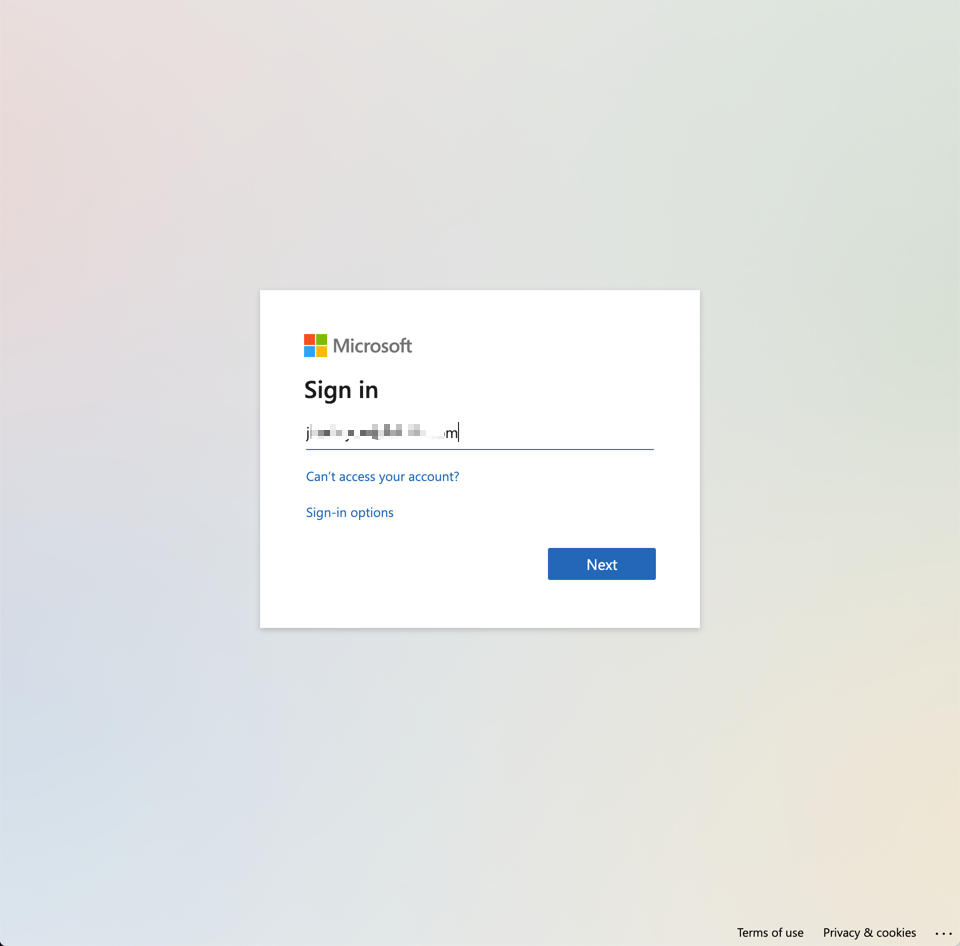
Open a web browser and access to the admin UI for the SSL certificate management, by accessing to https://ssl-management.azurewebsites.net/add-certificate. If it’s the first time for you to access, you’ll be asked to log-in.
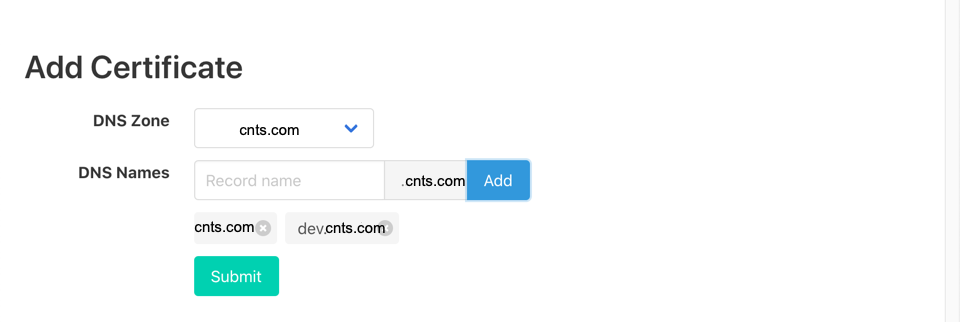
Once logged-in, the admin UI appears. For APEX domain, enter nothing to the Record name field then click the Add button. If you want to issue the certificate for subdomains, add the subdomain to the Record name field. You can also issue one certificate for as many domains as you want. Here we generate one certificate for both cnts.com and dev.cnts.com.
If you prefer to creating a separate certificate for each domain, cnts.com and dev.cnts.com, then run the registration twice.
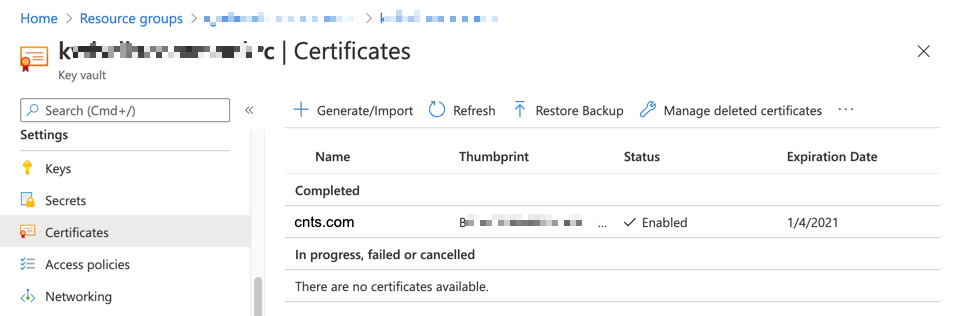
Once completed, the pop-up appears like:
Let’s go to the Azure Key Vault instance to check whether the SSL certificate has been generated or not.
SSL Certificate Binding to APEX Custom Domain on Azure Functions
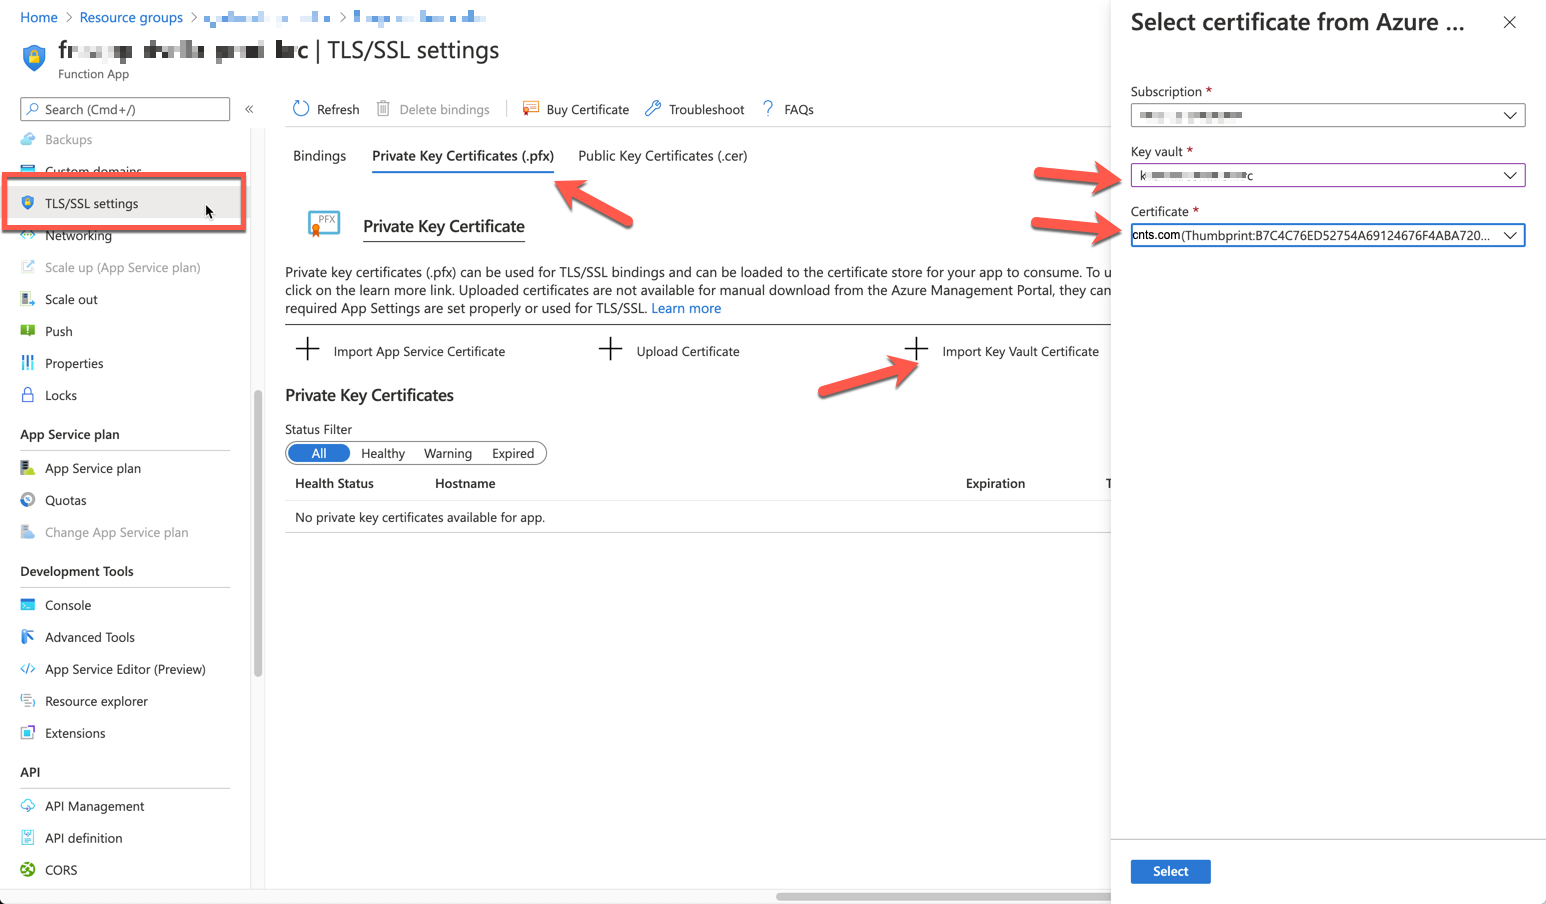
We’ve got the custom APEX domain, mapped from the previous post. Now, it’s time to bind the certificate with the domain. Go to the Azure Functions instance that I want to attach the certificate and select the TLS/SSL settings blade. Click the Private Key Certificates (.pfx) tab then Import Key Vault Certificate button to import the one stored in our Key Vault instance.
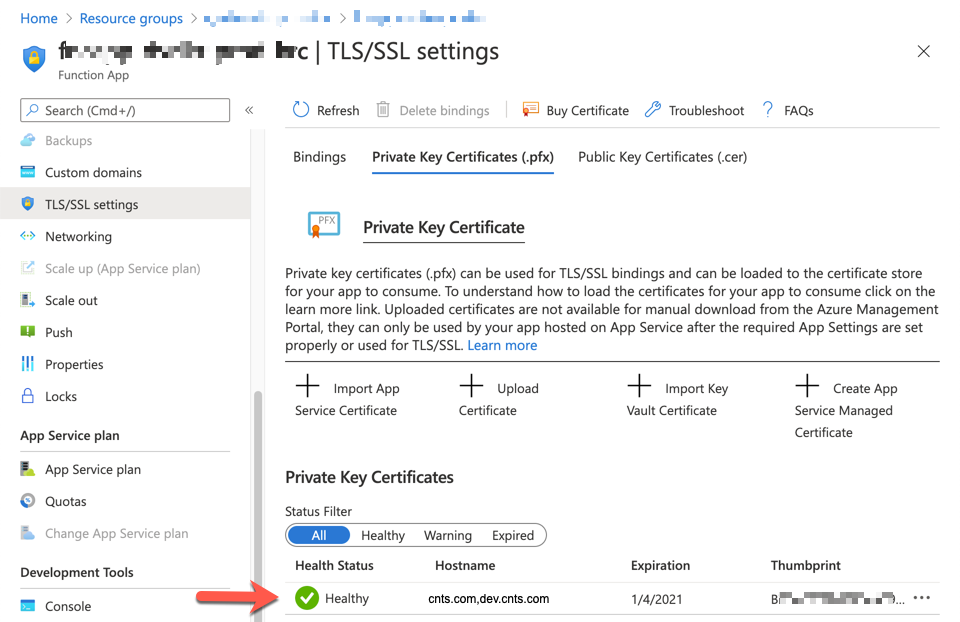
Once imported, you can see the screen below. As we generated one certificate for both cnts.com and dev.cnts.com, it’s normal to see both domain names.
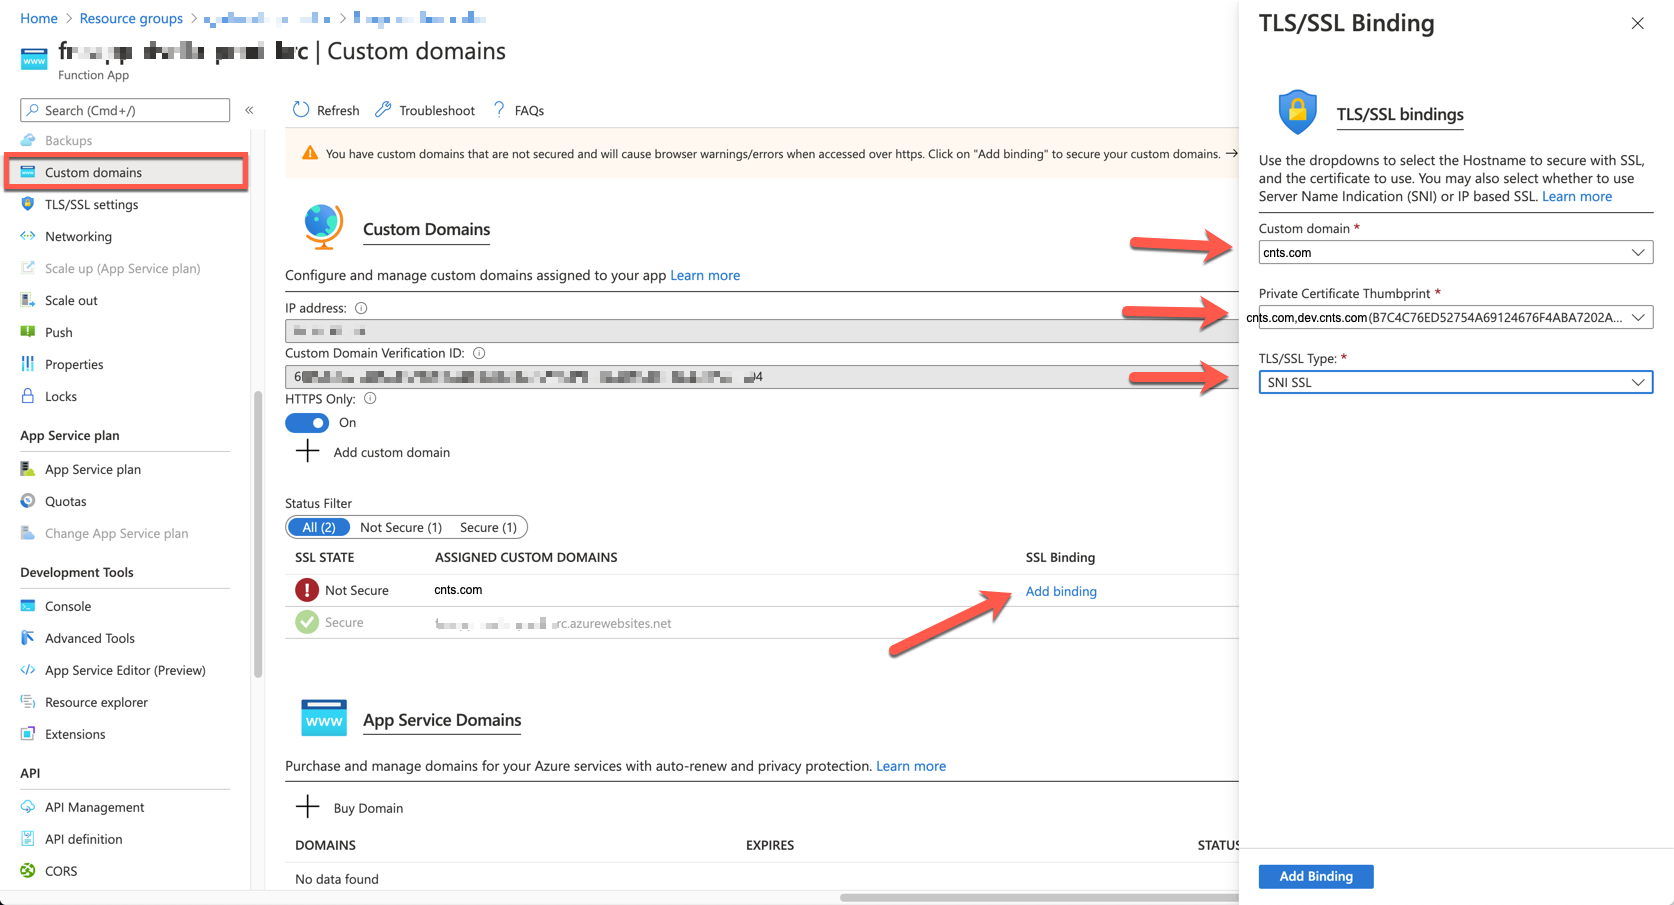
Let’s select the Custom domains blade. The domain is still not bound with the SSL certificate that we just imported. Click the Add binding link, choose cnts.com for the Custom domain field, cnts.com,dev.cnts.com for the Private Certificate Thumbprint field. And finally, choose SNI SSL for the TLS/SSL Type field.
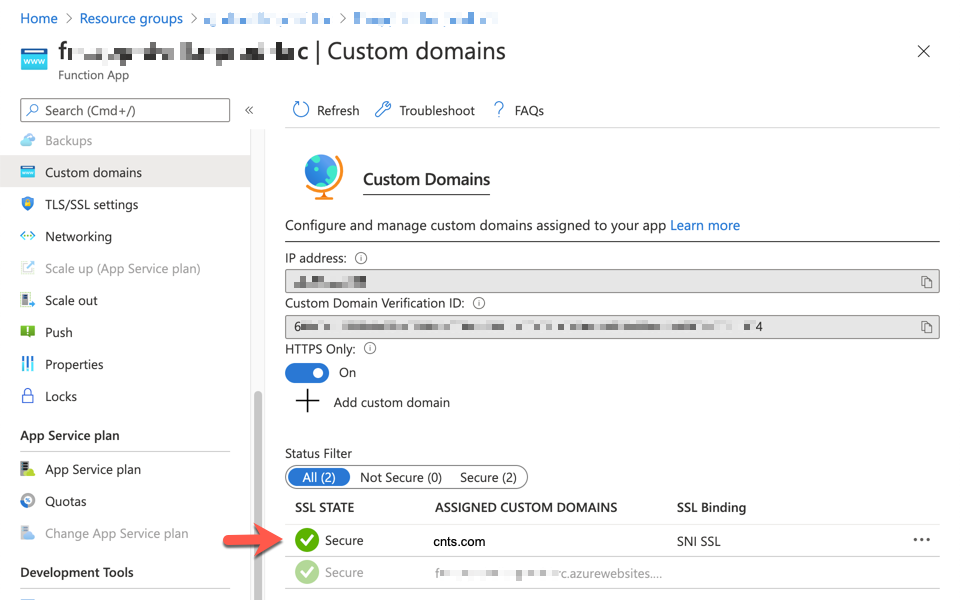
Now we can see the SSL certificate is properly bound with the custom APEX domain.
So far, we’ve walked through how Let’s Encrypt SSL certificate can be bound with a Custom APEX domain on Azure Functions instance. In the next post, I’ll discuss how the inbound IP of the Azure Functions instance is automatically updated to the A Record of Azure DNS.
This article was originally published on Dev Kimchi.
This article is contributed. See the original author and article here.
During the past few weeks Microsoft has experienced some unfortunate outages in our cloud services. These outages led to a number of organizations I support reaching out and asking, “How can I better proactively monitor the status of Office 365?”. This gave me an idea……but before we get to that, let’s discuss where you can find service status information for Office 365 and Azure.
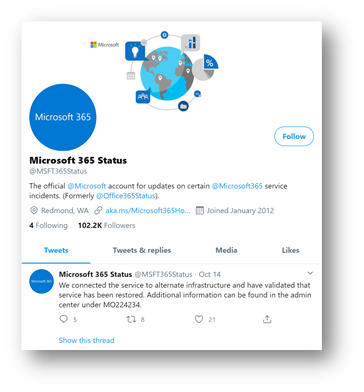
In addition to this portal, if you are a Twitter user you can follow Microsoft 365 Status (@MSFT365Status) to get notifications of incidents within Microsoft 365:
If you are interested in the status of Microsoft Azure, you can leverage the Service Health Blade (https://aka.ms/azureservicehealth :(
These are all very effective methods of tracking service status, but what if I am leveraging Azure Sentinel as my SIEM and I want to track the Office 365 Service Status? Well that was the question that got me started on this article. I find it is easiest to learn new technology by having a problem to resolve or an actual goal to achieve. So I decided this was a good use case to learn more about how to get custom data, in this case REST API data, into Azure Sentinel, use that data to alert on service degradation and then create a new workbook to visualize it. A pretty lofty goal for a guy with almost zero coding experience. Let’s see how it worked out…..
Step One: Getting Office 365 Service Status via API
As with just about every other component of the Microsoft Cloud, Office 365 Service Status can be accessed via the Office 365 Management API ( https://docs.microsoft.com/en-us/office/office-365-management-api/office-365-service-communications-api-reference ). I decided the most effective way to pull this data and send it to Azure Sentinel was to use an Azure Logic App. If you are not familiar with Azure Logic Apps, it is a low code/no code cloud service that helps you schedule, automate, and orchestrate tasks, business processes, and workflows when you need to integrate apps, data, systems, and services across enterprises or organizations. Azure Logic Apps are a sibling to Microsoft Power Automate that is part of Office 365, so learning one of these services translates to the other. This was very helpful because a Microsoft MVP in the UK, Lee Ford, had written a blog post in 2019 on accessing the Service Status via Power Automate (which was called Flow at the time): https://www.lee-ford.co.uk/get-latest-office-365-service-status-with-flow-or-powershell/ . I built on Lee’s idea to create my Logic App:
I started by creating a new Logic App that runs on a schedule and connects to the Office 365 Management API to get the Service Status via an “HTTP” Action. I chose every 4 hours, you can decide how often you want to pull the data for your use case.
Next I used a “Parse JSON” action to manipulate the returned information from the HTTP Get. I used the schema from Lee Ford’s Blog post as my sample payload.
Now the last step is a little tricky. We need to take the returned JSON payload and send it to Azure Sentinel. This payload is an array, so it must be iterated through. Luckily, Logic Apps is built for people with minimal coding experience and helps guide you through the experience. Since we want to send this data to Azure Sentinel, which is built on Azure Log Analytics, we choose the “Send Data to Log Analytics” Action. When I click in the box for “JSON Request body” I am provided a pick list of returned information to choose from. However, the item we need to use is not shown, so you need to click the “see more” option in the pick list. This will expose the “value” item, which is what we need.
When we finish filling in the required parameters, Logic Apps will automatically recognize this is an array and create a For Each container to iterate through the values…pretty cool!
We are not finished yet. We don’t actually want “value” in the JSON Request Body field. We want whatever is the “Current Item” in the loop. So, delete “value” in the Send Data action and go back to the bottom of your pick list and choose Current Item.
And that’s it! You have now ingested Office 365 Service Status to Azure Sentinel. One thing I forgot to point out, Azure Log Analytics will automatically create the custom log the first time the Logic App runs. It will add a table called “yourname_CL”.
Step Two: Making use of the data
Now that we have ingested the service status data into Azure Sentinel, let’s do something with it.
First let’s write a simple KQL (Kusto Query Language) query to pull out the basic data we need:
Now let’s create a scheduled query analytics rule that will create an incident when a service is degraded:
One of the cool new features in Azure Sentinel that you will notice above is where we can get a preview of what this query will produce. Based on the settings I have chosen; this will create 1 Alert per day. You don’t want to create an alert flood, but you do want to be notified appropriately. So, change the Query Scheduling for what makes sense for your organization.
I’m just going to use the defaults for Incident Settings.
You can even use an Azure Logic App playbook to take some automated action based on the Incident.
Done! Now we will see an incident generated if there is a service degradation in Office 365. See below:
For a production environment, I would probably want to be a little more detailed in my incident generation, getting down to individual services, but hopefully this has shown you the “Art of the Possible” and you can take it further.
Step Three: Bonus Step! Let’s create a workbook in Azure Sentinel to display some of the information we have gathered.
Let’s see what we can come up with. First we need to create a new workbook:
This will get a workbook populated with some sample data to start with, let’s edit it:
Let’s start off by just making a simple grid of the query we already built to show degraded services in the past 4 hours:
That will get us a simple workbook like this (I also edited the title before I captured the screenshot):
That’s not very exciting, so let’s add another Query section and try to build a graph:
We are going to build a “honey comb” graph that will show which services are operational and which are degraded:
Instead of creating multiple screenshots I have highlighted in green the items I changed. Also I used a query that returns all service status, not just degraded. (see above)
When you click “Done Editing” you will get this visualization which can be zoomed into and out of, as well as moved around. Not perfect, but it only took a few minutes to build. I’m sure you can come up with an even better one!
Thank you for getting this far in my post…..It went a little long :smiling_face_with_smiling_eyes:. I hope you found this useful and that you can use it to build something for your organization. Please post comments or questions below.


Recent Comments