
by Contributed | Oct 18, 2020 | Azure, Technology
This article is contributed. See the original author and article here.
View the recording of Azure Data Explorer online event recording to hear all about the great new features, announcements, and collaborations for Azure Data Explorer – Azure’s fast, fully- service for real-time analysis of telemetry big data streaming from apps, websites, IoT devices, and more.

One of Azure’s most used services and the foundation of Microsoft’s telemetry platform, Azure Data Explorer , combines broad data exploration and powerful analytical queries with lightning-fast interactivity.
Use Azure Data Explorer to:
- Monitor mission-critical systems.
- Analyze IoT data from thousands of devices.
- Explore and identify trends and anomalies in your data.
- Tune up customer experience.
- And many more exciting capabilities!
Read Azure Data Explorer – Reimagine Telemetry Analytics to learn about the latest groundbreaking innovations, new features, and exciting collaborations.
The event includes a keynote by Rohan Kumar, CVP, Azure Data and fascinating content by the product group team members, delivering sessions on various topics. See the full agenda below.

List the announcements & Azure Updates:

Agenda
Name
|
Description
|
Speakers
|
Duration (Min)
|
Opening Session
|
Opening words, brief overview of the agenda and service
|
Oded Sacher, Partner Group Manager
Uri Barash, Principal Group Program Manager
|
15
|
Reimagine Telemetry Analytics, with Rohan Kumar
|
Join us to hear from Rohan Kumar, Corporate Vice President of Azure Data, about the exciting developments with Azure Data Explorer, Microsoft’s telemetry analytics platform that is powering Microsoft’s internal and external business
|
CVP, Azure Data, Rohan Kumar
|
30
|
|
Daimler trucks north America |
Lutz Beck – CIO
Doug Murphy Data intelligence manager
Sammi Li, data analysts
|
|
|
Checkpoint |
Itai Greenberg, VP Product & Product marketing |
|
What’s new with ADX
|
Updates on the latest and greatest in ADX ingestion, query, dashboards and more
|
Gabi Lehner, Program Manager
Tzvia Gitlin Troyna, Program Manager
|
30
|
Powering Engineering Excellence With Azure Data Explorer
|
Taboola on AzureDataExplorer “It’s magic, interactive & intuitive. My users are in love”
|
Ariel Pisetzky, VP Information Technology & Cyber at Taboola.
|
15
|
Start Fast and Accelerate!
The next generation of the Kusto engine
|
Azure Data Explorer engine enhancements.
|
Evgeney Ryzhyk, Partner Software Engineer
Alexander Sloutsky, Principal Engineering Manager
Avner Aharoni, Principal Program Manager
|
15
|
AMD
|
Azure Data Explorer now supports AMD based SKUs
|
Vlad Rozanovich, CVP Datacenters and Cloud sales
|
|
|
Customers’ Stories
|
- Bosch – Andreas Mauer, VP CTO Integrator Business
- Siemens Health – Thomas Zeiser, Product Owner, Philipp Guendisch, Operation Engineer, Henri Benoit, System Engineering Lead and Emilian Ertel, Operation Engineer
- Zoomd – Niv Sharoni, CTO
- BASF – Ringo Fodisch, Senior Automation Engineer
|
|
Buhler
|
|
Cedric Menzi, Solution Architect Samuel Ochsner, Lead Software Developer IoT bei Bühler Group
|
15
|

Azure Data Explorer
by Contributed | Oct 18, 2020 | Azure, Technology
This article is contributed. See the original author and article here.
Abstract
Azure WVD has played a tremendous role in enabling many organizations to allow their employees to work from home/remote locations.
By looking at the number of WVD adoption across organization, I would say “Year 2020 is WVD year for Azure”.
With so many users using WVD on regular basis Microsoft received lot of feedback to improve the WVD offering and from Ignite 2020 announcement I would certainly say; feedback is being addressed at rapid pace.
Let us look at important announcement with respect to Azure WVD and what problems those announcements will solve.
Microsoft Endpoint Manager Integration
Far far years ago in the year 2019, people used to get their own laptops, which was a physical device, and it was controlled through endpoint manager. Companies registers the laptop physical device to Intune just like your mobile devices.
Now in this current year 2020, people are using magical service of WVD where users have their own virtual machine. So, companies were demanding that, as WVD machine is just like physical laptop for my employees, so have them also controlled through Intune and endpoint manager. Earlier it was not there and now this is announced.
We will be able to configure WVD using endpoint manager and manage it centrally.
WVD is the only platform that supports Windows 10 multisession for remote working enabling organizations to save lot of their cost. Windows 10 multisession OS will also be allowed to register in Intune as per announcement. So, this is an important update.
Attach MSIX App directly from Azure Portal.
MSIX is a packaging tool that enables you to repackage your existing desktop app to MSIX format, without any code change. There are still many desktop application companies are using which are legacy. They don’t support modern feature like touch. You repackage them and install with MSIX, then touch feature will be supported. Plus, you can send the update to the application packaged as a part of your OS patches. IT management becomes easy and they are deployed like store apps rather than desktop apps.
Now from WVD context, the general approach is to create golden image per application / group of users/ department base. Then if there are other set of applications that need to be exposed then create a new golden image. MSIX can help you to make single golden image for your WVD and attach app to respective Host Pools. So, no need to create app specific golden image.
This is significant improvement and simplifies lot of headache involved in golden image preparation and management.
Disable Screen Capture
This was number one ask from security teams. Screen capture is still a possible way of data leakage. With disablement of screen capture this concern is also addressed.
Direct RDP to WVD Hosts
Azure WVD work on reverse connect technology and the connection made to WVD common URL or control plain is over the internet. Customer was asking if WVD user is already on a trusted network then why do we use reverse connection?
Going forward as per announcement users will be able to connect to WVD session host directly over RDP, if they are already on trusted network. This will result in significant reduction on hops and hence ultimately improving connectivity experience of WVD user.
Conclusion
Above announcements are impressive and will definitely increase the adoption of Azure WVD multifold.
by Contributed | Oct 18, 2020 | Azure, Technology
This article is contributed. See the original author and article here.
This blog explains how a Server Provider can onboard Customer to Azure Lighthouse by sample templates in Azure Portal.
Pre-requirements:
Before we start, please read this document about what is Azure Lighthouse.
Azure Lighthouse can enable cross and Multi-tenant management, allow for higher automation, scalability, and enhanced governance across resources and tenants.
Concepts:
Service Provider: the one to manage delegated resources.
Customer: the delegated resources (subscription and/or resources group) can be accessed and managed through service provider’s Azure Active Directory tenant.
To onboard the Customer, at first we need to gather Server Provider’s Tenant ID and Principal ID.
Gather Server Provider’s Tenant ID and Principal ID
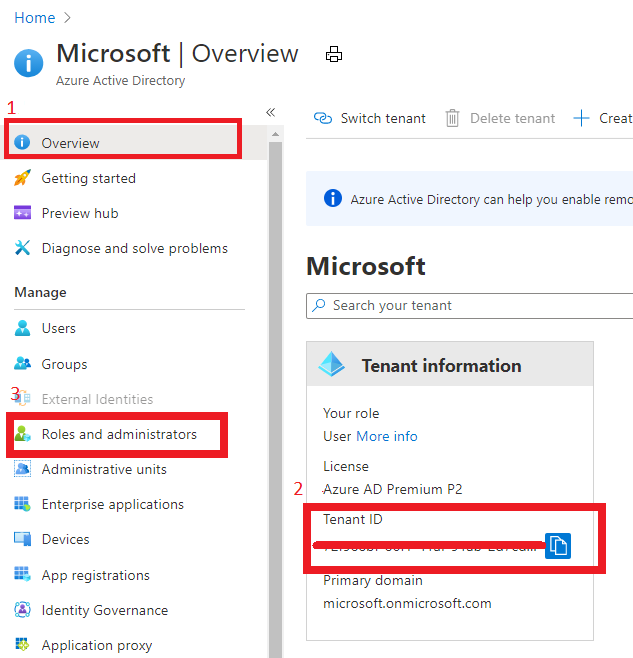
- Tenant ID:
In Azure portal, search for “Azure Active Directory”, you can find the Tenant ID in Overview.
It also can get Tenant ID through Azure Powershell or Azure CLI in local Poweshell (need to login first) or Cloud shell in Azure Portal.

For example, in Azure Poweshell use command “Select-AzSubscription <subscriptionId>”

- Principal ID:
This principal Id should be the User or Security AAD group who needs to manage customer’s resources.
In Azure portal you can search for “Azure AD roles “ or Click “Role and administrator” in the first image (marked 3). Then click find the role you want to onboard Azure Lighthouse.

Select “Profile”, you can find the Object ID there. It’s the principal ID need to keep.

Define roles and permission
As a service provider, you may want to perform multiple tasks for a single customer, requiring different access for different scopes. You can define as many authorizations as you need in order to assign the appropriate role-based access control (RBAC) built-in roles to users in your tenant.
You can get all the roles definition ID from role-based access control (RBAC) built-in roles.
https://docs.microsoft.com/en-us/azure/role-based-access-control/built-in-roles
If you know which role should assign, you also can use Azure Powershell or Azure CLI to get the role definition ID.
For example, use this command “(Get-AzRoleDefinition -Name ‘<roleName>’).id” in Azure Powershell. Here the example in below shows role definition ID for “Contributor”.

Note: Some roles are not supported for Azure Lighthouse(Like Owner role), pls check the details here https://docs.microsoft.com/en-us/azure/lighthouse/concepts/tenants-users-roles#role-support-for-azure-lighthouse
Onboard Customer delegation
After these preparation work, now let’s start to onboard the Customer delegation.
You can select one template you want to deploy for subscription or Resource group for Azure Lighthouse samples
Note: This deployment must be done by a non-guest account in the customer’s tenant who has the Owner built-in role for the subscription being onboarded (or which contains the resource groups that are being onboarded).
If the subscription was created through the Cloud Solution Provider (CSP) program, any user who has the Admin Agent role in your service provider tenant can perform the deployment.
Click one for the Azure button, it directly goes to the Azure portal custom deployment page.

Then select “Edit parameter”.

Put TenantID, PrincipalID and Role definitions found before. And click “Save”.

The deployment may take several minutes to complete.
After the deployment succeeds, it may take about 15 mins to allow us see it from portal.
In Customer Azure Portal, search for “Service Provider” and click “Service provider offers”.

In Service Provider portal, search for “My customers”, select “Customer”.

As I applied for “Contributor” role, you can find it in directory and subscription in Service Provider side.

What can we do in Azure Lighthouse delegation?
After on board Lighthouse successfully. you can use Server Provider account to manage Customer resources without switch tenant.
If Service Provider has Contributor role, it can update, delete and create resources in Customer’s subscription.
Below image shows Storage account can be created in Customer Resource group from Server provider.

To conclude, Azure Lighthouse provide benefits for managing Customers’ Azure resources securely, without having to switch context and control planes.
Reference: https://docs.microsoft.com/en-us/azure/lighthouse/how-to/onboard-customer
by Contributed | Oct 18, 2020 | Azure, Technology
This article is contributed. See the original author and article here.
This blog explains how a Server Provider can onboard Customer to Azure Lighthouse by sample templates in Azure Portal.
Pre-requirements:
Before we start, please read this document about what is Azure Lighthouse.
Azure Lighthouse can enable cross and Multi-tenant management, allow for higher automation, scalability, and enhanced governance across resources and tenants.
Concepts:
Service Provider: the one to manage delegated resources.
Customer: the delegated resources (subscription and/or resources group) can be accessed and managed through service provider’s Azure Active Directory tenant.
To onboard the Customer, at first we need to gather Server Provider’s Tenant ID and Principal ID.
Gather Server Provider’s Tenant ID and Principal ID
- Tenant ID:
In Azure portal, search for “Azure Active Directory”, you can find the Tenant ID in Overview.
It also can get Tenant ID through Azure Powershell or Azure CLI in local Poweshell (need to login first) or Cloud shell in Azure Portal.
For example, in Azure Poweshell use command “Select-AzSubscription <subscriptionId>”
- Principal ID:
This principal Id should be the User or Security AAD group who needs to manage customer’s resources.
In Azure portal you can search for “Azure AD roles “ or Click “Role and administrator” in the first image (marked 3). Then click find the role you want to onboard Azure Lighthouse.
Select “Profile”, you can find the Object ID there. It’s the principal ID need to keep.
Define roles and permission
As a service provider, you may want to perform multiple tasks for a single customer, requiring different access for different scopes. You can define as many authorizations as you need in order to assign the appropriate role-based access control (RBAC) built-in roles to users in your tenant.
You can get all the roles definition ID from role-based access control (RBAC) built-in roles.
https://docs.microsoft.com/en-us/azure/role-based-access-control/built-in-roles
If you know which role should assign, you also can use Azure Powershell or Azure CLI to get the role definition ID.
For example, use this command “(Get-AzRoleDefinition -Name ‘<roleName>’).id” in Azure Powershell. Here the example in below shows role definition ID for “Contributor”.
Note: Some roles are not supported for Azure Lighthouse(Like Owner role), pls check the details here https://docs.microsoft.com/en-us/azure/lighthouse/concepts/tenants-users-roles#role-support-for-azure-lighthouse
Onboard Customer delegation
After these preparation work, now let’s start to onboard the Customer delegation.
You can select one template you want to deploy for subscription or Resource group for Azure Lighthouse samples
Note: This deployment must be done by a non-guest account in the customer’s tenant who has the Owner built-in role for the subscription being onboarded (or which contains the resource groups that are being onboarded).
If the subscription was created through the Cloud Solution Provider (CSP) program, any user who has the Admin Agent role in your service provider tenant can perform the deployment.
Click one for the Azure button, it directly goes to the Azure portal custom deployment page.
Then select “Edit parameter”.
Put TenantID, PrincipalID and Role definitions found before. And click “Save”.
The deployment may take several minutes to complete.
After the deployment succeeds, it may take about 15 mins to allow us see it from portal.
In Customer Azure Portal, search for “Service Provider” and click “Service provider offers”.
In Service Provider portal, search for “My customers”, select “Customer”.
As I applied for “Contributor” role, you can find it in directory and subscription in Service Provider side.
What can we do in Azure Lighthouse delegation?
After on board Lighthouse successfully. you can use Server Provider account to manage Customer resources without switch tenant.
If Service Provider has Contributor role, it can update, delete and create resources in Customer’s subscription.
Below image shows Storage account can be created in Customer Resource group from Server provider.
To conclude, Azure Lighthouse provide benefits for managing Customers’ Azure resources securely, without having to switch context and control planes.
Reference: https://docs.microsoft.com/en-us/azure/lighthouse/how-to/onboard-customer
by Contributed | Oct 18, 2020 | Azure, Technology
This article is contributed. See the original author and article here.
In the Summer of 2018, we released SQL Server Integration Services (SSIS) in Azure Data Factory (ADF), which is a Platform as a Service (PaaS) for lifting & shifting on-premises SSIS workloads to the cloud. It offers SSIS Integration Runtime (IR) as a managed and dedicated compute resource to run SSIS packages in ADF. We realized early on that there’s a long road ahead for us to support full backward compatibility.
Our customers’ enthusiasm that greeted the release was curbed by their fear of losing accumulated investments in legacy SSIS packages and entrenched operational tools that they use to design, debug, deploy, configure, and manage those packages, as well as to trigger, schedule, or orchestrate their executions. Redesigning hundreds to thousands of those existing packages and retraining their teams to operate new tools are simply non-starters.
Recently, we’ve reached the end of that proverbial long road and can finally allay their fear of losing investments by providing many enablers that unblock and accelerate their legacy SSIS migrations into ADF. On top of that, we’ve also amplified their fear of missing out by offering cloud-first/cloud-only features that allow them to modernize their SSIS workflows in ADF.
This article highlights some of those enablers/features that avoid or at least minimize any changes to their existing packages and tools.
Design, Management, and Migration Tools
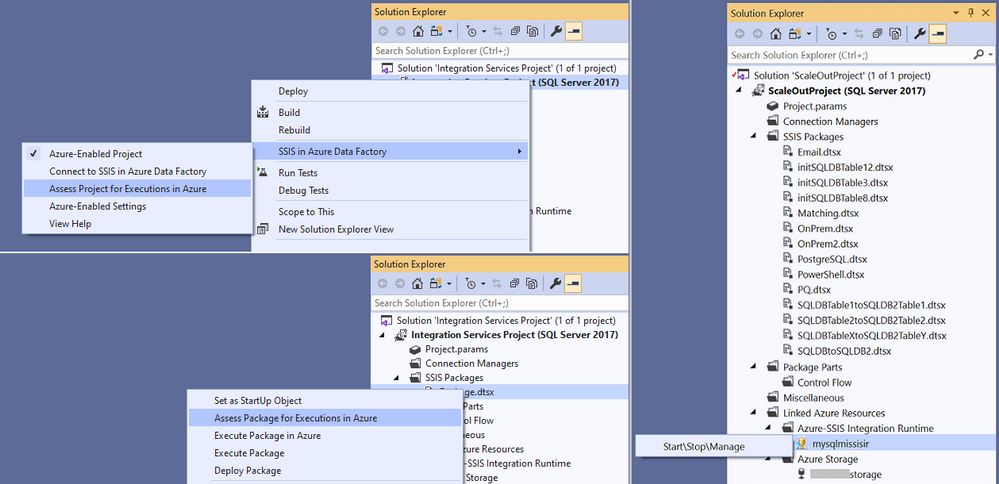
One of the main requirements from our customers is to preserve their skillsets in using the familiar tools, such as SQL Server Data Tools (SSDT) and SQL Server Management Studio (SSMS), to design, debug, deploy, configure, execute, and manage their SSIS packages.
To fulfil this requirement, we’ve Azure-enabled both SSDT and SSMS for you to operate on your packages in the cloud just like you’ve done on premises. On top of that, we’ve turned Azure-enabled SSDT into an all-in-one SSIS migration tool where you can perform the 3-step iterative process of package assessment for cloud compatibility, package execution testing in Azure, and package redeployment to Azure.
For more info, see the following docs:
https://docs.microsoft.com/azure/data-factory/how-to-invoke-ssis-package-ssdt
https://docs.microsoft.com/sql/integration-services/lift-shift/ssis-azure-deploy-run-monitor-tutorial?view=sql-server-ver15

Deployment Models
For a bit of history, SSIS on premises has supported two deployment models for a while:
- Package Deployment Model that has been around since the early days of SSIS. It allows you to deploy packages into file system or SQL Server database (MSDB), and then manage them using the legacy SSIS package store interface on SSMS.
- Project Deployment Model that was introduced with SQL Server 2012. It allows you to deploy projects/packages into SSIS catalog (SSISDB) hosted by SQL Server, and then manage them using the Integration Services Catalogs interface on SSMS.
In the beginning, SSIS in ADF supported only Project Deployment Model where SSISDB is hosted by Azure SQL Database (DB)/Managed Instance (MI). Over time, we’ve learned that converting SSIS packages from Package Deployment Model into Project Deployment Model can be quite challenging, especially when you have to redesign many of them to replace configuration files with project/package parameters. On top of that, our on-premises telemetry shows that SSIS instances with Package Deployment Model continue to outnumber those with Project Deployment Model by two to one.
Now, SSIS in ADF also supports Package Deployment Model where packages can be stored in file system, Azure Files, or MSDB hosted by Azure SQL MI, and managed using the new SSIS IR package store interface on SSMS. This also turns SSISDB from a potential migration blocker into an optional enhancement and makes the provisioning of SSIR IR much simpler, because bringing your own Azure SQL DB/MI to host SSISDB is not mandatory anymore.
With Project Deployment Model, you can use Integration Services Deployment Wizard on SSDT/SSMS to deploy projects/packages into SSISDB hosted by Azure SQL DB/MI. With Package Deployment Model, you can use dtutil command prompt utility to deploy packages into Azure Files or MSDB hosted by Azure SQL MI, while switching their protection level at the same time.
For more info, see the following docs:
https://docs.microsoft.com/azure/data-factory/tutorial-deploy-ssis-packages-azure#creating-ssisdb
https://docs.microsoft.com/azure/data-factory/tutorial-deploy-ssis-packages-azure#creating-azure-ssis-ir-package-stores
https://docs.microsoft.com/azure/data-factory/azure-ssis-integration-runtime-package-store
https://docs.microsoft.com/azure/data-factory/azure-ssis-integration-runtime-package-store#deploying-multiple-packages-with-dtutil

Orchestration Tools
On premises, most of our customers use SQL Server Agent to orchestrate SSIS package executions on SQL Server. Their packages can be stored in file system or MSDB/SSISDB hosted by SQL Server and referenced directly or indirectly via SSIS package stores.
If you migrate your SQL Server to Azure SQL MI, you can use Azure SQL MI Agent, which is a built-in tool similar to SQL Server Agent, to orchestrate SSIS package executions on SSIS IR in ADF. Your packages can be stored in file system, Azure Files, or MSDB/SSISDB hosted by Azure SQL MI and referenced directly or indirectly via SSIS IR package stores.
Since Azure SQL MI Agent supports SSIS jobs via SSISDB hosted by Azure SQL MI, if you want to use it as your orchestration tool, we’ll need to create and manage SSISDB on your behalf, even if you use Package Deployment Model that doesn’t store packages in SSISDB.
For more info, see the following doc:
https://docs.microsoft.com/azure/data-factory/how-to-invoke-ssis-package-managed-instance-agent
If you migrate your SQL Server to Azure SQL DB, there’s no built-in tool similar to SQL Server Agent to orchestrate SSIS package executions on SSIS IR in ADF. To address this gap, we’ve provided SSIS scheduling feature on SSMS for you to auto-create new ADF pipelines, activities, and triggers that orchestrate SSIS package executions on SSIS IR. We’ve also provided SSIS Job Migration Wizard on SSMS for you to convert your existing SSIS jobs created for SQL Server Agent into new ADF pipelines, activities, and triggers that orchestrate SSIS package executions on SSIS IR.
For more info, see the following docs:
https://docs.microsoft.com/sql/integration-services/lift-shift/ssis-azure-schedule-packages-ssms?view=sql-server-ver15
https://docs.microsoft.com/azure/data-factory/how-to-migrate-ssis-job-ssms

If you use a third-party tool, such as Tivoli, Control-M, ActiveBatch, etc., to orchestrate SSIS package executions on SQL Server, you probably want to continue using it to orchestrate SSIS package executions on SSIS IR in ADF after migrating your SQL Server to Azure SQL DB/MI. To facilitate this, we’ve provided Azure-enabled DTExec (AzureDTExec) command prompt utility that can be configured on SSMS and invoked by your third-party tool. It auto-creates new ADF pipelines and activities for SSIS package executions on SSIS IR that can be orchestrated by your third-party tool.
For more info, see the following doc:
https://docs.microsoft.com/azure/data-factory/how-to-invoke-ssis-package-azure-enabled-dtexec
On-Premises Data Access
After migrating your SQL Server to Azure SQL DB/MI and SSIS workloads to SSIS in ADF, you probably still have data stores on premises that you want to access from packages running on SSIS IR. We’ve provided two access methods: Virtual Network (VNet) injection of SSIS IR and Self-Hosted IR (SHIR) as a proxy for SSIS IR.
With VNet injection, the on-premises network where your data stores reside must be connected via ExpressRoute/VPN Gateway to the VNet where your SSIS IR is injected. In this way, those data stores will get their own private IP addresses that are accessible by your SSIS IR inside the same VNet. This requires you to modify the relevant connection strings to use these private IP addresses. Without redesigning your packages, you can make the above modifications at run-time by assigning the appropriate values to your SSIS parameters, connection manager properties, or property overrides.
With SHIR as a proxy, you can install SHIR in the on-premises network where your data stores reside. In this way, your packages can run on SHIR and still access those data stores just like they did when they ran on SQL Server. This requires you to enable the ConnectByProxy property of relevant connection managers. Without redesigning your packages, you can make the above modifications at run-time by assigning the appropriate values to your SSIS parameters, connection manager properties, or property overrides.
For more info, see the following blog:
https://techcommunity.microsoft.com/t5/sql-server-integration-services/vnet-or-no-vnet-secure-data-access-from-ssis-in-azure-data/ba-p/1062056

Authentication Methods
When running SSIS packages on SQL Server, you probably used Windows authentication to access on-premises data stores like most of our customers. Now that you run SSIS packages on SSIS IR in ADF, you can still access the same data stores using Windows authentication feature. Without redesigning/modifying your packages, you can enable this feature in several ways, for example via Execute SSIS Package activities in ADF pipelines, SSISDB stored procedure to set execution credentials, or Windows cmdkey command as express custom setups.
For more info, see the following doc and blog:
https://docs.microsoft.com/azure/data-factory/ssis-azure-connect-with-windows-auth
https://techcommunity.microsoft.com/t5/sql-server-integration-services/scripts-we-don-t-need-no-scripts-express-custom-setups-for-ssis/ba-p/1084779
If your on-premises data stores were databases on SQL Servers, you probably used Windows authentication via OLEDB connectors to access them like most of our customers. If you’ve migrated those databases to Azure SQL DB/MI, you can’t use Windows authentication to access them anymore, since Azure SQL DB/MI doesn’t support it, but you can use SQL authentication instead. This requires you to modify the relevant connection strings to switch from Windows authentication to SQL authentication. Without redesigning your packages, you can make the above modifications at run-time by assigning the appropriate values to your SSIS parameters, connection manager properties, or property overrides.
Now that you run SSIS packages on SSIS IR in ADF, you can also securely store your SQL authentication credentials in Azure Key Vault (AKV) when you use Execute SSIS Package activities in ADF pipelines.
For more info, see the following doc:
https://docs.microsoft.com/azure/data-factory/how-to-invoke-ssis-package-ssis-activity#connection-managers-tab
If you want to omit authentication credentials altogether from your packages, you can use Azure Active Directory (AAD) authentication with ADF managed identity to access Azure SQL DB/MI. This requires you to enable the ConnectUsingManagedIdentity property of relevant connection managers and modify the relevant connection strings to use the latest OLEDB driver for SQL Server (MSOLEDBSQL). Without redesigning your packages, you can make the above modifications at run-time by assigning the appropriate values to your SSIS parameters, connection manager properties, or property overrides.
For more info, see the following doc:
https://docs.microsoft.com/sql/integration-services/connection-manager/ole-db-connection-manager?view=sql-server-ver15#managed-identities-for-azure-resources-authentication

Monitoring and Alerting Capabilities
After provisioning your SSIS IR in ADF, you can check its operational status on ADF monitoring hub, where you’ll also find various informational/functional tiles depending on how you’ve configured its general, deployment, and advanced settings.
For more info, see the following doc:
https://docs.microsoft.com/azure/data-factory/monitor-integration-runtime#monitor-the-azure-ssis-integration-runtime-in-azure-portal
With Project Deployment Model, SSIS package execution logs are always stored in SSISDB internal tables and views, so you can interactively query/analyze and visually present them using designated tools like SSMS. With Package Deployment Model, SSIS package execution logs can be stored in file system or Azure Files as CSV files, but you still need to parse and process them using other designated tools first, before you can interactively query/analyze and visually present them.
Now, SSIS in ADF is also integrated with Azure Monitor, so you can interactively query/analyze and visually present all metrics and logs generated from SSIS IR operations and SSIS package executions on Azure portal, regardless of your deployment models. On top of that, you can also raise near-real time alerts on those metrics and logs.
For more info, see the following doc:
https://docs.microsoft.com/azure/data-factory/monitor-using-azure-monitor#monitor-ssis-operations-with-azure-monitor

I hope you’ll find the above enablers/features useful to unblock and accelerate your legacy SSIS migration into ADF. Please don’t hesitate to contact us if you have any feedbacks, questions, or issues, and we’ll follow up ASAP. Thank you as always for your support.
by Contributed | Oct 16, 2020 | Azure, Technology
This article is contributed. See the original author and article here.
Azure Database for MySQL allows you retain your backup up to 35 days. Often, for audit purposes and compliance requirements, you may need to retain the backups longer than 35 days. In this scenario, you can perform logical backups of your database from Azure Database for MySQL to azure storage for long term retention at optimized. You can follow the steps below to automate full backup of your database on a weekly schedule using an Ubuntu server.

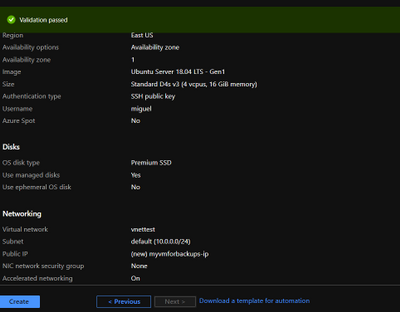
- Provision a VM in Virtual Network to perform secure backups – Create a D4s_v3 VM with ubuntu image and accelerated networking enabled as shown below. You should create the VM in the same region as your Azure Database for MySQL server and add it to a virtual network for secure communication to the MySQL server for backup operation.
- Add you Azure DB for MySQL server in VNet Service endpoint – While the VM is being created, you can use the time to add your Azure Database for MySQL server to VNet service endpoints as shown below:
- Navigate to connection security blade in Azure portal for you Azure Database for MySQL server.

- Click on “+ Adding existing virtual network” under VNet rules. After filling the details in the Create virtual network rule blade, you should have something like the screenshot below. Click on enable and click ok.

- After enabling the VNET rule it should look like the following screenshot.

- Create an Azure storage account – Create an Azure storage account with the name of your preference to host the backups of the server for longer term retention. In this case we will use a unique name to identify that the storage account is for our backups. On the Azure Portal navigate to “Storage Accounts” blade and click on “Add”.

- Select the same resource group and create a new storage account. On performance we will use standard. Create it with a RA-GRS availability, and choose the same region where the vm is located.

- Add Storage account to the same Virtual Network – Once the storage account is created and under the newly created storage account navigate to “Firewalls and virtual networks” blade and choose “selected networks” instead of all networks. Click on add existing virtual network. Choose the virtual network, the subnet and click add. If you want to explore the files from the portal, you will need to add your public ip.


- Add Fileshare to store backups – Once the Firewall rule is configured, on the Storage Account navigate to “File Shares” under File Service. Click on Add fileshare. Give it a name (this will be a nfs disk which we will mount in our linux vm) Select Hot as the tier. Choose a name and configure the disk size depending on your estimated backup size up to 5 TB. Give it a name and enter how much Gib you want on the disk. Max to 5TB.

- Connect to Fileshare – Once the File Share is create, click on it to access it and click Connect.
 From the sidebar that will show up on the right handside select Linux and click on “Copy to Clipboard”. Please modify the sections in red below
sudo mkdir /home/yourusername/mysqlbackups
if [ ! -d “/etc/smbcredentials” ]; then
sudo mkdir /etc/smbcredentials
fi
if [ ! -f “/etc/smbcredentials/mysqlpaasbackup.cred” ]; then
    sudo bash -c ‘echo “username=mysqlpaasbackup” >> /etc/smbcredentials/mysqlpaasbackup.cred’
    sudo bash -c ‘echo “password=thiswillbedifferent” >> /etc/smbcredentials/mysqlpaasbackup.cred’
fi
sudo chmod 600 /etc/smbcredentials/mysqlpaasbackup.cred
sudo bash -c ‘echo “//mysqlpaasbackup.file.core.windows.net/mysqlbackups /home/yourusername/mysqlbackups cifs nofail,vers=3.0,credentials=/etc/smbcredentials/mysqlpaasbackup.cred,dir_mode=0777,file_mode=0777,serverino” >> /etc/fstab’
sudo mount -t cifs //mysqlpaasbackup.file.core.windows.net/mysqlbackups /home/yourusername/mysqlbackups -o vers=3.0,credentials=/etc/smbcredentials/mysqlpaasbackup.cred,dir_mode=0777,file_mode=0777,serverino
#(Make sure you don’t leave the path under /mnt/ since this disk is erased everytime the vm is shutdown and since we create the directory it will no longer be available to mount it)
11. Verify connectivity to the file share from Azure VM – Connect to the Azure VM created in Step 1. Verify connectivity to the storage account using the following command. (change the storage account) This will not check if you have access to the file share but will make sure that if the storage account is configured correctly then the connection to the file share will succeed.
nc -zvw3 mysqlpaasbackup.file.core.windows.net
You should see the following screen.

Copy the updated script and run it in the terminal.

12. Install MySQL Client on Azure VM – Install the required packages to do the dump. In this case we will be using mysqldump which is installed as part of mysql client installation.
sudo apt install mysql-client
13.Install and login to the azure CLI to shutdown vm after backup runs.
curl –sL https://aka.ms/InstallAzureCLIDeb | sudo bash
az login
14.Setup bash script to take backups – Copy the script from here and change it accordingly to what you need. We will be dumping our dbs into one single file.
#!bin/bash
cd /home/miguel
export DBNAME=”testconn newdb“
export MYPASSWORD=”yourpassword“
date=$(date +%s)
year=$(date +%Y)
month=$(date +%m)
day=$(date +%d)
hour=$(date +%H)
path=$year/$month/$day/$hour
echo $date
cd /home/miguel/mysqlbackups/
mkdir -p $path
cd $pathmysqldump –databases $DBNAMES -hyourservername.mysql.database.azure.com -u username@servername –p$MYPASSWORD > back$date.bak
az vm deallocate -g MyResourceGroup -n MyVm
15. Setup a cron job to schedule backup – Run crontab -e and edit it with your favorite editor. This time we will use nano.
At the end of the file enter the time you want the vm to create the backup.
We will setup to run on Sundays, at 2AM. The server is on UTC, you can either change it to your timezone or just make sure it is 2AM in the morning for you. In our case we have change the time in the server to our region.
0 2 * * 6 sh /home/miguel/backup.sh >> /home/miguel/backup.log

You can check the backup history with cat /home/miguel/backup.log
16. Schedule VM Start to save cost – Schedule the VM to start before the selected backup time using Logic Apps, we will do it 30 mins before our backup runs. Click on Add and enter the required information and create it. Shutdown will be executed after backup finish in the script using azure cli to deallocate vm.


When it is created, it will be under Logic Apps Designer, choose Recurrence.

Enter the interval you want this action to be run. We choose 1 every week, at 1 am, 30 min, Sunday, and select the timezone. Click on new step, and search for azure vm. Under azure vm search for start VM. Select your subscription, the resource group, and the vm. Hit on save and close it.

If you have any questions with Logic Apps, please follow the next link.
https://docs.microsoft.com/en-us/azure/logic-apps/
Hope this step by step guide allows you to automate backups of your Azure DB for MySQL server to azure storage for long term retention and archival.


Recent Comments