by Contributed | Oct 16, 2020 | Azure, Technology
This article is contributed. See the original author and article here.
Azure Database for MySQL allows you retain your backup up to 35 days. Often, for audit purposes and compliance requirements, you may need to retain the backups longer than 35 days. In this scenario, you can perform logical backups of your database from Azure Database for MySQL to azure storage for long term retention at optimized. You can follow the steps below to automate full backup of your database on a weekly schedule using an Ubuntu server.
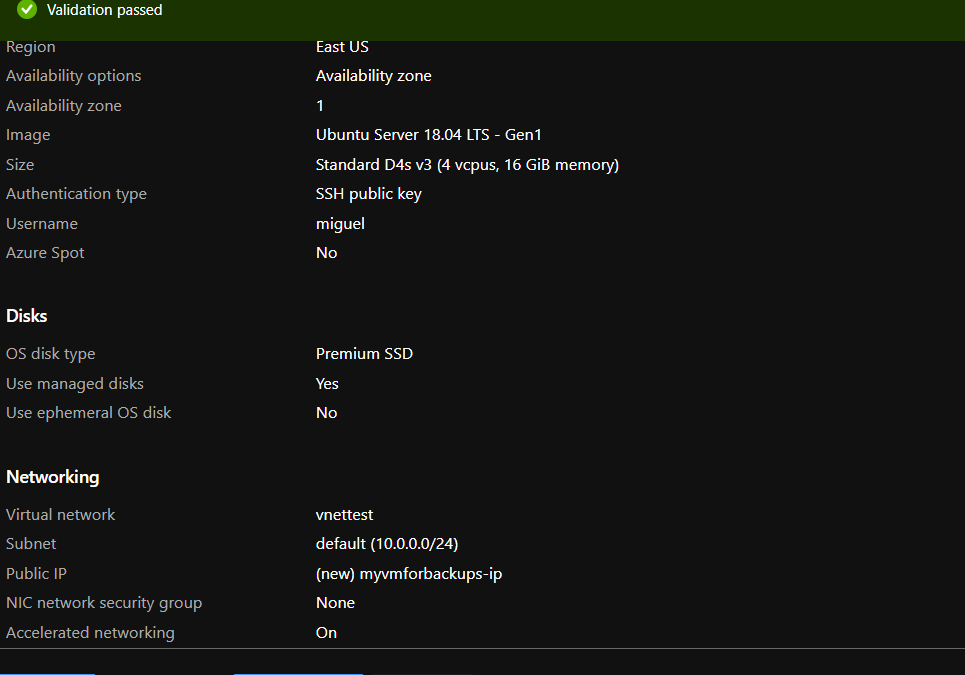
- Provision a VM in Virtual Network to perform secure backups – Create a D4s_v3 VM with ubuntu image and accelerated networking enabled as shown below. You should create the VM in the same region as your Azure Database for MySQL server and add it to a virtual network for secure communication to the MySQL server for backup operation.

- Add you Azure DB for MySQL server in VNet Service endpoint – While the VM is being created, you can use the time to add your Azure Database for MySQL server to VNet service endpoints as shown below:
- Navigate to connection security blade in Azure portal for you Azure Database for MySQL server.

- Click on “+ Adding existing virtual network” under VNet rules. After filling the details in the Create virtual network rule blade, you should have something like the screenshot below. Click on enable and click ok.

- After enabling the VNET rule it should look like the following screenshot.

- Create an Azure storage account – Create an Azure storage account with the name of your preference to host the backups of the server for longer term retention. In this case we will use a unique name to identify that the storage account is for our backups. On the Azure Portal navigate to “Storage Accounts” blade and click on “Add”.

Select the same resource group and create a new storage account. On performance we will use standard. Create it with a RA-GRS availability, and choose the same region where the vm is located.

- Add Storage account to the same Virtual Network – Once the storage account is created and under the newly created storage account navigate to “Firewalls and virtual networks” blade and choose “selected networks” instead of all networks. Click on add existing virtual network. Choose the virtual network, the subnet and click add. If you want to explore the files from the portal, you will need to add your public ip.


- Add Fileshare to store backups – Once the Firewall rule is configured, on the Storage Account navigate to “File Shares” under File Service. Click on Add fileshare. Give it a name (this will be a nfs disk which we will mount in our linux vm) Select Hot as the tier. Choose a name and configure the disk size depending on your estimated backup size up to 5 TB. Give it a name and enter how much Gib you want on the disk. Max to 5TB.

- Connect to Fileshare – Once the File Share is create, click on it to access it and click Connect. From the sidebar that will show up on the right handside select Linux and click on “Copy to Clipboard”. Please modify the sections in red below

sudo mkdir /home/yourusername/mysqlbackups
if [ ! -d "/etc/smbcredentials" ]; then
sudo mkdir /etc/smbcredentials
fi
if [ ! -f "/etc/smbcredentials/mysqlpaasbackup.cred" ]; then
sudo bash -c 'echo "username=mysqlpaasbackup" >> /etc/smbcredentials/mysqlpaasbackup.cred'     sudo bash -c 'echo "password=thiswillbedifferent" >> /etc/smbcredentials/mysqlpaasbackup.cred'
fi
sudo chmod 600 /etc/smbcredentials/mysqlpaasbackup.cred
sudo bash -c 'echo "//mysqlpaasbackup.file.core.windows.net/mysqlbackups /home/yourusername/mysqlbackups cifs nofail,vers=3.0,credentials=/etc/smbcredentials/mysqlpaasbackup.cred,dir_mode=0777,file_mode=0777,serverino" >> /etc/fstab'
sudo mount -t cifs //mysqlpaasbackup.file.core.windows.net/mysqlbackups /home/yourusername/mysqlbackups -o vers=3.0,credentials=/etc/smbcredentials/mysqlpaasbackup.cred,dir_mode=0777,file_mode=0777,serverino
#(Make sure you don’t leave the path under /mnt/ since this disk is erased everytime the vm is shutdown and since we create the directory it will no longer be available to mount it)
Verify connectivity to the file share from Azure VM – Connect to the Azure VM created in Step 1. Verify connectivity to the storage account using the following command. (change the storage account) This will not check if you have access to the file share but will make sure that if the storage account is configured correctly then the connection to the file share will succeed.
nc -zvw3 mysqlpaasbackup.file.core.windows.net
You should see the following screen.

Copy the updated script and run it in the terminal.

Install MySQL Client on Azure VM – Install the required packages to do the dump. In this case we will be using mysqldump which is installed as part of mysql client installation.
sudo apt install mysql-client
- Install and login to the azure CLI to shutdown vm after backup runs.
curl -sL https://aka.ms/InstallAzureCLIDeb | sudo bash
az login
- Setup bash script to take backups – Copy the script from here and change it accordingly to what you need. We will be dumping our dbs into one single file.
#!bin/bash
cd /home/miguel
export DBNAME="testconn newdb"
export MYPASSWORD="yourpassword"
date=$(date +%s)
year=$(date +%Y)
month=$(date +%m)
day=$(date +%d)
hour=$(date +%H)
path=$year/$month/$day/$hour
echo $date
cd /home/miguel/mysqlbackups/
mkdir -p $path
cd $pathmysqldump --databases $DBNAMES -hyourservername.mysql.database.azure.com -u username@servername -p$MYPASSWORD > back$date.bak
az vm deallocate -g MyResourceGroup -n MyVm
Setup a cron job to schedule backup – Run crontab -e and edit it with your favorite editor. This time we will use nano.
At the end of the file enter the time you want the vm to create the backup. We will setup to run on Sundays, at 2AM. The server is on UTC, you can either change it to your timezone or just make sure it is 2AM in the morning for you. In our case we have change the time in the server to our region. You can check the backup history with cat /home/miguel/backup.log
0 2 * * 6 sh /home/miguel/backup.sh >> /home/miguel/backup.log

Schedule VM Start to save cost – Schedule the VM to start before the selected backup time using Logic Apps, we will do it 30 mins before our backup runs. Click on Add and enter the required information and create it. Shutdown will be executed after backup finish in the script using azure cli to deallocate vm.


When it is created, it will be under Logic Apps Designer, choose Recurrence. 
Enter the interval you want this action to be run. We choose 1 every week, at 1 am, 30 min, Sunday, and select the timezone. Click on new step, and search for azure vm. Under azure vm search for start VM. Select your subscription, the resource group, and the vm. Hit on save and close it.

If you have any questions with Logic Apps, please follow the next link.
https://docs.microsoft.com/en-us/azure/logic-apps/
Hope this step by step guide allows you to automate backups of your Azure DB for MySQL server to azure storage for long term retention and archival.
by Contributed | Oct 16, 2020 | Azure, Technology
This article is contributed. See the original author and article here.
Customers may have been unable to connect to their lab virtual machines (VMs) between Oct 13, 2020 and Oct 15, 2020.
Cause of the outage:
Azure Lab Services manages the customers’ VMs within internal Azure subscriptions that the service owns (more details on the service’s architecture fundamentals here). For internal subscriptions, Microsoft runs regular organizational security rules. Due to recent configuration changes, an internal security rule got applied to the customer VMs inside our subscriptions that blocked VM connections that came from external to Microsoft.
Resolution:
The internal security rules that were blocking customers’ access to the VMs have been removed, and we have ensured that the internal configurations will no longer be applied to our service’s subscriptions that host customer VMs.
This outage has been resolved and customers can now connect to their VMs. If you were affected by the issue, please try starting and connecting to the VMs again.
We apologize for the inconvenience. If you have any questions, please leave us a comment below.
– Azure Lab Services Team
by Contributed | Oct 16, 2020 | Azure, Technology
This article is contributed. See the original author and article here.
Virtual desktop infrastructure (VDI) is defined as the hosting of desktop environments on a central server. It is a form of desktop virtualization, as the specific desktop images run within virtual machines (VMs) and are delivered to end clients over a network. Those endpoints can be various devices including PC and tablets. There are many applications for this technology but today we will discuss some of the most common issues our customers face when using Microsoft Outlook (this extends to other Microsoft office apps) in a non-persistent Virtual Desktop Infrastructure (a.k.a. VDI) and are using Exchange Online. Some of the issues end users might see include:
- Outlook prompting for password repeatedly
- Outlook displaying “Need Password”
- Outlook/Office displaying a blank password screen
- Outlook/Office activation issues
To avoid these issues being caused by non-persistent VDI, we will discuss best practices. There are a lot of unsupported scenarios when it comes to using VDIs with Azure. To check supported scenarios please see the following link – VDI Supported Scenarios. There are some preparations that must be made for your users to have the best Microsoft 365 experience with Outlook. Currently, Microsoft only supports Hybrid Azure AD Join for VDIs. This means that you must follow the prerequisites and planning that is laid out here.
Not planning on hybrid Azure AD joining?
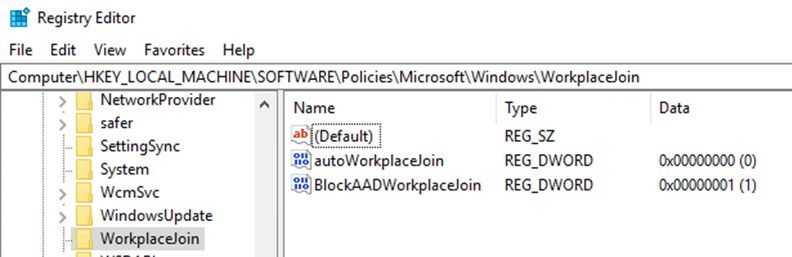
To prevent machines from performing workplace and Azure AD Join use the following registry keys: (Note: You may also have to delete the computer/device object from Azure AD devices if these computers have already been joined.)
Create a new DWORDs in this path HKEY_LOCAL_MACHINESoftwarePoliciesMicrosoftWindowsWorkplaceJoin
- DWORD: “BlockAADWorkplaceJoin”, Value=1
- DWORD: “autoWorkplaceJoin”, Value=0
 Requirements for all scenarios for non-persistent VDI
Ensure that you are NOT roaming your Identity hive located in ComputerHKEY_CURRENT_USERSoftwareMicrosoftOffice16.0CommonIdentity
- This entire hive must be excluded from roaming profiles. There are several ways you can exclude this from roaming. Example, Citrix profile management or GPO and sometimes both need to be configured depending on your configuration. The reason for this is due to the ADAL process writes device information into this key and if you only have one host this is acceptable but most environments have multiple VDI hosts and the machine information will not match when that user logs into a different machine with another machines Identity hive information. This will cause a prompt for the user even on application hosts only.
Ensure that you have shared computer activation configured for your VD environment. (See here for more information on shared computer activation)
- If shared computer activation is not configured for users, then users may be prompted to login to office to verify licensing.
- If you don’t have Single Sign-on configured, you can now roam the license location for profiles or have them on a shared folder on your network as well. The location for licensing token is %localappdata%MicrosoftOffice16.0Licensing. (Note: This does not guarantee that your user will not be prompted for credentials.)
Ensure that Office and Windows are to the most recent updates. Please see here for necessary Windows and Office builds.
If you are using a non-persistent VDI and may already be Azure AD Domain joined the following steps should remove the device from being Azure AD joined:
Verify that machines are not Azure AD and/or Workplace joined
Verify the following registry keys are present to prevent the machine from rejoining Azure AD or Workplace join:
1. Create a new DWORDs in this path HKEY_LOCAL_MACHINESoftwarePoliciesMicrosoftWindowsWorkplaceJoin
- DWORD: “BlockAADWorkplaceJoin”, Value=1
- DWORD: “autoWorkplaceJoin”, Value=0
2. If you are Azure AD joined, run the following command in an elevated command prompt, DSRegCMD /Leave and then reboot the host. You can check the status of AAD join by running DSRegCMD /status in command prompt.
- Azure AD join status showing that the machine is Azure AD joined.
 3. If you are Workplace joined (this is harder to remove) you have to perform the below steps. Run DSRegCMD /Status to check status of workplace join in command prompt.

4. Navigate to Settings > Accounts > Access work or school > Disconnect
 Hope this helps in your deployments! Let us know if you have any questions!
Taylor Morrison
by Contributed | Oct 16, 2020 | Azure, Technology
This article is contributed. See the original author and article here.
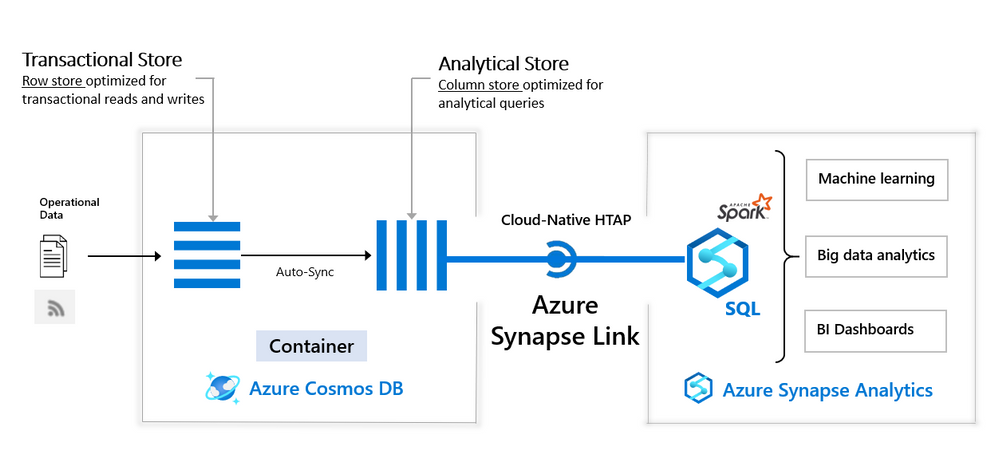
Azure Synapse workspace is advanced analytic solution that enables you to analyze various data sources in Azure cloud. Azure Synapse Link for CosmosDB connects Synapse workspace with Azure CosmosDB analytical store (preview) that contains a copy of CosmosDB data highly optimized for analytic workloads. With Synapse Link for CosmosDB, you can run complex analytic and create reports on top data stored in CosmosDB analytical store without impacting the main CosmosDB transactional containers.

Synapse Analytic s already enables you to use Apache Spark in Synapse workspace to analyze data and apply machine learning algorithms on Azure CosmosDB analytical data.
We are happy to announce that now Synapse workspace enables you to use Transact-SQL language to analyze data in CosmosDB analytical store. Synapse workspace has serverless T-SQL query engine where you can run T-SQL queries on top of your CosmosDB data.
Rich T-SQL surface in Synapse SQL endpoint enables a large ecosystem of tools and applications that can use T-SQL language to directly query CosmosDB analytical data. Synapse SQL represents a bridge between the analytical tools and globally distributed data stored in Azure CosmosDB containers.

With serverless Synapse SQL endpoint in Synapse workspace you can easily explore data in analytical store of CosmosDB container using T-SQL OPENROWSET function. You need to provide a connection string to your CosmosDB account and specify container name that should be analyzed. The following example shows how to explore sample data from your CosmosDB container:
SELECT TOP 10 *
FROM OPENROWSET (
    'CosmosDB',
    'account=<CosmosDB account>;database=<database>;region=<region>;key=<CosmosDB key>',
    Product
) AS products
Besides reading data, Synapse SQL enables you to create complex reports that join multiple containers, group by results, apply window aggregates, and perform any analytic and data transformation that you usually apply on classic SQL database data.
Synapse SQL with CosmosDB analytical store enables you to combine the power of a low latency, globally distributed NoSQL database with a powerful relational SQL analytics engine. This solution enables you to leverage cloud-native hybrid transactional and analytical processing (HTAP) capabilities to provide near real-time analytics solutions on Azure CosmosDB data. The resources in your Azure CosmosDB transactional store are not affected by analytic queries and analytic query don’t spend any Azure CosmosDB resource units (RU). No- extract-transform-load (ETL) analytics against globally distributed operational data at scale enables business analysts and data engineers with T-SQL skills to run near real-time business intelligence and analytics without impacting the performance on the transactional workloads on Azure CosmosDB.
In this video you can see Synapse SQL link to Cosmos DB in action:
Find more information about querying Azure CosmosDB analytical store using SQL language in the article How to query CosmosDB data using serverless Synapse SQL endpoint and Synapse Link.
by Contributed | Oct 16, 2020 | Azure, Technology
This article is contributed. See the original author and article here.
Abstract
Location – classified. Customer – classified.
CTO: Azure Cloud Adoption Framework is best resource to define out Cloud adoption strategy. As of part of “Ready” stage n CAF, can you tell me what best practices we are following to ensure “azure resources and resource groups are organized effectively”?
Azure Architect: Yes, we follow 2 important guidelines as follow –
- Allow deployment of azure resources in designated allowed locations only; so, we follow the geopolitical boundary of our country.
- Define resource group – project wise.
CTO: This is good. I recently went through many Azure Events webinar. I think as a best practice for our Azure environment, we should also make sure that “Azure resources are deployed in same location as of Resource group for better management and clarity? How are we placed on this task?”
Azure Architect: Ummmm, yes. It is a good suggestion!
CTO: Ok, so give me report every week where I can see if we are following having all resources in the same location of parent Resource group. Thanks.
Azure Architect: But we have 100+ Resource Groups, 300+ resource in subscription. That will be good time-consuming task every week.
CTO: Well, let us find better solution to get report of azure resources not belonging to Azure Resource group location/ region.
This blog will help our friend Azure Architect to find report of “any azure resources not having same location as parent resource group”.
This will help to satisfy CTO requirement and promotion for our Azure Architect friend in the company.
Azure Resource Group, Azure Resource and Location
Azure Resource Manager is a consistent management layer on Azure used for deployment and end to end management. Important component of Azur Resource Manager is “Resource Group.”
Azure Resource Group is a container that holds related resources for azure solution. It helps hold those resources which you want to manage as a group. The choice of resource group and resource
deployment within is completely organization and project specific decision.
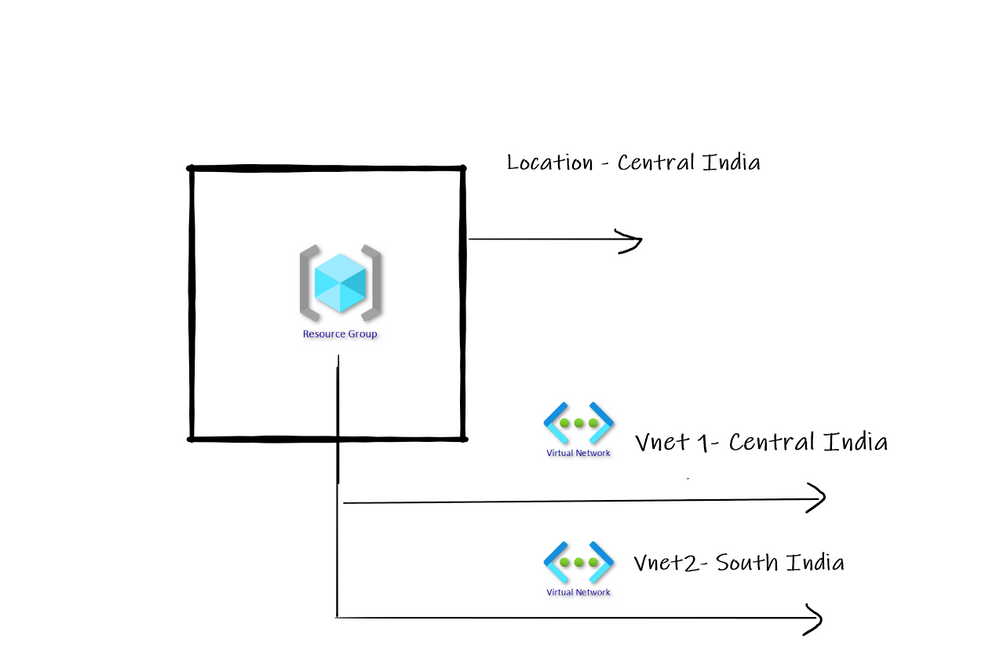
As resource group is container only and never control actual life cycle of resources deployed; the location of Resource Group and Actual Resource can be different. Refer below diagram –

How to report resource and associated resource group location mismatch?
Azure Policy is best thing on Azure that can help to do wonders. If Policy is applied on Azure Subscription level, then automatically Azure policy searches and report noncompliance as per policy definition. There are many built in policies already available on Azure.
One of such important built in policy is – “Audit resource location matches its resource group location”.
This policy can help us to identify is Resources present in Resource Group do not have same location as Resource Group.
In above diagram we have resource group in Central India where as one VNET is in different region. Having separate location for Resource group and separate location for actual Resource is completely normal.
However, as a general best practice I have seen that having all resources deployed in the same location as that of resource group works best in many scenarios.
Create and Assign Policy
Go to Azure portal and search for Policy in top search box. Once found click on it. You will land on below screen. Click on Assign Policy as shown below –

Search the policy named as Audit that the resource location matches its resource group location.
Then click on Review + Create. Once enabled the policy will review the entire Azure subscription for the policy and will also report.

Compliance view
Now click on Compliance view as shown below and we should see the non-compliant resources list for the policy as shown below –

When you go into details you can view individual resources with current value of location and Target expected value of location.

Conclusion
Hope this blog post helped you to understand how Azure policy can effectively help you implement your specific restrictions, best practices on Azure.

by Contributed | Oct 16, 2020 | Azure, Technology
This article is contributed. See the original author and article here.
Lots to share in the world of Microsoft services this week. News includes Microsoft 365 Apps Admin Center’s new inventory & monthly servicing feature currently in preview, Azure Cognitive Services has achieved human parity in image captioning, Azure Site Recovery TLS Certificate Changes, Static Web App PR Workflow for Azure App Service using Azure DevOps, and of course the Microsoft Learn Module of the week.
Microsoft 365 Apps Admin Center’s new inventory & monthly servicing feature currently in preview
Microsoft has released in preview tools and services that provide insights, automation, and control to help manage monthly Office app updates. Some of the features offered include: Servicing profiles, Office Apps and Add-in Inventory, and Security Currency reports. Access to these services will require that each of the Office Apps are currently on version 2007 or higher and will require a passthrough of a simple onboarding process. More details can be found here: Microsoft 365 Apps Admin Center
Azure Cognitive Services reaches human parity in image captioning
Artificial intelligence researchers at Microsoft have successfully created a solution that can generate caption for images that are more accurate than the descriptions provided by people as measured by the NOCAPS benchmark. This achievement milestone brings Microsoft one step closer in the making products and services accessible to everyone. This Computer Vision service is now commercially available and further details can be found here: Computer Vision Services
TLS Certificate changes for Azure Site Recovery
As Producer Pierre reported last week, Microsoft has updated the Azure services to use Transport Layer Security (TLS) certificates from a different set of Root Certificate Authorities (CAs). As reported, the changes were made because the current CA certificates don’t comply with one of the CA/Browser Forum Baseline requirements. This change also effects Azure Site Recovery service endpoints which will be updated in a phased transition across all public regions beginning on October 16 2020, completed by October 26, 2020. This change affects connectivity from on-premises configuration server/process servers (for physical/VMware VM replication), and from Hyper-V host servers/System Center VMM servers connected to the Azure Site Recovery service. Additional details regarding the change can be found here: Azure Site Recovery TLS Certificate changes
Static Web App PR Workflow for Azure App Service using Azure DevOps
Fellow Cloud Advocate, Abel Wang, has shared an amazing pull request workflow built right out of the box for use with Static Web Apps. Abel highlights how Static Web Apps uses GitHub Actions for CI/CD and when a user issues a pull request to perform certain tasks and shares steps on how to harness it. Further information can be found here: Static Web App PR Workflow
MS Learn Module of the Week
Building applications with Azure DevOps
As stated earlier, Azure DevOps enables you to build, test, and deploy any application to any cloud or on premises. Learn how to configure build pipelines that continuously build, test, and verify your applications. Complete this module here: Azure DevOps Learn Module
Let us know in the comments below if there are any news items you would like to see covered in next week show. Az Update streams live every Friday so be sure to catch the next episode and join us in the live chat.

Recent Comments