by Contributed | Oct 8, 2020 | Azure, Technology
This article is contributed. See the original author and article here.
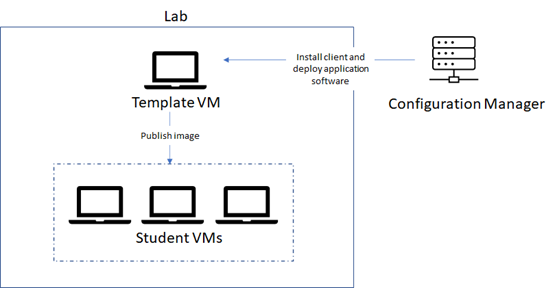
A question that we get asked by IT departments is whether Configuration Manager can be used to set up your lab. The answer is yes! In this blog post, we will show how you can use Microsoft Endpoint Manager Configuration Manager, which is the new brand name for SCCM, to automatically deploy software to a lab’s template VM.
IMPORTANT: It’s important that when you move from a physical lab environment to Azure Labs, that you also restructure images instead of reusing images from your physical environment. Refer to the following blog post that has more details: Moving from a Physical Lab to Azure Lab Services

Recommended Approach
To use Configuration Manager with Azure Lab Services, here is the approach that we recommend:
1. Start with a Windows marketplace image when you create your lab.
Custom images that are created by exporting from a lab’s template VM are specialized images which means that SysPrep has not been run on the image. As a result, all VMs that are created from a custom image will have the same Windows SID. Configuration Manager requires that each VM have a unique SID for its features to work properly. To ensure that your template VM has a unique SID, we recommend that you start with a Windows image from the marketplace when you create the lab.
2. Use Configuration Manager to deploy software to the template VM.
You should use Configuration Manager to deploy software to the template VM – not to deploy software directly to the student VMs. There are a couple of reasons for this:
- The template VM should serve as the ‘master’ image for all of the student VMs in the lab.
- When the student VMs are published, they all have the same SID as the template VM. Configuration Manager’s features won’t work properly because the student VMs do not have unique SIDs.
Prerequisites
These steps assume the following prerequisites have been configured:
- You already have a Configuration Manager site server installed.
- You have a Lab Account that is peered with a Virtual Network (VNet) that has access to your Configuration Manager site server. By peering your Lab Account, this will enable its lab VMs to communicate with the site server. More information on Lab Account creation and VNet peering can be found in this article:
IMPORTANT: The lab account must be peered to the VNet before the lab is created. You may also need to ensure that required ports are enabled within your VNet andor on-premise network. For example, you need to allow HTTPHTTPS communication between your lab VMs and the Configure Manager site server. Refer to the following link for details: Ports used in Configuration Manager
Lab Setup
Let’s look at the steps to set up your lab to use Configuration Manager to deploy software to the template VM.
1. Create lab
Create a new lab using a Windows marketplace image.
2. Install the Configuration Manager client onto the template VM
You have several options for installing Configuration Manager’s client onto the template VM. The simplest option is to manually install Configuration Manager’s client. Once the template VM has the client installed and is assigned to a site, you may need to manually approve the template VM in Configuration Manager’s console.

3. Deploy software applications using Configuration Manager
Once the template VM is approved in Configuration Manager, you can use Configuration Manager to deploy software applications onto the template VM. Read the following instructions for details:
4. Uninstall Configuration Manager’s client
Before you publish the template VM, you should uninstall Configuration Manager’s client. Otherwise, if you leave the Configuration Manager client installed when you publish, this will potentially cause negative side-effects because the student VMs will be assigned to a site yet will have non-unique SIDs.
5. Publish the template VM
Finally, you can publish the template VM as you normally would to create the student VMs.
A Few Considerations with Active Directory Domain Joining
In addition to using Configuration Manager to set up your template VM, you may also be planning to join your student VMs to your AD domain as shown in a previous blog post. There are a few things to note if you are planning to do both in your lab.
First, when you:
- Domain join your student VMs.
- And you use Configuration Manager’s AD discovery methods to automatically discover client computers in your domain.
You will likely see your student VMs listed in Configuration Manager’s console. However, you should not use Configuration Manager to manage the student VMs due to the reasons already mentioned in this post.
Secondly, you may choose other options for installing the Configuration Manager client on the template VM, such as a client push installation, where you also need to use AD discovery. Here are a few helpful tips for using AD discovery to find your lab’s template VM:
- You will need to manually join the template VM to your domain.
- After you’ve finished installing the Configuration Manager client and deploying applications to the template VM, then make sure that you remove the template VM from the domain. Otherwise, if the template VM remains joined to the domain, this will cause an issue later when you use the steps for joining student VMs to the domain.
Wrap Up
For IT departments that are already using Configuration Manager for managing devices, we hope that you find this guidance useful for also using Configuration Manager to prepare your lab’s template VM.
by Contributed | Oct 8, 2020 | Azure, Technology
This article is contributed. See the original author and article here.
One way you can quickly search and query metrics data is using Azure Portal, where you have chart data. But maybe you want to get the raw data and query it yourself. Find below a Powershell sample to get this data
Find below a sample I build based on one I got from https://docs.microsoft.com/en-us/azure/azure-sql/database/scripts/monitor-and-scale-database-powershell
And you can get the other possible metric names to send it in as parameter in this other document: https://docs.microsoft.com/en-us/azure/azure-monitor/platform/metrics-supported#microsoftsqlserversdatabases
Find full sample at https://github.com/FonsecaSergio/ScriptCollection/blob/master/Powershell/AzureSQL%20-%20Read%20Azure%20SQL%20Metrics.ps1
But the main idea is using Get-AzMetric powershell command. You will get results as table, that you can save it in the format you want or save it to a database.
$MonitorParameters = @{
ResourceId = "/subscriptions/$($SubscriptionID)/resourceGroups/$($ResourceGroup)/providers/Microsoft.Sql/servers/$($ServerName)/databases/$($DBName)"
TimeGrain = $TimeGrain
MetricNames = $MetricName
StartTime = (Get-Date).AddDays($DaysToLook)
}
$Metrics = Get-AzMetric @MonitorParameters -DetailedOutput
TimeStamp           Average Metric
---------           ------- ------
07/10/2020 11:07:00       0 dtu_consumption_percent
07/10/2020 11:07:00      10 dtu_limit
07/10/2020 11:07:00       0 dtu_used
07/10/2020 11:12:00       0 dtu_consumption_percent
07/10/2020 11:12:00      10 dtu_limit
07/10/2020 11:12:00       0 dtu_used
07/10/2020 11:17:00    19,6 dtu_consumption_percent
07/10/2020 11:17:00      10 dtu_limit
07/10/2020 11:17:00    1,96 dtu_used
07/10/2020 11:22:00   34,85 dtu_consumption_percent
07/10/2020 11:22:00      10 dtu_limit
07/10/2020 11:22:00   3,485 dtu_used
07/10/2020 11:27:00    30,1 dtu_consumption_percent
07/10/2020 11:27:00      10 dtu_limit
07/10/2020 11:27:00    3,01 dtu_used
07/10/2020 11:32:00    27,7 dtu_consumption_percent
07/10/2020 11:32:00      10 dtu_limit
07/10/2020 11:32:00    2,77 dtu_used
07/10/2020 11:37:00       0 dtu_consumption_percent
07/10/2020 11:37:00      10 dtu_limit
07/10/2020 11:37:00       0 dtu_used
07/10/2020 11:42:00       0 dtu_consumption_percent
07/10/2020 11:42:00      10 dtu_limit
07/10/2020 11:42:00       0 dtu_used

by Contributed | Oct 7, 2020 | Azure, Technology
This article is contributed. See the original author and article here.
Hi Cloud automation friends. This is Preston K. Parsard again, and in this post we’ll cover configuring PKI on an existing Active Directory domain-joined Windows Azure Virtual Machine in Microsoft Azure.
Now before being scared by the term PKI, like zombies shuffling towards you at twilight, it’s really not that bad this time. In fact, I’ve provided a link in the references section of this post to a short video demonstration as well. Feel free to skip to it now if you prefer, but the rest of this post does provide some background and sets the context for this type of configuration.
DISCLAIMER: These instructions are primarily meant for an informal dev/test or training lab environment intended to experiment or learn about technologies which may rely on a basic certificate authority service. For a more formal and extensive reference for Windows PKI, please see the Windows PKI Documentation Reference and Library link in the references section at the end of this article. Also my esteemed colleague Daniel Metzger wrote Building the Totally Network Isolated Root Certificate Authority, which is a great article for production environments and is also referenced at the end.
By configuring an enterprise certificate authority server in your test and development or lab environment, you can reproduce scenarios that require certificates for web server, code signing or document encryption. One example may include building a simulated on-premises Desired State Configuration (DSC) pull server and auto-enrolling the virtual machines in the domain for document encryption certificates.
Now I realize that it’s more likely that if you have workloads in Azure and you need to leverage desired state configuration, you already have the option to use the native Azure automation state configuration feature for this purpose. So you wouldn’t really need to build a traditional on-premises simulated DSC pull server after-all and consequently would not require a certificate server as well.
The idea behind our scenario however is simply to provide the added flexibility to experiment with setting up a small PKI infrastructure to evaluate, train or prepare for any certificate services related technologies. Most medium and large enterprise customers I’ve worked with have separate IT operations and PKI teams, and IT ops folks are not usually exposed to the mechanics and experience of the PKI integration, relying fully on the PKI teams instead for these services. This solution aims to now empower the IT ops staff to learn and gain better insights and appreciation for any PKI related technologies their projects may rely on. Who knows? It may even encourage greater dialogue and collaboration between both teams when ops can more explicitly elaborate their requirements to the PKI team and the PKI folks can see exactly how and why ops will be using these services if they need such information for approving certificate requests.
Adatum Consulting Overview
First, let’s visit our fictitious company, Adatum Consulting, which is a global provider of cloud architecture and automation consulting services for its manufacturing customers. Adatum has recently created a consolidated development environment where they can develop, test, reproduce and prototype solutions for their clients.
Opportunity
To accommodate this requirement, Jason, the infrastructure team lead, has asked Jessica to deploy certificate services on an existing Azure VM to act as the enterprise certificate authority for this environment. By implementing a simple single tier certificate services PKI infrastructure, the team can quickly issue certificates for these secure web applications or to reproduce configuration management solutions. In fact, to configure the certificate services server, Jessica will actually use the Azure automation state configuration capability, but the really cool part about this option is that Azure based DSC does not require first configuring a certificate authority itself, because certificate services for this feature is already built into Azure!
 Jessica
Target State Diagram
Here is the target state diagram, which is based on the existing Project 0026 solution in GitHub. If you want to use this solution to automatically provision the dev.adatum.com environment so you can follow along, please use these links below and return to this article when you’re ready to continue.
- Blog
- Code

Requirements
So let’s review the sequence of steps that Jessica will take to configure certificate services on an VM in their existing dev.adatum.com domain, right after we outline the requirements and assumptions below.
- An Azure subscription is needed, which will include at least a domain controller and a new installation of a domain-joined Windows Server 2019 Virtual Machine in the dev.adatum.com domain. If you want to follow along, you will just need to use your own domain with an available Windows Server 2019 image. This subscription must have an automation account since the state configuration feature will be used later to apply the configuration on the target virtual machine.
- We’ll assume that an internet connection from Adatums’ enterprise or Jessica’s home office to connect to her company’s Azure subscription is available.
- Windows PowerShell version 5.1 or greater. Note that Jessica may be able to use PowerShell (version 7+), but some refactoring of the code may be required. This solution has only been tested on Windows PowerShell 5.1 specifically.
- The account that Jessica will use to run the PowerShell script must be a member of the local administrators group on the machine from which the script is executed. This is because the Az module installations, if required will need this permission.
- During the script execution, Jessica will be prompted to upgrade from the AzureRM modules, in case she still uses these legacy cmdlets, to the newer Az modules from the PowerShell gallery repository.
- A final prompt will appear when the script runs for Jessica to supply credentials for an account that will be used to configure the Active Directory Certificate Services server. This account must actually be members of both the enterprise administrator and root domain administrator for dev.adatum.com in our scenario.
Workflow
1. Download Script
In a PowerShell console, opened in the context of administrator, Jessica first creates a target folder named C:Project0067 on her machine to download the script from a public GitHub repository.
New-Item -Path C:Project0026 -ItemType Directory -Verbose
Start-Process -FilePath https://github.com/autocloudarc/0067-ConfigurePKI
Next, she downloads the zip file, extracts only the Configure-PKIonVMinAzure.ps1 script and copies it to the new directory named C:Project0067. She then unblocks it assuming that her PowerShell execution policy is set to RemoteSigned so it can be executed locally.
Set-Location -Path c:project0067 -Verbose
Unblock-File -Path .Configure-PKIonVMinAzure.ps1 -Verbose
2. Execute Script
Next, Jessica executes the C:Project0067Configure-PKIonVMinAzure.ps1 script from her existing Windows PowerShell 5.1 session. She uses the command below to specify the automation account name and resource group that contains the dev.adatum.com environment and the target VM that will be configured.
. .Configure-PKIonVMinAzure.ps1 -aaaName <AutomationAccountName> -rgpName <ResourceGroupName> -Verbose

A prompt will appear to upgrade from the legacy AzureRM to the newer Az PowerShell modules so that the most up-to-date PowerShell Azure cmdlets can be used for this configuration. Jessica will enter ‘y’, or ‘yes’, which is not case sensitive, to proceed with the upgrade if it is required.

3. Authenticate to Subscription
The script then presents a prompt for Jessica to enter her Azure subscription credentials. Since Jessica has multiple subscriptions, a secondary prompt also asks her to specify which subscription associated with her credentials she wants to use. She chooses the subscription in which the dev.adatum.com target PKI virtual machine resides.

4. Select Virtual Machine

Based on the resource group used in the parameter -rgpName for this script shown in step 2 above, which was rg10, the virtual machines in that resource group is then listed so that Jessica can select the appropriate target VM that she wants to configure. She chooses AZRPKI1001. The naming convention used here is AZR = three letter cloud service provider code ([A][Z]u[R]e), PKI = virtual machine function code ([P]ublic [K]ey [I]nfrastructure), and the remaining characters are 1001, where 10 represents the resource group identifier in rg[10] and 01 is the series number.
5. Provide Credentials

Jessica enters the username for this domain as adm.infra.user@dev.adatum.com, which is a member of the Enterprise Admins and Domain Admins in the root (and only) domain for this forest. This is a requirement to install and configure Active Directory Certificate Services.
6. Download Configuration
The script will now automatically download both the pkiConfig.ps1 as well as the configuration data file pkiConfigData.psd1 as artifacts from the public GitHub project.

The pkiConfigData.psd1 information are the set of DSC related parameter values that are associated with the pkiConfig.ps1 configuration script. When the configuration is imported and compiled, it will include these configuration data parameters and used to specify properties of the PKI server. Some examples of these properties include; the CACommonName, the cryptographic provider, hash algorithm and key length for the CA root certificate.
7. Import Modules
Before the configuration script can be imported and compiled, the DSC resource modules it requires must first be imported from the PowerShell gallery into the Azure automation account. The script also does this automatically as shown in the image below.

8. Import and Compile Configuration
The script will also import and compile the configuration with the configuration data associated. Both the import and compilation steps are initiated from a single command in PowerShell, which is show below in line 404.

The output in the PowerShell console shows that the PkiConfig compilation has started.

The automation account will also confirm that the configuration was compiled.

9. Register Node
Since the script has now completed the compilation of the configuration, it proceeds to register or on-board the target virtual machine that will be configured. In this example this process took less than 5 minutes, but there may be other factors that may make it take longer. As with most of the previous steps, no manual intervention is required here either. Recall from step 4 that this is the AZRPKI1001.dev.adatum.com virtual machine. This is the last step in the configuration process where the configuration is actually applied to the PKI server and then restarted to finalize that configuration.

10. Get Results
The script then provides a set of instructions to perform the final verification and prompts Jessica to open the transcript. This transcript provides all the details of the script output that was shown in the console and Jessica decides to open the transcript to see if there are any errors she may have missed. The transcript opens with notepad in a new window and the script completes.

From the Azure portal, Jessica confirms that the target node applied the PkiConfig.localhost node configuration and that the node itself is compliant.

11. Verify Configuration
For the final verification that PKI was properly setup on this target VM, Jessica will log into the VM with RDP over HTTPs using the Azure bastion service.
She then starts a PowerShell session and types certsrv.msc to open the certificate authority MMC console and validates that this certificate services feature was installed and configured correctly.

Summary
So to quickly setup a simple PKI server, we can just download and execute a script from a public GitHub repository. Once executed, this script will automatically retrieve, import artifacts and modules, compile a configuration and register a target domain joined virtual machine in Azure to configure it as a certificate authority server. I hope this information was useful and feel free to leave a comment. Thanks for reading and happy automating!
References
- Video for this article.
- Code for this article.
- How to build an Azure Automation Lab: Article
- How to build an Azure Automation Lab: Code
- Check out my other blog articles at https://aka.ms/AutoCloudArc
Other Links
- Windows PKI Documentation Reference and Library
- Building the Totally Network Isolated Root Certificate Authority
- Azure Automation: https://docs.microsoft.com/en-us/azure/
- Desired State Configuration: https://docs.microsoft.com/en-us/powershell/dsc/overview
by Contributed | Oct 7, 2020 | Azure, Technology
This article is contributed. See the original author and article here.
The Azure Sphere 20.10 OS is scheduled for release to Retail Evaluation in mid-October. For this release, we are making important changes to the Retail Evaluation period:
- The Retail Evaluation period will last three weeks instead of the usual 14 days.
- We will provide a special evaluation version of the SDK for use during this period. This SDK will be replaced by the final version of the 20.10 SDK when the OS is released to the retail feed.
- We ask you not only to validate your current application binaries (built with the 20.07 or earlier SDK) but also to rebuild your applications with the evaluation SDK and validate those binaries as well.
Why is 20.10 Retail Evaluation different?
The Azure Sphere 20.10 OS and SDK incorporate some fundamental changes that may affect your applications. For 20.10, we upgraded The Yocto Project to the latest 3.1 LTS Dunfell release, which includes updated tools and libraries that may result in a change to the amount of memory used by applications.
To help you verify that your applications continue to work as intended, we will provide an evaluation version of the 20.10 SDK along with the Azure Sphere OS, so that you can rebuild your applications. You might see new or different GCC warnings when you compile with the new Azure Sphere SDK.
We are providing early notification of the evaluation release and extending the overall evaluation period by a week so that you have additional time to validate your existing applications and ensure that you can rebuild and run them without issues.
What should you do?
First, set up a device group for Retail Evaluation if you haven’t already done so. Devices in this group will receive the 20.10 Retail Evaluation OS when we release it.
When we release the 20.10 OS to Retail Evaluation:
- Test your existing application binaries with the new OS to make sure that they continue to work as you expect.
- Recompile your applications using the evaluation SDK and test them with the new OS. We recommend that you test high-memory use scenarios.
- If you encounter problems or discover errors, notify Microsoft immediately.
When the Retail Evaluation OS is released, we will provide details about installation and use of the evaluation SDK, recommended testing scenarios, and how to notify us about problems. See 20.10 Retail Evaluation for more information.

Recent Comments