by Contributed | Oct 5, 2020 | Azure, Technology, Uncategorized
This article is contributed. See the original author and article here.

Most of the time when we think about the basics of a detection research lab, it is an environment with Windows endpoints, audit policies configured, a log shipper, a server to centralize security event logs and an interface to query, correlate and visualize the data collected.
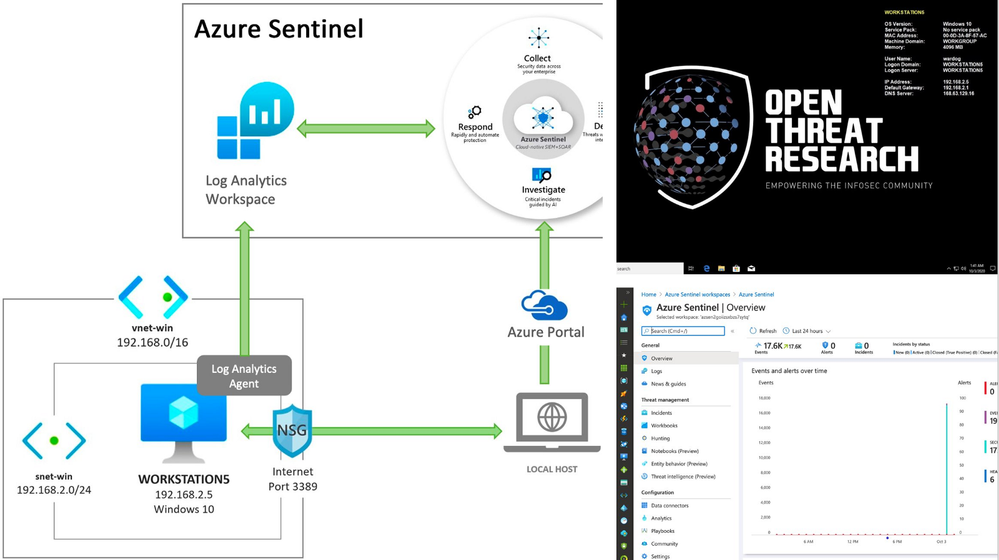
Recently, I started working with Azure Sentinel and even though there are various sources of data and platforms one could integrate it with, I wanted to learn and document how I could deploy an Azure Sentinel with a Windows lab environment in Azure for research purposes.
In this post, I show how to integrate an ARM template created in the previous post to deploy an Azure Sentinel solution with other templates to deploy a basic Windows network lab. The goal is to expedite the time it takes to get everything set up and ready-to-go before simulating a few adversary techniques.
This post is part of a four-part series where I show some of the use cases I am documenting through the open source project Azure Sentinel To-Go! . The other three parts can be found in the following links:
Azure Sentinel To-Go?

In a previous post (part 1), I introduced the project Azure Sentinel To-Go to start documenting some of the use cases that one could use an Azure Sentinel solution for in a lab environment, and how it could all be deployed via Azure Resource Manager (ARM) templates to make it practical and modular enough for others in the community to use.
If you go to the project’s current deployment options, you can see some of the current scenarios you can play with. For this post, I am going to use the one highlighted below and explain how I created it:
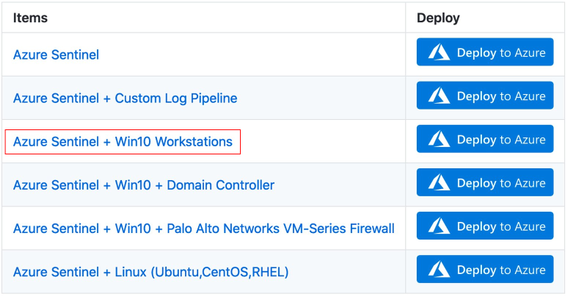
First of all, I highly recommend to read these two blog post to get familiarized with the process of deploying Azure Sentinel via an ARM template:
A basic template to deploy an Azure Sentinel solution would look similar to the one available in the Blacksmith project:
https://github.com/OTRF/Blacksmith/blob/master/templates/azure/Log-Analytics-Workspace-Sentinel/azuredeploy.json
Extending The Basic Azure Sentinel Template
In order to integrate an Azure Windows lab environment with the basic Azure Sentinel ARM template, we need to enable and configure the following features in our Azure Sentinel workspace:
- Enable the Azure Sentinel Security Events Data Connector to stream all security events (Microsoft-Windows-Security-Auditing event provider) to the Azure Sentinel workspace.
- Enable and stream additional Windows event providers (i.e Microsoft-Windows-Sysmon/Operational or Microsoft-Windows-WMI-Activity/Operational) to increase the visibility from a data perspective.
Of course, we also need to download and install the Log Analytics agent (also known as the Microsoft Monitoring Agent or MMA) on the machines for which we want to stream security events into Azure Sentinel. We will take care of that after this section.
1) Azure Sentinel + Security Events Data Connector
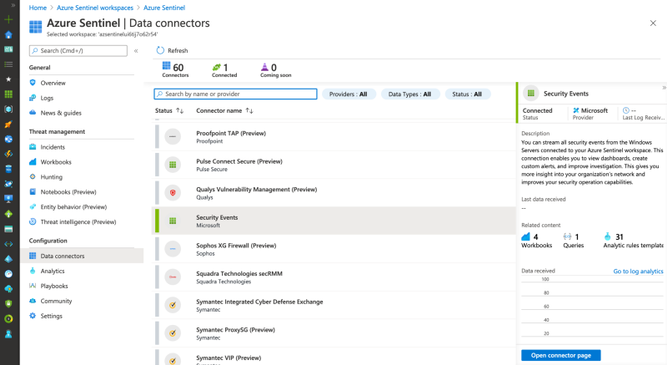
If you have an Azure Sentinel instance running, all you would have to do is go to Azure Portal>Azure Sentinel Workspaces>Data connectors>Security Events > Open connector page
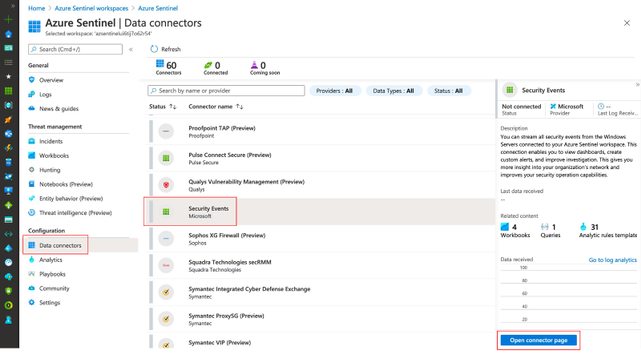
Then, you will have to select the events set you want to stream (All events, Common, Minimal or None)
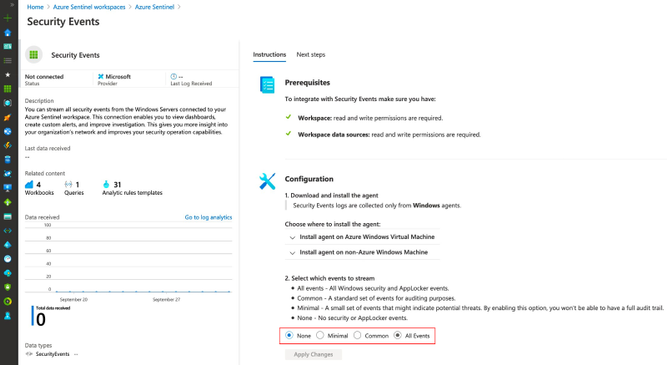
If you want to know more about each event set, you can read more about it here. The image below shows all the events behind each event set.
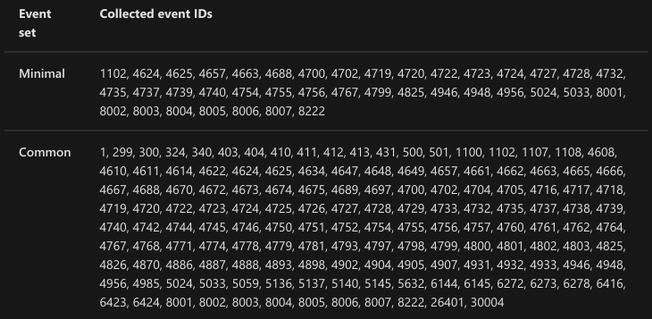 https://docs.microsoft.com/en-us/azure/sentinel/connect-windows-security-events
Once you select an event set and click on Apply Changes, you will see the status of the data connector as Connected and a message indicating the change happened successfully.
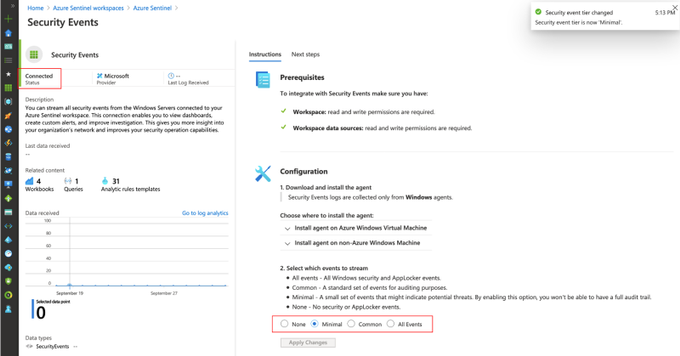
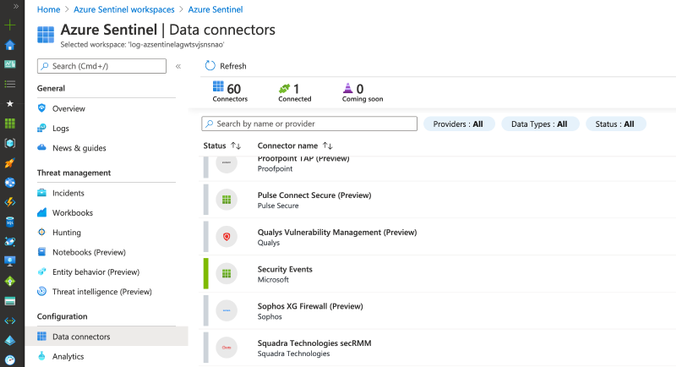
If you go back to your data connectors view, you will see the Security Events one with a green bar next to it and again with the Connected status.
Azure Resource Manager (ARM) Translation
We can take all those manual steps and express them as code as shown in the template below:
https://github.com/OTRF/Azure-Sentinel2Go/blob/master/azure-sentinel/linkedtemplates/data-connectors/securityEvents.json
The main part in the template is the following resource of type Microsoft.OperationalInsights/workspaces/dataSources and of kind SecurityInsightsSecurityEventCollectionConfiguration . For more information about all the additional parameters and allowed values, I recommend to read this document.
{
  "type": "Microsoft.OperationalInsights/workspaces/dataSources",
  "apiVersion": "2020-03-01-preview",
  "location": "[parameters('location')]",
  "name": "<workspacename>/<datasource-name>",
  "kind": "SecurityInsightsSecurityEventCollectionConfiguration",
  "properties": {
    "tier":  "<None,Minimal,Recommended,All>",
    "tierSetMethod": "Custom"
  }
}
2) Azure Sentinel + Additional Win Event Providers
It is great to collect Windows Security Auditing events in a lab environment, but what about other event providers? What if I want to install Sysmon and stream telemetry from Microsoft-Windows-Sysmon/Operational? Or maybe Microsoft-Windows-WMI-Activity/Operational?
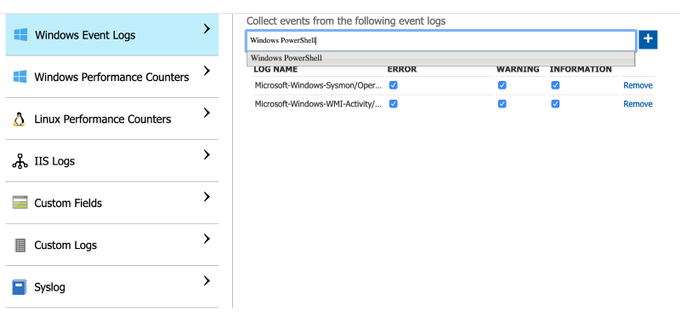
There is not an option to do it via the Azure Sentinel data connectors view, but you can do it through the Azure Sentinel Workspace advanced settings (Azure Portal>Azure Sentinel Workspaces>Azure Sentinel>{WorkspaceName} > Advanced Settings) as shown below:
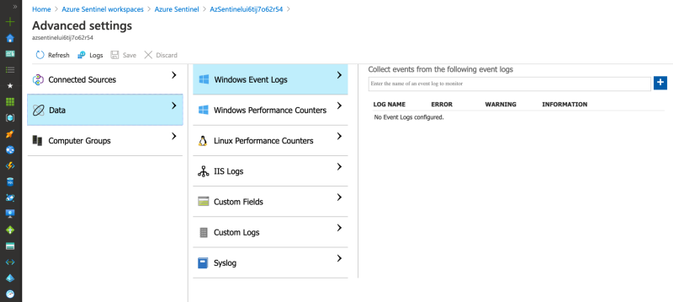
We can manually add one by one by typing the names and clicking on the plus sign.
Azure Resource Manager (ARM) Translation
We can take all those manual steps and express them as code as shown in the template below:
https://github.com/OTRF/Azure-Sentinel2Go/blob/master/azure-sentinel/linkedtemplates/log-analytics/winDataSources.json
The main part in the template is the following resource of type Microsoft.OperationalInsights/workspaces/dataSources and of kind WindowsEvent. For more information about all the additional parameters and allowed values, I recommend to read this document.
{
  "type": "Microsoft.OperationalInsights/workspaces/dataSources",
  "apiVersion": "2020-03-01-preview",
  "location": "[parameters('location')]",
  "name": "<workspacename>/<datasource-name>",
  "kind": "WindowsEvent",
  "properties": {
    "eventLogName": "",
    "eventTypes": [
      { "eventType": "Error"},
      { "eventType": "Warning"},
      { "eventType": "Information"}
    ]
  }
}
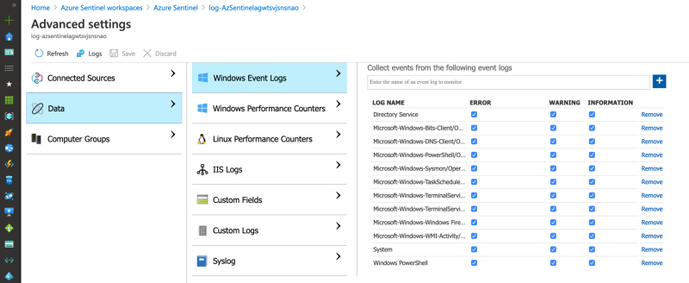
In the template above, I use an ARM method called Resource Iteration to create multiple data sources and cover all the event providers I want to stream more telemetry from. By default these are the event providers I enable:
"System"
"Microsoft-Windows-Sysmon/Operational",
"Microsoft-Windows-TerminalServices-RemoteConnectionManager/Operational",
"Microsoft-Windows-Bits-Client/Operational",
"Microsoft-Windows-TerminalServices-LocalSessionManager/Operational",
"Directory Service",
"Microsoft-Windows-DNS-Client/Operational",
"Microsoft-Windows-Windows Firewall With Advanced Security/Firewall",
"Windows PowerShell",
"Microsoft-Windows-PowerShell/Operational",
"Microsoft-Windows-WMI-Activity/Operational"
"Microsoft-Windows-TaskScheduler/Operational"
Executing The Extended Azure Sentinel Template
We need to merge or link the previous two templates to the initial template . You might be asking yourself:
“Why are the two previous templates on their own and not just embedded within one main template?”
That’s a great question. I initially did it that way, but when I started adding Linux and other platform integrations to it, the master template was getting too big and a little too complex to manage. Therefore, I decided to break the template into related templates, and then deploy them together through a new master template. This approach also helps me to create a few template combinations and cover more scenarios without having a long list of parameters and one master template only. I use the Linked Templates concept which you can read more about here.
These are the steps to execute the template:
1) Download current demo template
https://github.com/OTRF/Blacksmith/blob/master/templates/azure/Log-Analytics-Workspace-Sentinel/demos/LA-Sentinel-Windows-Settings.json
2) Create Resource Group (Azure CLI)
You do not have to create a resource group, but for a lab environment and to isolate it from other resources, I run the following command:
az group create -n AzSentinelDemo -l eastus
-
az group create : Create a resource group
-
-n : Name of the new resource group
-
-l : Location/region
3) Deploy ARM Template (Azure CLI)
az deployment group create -f ./LA-Sentinel-Windows-Settings.json -g AzSentinelDemo
-
az deployment group create: Start a deployment
-
-f : Template that I put together for this deployment.
-
-g: Name of the Azure Resource group
Monitor Deployment
As you can see in the image below, multiple deployments were executed after executing the master template for this demo.

Check Azure Sentinel Automatic Settings (Data Connector)
Check Azure Sentinel Automatic Settings (Win Event Providers)
Everything got deployed as expected and in less than 30 seconds!! Now, we are ready to integrate it with a Windows machine (i.e Azure Win10 VM).
Re-Using a Windows 10 ARM Template
Building a Windows 10 virtual machine via ARM templates, and from scratch, is a little bit out of scope for this blog post ( I am preparing a separate series for it), but I will highlight the main sections that allowed me to connect it with my Azure Sentinel lab instance.
A Win 10 ARM Template 101 Recipe
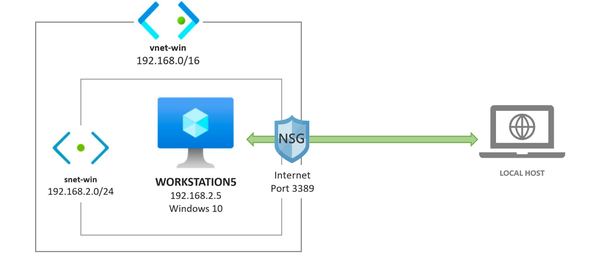
I created a basic template to deploy a Win10 VM environment in Azure. It does not install anything on the endpoint, and it uses the same ARM method called Resource Iteration , mentioned before, to create multiple Windows 10 VMs in the same virtual network.
https://github.com/OTRF/Blacksmith/blob/master/templates/azure/Win10/demos/Win10-101.json
Main Components/Resources:
One part of the virtual machine resource object that is important to get familiarized with is the imageReference properties section.
A Marketplace image in Azure has the following attributes:
-
Publisher: The organization that created the image. Examples: MicrosoftWindowsDesktop, MicrosoftWindowsServer
-
Offer: The name of a group of related images created by a publisher. Examples: Windows-10, WindowsServer
-
SKU: An instance of an offer, such as a major release of a distribution. Examples: 19h2-pro, 2019-Datacenter
-
Version: The version number of an image SKU.
How do we get some of those values? Once again, you can use the Azure Command-Line Interface (CLI) . For example, you can list all the offer values available for the MicrosoftWindowsDesktop publisher in your subscription with the following command:
> az vm image list-offers -p MicrosoftWindowsDesktop -o table
Location    Name
----------  --------------------------------------------
eastus      corevmtestoffer04
eastus      office-365
eastus      Test-offer-legacy-id
eastus      test_sj_win_client
eastus      Windows-10
eastus      windows-10-1607-vhd-client-prod-stage
eastus      windows-10-1803-vhd-client-prod-stage
eastus      windows-10-1809-vhd-client-office-prod-stage
eastus      windows-10-1809-vhd-client-prod-stage
eastus      windows-10-1903-vhd-client-office-prod-stage
eastus      windows-10-1903-vhd-client-prod-stage
eastus      windows-10-1909-vhd-client-office-prod-stage
eastus      windows-10-1909-vhd-client-prod-stage
eastus      windows-10-2004-vhd-client-office-prod-stage
eastus      windows-10-2004-vhd-client-prod-stage
eastus      windows-10-ppe
eastus      windows-7
Then, you can use a specific offer and get a list of SKU values:
> az vm image list-skus -l eastus -f Windows-10 -p MicrosoftWindowsDesktop -o table
Location    Name
----------  ---------------------------
eastus      19h1-ent
eastus      19h1-ent-gensecond
eastus      19h1-entn
eastus      19h1-entn-gensecond
eastus      19h1-evd
eastus      19h1-pro
eastus      19h1-pro-gensecond
eastus      19h1-pro-zh-cn
eastus      19h1-pro-zh-cn-gensecond
eastus      19h1-pron
eastus      19h1-pron-gensecond
Execute the Win 10 ARM Template 101 Recipe (Optional)
Once again, you can run the template via the Azure CLI as shown below:
az deployment group create -f ./Win10-101.json -g AzSentinelDemo --parameters adminUsername='wardog' adminPassword='<PASSWORD>' allowedIPAddresses=<YOUR-PUBLIC-IP
One thing to point out that is very important to remember is the use of the allowedIPAddresses parameter. That restricts the access to your network environment to only your Public IP address. I highly recommended to use it. You do not want to expose your VM to the world.
This will automate the creation of all the resources needed to have a Win 10 VM in azure. Usually one would need to create one resource at a time. I love to automate all that with an ARM template.
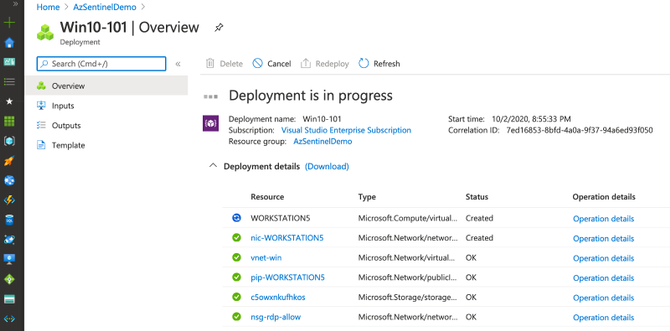
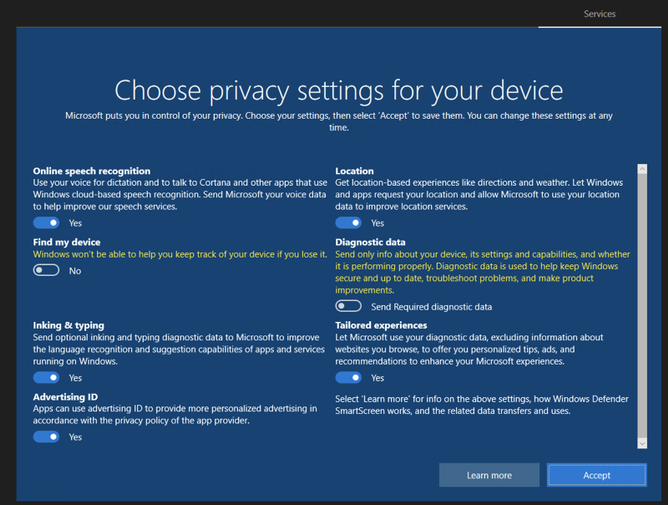
Once the deployment finishes, you can simply RDP to it by its Public IP address. You will land at the privacy settings setup step. This is a basic deployment. Later, I will provide a template that takes care of all that (Disables all those settings and prepares the box automatically).
You can delete all the resources via your Azure portal now to get ready for another deployment and continue with the next examples.
Extending the Basic Windows 10 ARM Template
In order to integrate the previous Win10 ARM template with the extended Azure Sentinel ARM template, developed earlier, we need to do the following while deploying our Windows 10 VM:
- Download and install the Log Analytics agent (also known as the Microsoft Monitoring Agent or MMA) on the machines for which we want to stream security events into Azure Sentinel from.
Win 10 ARM Template + Log Analytics Agent
I put together the following template to allow a user to explicitly enable the monitoring agent and pass workspaceId and workspaceKey values as input to send/ship security events to a specific Azure Sentinel workspace.
https://github.com/OTRF/Blacksmith/blob/master/templates/azure/Win10/demos/Win10-Azure-Sentinel.json
The main change in the template is the following resource of type Microsoft.Compute/virtualMachines/extensions. Inside of the resource properties, I define the publisher as Microsoft.EnterpriseCloud.Monitoring and of type MicrosoftMonitoringAgent. Finally, I map the workspace settings to their respective input parameters as shown below:
{
  "name": "<VM-NAME/EXTENSION-NAME>",
  "type": "Microsoft.Compute/virtualMachines/extensions",
  "apiVersion": "2019-12-01",
  "location": "[parameters('location')]",
  "properties": {
    "publisher": "Microsoft.EnterpriseCloud.Monitoring",
    "type": "MicrosoftMonitoringAgent",
    "typeHandlerVersion": "1.0",
    "autoUpgradeMinorVersion": true,
    "settings": {
      "workspaceId": "[parameters('workspaceId')]"
    },
    "protectedSettings": {
      "workspaceKey": "[parameters('workspaceKey')]"
    }
  }
}
Putting it All Together!
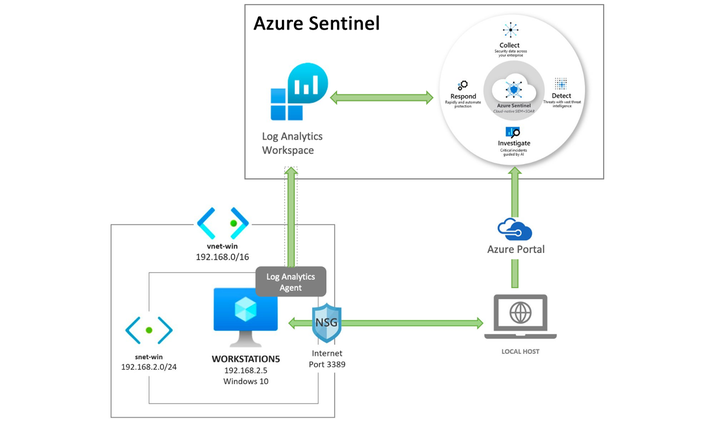
To recap, the following template should do the following now:
- Deploy an Azure Sentinel solution
- Enable the Azure Sentinel SecurityEvents data connector
- Enable more Windows event providers to collect more telemetry
- Deploy a Windows 10 virtual machine and its own virtual network.
- Install the Log Analytics Agent (Microsoft Monitoring Agent) in the Windows 10 VM.
Executing the ARM Template (Azure CLI)
az deployment group create -n Win10Demo -f ./Win10-Azure-Sentinel-Basic.json -g Win10AzSentinel --parameters adminUsername='wardog' adminPassword='<PASSWORD>' allowedIPAddresses=<PUBLIC-IP-ADDRESS>

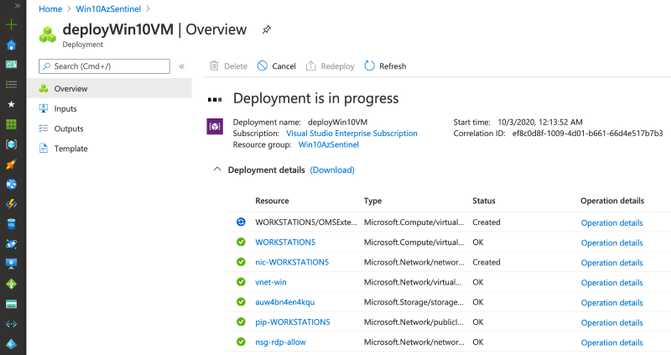
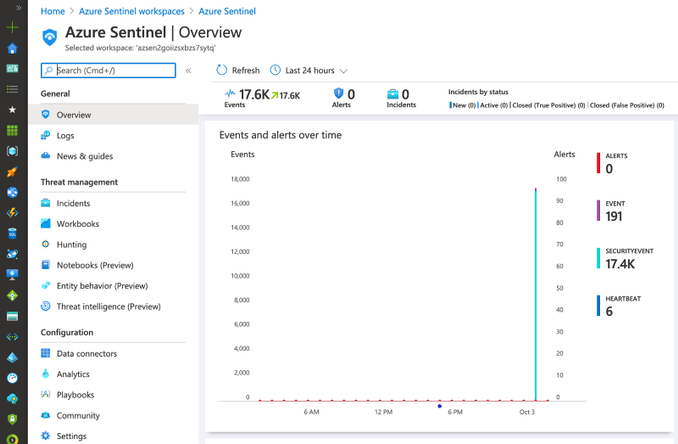
Once the deployment finishes (~10mins), you can go to your Azure Sentinel dashboard, wait a few mins and you will start seeing security events flowing:
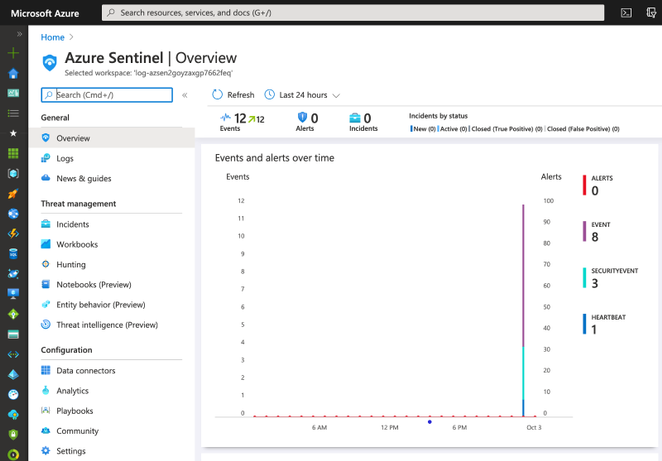
As you can see in the image above, we have events from SecurityEvent and Event tables. We can explore the events through the Logs option.
SecurityEvent
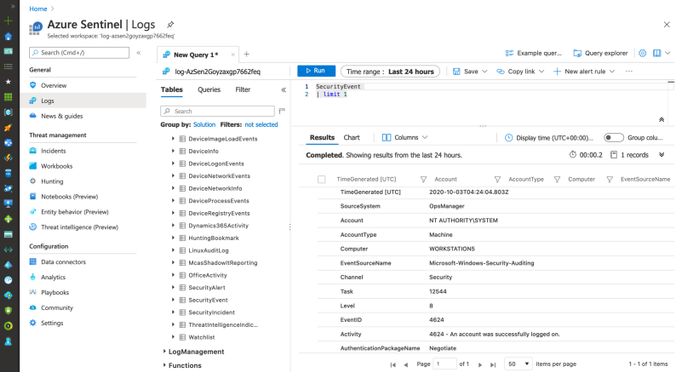
You can run the following query to validate and explore events flowing to the SecurityEvent table:
SecurityEvent
| limit 1
Event
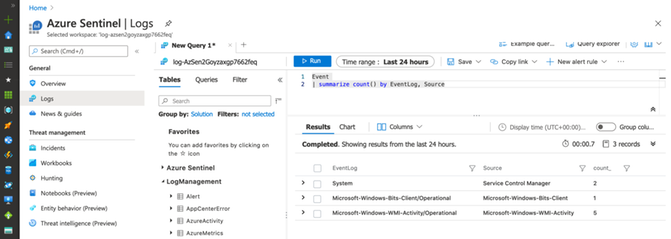
The following basic query validates the consumption of more Windows event providers through the Event table:
Event
| summarize count() by EventLog, Source
That’s it! Very easy to deploy and in a few minutes.
Improving the Final Template! What? Why?
I wanted to automate the configuration and installation of a few more things:
- New Firewall rules, Power options, Security Private settings, Disabling a few Windows 10 settings, PowerShell Remoting service, etc. I used the following script.
-
System Access Control List (SACL) known as Audit Rules on specific secured objects to generate more telemetry. I used the following script.
- Setting a wallpaper via Bginfo. I used the following script.
- Install AntiMalware extension on every Windows 10 VM via the following embedded resource. My way to configure Windows Defender exclusions.
- Install Sysmon on every Windows 10 VM via this script.
- Embed a Log Analytics Function option via the Azure Sentinel template to call a linked template and import a Sysmon function/parser.
- [Optional] Azure bastion host set up.
- [Optional] A Command and control (C2) framework. I wanted to have the option to deploy a C2 along with my setup and test a few things.
- [Optional] Virtual Network Peering between the Windows 10 Virtual Network and the C2 Virtual Network.
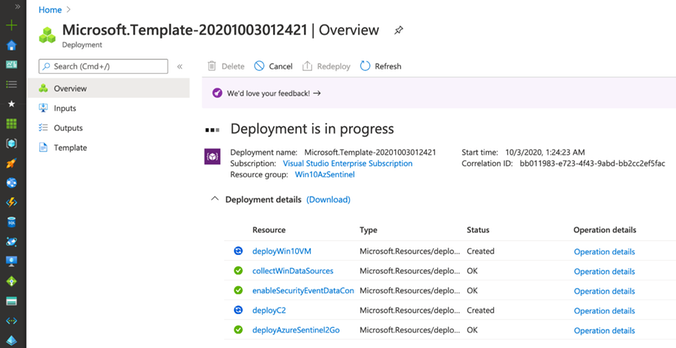
This final official template is provided by the Azure Sentinel To-Go project and can be deployed by clicking on the “Deploy to Azure” button in the repository as shown below.
 https://github.com/OTRF/Azure-Sentinel2Go
The Final Results!
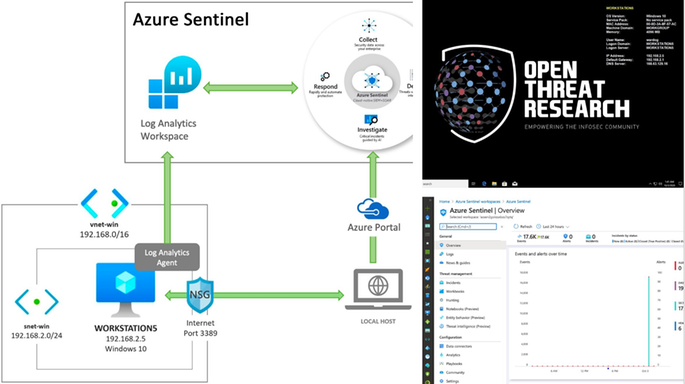
Azure Sentinel
An Azure Sentinel with security events from several Windows event providers flowing right from a Win10 VM.
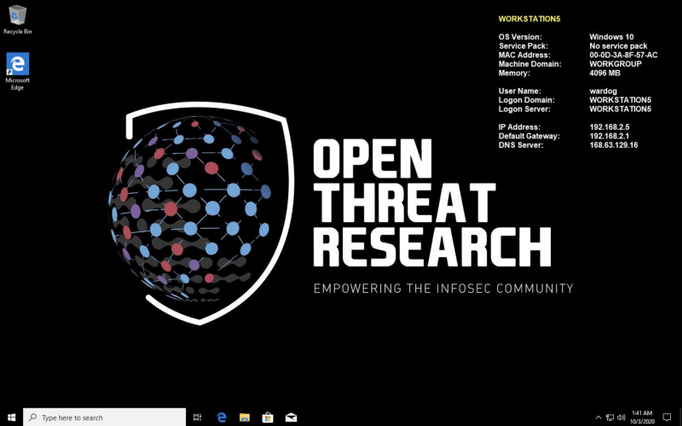
Windows 10 VM
A pre-configured Win10 VM ready-to-go with Sysmon installed and a wallpaper courtesy of the Open Threat Research community.
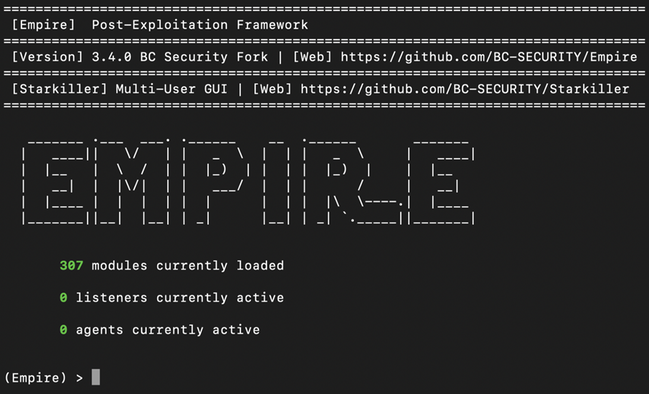
[Optional] Ubuntu — Empire Option Set
An Ubuntu 18 VM with Empire dockerized and ready-to-go. This is optional, but it helps me a lot to run a few simulations right away.
ssh wardog@<UBUNTU-PUBLIC-IP>
> sudo docker exec -ti empire ./empire
Having a lab environment that I can deploy right from GitHub and in a few minutes with One Click and a few parameters is a game changer.
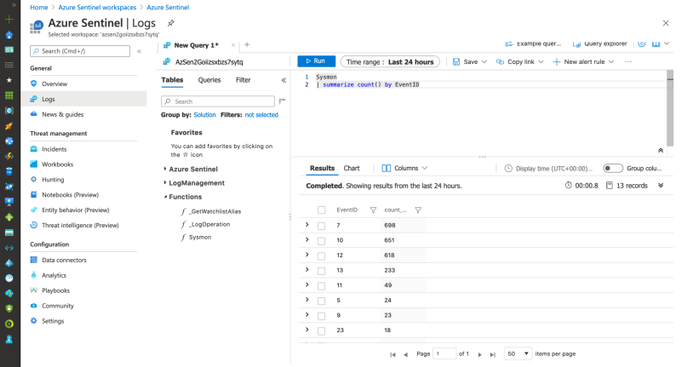
What you do next is up to you and depends on your creativity. With the Sysmon function/parser automatically imported to the Azure Sentinel workspace, you can easily explore the Sysmon event provider and use the telemetry for additional context besides Windows Security auditing.
Sysmon
| summarize count() by EventID
FQA:
How much does it cost to host the last example in Azure?
Azure Sentinel (Receiving Logs), Win10VM (Shipping Logs) and Ubuntu VM running for 24 hours was ~$3–$4. I usually deploy the environment, run my test, play a little bit with the data, create some queries and destroy it. Thefore, it is usually less than a dollar every time I use it.
What about Windows Event Filtering? I want more flexibility
Great question! That is actually a feature in preview at the moment. You can read more about Azure Monitor Agent and Data Collection Rules Public Preview here. This is a sample data collection rule where you can specify specific events and event providers. I wrote a basic one for testing as shown below:
"dataSources": {
  "windowsEventLogs": [
    {
      "name": "AuthenticationLog",
      "streams": [
        "Microsoft-WindowsEvent"
      ],
     "scheduledTransferPeriod": "PT1M",
     "xPathQueries": [
        "Security!*[System[(EventID=4624)]]"
     ]
    }
   ]
}
That will be covered in another blog post once it is more mature and is GA. xPathQueries are powerful!
I hope you liked this tutorial. As you can see in the last part of this post, you can now deploy everything with one click and a few parameters and through the Azure Portal. That is what the Azure Sentinel To-Go project is about. Documenting and creating templates for a few lab scenarios and share them with the InfoSec community to expedite the deployment of Azure Sentinel and a few resources for research purposes.
Next time, I will go over a Linux environment deployment, so stay tuned!
References
https://docs.microsoft.com/en-us/azure/virtual-machines/windows/cli-ps-findimage
https://docs.microsoft.com/en-us/azure/azure-resource-manager/templates/template-syntax
https://azure.microsoft.com/en-us/pricing/details/virtual-machines/windows/
https://docs.microsoft.com/en-us/windows/win32/secauthz/access-control-lists
https://docs.microsoft.com/en-us/azure/sentinel/connect-windows-security-events
https://docs.microsoft.com/en-us/sysinternals/downloads/sysmon
https://github.com/OTRF/Blacksmith/tree/master/templates/azure/Win10
https://github.com/OTRF/Azure-Sentinel2Go
https://github.com/OTRF/Azure-Sentinel2Go/tree/master/grocery-list/win10
by Contributed | Oct 5, 2020 | Azure, Technology, Uncategorized
This article is contributed. See the original author and article here.
AI today is about scale: models with billions of parameters used by millions of people. Azure Machine Learning is built to support your delivery of AI-powered experiences at scale. With our notebook-based authoring experience, our low-code and no-code training platform, our responsible AI integrations, and our industry-leading ML Ops capabilities, we give you the ability to develop large machine learning models easily, responsibly, and reliably.
One key component of employing AI in your business is model serving. Once you have trained a model and assessed it per responsible machine learning principles, you need to quickly process requests for predictions, for many users at a time. While serving models on general-purpose CPUs can work well for less complex models serving fewer users, those of you with a significant reliance on real-time AI predictions have been asking us how you can leverage GPUs to scale more effectively.
That is why today, we are partnering with NVIDIA to announce the availability of the Triton Inference Server in Azure Machine Learning to deliver cost-effective, turnkey GPU inferencing.
There are three components to serving an AI model at scale: server, runtime, and hardware. This new Triton server, together with ONNX Runtime and NVIDIA GPUs on Azure, complements Azure Machine Learning’s support for developing AI models at scale by giving you the ability to serve AI models to many users cheaply and with low latency. Below, we go into detail about each of the three components to serving AI models at scale.
Server
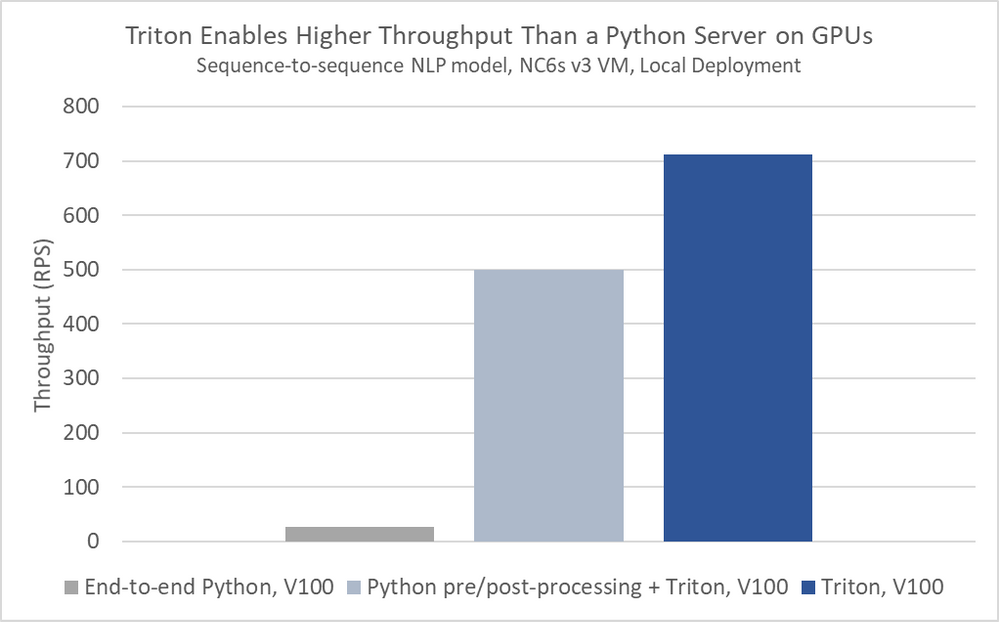
Triton Inference Server in Azure Machine Learning can, through server-side mini batching, achieve significantly higher throughput than can a general-purpose Python server like Flask.

Triton can support models in ONNX, PyTorch, TensorFlow, and Caffe2, giving your data scientists the freedom to explore any framework of interest to them during training time.
Runtime
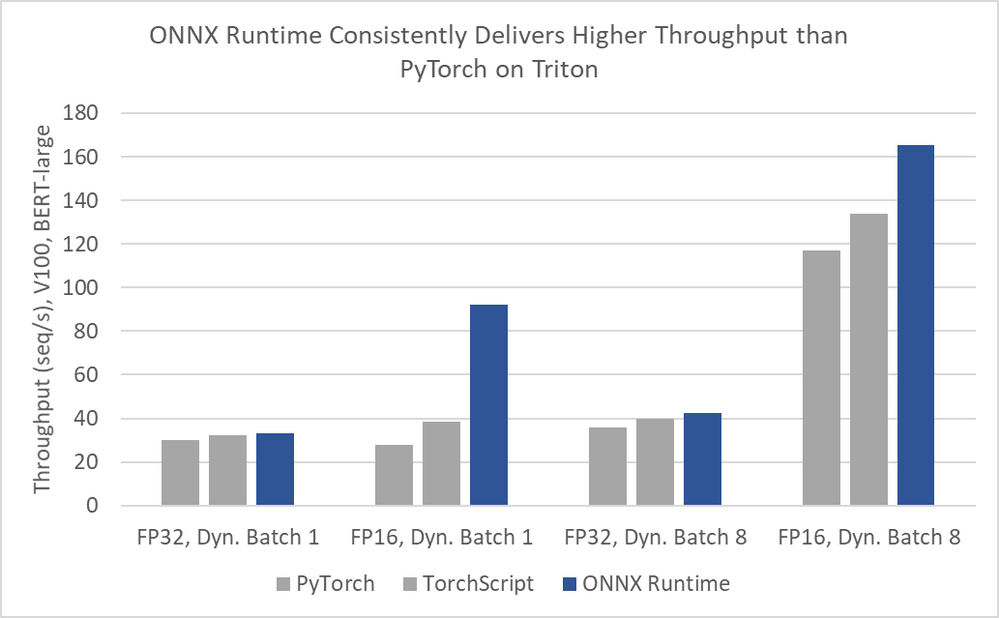
For even better performance, serve your models in ONNX Runtime, a high-performance runtime for both training (in preview) and inferencing.
Numbers Courtesy of NVIDIA
ONNX Runtime is used by default when serving ONNX models in Triton, and you can convert PyTorch, TensorFlow, and Scikit-learn models to ONNX.
Hardware
NVIDIA Tesla T4 GPUs in Azure provide a hardware-accelerated foundation for a wide variety of models and inferencing performance demands. The NC T4 v3 series is a new, lightweight GPU-accelerated VM, offering a cost-effective option for customers performing real-time or small batch inferencing who may not need the throughput afforded by larger GPU sizes such as the V100-powered ND v2 and NC v3-series VMs, and desire a wider regional deployment footprint.
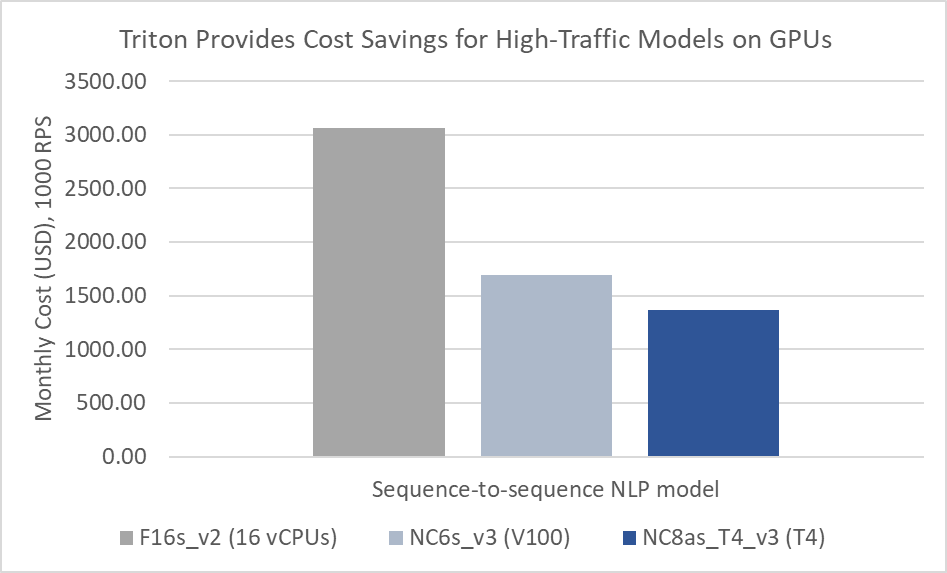
The new NCasT4_v3 VMs are currently available for preview in the West US 2 region, with 1 to 4 NVIDIA Tesla T4 GPUs per VM, and will soon expand in availability with over a dozen planned regions across North America, Europe and Asia.
To learn more about NCasT4_v3-series virtual machines, visit the NCasT4_v3-series documentation.
Easy to Use
Using Triton Inference Server with ONNX Runtime in Azure Machine Learning is simple. Assuming you have a Triton Model Repository with a parent directory triton and an Azure Machine Learning deploymentconfig.json, run the commands below to register your model and deploy a webservice.
az ml model register -n triton_model -p triton --model-framework=Multi
az ml model deploy -n triton-webservice -m triton_model:1 --dc deploymentconfig.json --compute-target aks-gpu
Next Steps
In this blog, you have seen how Azure Machine Learning can enable your business to serve large AI models to many users simultaneously. By bringing together a high-performance inference server, a high-performance runtime, and high-performance hardware, we give you the ability to serve many requests per second at millisecond latencies while saving money.
To try this new offering yourself:
- Sign up for an Azure Machine Learning trial
- Clone our samples repository on GitHub
- Read our documentation
- Be sure to let us know what you think
You can also request access to the new NCasT4_v3 VM series (In Preview) by applying here.

by Contributed | Oct 3, 2020 | Azure, Technology, Uncategorized
This article is contributed. See the original author and article here.
At Ignite, we announced the preview of a new deployment option for Azure Database for PostgreSQL: Flexible Server. Flexible Server is the result of a multi-year Azure engineering effort to deliver a reimagined database service to those of you who run Postgres in the cloud. Over the past several years, our Postgres engineering team has had the opportunity to learn from many of you about your challenges and expectations around the Single Server deployment option in Azure Database for PostgreSQL. Your feedback and our learnings have informed the creation of Flexible Server.
If you are looking for a technical overview of what Flexible Server is in Azure Database for PostgreSQL—and what the key capabilities are, let’s dive in.

Flexible server is architected to meet requirements for modern apps
Our Flexible Server deployment option for Postgres is hosted on the same platform as Azure Database for PostgreSQL – Hyperscale (Citus), our deployment option that scales out Postgres horizontally (by leveraging the Citus open source extension to Postgres).
Flexible Server is hosted in a single-tenant Virtual Machine (VM) on Azure, on a Linux based operating system that aligns naturally with the Postgres engine architecture. Your Postgres applications and clients can connect directly to Flexible Server, eliminating the need for redirection through a gateway. The direct connection also eliminates the need for an @ sign in your username on Flexible Server. Additionally, you can now place Flexible Server’s compute and storage—as well as your application—in the same Azure Availability Zone, resulting in lower latency to run your workloads. For storage, our Flexible Server option for Postgres uses Azure Premium Managed Disk. In the future, we will provide an option to use Azure Ultra SSD Managed Disk. The database and WAL archive (WAL stands for write ahead log) are stored in zone redundant storage.
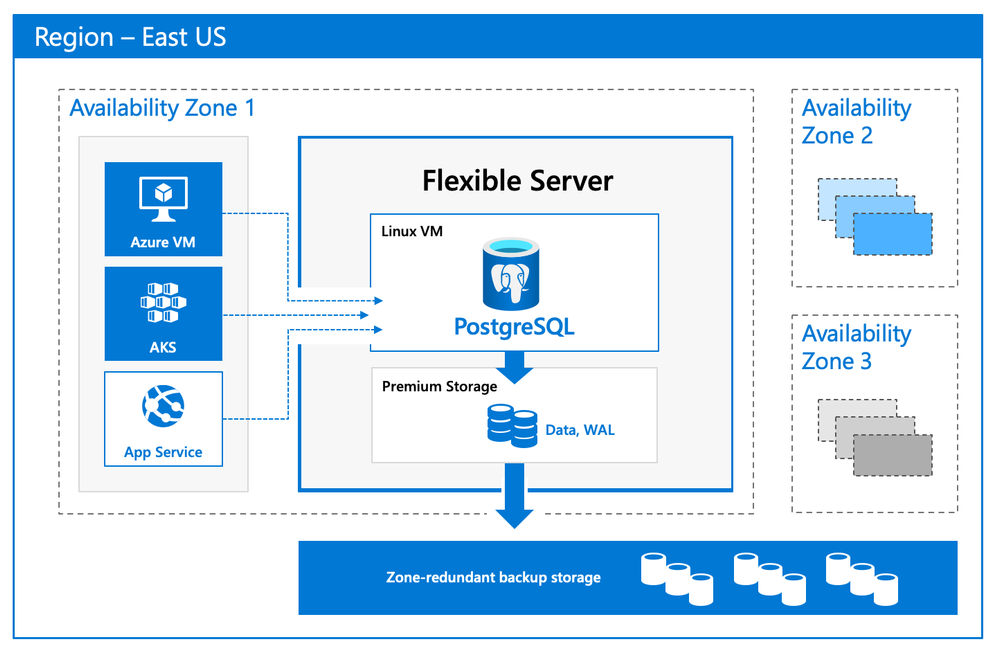 Flexible Server Architecture showing PostgreSQL engine hosted in a VM with zone redundant storage for data/log backups and client, database compute and storage in the same Availability Zone
There are numerous benefits of using a managed Postgres service, and many of you are already using Azure Database for PostgreSQL to simplify or eliminate operational complexities. With Flexible Server, we’re improving the developer experience even further, as well as providing options for scenarios where you want more control of your database.
A developer-friendly managed Postgres service
For many of you, your primary focus is your application (and your application’s customers.) If your application needs a database backend, the experience to provision and connect to the database should be intuitive and cost-effective. We have simplified your developer experience with Flexible Server on Azure Database for PostgreSQL, in few key ways.
-
Intuitive and simplified provisioning experience. To provision Flexible Server, some of the fields are automatically filled based on your profile. For example, Admin username and password use defaults but you can always overwrite them.
-
Simplified CLI experience. For example, it’s now possible to provision Flexible Server inside a virtual network in one command, and the number of keystrokes for the command can be reduced by using local context. For more details, see Flexible server CLI reference.
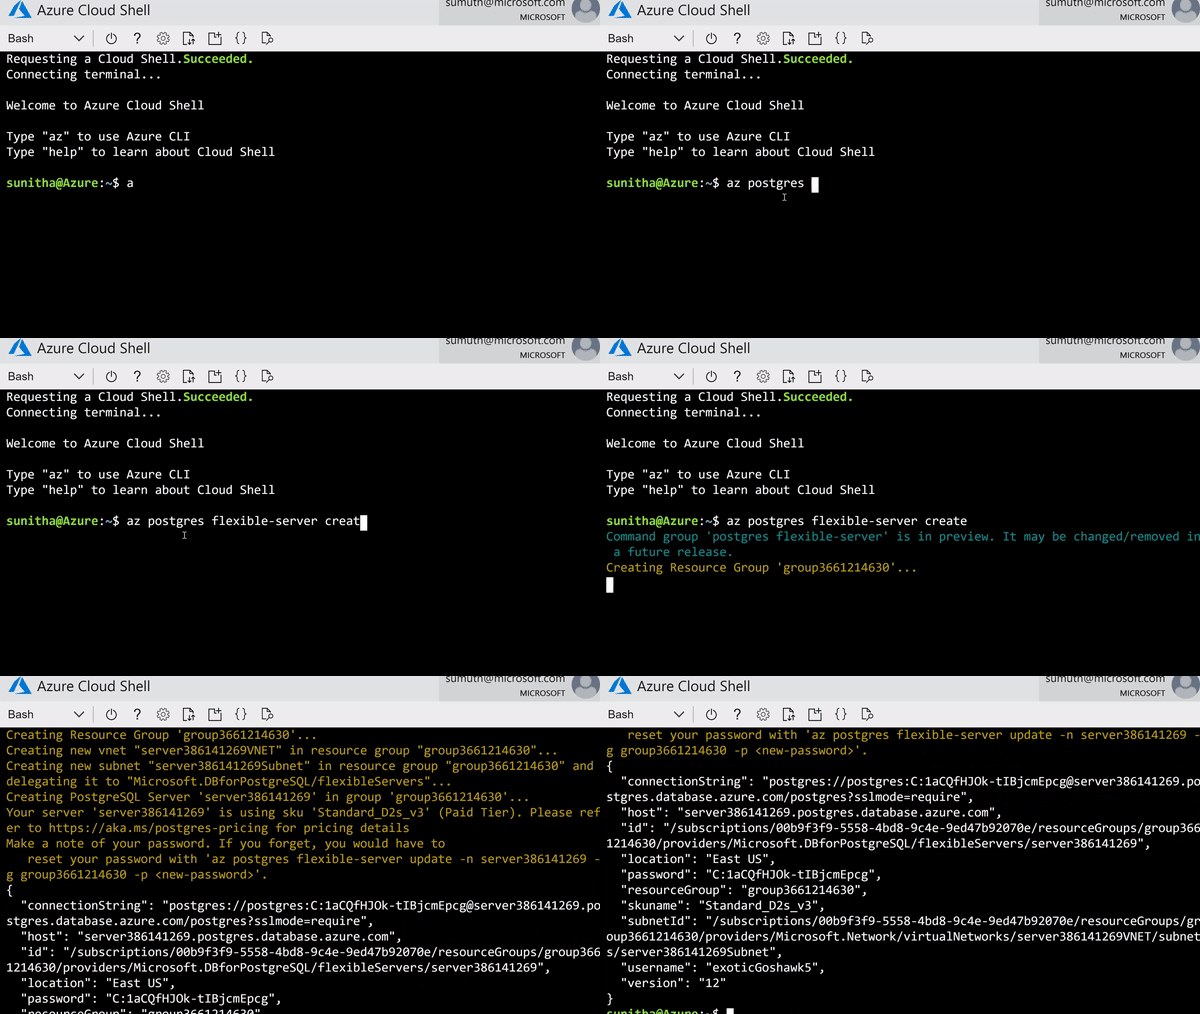 CLI command to provision the Flexible Server
-
Connection string requirement. The requirement to include @servername suffix in the username has been removed. This allows you to connect to Flexible Server just like you would to any other PostgreSQL engine running on-premise or on a virtual machine.
-
Connection management: Pgbouncer is now natively integrated to simplify PostgreSQL connection pooling.
-
Burstable compute: You can optimize cost with lower-cost, burstable compute SKUs that let you pay for performance only when you need it.
-
Stop/start: Reduce costs with the ability to stop/start the Flexible Server when needed, to stop a running service or to start a stopped Service. This is ideal for development or test scenarios where it’s not necessary to run your database 24×7. When Flexible Server is stopped, you only pay for storage, and you can easily start it back up with just a click in the Azure portal.
 Screenshot from the Azure Portal showing how to stop compute in your Azure Database for PostgreSQL flexible server when you don’t need it to be operational.
 Screenshot from the Azure Portal depicting how to start compute for your Azure Database for PostgreSQL flexible server, when you’re ready to restart work.
Maximum database control
Flexible Server brings more flexibility and control to your managed Postgres database, with key capabilities to help you meet the needs of your application.
-
Scheduled maintenance: Enterprise applications must be available all the time, and any interruptions during peak business hours can be disruptive. Similarly, if you’re a DBA who is running a long transaction—such as a large data load or index create/rebuild operations—any disruption will abort your transaction prematurely. Some of you have asked for the ability to control Azure maintenance windows to meet your business SLAs. Flexible Server will schedule one maintenance window every 30 days at the time of your choosing. For many customers, the system-managed schedule is fine, but the option to control is helpful for some mission-critical workloads.
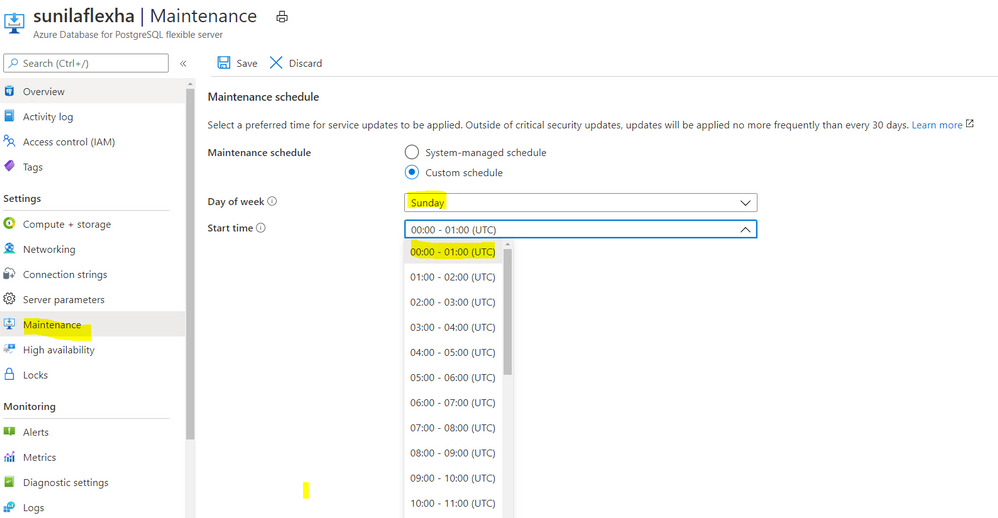 Screenshot from the maintenance settings for Azure Database for PostgreSQL flexible server in the Azure Portal, showing where you can select the day of week and start time for your maintenance schedule.
-
Configuration parameters: Postgres offers a wide range of server parameters to fine tune the database engine performance, and some of you want similar control in a managed service as well. For example, there is sometimes a need to mimic the configuration you had on-premises or in a VM. Flexible Server has enabled control over additional server parameters, such as Max_Connections, and we will add even more by Flexible Server GA.
-
Lower Latency: To provide low latency for applications, some of you have asked for the ability to co-locate Azure Database for PostgreSQL and your application in physical proximity (i.e. the same Availability Zone). Flexible Server provides the ability to co-locate the client, database, and storage for lower latency and improved out-of-the-box performance. Based on our internal testing and customer testimonials, we are seeing much better out-of-the-box performance.
-
Network Isolation: Some of you need the ability to provision servers with your own VNet or subnet, to ensure complete lock down from any outside access. With Flexible Server private endpoints, you can completely isolate the network by preventing any public endpoint to exist for the database workload. All connections to the server on public or private endpoints are secured and encrypted by default with SSL/TLS v1.2.
Zone-redundant high availability
With the new Flexible Server option for Azure Database for PostgreSQL, you can choose to turn on zone redundant high availability (HA). If you do, our managed Postgres service will spin up a hot standby with the exact same configuration, for both compute and storage, in a different Availability Zone. This allows you to achieve fast failover and application availability should the Availability Zone of the primary server become unavailable.
Any failure on the primary server is automatically detected, and it will fail over to the standby which becomes the new primary. Your application can connect to this new primary with no changes to the connection string.
Zone redundancy can help with business continuity during planned or unplanned downtime events, protecting your mission-critical databases. Given that the zone redundant configuration provides a full standby replica server, there are cost implications, and zone redundancy can be enabled or disabled at any time.
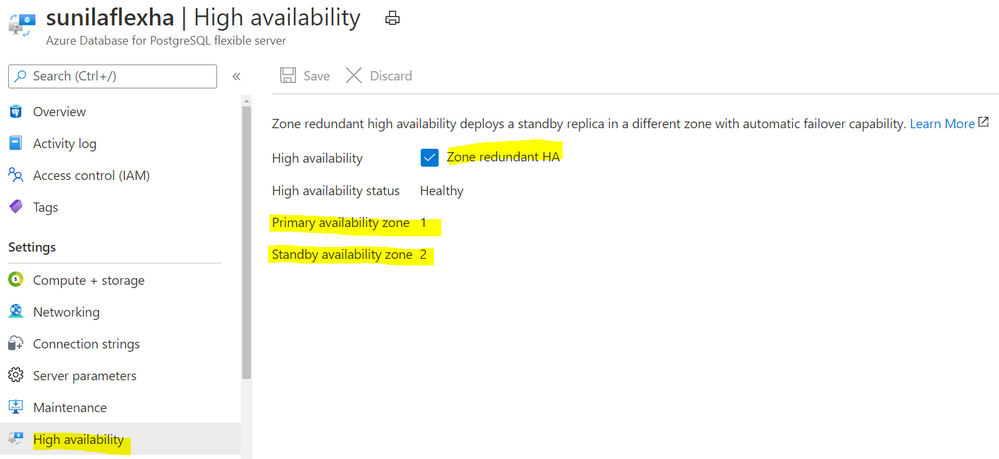 Screenshot from the Azure Portal depicting an Azure Database for PostgreSQL flexible server in a zone-redundant HA configuration, with the primary server in Availability Zone 1 and the standby server in Availability Zone 2.
Get started with Flexible Server today!
We can’t wait to see how you will use our new Flexible Server deployment option that is now in preview in Azure Database for PostgreSQL. If you’re ready to try things out, here are some quickstarts to get you started:
Azure Database for PostgreSQL Single Server remains the enterprise ready database platform of choice for your mission-critical workloads, until Flexible Server reaches GA. For those of you who want to migrate over to Flexible Server, we are also working to provide you a simplified migration experience from Single Server to Flexible Server with minimal downtime.
If you want to dive deeper, the new Flexible Server docs are a great place to roll up your sleeves, and visit our website to learn more about our Azure Database for PostgreSQL managed service. We are always eager to hear your feedback so please reach out via email using Ask Azure DB for PostgreSQL.
Sunil Agarwal
Twitter: @s_u_n_e_e_l


Recent Comments