by Contributed | Oct 2, 2020 | Azure, Technology, Uncategorized
This article is contributed. See the original author and article here.
In this blog post, we have invited Shriram Natarajan (Senior Program Manager, Azure Stack Hub) to walk us through how to interact with Azure Stack Hub using REST APIs.
Microsoft Azure cloud provides a robust platform for developers and operators to build and deploy their solutions seamlessly to the public cloud, the regional clouds as well as to Azure Stack Hub on-premises solutions. This ease of management is enabled by the consistent APIs, provided by the Cloud services available across all of these instances. Each cloud is fronted by the Azure Resource Manager (ARM) which simplifies the manage of application resources, enabling you to repeatedly deploy applications, with confidence that the resources are deployed in a consistent state. Azure Resource Manager makes it easy for you to manage and visualize resources in your app. You no longer have to deploy parts of your app separately and then manually stitch them together. You put resources with a common lifecycle into a resource group that can be deployed or deleted in a single action. You can see which resources are linked by a dependency. You can apply tags to resources to categorize them for management tasks, such as billing. On Azure Stack Hub, ARM is available for the cloud Operators as well to manage the cloud easily and ensure high availability to their customers.
Azure has robust tooling with SDKs in a variety of languages to help customers interact with the ARM APIs wherever they are. These tools are the recommended way to interact with any of the Azure clouds. However, there may be some cases where you would want to call the ARM APIs directly. For example:
- You may need to call APIs that are not supported by tooling yet.
- The tools standardize the parsing of the request responses to provide a good usability experience regardless of the service you’re calling. However, advanced users may require a different processing of this response based on their scenario.
- The Azure SDKs are not available in the language of your choice and so you need to make direct REST calls to the ARM API.
For such scenarios, this blog will detail the process of making Authenticated API calls to the Azure Resource Manager. For the purposes of this blog we will use the ARM instance in Azure Stack Hub, but the process is the same regardless of whether you authenticate to Public Azure, any of the regional clouds or Azure Stack Edge.
This blog will help you get boots on ground quick and get started with calling ARM.
Note:
- This post focuses on Azure Stack Operators and the Admin ARM in Azure Stack Hub, but know that it’s the same process for the User ARM as well.
- This post will use Postman as a way to show the API calls. You can use the code generation part of the tool to generate the calls in a variety of languages.
Pre-Requisites:
- Create a Service Principal in Azure and give it the right level of RBAC privileges on your Azure Stack Hub installation. Following this documentation will get you through it.
Note: this post will use Service Principal with a secret.
- Download and install Postman. We’re going to assume some level of familiarity with Postman here to the extent of being able to modify values and being able to send requests.
Setting up the Requests and Environment Variables in Postman
Download the API requests and Environment Variables.
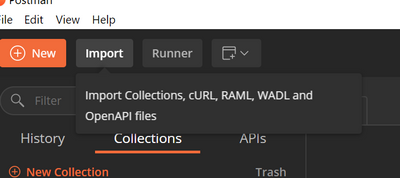
Import the API requests into postman using the import wizard.

Click on Upload files and select both the Azure Stack – Admin ARM REST.postman_collection.json and Azure Stack – Admin ARM REST.postman_environment.json files. This will set up the necessary requests and the environment variables needed for you to follow along.

Make sure you have the API request collection imported on the left nav. To see the Environment variables, click on the dropdown on the top right.

Configure your Environment
Before you can start communicating with your Azure Stack Environment, you need to know a couple of things:
-
The URL of the ARM endpoint for that Azure Stack . As an Azure Stack Operator, you interact with he Admin ARM which is typically at https://adminmanagement.{region}.{fqdn}
-
The Azure Active Directory Tenant ID – the tenantID of the Directory that you’re going to log into using the Service Principal
-
The Service Principal credentials (App ID and Secret) that you’re going to use to authenticate to that ARM endpoint
You can enter these values in the Environment setup in Postman. Click on the Manage Environments icon and Select the Azure Stack – Admin ARM REST environment.


Replace the “Current Value” field for all the variables with the values from your environment.

The Theory
Before we start executing the postman requests, let’s quickly see an overview of the steps that need to be done:
-
Discover the endpoints for the Azure Stack Hub – We’ll need a few endpoints other than ARM to interact with the cloud (e.g. the authentication/token endpoint where you need to go to get a token, the audience to get the token for etc.). Fortunately, these are available to us through an unauthenticated API on ARM itself, so the first step is to call that API and get the values.
-
Get the AAD or AD FS Token endpoint by looking at the Open Id configuration – I’ll not get into details here about OpenID, Identity tokens and Access tokens etc. but know that the token endpoint is where you go and provide your credentials and get a token back after authentication. You will send this token to whichever application you are interacting with (ARM in this case) for it to authorize you and permit you to call it’s APIs
-
Authenticate with the identity system – As mentioned above, you will need to send a request to the Token endpoint of the identity system and present your credentials (SP ID and secret), and the target application (audience) you’re looking to interact with. If all the information you provided matches, the Identity System will now issue a token in response to this request.
-
Make an authenticated request to the necessary ARM API – You can now call the ARM APIs by passing the token as a Bearer token in the header of the request. ARM will receive the token and verify if you have access to the API you’re calling and will respond with the right value as appropriate!
Now you’re ready to call the ARM endpoint and have authenticated interactions with the Cloud!
Note: Make sure the right Environment is selected in Postman before you execute the requests below.
This is one of the common causes for failure in following this guide.

Execute Endpoint Discovery
This will send a request to {{adminArmEndpoint}}/metadata/endpoints?api-version=2015-11-01 with the adminArmEndpoint value being the one you set up in the Environment.
You will get the following response back from ARM.

Using the “Tests” functionality in POSTMAN, we’re creating additional environment variables using the values in the response. The most important ones are the ARM Audience and the loginEndpoint. These variables will be used for subsequent requests.

Execute AAD Token Endpoint Discovery
This step will send a call to the AAD or AD FS endpoint discovered in the previous step to fetch the actual token endpoint where we will need to send our credentials. The token endpoint can be read from the “Open ID connect Configuration” for that Identity system.

We will again use the Tests to save this into a new environment variable.
Authenticating with the Identity System and getting a token
Execute the Authenticate Service Principal request next and make sure that the service Principal ID and secret are set in the environment. This will send a request to the token endpoint discovered in the previous step along with the credentials and the ARM audience inferred from the endpoint discovery step.

Assuming your credentials are correct and you do have the permission to request a token, you will get the access token back in the response as seen above. Using Tests, we will store this token in a new variable inside the environment.
At this point you have everything you need to interact with ARM! The first thing you would need to know is the subscription ID – in this scenario, the operator would need to know the id of the Default Provider Subscription.
Execute Get Default Provider Subscription
This will send a request to the {{adminArmEndpoint}}/subscriptions?api-version=2015-01-06 endpoint. Note that the token is sent as a Bearer token in the Authorization Header of the request.
Note: the number of subscriptions returned in this request is dependent on the number of subscriptions the Service Principal has access to on the Admin ARM. In this case, the Service Principal has access only to the Default Provider Subscription, and so only one will be returned.

Execute Get Location
Following the same template for get subscription, we can also get the default location for that Azure Stack Stamp.

Execute Get namespaces within a subscription
Executing this will send a request to the /providers API which will return all the namespaces and the corresponding resource types and api-versions available under them.

With the information we’ve obtained from the above requests viz. Arm Endpoint, subscriptionID, location, namespaces, resource types and API versions that are available to the subscription, we can compose other requests to ARM. The Postman Request collection has samples of other such API calls you can compose with this information. Feel free to give them a whirl!
Resources
Here are some resources that do a great job in providing you an overview of ARM and how to interact with it.
- This article provides a great overview of ARM and its placement in the overall Azure Architecture.
- This is a good doc with details on authenticating and calling Azure Resource Manager on Azure Stack Hub. It provides a detailed description of how to interact with Azure Stack Hub
- As always, check out the Azure API reference.
For learning more about operating an Azure Stack Hub, check the https://github.com/Azure-Samples/Azure-Stack-Hub-Foundation-Core which includes videos, slides, and workshops.
by Contributed | Oct 2, 2020 | Azure, Technology, Uncategorized
This article is contributed. See the original author and article here.
Memory errors during data extraction from SAP using Azure Data Factory SAP Table connector
Azure Data Factory (ADF) is a fully managed data integration service for cloud-scale analytics in Azure. ADF provides more than 90 out of the box connectors to integrate with your source and target system. When we think about enterprise systems, SAP play a major role.
ADF has six different connectors to integrate with your SAP systems. Here are the connectors for ADF.
- SAP BW Open Hub
- SAP BW MDX
- SAP HANA
- SAP Table
- SAP C4C (Cloud for Customer)
- SAP ECC
You can read more about these connectors, when to use which one, support scenarios and more details here: https://github.com/Azure/Azure-DataFactory/blob/master/whitepaper/SAP%20Data%20Integration%20using%20Azure%20Data%20Factory.pdf
In this bog, we focus on memory error during data extraction from SAP using Azure Data Factory SAP Table connector. The SAP table depends on three layers of implementation:
- The SAP RFC Function module (/SAPDS/RFC_READ_TABLE2 or custom one)
- The SAP Driver – SAP Nco
- ADF SAP Table Runtime – Compile the partition queries/Trigger the SAP connection/calls/Wash the data/put the data into the downstream ADF runtime/sinks
In the recent customer engagement, we learned that while creating ADF Pipeline and transferring data, the following error occurs on a specific table.
Operation on target Copy_z0z failed: ‘Type=Microsoft.DataTransfer.Common.Shared.HybridDeliveryException,Message=Failed to invoke function /SAPDS/RFC_READ_TABLE2 with error: SAP.Middleware.Connector.RfcAbapRuntimeException, message: No more memory available to add rows to an internal table., stacktrack: at SAP.Middleware.Connector.RfcConnection.ThrowRfcErrorMsg() at SAP.Middleware.Connector.RfcConnection.ReadBytes(Byte* buffer, Int32 count) at SAP.Middleware.Connector.RfcConnection.ReadRfcIDBegin(Int32& length) at SAP.Middleware.Connector.RfcConnection.ReadUpTo(RFCGET readState, RfcFunction function, RFCID toRid) at SAP.Middleware.Connector.RfcConnection.RfcReceive(RfcFunction function) at SAP.Middleware.Connector.RfcFunction.RfcDeserialize(RfcConnection conn, IRfcIOStream stream) at SAP.Middleware.Connector.RfcFunction.RfcCallReceive(RfcConnection conn, IRfcIOStream stream, RFCID rid) at SAP.Middleware.Connector.RfcFunction.Invoke(RfcDestination destination) at Microsoft.DataTransfer.Runtime.SapRfcHelper.SapRfcClient.InvokeFunctionInternal(IRfcFunction function, Boolean initStatefulSession, Boolean checkForErrors) at Microsoft.Practices.TransientFaultHandling.RetryPolicy.<>c__DisplayClass1.<ExecuteAction>b__0() at Microsoft.Practices.TransientFaultHandling.RetryPolicy.ExecuteAction[TResult](Func`1 func) at Microsoft.DataTransfer.Runtime.SapRfcHelper.SapRfcClient.InvokeFunction(IRfcFunction function, Boolean initStatefulSession, Boolean checkForErrors).,Source=Microsoft.DataTransfer.Runtime.SapRfcHelper,”Type=SAP.Middleware.Connector.RfcAbapRuntimeException,Message=No more memory available to add rows to an internal table.,Source=sapnco,’
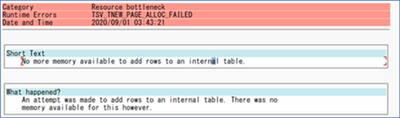
This message also generated the short dump (ST22) in the SAP system. If you run a transaction ST22 in SAP application, you can see below error indicates SAP memory allocation to user is not enough.

This obviously means, you are extracting a way too much data that your SAP application with current memory configuration can handle. It does not mean, you server or VM running SAP is not capable, it just that you have restricted SAP application instance to restrict the memory. Now, logically there are a few possible solutions:
- Increase the memory parameters to high value in your application instance so it can handle more load.
- Use ABAP program RSMEMORY to adjust memory dynamically in the SAP application server. Temporary fix and reboot of app servers is not necessary.
- This can be done by adjusting the PHYS_MEMSIZE parameter to high value. You set this parameter in application instance profile, and it requires an SAP application instance where the parameter is configured, to be restarted (not a VM reboot)
- Reduce the data extraction size.
- This may be possible when you are doing incremental or delta extract. However, if you are doing a full pull it may not be possible.
- Reduce the data at source itself!
- This is sometimes possible by archiving or deleting the data from the source system itself. Be careful and ensure your decision of archiving/deleting before you do it.
Note: When you extract for the first time, you may have tons of data to load and need a lot of memory, and later with incremental load, you may reduce that memory footprint.
With the above recommendations, you did the first aid, and it may already solve your problem. However, you can further tune it for optimal performance.
Let’s take a look.
Sometimes, this can be a code issue, which can be an SAP standard code, or a Customer Code (aka Z programs)?
This usually results from reading in a dataset into an Internal Table, and trying to process it. This works for smaller source data. But if you try to do this and read from a database table that has grown beyond the size that a single work process is allowed to allocate, this error will result. The program needs to be able to handle the data in smaller chunks, Otherwise you will end up in a situation where you will progressively need to increase these parameters and will lead to poor performance over time. This is where you work with basis and dev team to run traces to look memory usage, runtime etc. One of the useful tools to assess SAP ABAP program is ABAP Runtime Analysis (transaction SE30).
For performance issues and ABAP runtime terminations due to data size, tracing the load using ST12 is a good starting point. It will give you additional insights on ABAP code, reading type, Programs and function module involved. Additionally, it is important to do a Table Analysis to identify which field can be used for range calculation, transaction DB05 can be used to analyze the distinct values of a table.
For huge SAP tables, the analysis should be started in a background task. The result is stored in the spool of background job TABLE_ANALYSIS_<table name>.

Recommendation
Here are some recommendations to consider while using SAP table connectors with ADF:
- Use the latest SHIR: Changing protocol from RFC to BASXML in runtime (which should be part of recent runtime anyway) not only helped to handle the bigger size data, but performance was improved significantly.
- Optimize the SAP application instance memory. Sometimes this could take several iterations to get the optimal memory value.
- Review the program code. For SAP program causing performance issues, often you have SAP OSS note to fix it. For customer codes (aka Z programs), dev team can trace and optimize it. Avoid using “Select *” in your extraction.
- Trigger extraction using a batch job. Often, dialog process has session expiration limit and cause process to fail.
- When planning Data extraction or replication scenarios, review the following:
- Table size
- Change rate.
- Memory and CPU requirements on the source, target and middleware layer
The classification of tables according to their size (Small, Medium and Large) and change rate derives proper sizing of the of all components involved.
- If the volume is quite large and there is column that can be used for partitioning, it is recommended to leverage the partitioning setting of the SAP Table source which will bring three main benefits:
- It can alleviate the memory consumption on the SAP instance
- It can help alleviate the memory burden on the SHIR machine as well
- Besides, it will be best for your performance since we offer the capabilities to retrieve data in parallel. The Unit of each processing is the partition you defined using the partition settings. For example, there is a table with 10 million rows, if you can have some partition settings to split it into 100 partitions which means each partition will have around 100K rows. With the parallelCopies set to 10(once partition Option is set with some NONE value, the default is 4. We are also enhancing the auto-Tuning logic to also increase based on the IR nodes number) then there will be 10 partitions processed at the same time. Suppose each thread has 3 M/s throughput, in ideal case, we can get 3 M/s * 10 = 30 M/s throughput.
- Currently we support 4 types of partitions: Int, Year(yyyy), CalendarMonth(yyyyMM) and CalendarDate(yyyyMMdd)
Thank you Damien Rodriguez, Wenbo Fu, Roman Broich, Morgan Deegan, Hitoshi Ikemoto, and Chan Uk Jin for your contribution to this blog.
by Contributed | Oct 2, 2020 | Azure, Technology, Uncategorized
This article is contributed. See the original author and article here.
The microservices/serverless confusion
Lucie Simeckova
Stakeholders expect to develop faster when we use serverless and microservices. We ignore best practices and essential steps. Are you aware of what things we overlook to deliver more quickly?
Azure functions vs firebase functions
If we compare the serverless function compute services of Azure and Firebase based on execution speed, ease of development and ease of deployment, we come to a conclusion that serverless functions run more efficiently on Azure than on Google Cloud Platform.
Azure Durable Functions | PowerShell 7 | Chaining Pattern
In this article, you can learn how provisioning your Azure Function with identity assign to interact on Azure, deploy your first Durable Function (runtime PowerShell), infrastructure as a code using Serverless, It’s a perfect combination.
Azure Stack Hub Partner Solutions Series – Datacom
Thomas Maurer
Datacom is an Azure Stack Hub partner that provides both multi-tenant environments, as well as dedicated ones. They focus on providing value to their customers and meeting them where they are by providing managed services as well as complete solutions. Datacom focuses on a number of customers ranging from large government agencies as well as enterprise customers. Join the Datacom team as we explore how they provide value and solve customer issues using Azure and Azure Stack Hub.
Serverless web apps with Blazor and Azure Functions
In this video I will show you how I’ve built Serverless Ponies, a game designed by my 9 year old daughter. We finally found a way to combine our respective interests of Azure architecture and cute ponies. The video covers the implementation of the front-end using Blazor and JavaScript interop to re-use existing libraries, as well as the back-end implementation using the latest Azure Durable Functions 2.0 features.
Faster Querying with Serverless Materialized Views
The materialized view pattern is a great way to make complex, expensive, and slow queries return in minimal time. And serverless is a great platform to power the generation and update of your materialized views due to its great support for event-driven programming and the excellent scalability to handle unpredictable workload volumes. Life is even easier if you choose to use the Cosmos DB change feed to drive your materialized view creation as it seamlessly integrates with Azure Functions. In this article, we look at the benefits of the materialized view pattern and show a simple example of how it can be implemented with Azure Functions and the Cosmos DB change feed.
Docker image deploy: from VSCode to Azure in a click
Lucas Santos
In this article, we explore the newest Docker CLI integration with Azure via VSCode
Look back at chat from a meeting in Microsoft Teams
Sarah Lean
Someone asked me if they could go back and check on the chat from a Microsoft Teams meeting so I’ve listed the options in this quick blog for doing that.
CloudSkills.fm Podcast – Azure Architecture with Thomas Maurer
Thomas Maurer
Last week I had the honor to speak with Mike Pfeiffer on his CloudSkills.fm post cast, about Azure Architecture, and much more. This is my second appearance in the
CloudSkills.fm podcast, last year I was speaking about Azure Hybrid Cloud Management. In this episode of the CloudSkills.fm podcast, Mike Peiffer and I dive into Azure Architecture. Learn about Enterprise-Scale Landing Zones, Azure Bicep, the Well-Architected Framework, and more.
Blog/ GitHub Actions and ARM Template Toolkit for Bicep Codes Linting (EN)
Justin Yoo
This post shows how to validate ARM templates generated by Bicep locally and integrate with GitHub Actions workflow.
Blog/ Build and Lint Bicep Codes within CI/CD Pipelines: GitHub Actions & ARM Template Toolkit
Justin Yoo
This post shows how to validate ARM templates generated by Bicep locally and integrate with GitHub Actions workflow.
First look at Azure Automanage
Sarah Lean
First look at Azure Automanage and how to set it up.
Passed AZ-303 and AZ-304 Microsoft Certified Azure Solutions Architect
Thomas Maurer
I just got the great mail in my inbox that I passed the AZ-303 Microsoft Azure Architect Technologies and AZ-304 Microsoft Azure Architect Design exams to receive and renew the Microsoft Certified Azure Solutions Architect Expert certification. Back in 2015 I received my first
MCSD Azure Solutions Architect certification and
renewed it in 2019. A couple of weeks back I took the new AZ-303 and AZ-304 beta exams
online, to future proof my knowledge on Azure cloud architecture. When you take a beta exam you get the test results after a couple of days the exam in generally launched, and today was the day.
Augmented Analytics With PySpark and Sentiment Analysis
Adi Polak
In this tutorial, you will learn how to enrich COVID19 tweets data with a positive sentiment score. You will leverage PySpark and Cognitive Services and learn about Augmented Analytics.

by Contributed | Oct 2, 2020 | Azure, Technology, Uncategorized
This article is contributed. See the original author and article here.

SQL Server Tips & Tricks: How to debug a Trigger
Sergio Govoni is a graduate of Computer Science from “Università degli Studi” in Ferrara, Italy. Following almost two decades at Centro Software, a software house that produces the best ERP for manufacturing companies that are export-oriented, Sergio now manages the Development Product Team and is constantly involved on several team projects. For the provided help to technical communities and for sharing his own experience, since 2010 he has received the Microsoft Data Platform MVP award. During 2011 he contributed to writing the book: SQL Server MVP Deep Dives Volume 2. Follow him on Twitter or read his blogs in Italian and English.

Start and Stop an Azure App Service on a Schedule with Azure Logic Apps
Steve Fenton is a Microsoft MVP for Developer Technologies. Steve is Director of Product and Development for Geronimo Web, a UK company which provides a global SaaS product that runs on Azure. Previously, Steve has worked with Microsoft technology in healthcare, antivirus, finance, and e-commerce. For more, visit Steve’s Twitter @_stevefenton

Using PowerShell to Automate StreamLabs OBS and Show Your Webcam in PowerPoint
Rob Sewell is a Cloud and Data Center MVP and a Data Platform MVP and a proud supporter of the Data and Powershell communities. Based in the UK, Rob is an officer for the PASS DevOps Virtual Chapter, co-leader of Data South West, and PSConf EU organiser. Rob has spoken and volunteered at many Data and PowerShell events all over the world. For more on Rob, check out his Twitter @sqldbawithbeard

Pets vs. Cattle – How to manage your Power App Environments
Scott Durow is a Microsoft Business Applications MVP specializing in Dynamics 365 and the Power Platform. He is a passionate software architect, technologist, blogger and speaker as well as the author of multiple tools, including the Ribbon Workbench. His software career spans more than 20 years where he has moved from assembly language device driver programming, industrial control software and then into enterprise business applications. Scott lives in the UK with his wife and 3 children. Find him on Twitter as @ScottDurow and read his blog.

Podcast: Episode 46: Teams and PowerShell with Lee Ford
Nicolas Blank is an Office Apps & Services MVP and the Founder and CEO of NBConsult Group.
Based in South Africa, Nicolas is co-founder of and a contributor to thearchitects.cloud podcast and YouTube Channel. For more on Nicolas, check out his blog and his Twitter @nicolasblank
by Contributed | Oct 2, 2020 | Azure, Technology, Uncategorized
This article is contributed. See the original author and article here.
> TLDR; Azure Static Web Apps is a service that allows you to deploy both JavaScript apps but now also Blazor apps. The service is simple to use as it only requires an Azure subscription and a GitHub repo. That’s all the set up you need.
Resources
Blazor
Blazor is a framework that allows you to write C# fullstack. If you are developing a fullstack web application, you usually have to involve JavaScript at some point. You either add it to improve the interaction of your pages or you split between having a backend in .NET and the frontend in JavaScript using for example a SPA framework like React, Angular or maybe Vue. A Blazor app can be compiled into WebAssembly and can thereby be a first-class web citizen and also really fast.
If you are completely new to Blazor I recommend reading this intro article.
What is Azure Static Web apps service
Static Web Apps is an Azure service with which you can deploy fullstack apps within minutes. It can deploy both JavaScript projects as well as Blazor.
NET developer here, you have my attention. So, it can deploy a Blazor project, what else can it do?
-
Web hosting, your app is hosted on Azure, the end product it hosts is just HTML, CSS and JavaScript or Web Assembly.
-
Integrated API, you can add a Serverless API to your app at any time.
- Free SSL certificates
-
Reverse proxy. When calling APIs, no need to configure CORS, it just works.
-
Social auth + AAD supported. Through simple configuration get auth providers like GitHub, Linked In and even Azure Active Directory authentication/authorization to just work. This includes being able to set up separate roles to have access to specific resources.
That’s a nice featurelist. I care about ease of use, what can you tell me about that?
There’s not much to fill in, everything revolves around your GitHub repo and once you selected a repo, and a few other things, it starts deploying it.
Ok, but how does it work under the hood?
It works by creating and running GitHub actions that carries out things like fetching dependent libraries, building your code, and finally deploying it. You end up getting a so-called workflow file pushed to your repo (it’s a YAML file).
Alright, but I’m likely to update my code quite a lot, does it help me with redeploy?
It does, you can define in the workflow file when a redeploy should be trigger, like merging of a PR or a commit to master/main branch for example.
This all sounds very promising; can you take me through a deploy?
Of course, next thing on my list :)
Deploy your first Blazor app
-
Clone an app. The easiest way to get started is to create a Blazor app from this GitHub template Generate app from GH template. Once it’s done generating you now have a repo on your GH user. Type the following command:
git clone <name of repo URL>
-
Inspect an app. To inspect the app, first ensure you have the latest version of dotnet core installed install. Change directory to that of your cloned repo.
- Build the solution. Ensure you are standing at the solution root and type the following command:
-
Run the client app. Run the client by typing the following command:
You should get a terminal output similar to the following:
   info: Microsoft.Hosting.Lifetime[0]
      Now listening on: https://localhost:5001
   info: Microsoft.Hosting.Lifetime[0]
      Now listening on: http://localhost:5000
   info: Microsoft.Hosting.Lifetime[0]
      Application started. Press Ctrl+C to shut down.
   info: Microsoft.Hosting.Lifetime[0]
      Hosting environment: Development
   info: Microsoft.Hosting.Lifetime[0]
      Content root path:
   /path/to/project/blazor-sample/Client
-
Navigate to the app. Type the following URL in the browser localhost:5000. The browser should now display the following content:

Deploy the app
At this point you have a working Blazor app that you can deploy using Azure Static functions. How do you do that?
- Navigate to the URL portal.azure.com in your browser and log on to Azure.
- Type Static Web Apps and select the suggestion.
- Click the + Add in the top left area.
Now you are met with a set of dropdowns where you need to fill in some info.
-
Subscription, select the subscription you want
-
Resource group, select the resource group you want or create a new one.
-
Name. Give the app name.
-
Region. Select a region.
-
SKU. No need to do a selection here, the service is free for now.
- Click Sign in to GitHub, after clicking this button you will need to locate and pick your generated repo.
-
Organization. Select organization.
-
Repository. Select the repo that was created when you generated it from the template.
-
Branch.. Select the branch, in this case we only have the main branch.
-
Build presets. Select Custom, now you are presented with some options:
-
App location. This is where the client app lives, so type /Client here.
-
Api location, leave as default
-
App artifact location. This is the folder that your client app gets built to. Give it the following value wwwroot
- Click Review + Create.
- Click Create at this point if you are happy with all selections you’ve made.
Click to be taken to the resource once deployed. The resource page should look something like this:

Above you have the resource. You could click the URL from the indicated field, but it would take you to default page. Why is that? Your app hasn’t finished building yet. Instead click the link GitHub action runs. This will take you to the GitHub actions of your repo. Once all the actions have finished it should look like so:

- Revisit your app. Now go back to the resource page at the Azure portal and click that app URL. You should see the following:

Adding an API
Now a Blazor app could contain its own backend. The way the Azure Static Web Apps service is constructed though it assumes your backend will be located in an Api directory. So what should be in that directory? Well a function app. Luckily your repo already have a working function app, almost.
Let’s review our repo quickly. Your solution should look something like this.
You already know about the Client directory where your Blazor app lives. The other directory of interest is the Api directory that contains a Function app. It’s an almost functioning Function app. What do I mean by almost? Well let’s have a look at it, expanding the Api directory there are some files of interest:
Client/
Api/
  ProductData.cs
  ProductsDelete.cs
  ProductsPost.cs
  ProductsPut.cs
The first file ProductData.cs contains an in-memory data store. The remaining three files is just routes for our API.
Adding missing GET route
For this API to be a full Create Read Update Delete it needs another file ProductsGet.cs, let’s create that file and give it the following content:
using System.Threading.Tasks;
using Microsoft.AspNetCore.Mvc;
using Microsoft.Azure.WebJobs;
using Microsoft.Azure.WebJobs.Extensions.Http;
using Microsoft.AspNetCore.Http;

namespace Api
{
  public class ProductsGet
  {
    private readonly IProductData productData;

    public ProductsGet(IProductData productData)
    {
      this.productData = productData;
    }

    [FunctionName("ProductsGet")]
    public async Task<IActionResult> Run(
        [HttpTrigger(AuthorizationLevel.Anonymous, "get", Route = "products")] HttpRequest req)
    {
      var products = await productData.GetProducts();
      return new OkObjectResult(products);
    }
  }
}
Now select Run > Start debugging from the top menu in VS Code. At the end of the build output you should have text stating something like this:
ProductsPut: [PUT] http://localhost:7071/api/products

ProductsGet: [GET] http://localhost:7071/api/products

ProductsPost: [POST] http://localhost:7071/api/products

ProductsDelete: [DELETE] http://localhost:7071/api/products/{productId:int}
You are almost there.
Testing locally, set up CORS
When testing things out locally you need to instruct the Function to allow requests from a cross domain, i.e our Blazor app. How do we do that? Locate the local.settings.json file and ensure it has the following content:
{
  "IsEncrypted": false,
  "Values": {
    "AzureWebJobsStorage": "",
    "FUNCTIONS_WORKER_RUNTIME": "dotnet"
  },
  "Host": {
    "CORS": "*"
  }
}
Above you added the Host property and made CORS point to allowing all requests. This is just something we do locally, don’t worry about this making production.
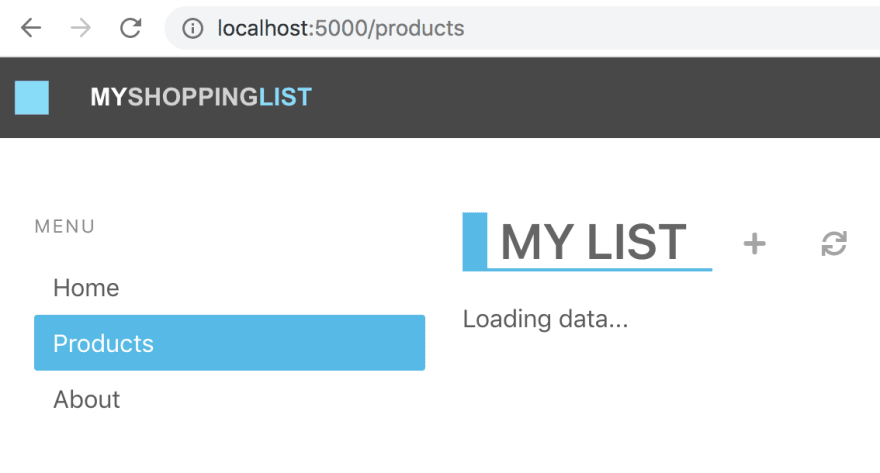
At this point you can run your client Blazor app and it will look like this:

The Blazor app is now able to talk to your Function app backend.
Deploy the app, now with API
So how do you deploy this so that the API part is there? You need to do the following:
-
Adjust the workflow YML file and point out the Api directory
-
Push the changes you did you did to the workflow file and Api directory
That’s it, the way the workflow file is constructed it should pick up the changes on push and redeploy the app.
Adjust workflow file
-
Open up the workflow file. It’s a file ending in .yml in your .github sub directory (ensure you have done a git pull before this so you get this file as it’s created and added to your repo the first time you deploy).
-
Locate the section called api_location:. Ensure it looks like this api_location: “/Api”. This will point out our Api sub directory.
Push the changes
Type the following command:
git add .
git commit -m "adding API"
git push
The above should push your changes to GitHub and the GitHub actions should be triggered.
- Go to the GitHub actions tab and wait for the actions to finish. Now ensure you reload the page
You should now see the deployed app, this time loading the data correctly

by Contributed | Oct 2, 2020 | Azure, Technology, Uncategorized
This article is contributed. See the original author and article here.
Another busy week in the Azure cloud. Here are the stories the team is covering this week: ZeroLogon is now detected by Microsoft Defender for Identity (CVE-2020-1472 exploitation), New updates for both Azure Backup and Azure Cost Management / Billing, Shared disks on Azure Disk Storage now available in broader set of regions and a new Microsoft Learn Fundamentals learning path.
Microsoft Defender for Identity now detects ZeroLogon (CVE-2020-1472) exploitation
Many have been intrigued about the recently patched CVE-2020-1472 Netlogon Elevation of Privilege Vulnerability, widely known as ZeroLogon. While we strongly recommend that you deploy the latest security updates to your servers and devices, Microsoft also wantes to provide you with the best detection coverage possible for your domain controllers. Microsoft Defender for Identity (previously Azure Advanced Threat Protection) along with other Microsoft 365 Defender (previously Microsoft Threat Protection) solutions detect adversaries as they try to exploit this vulnerability against your domain controllers.
What’s new in Azure Backup
Microsoft recently announced several new Azure Backup features that enhance the protection of your data in Azure. Azure Backup is Azure’s native backup solution that provides data protection capabilities for diverse and mission-critical workloads in a simple, secure, and cost-effective manner. The latest capabilities that we announced this Ignite let you expand your data protection to new workload types, enhance security, and improve the availability of your backup data. Furthermore, you can now increase operational efficiencies with built-in capabilities for managing backups at scale, along with the ability to automatically onboard Azure Backup to Windows Server Virtual Machines.
Shared disks on Azure Disk Storage is now available in broader set of regions
Azure Disk Storage is the only shared block storage in the cloud that supports both Windows and Linux based clustered or high-availability applications. Shared disks is now available for Premium SSDs in all regions and available for Ultra Disks in all regions that support Ultra Disks. Shared disks allows a single disk to be attached to multiple virtual machines, enabling customers to run their most demanding enterprise applications in the cloud like clustered databases, parallel file systems, persistent containers, and machine learning applications, without compromising on well-known deployment patterns for fast failover and high availability.
Azure Cost Management and Billing updates for September 2020
Whether you’re a new student, thriving startup, or the largest enterprise, you have financial constraints, and you need to know what you’re spending, where, and how to plan for the future. Nobody wants a surprise when it comes to the bill, and this is where Azure Cost Management + Billing comes in.
Microsoft is always looking for ways to learn more about your challenges and how Azure Cost Management + Billing can help you better understand where you’re accruing costs in the cloud, identify and prevent bad spending patterns, and optimize costs to empower you to do more with less. Here are a few of the latest improvements and updates based on your feedback: Simplify financial reporting with cost allocation (preview), Connector for AWS is now generally available, Pay-as-you-go rates for all Azure products and services, What’s new in Cost Management Labs, Expanded availability of resource tags in cost reporting, 15 ways to optimize your Azure costs, New ways to save money with Azure, Upcoming changes to Azure usage data, and Documentation updates.
MS Learn Module of the Week
Azure Fundamentals part 1: Describe core Azure concepts
New to the cloud? Azure Fundamentals teaches you basic cloud concepts, provides a streamlined overview of many Azure services, and guides you with hands-on exercises to deploy your very first services for free.
- Understand the benefits of cloud computing in Azure
- Explain cloud concepts such as high availability, scalability, elasticity, agility, and disaster recovery
- Describe core Azure architecture components such as subscriptions, management groups, resources, and resource groups
- Summarize geographic distribution concepts such as Azure regions, region pairs, and availability zones
Let us know in the comments below if there are any news items you would like to see covered in next week show. Az Update streams live every Friday so be sure to catch the next episode and join us in the live chat.

Recent Comments