by Contributed | Oct 5, 2020 | Uncategorized
This article is contributed. See the original author and article here.
Continuing our hybrid migration blog post series (see part 1 here and part 2 here) we arrived at troubleshooting failed migrations.
A ‘failed migration’ is when the status of the move request shows as ‘failed’, and we have one or more failures logged in the move report. The move is stopped and needs the administrator’s attention to investigate the reason of failure. Sometimes, resuming of the move can help, especially if there were some temporary issues on the Exchange Online side that were addressed.
Before getting into troubleshooting, I recommend you check the following ‘Minimum Requirements’; those are the things we know will break migrations (and we see them do so):
-
MRSProxy needs to be enabled and running on Exchange on-premises.
- Exchange Online requires Negotiate (NTLM) authentication for MRSProxy.
- Make sure your migration users are synchronized with AADconnect tool and corresponding mail users are provisioned correctly on the Exchange Online side for corresponding on-premises mailboxes (ExchangeGuid present, alias, recipient type correct, accepted domains for the email addresses and secondary smtp address user@tenant.mail.onmicrosoft.com).
- Maximum storage quota in Exchange Online for both primary and archive mailbox is 100GB each. Even if you have auto-expanding enabled in Exchange Online, as of this writing the maximum mailbox size for migration of main archive is still 100GB – reference here.
- Maximum number of items per regular mailbox folder is 1 million and 3 million for the dumpster, reference here
- On-premises migration admin needs to have the minimum required permissions and valid credentials.
- You cannot offboard to Exchange 2010 an Exchange Online Mailbox that has any hold other than Litigation Hold. This is because Exchange 2010 doesn’t know about in-place hold which was introduced in Exchange 2013 or about organization-wide holds in Office 365. More info on the types of holds can be found here.
- You cannot offboard an Exchange Online archive mailbox which has auto-expanding enabled in Office 365
- You cannot offboard a mailbox and a primary archive to Exchange 2007
- You cannot offboard a remote mailbox without ExchangeGuid set on it
- Any network load-balancing for Exchange 2010 MRSProxy servers requires IP persistence (affinity).
-
SSL offloading is not supported for MRSProxy.
- For classic hybrid – where we require inbound connectivity from Exchange Online to on-premises Exchange, allow all Exchange Online IP addresses to connect to on-premises EWS / Autodiscover.
- For classic hybrid, pre-authentication for EWS / Autodiscover virtual directories is not supported.
- For classic hybrid, a valid 3rd party certificate is required for EWS / IIS. Also see this.
-
TLS1.2 should be enabled in the on-premises infrastructure.
- If you have an Exchange organization with Exchange 2013/2010 in coexistence with legacy Exchange servers (Exchange 2010), then you need to point the MRSproxy namespace to the newer Exchange version in your environment. This is required because, for example, Exchange 2010 cannot proxy to Exchange 2016 in order to move an Exchange 2016 mailbox to or from Exchange Online through an Exchange 2010 MRSProxy endpoint.
We also recommend that you bypass the network devices such as firewalls and reverse proxies during migrations in order to reduce source network latency and avoid frequent communication transient errors that would result in mailbox locks and slow migrations.
Often when troubleshooting Office 365 migrations, the Exchange Admin Center GUI is helpful and quite verbose regarding the reason of failure, and it many times includes a link to the corresponding documentation page for more information on specific issue.
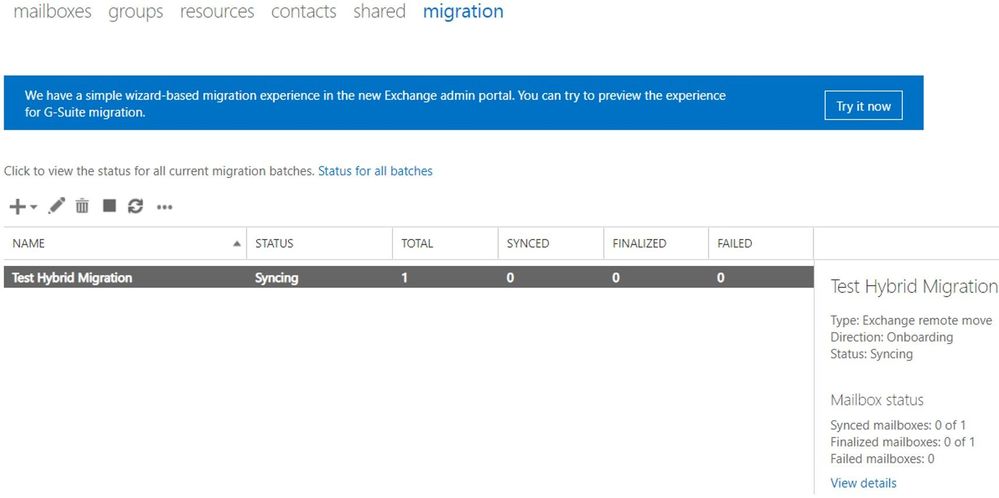
Let me briefly show you some useful info that we can see in the (Classic) Exchange Admin Center. As a note, at the time of writing this article, the New Exchange Admin Center doesn’t currently show all of this information.

The following can be seen in the above screenshot:
- We have one migration batch called “Test Hybrid Migration” of type Exchange Remote Move
- Direction of the move is Onboarding (from on-premises to the cloud)
- The current status Syncing (things are going well so far)
- There is only one migration user in the batch (looking at the Total column)
- The user is not Synced (hasn’t reached the Incremental Sync at 95%), not Finalized (hasn’t reached the 100% completion) and not Failed (didn’t encounter a fatal failure)
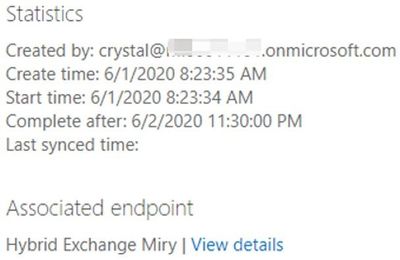
After clicking on View details, we also see:
- Who created the batch (crystal@mytenant.onmicrosoft.com),
- When it was created and started (New-MigrationBatch -AutoStart),
- When it should complete (after the initial sync will be done)
- There is no last synced time because the status is syncing and no initial sync has been done
- Also, the associated endpoint is the name of my migration endpoint (Get-MigrationEndpoint) through which I am running the batch.
After a little while, the user failed because of the ExchangeGuid missing on the mail user object in Exchange Online:
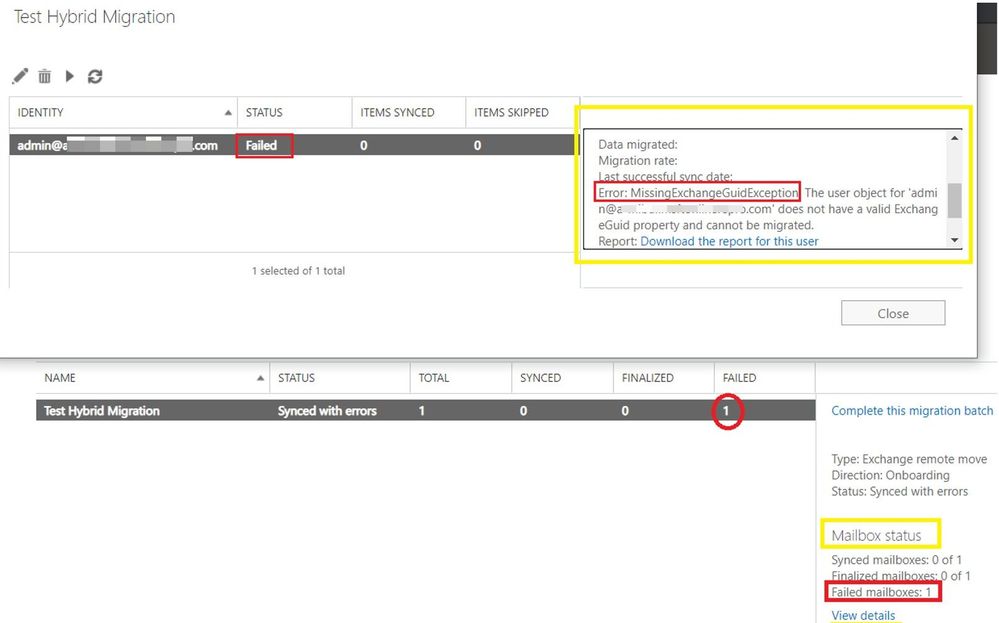
In such situation, the migration service failed to inject the move request because the user failed validation. This means that we don’t have a move request for this user and therefore will have no move report.
If you were to click on ‘Download the report for this user’, you would get an empty .txt file.
Let me show you how this failure looks like in PowerShell and what objects are created and available for us to check there.
With Get-MigrationBatch command, we can see the name of the batch, the status, the type and how many users are contained in the batch:

To see all properties, run Get-MigrationBatch |FL.
Some other attributes values that you saw in the Exchange Admin Center GUI, for this batch were:
CreationDateTime : 6/1/2020 8:23:35 AM
StartDateTime : 6/1/2020 8:23:34 AM
LastSyncedDateTime :
SubmittedByUser : crystal@<mytenant>.onmicrosoft.com
BatchDirection : Onboarding
SourceEndpoint : Hybrid Exchange Miry
If I had multiple batches and I was interested in seeing this particular one, I would run: Get-MigrationBatch “Test Hybrid Migration” or if I wanted to see all batches that are failed, I would run: Get-MigrationBatch -Status SyncedWithErrors
Going further with PowerShell, if I want to see the migration user contained in that batch, I would do it like this: Get-MigrationUser -BatchId “Test Hybrid Migration”. To see all the details on the migration user, I would again append |FL
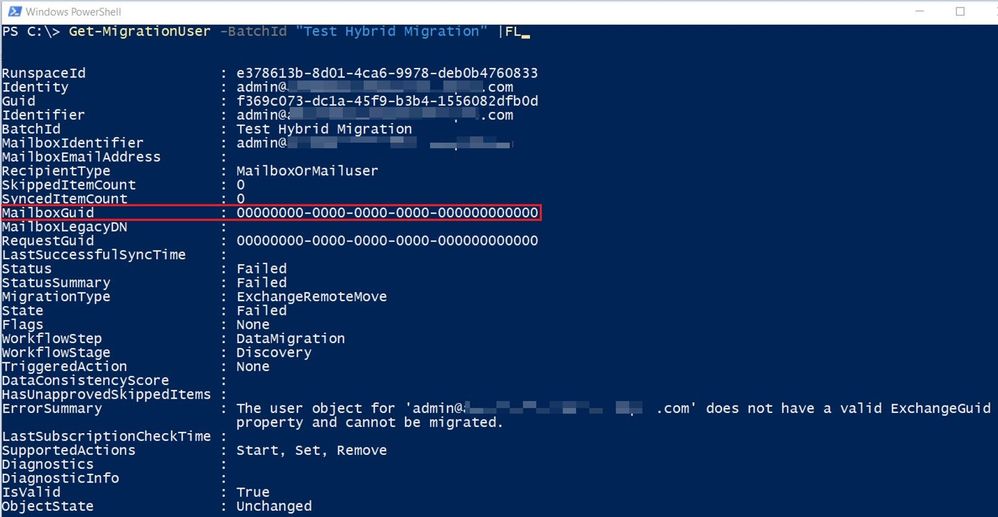
This error is self-explanatory, ExchangeGuid is missing on the user and I can also see it with Get-MailUser command for this migration user:
 From the Get-MigrationUser output, I can also see the RequestGuid is empty, so this also tells me that there is no move request / move report for this migration user. I can run Get-MoveRequest <user> or Get-MigrationUser -BatchId “Test Hybrid Migration” | Get-MoveRequest to confirm this.

In cases where the error message on the migration user is not so obvious and you still don’t have a move request created for it, you can check Get-MigrationUserStatistics with DiagnosticInfo verbose switch: Get-MigrationUserStatistics <user identity> -DiagnosticInfo verbose |FL and see if any more details found.
I will now go through some more command examples if you want to play around and check simple or more complicated stuff in PowerShell. Also, some things can be only checked from PowerShell and if you have a move request created and this is failed or is progressing slow, you can see more on analyzing move reports with PowerShell in later part of this blog series.
To get an overview of migration statistics:
Get-MigrationStatistics

To get all migration users, their status and corresponding batches:
Get-MigrationUser

To get a specific migration user:
Get-MigrationUser <email address>

To check the error on a specific migration user:
Get-MigrationUser <email address> |FL errorsummary
Get-MigrationUser <email address> |FL

To get all failed migration users:
Get-MigrationUser -Status Failed

To get all failed migration users and their errors:
Get-MigrationUser -Status Failed | FT identity , errorsummary
Get-MigrationUser -Status Failed | FL identity , errorsummary

To get migration users from a particular batch:
Get-MigrationUser -Batch “Batch Name”

To get all migration batches:
Get-MigrationBatch

To get a particular batch:
Get-MigrationBatch “Batch Name”

Checking move requests (specific for hybrid remote moves)
To get all existing move requests:
Get-MoveRequest

To get move request statistics for a specific move request:
Get-MoveRequestStatistics “User”

Know that there are 2 main types of failures:
- Transient Exceptions, example DataExportTransientException
- Permanent Exceptions, example StoragePermanentException
Note: For a move request to be in a Failed state, we would need to have a permanent failure. Too many transient failures (usually more than 60) will eventually cause a permanent failure. Too many transient failures can also slow down your migration considerably.
To see the failures (transient or permanent), you would run commands similar to these or export the statistics to an XML file (discussed in the later part of this blog series)
To store the move report in a variable:
$stats = Get-MoveRequestStatistics “Affected User” -IncludeReport
To check all failures and their count:
$stats.report.Failures | group failuretype | Format-Table -AutoSize

To check full details of the last failure:
$stats.report.Failures[-1]

To check the last 2 failures:
$stats.Report.Failures | select -last 2
To check the first failure:
$stats.report.Failures[0]
To check the first 3 failures:
$stats.Report.Failures | select -first 3
If there are a lot of failures, you can create a list of the failures with the PowerShell Index number associated with each failure by running the following:
$i=0;$stats.report.Failures | % { $_ | Select-Object @{name=”index”;expression={$i}},timestamp,failurecode,failuretype,failureside;$i++} | ft

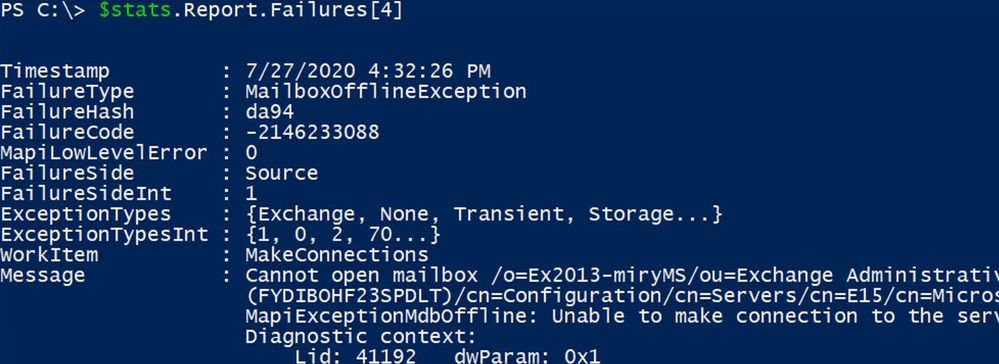
Using this output, you can then easily identify the index number you want to focus on by enclosing the failure index number in [brackets], example:
$stats.report.Failures[4]
To get failed move requests:
Get-MoveRequest -MoveStatus Failed

Most frequent failures
Here is a list of most frequently seen failures in hybrid migrations (and when I say ‘most frequent’ I mean ‘most frequent’ issues that we see in support, not that you will see those errors in every migration). Note that not all are permanent failures, meaning not all these will cause your migrations to fail.
- “User is already being moved” – reference here
- “You can’t use the domain because it’s not an accepted domain for your organization” – reference here
- “Target mailbox doesn’t have an smtp proxy matching ‘.mail.onmicrosoft.com’” – reference here
- “MigrationPermanentException: Cannot find a recipient that has mailbox GUID” – reference here. Note that another possible scenario for this error is when we cannot find a ComponentShared Mailbox by its GUID on the Exchange Online side. A ComponentShared mailbox is used to host data from other Office 365 workloads like Teams, OneDrive for Business and SharePoint. You would check (in Exchange Online PowerShell) these mailbox GUIDs with the command: Get-MailboxLocation -User <SMTP>. If the mailbox GUID in the error belongs to a component shared mailbox, please log a case with Microsoft Support.
- “You must specify the PrimaryOnly parameter” – reference here
- “The remote server returned an Error 404” or “HTTP request has exceeded the allotted timeout” – reference here
- “The remote server returned an error: (403) Forbidden” – reference here
- “Access is denied” – reference here
- “Couldn’t switch the mailbox into Sync Source mode” – reference here
- “CommunicationErrorTransientException – The remote endpoint no longer recognizes this sequence. This is most likely due to an abort on the remote endpoint. The value of wsrm:Identifier is not a known Sequence identifier. The reliable session was faulted.” – reference here
- “The server was unable to process the request due to an internal error. For more information about the error, either turn on IncludeExceptionDetailInFaults …” – references here and here
- “TooManyBadItemsPermanentException” – Failed to find a principal from the source forest or target forest – references here and here
- “The data consistency score (Investigate) for this request is too low” – reference here. Note that we will have more on Data Consistency Score later in the blog post series.
- “Exception has been thrown by the target of an invocation.” – reference here
- “Transient error CommunicationErrorTransientException has occurred. The system will retry” – reference here
- “The Mailbox ‘<username>@contoso.com’ isn’t enabled for unified messaging.” – reference here
- “Failed to convert the source mailbox ‘Primary (00000000-0000-0000-0000-000000000000)’ to mail-enabled user after the move.” or “Unable to update Active Directory information for the source mailbox at the end of the move.” – reference here
- “Target user <User> already has a primary mailbox”. Note: pay special attention to the scenario, it matters if you get this error in onboarding (move to Exchange Online) or offboarding (move from Exchange Online). For onboarding moves, please see this, and for offboarding see this. For onboarding, follow this. Note on scenario 1 step 7 in that article: it is not supported to remote restore a disconnected mailbox from Exchange 2010 on-premises source server version, it needs to be minimum Exchange 2013 version.
- “StalledDueTo_Target*” when you move mailboxes to 0365 Exchange Online – reference here. More on this when we will be discussing slow migrations in next part of this blog post series.
- “MapiExceptionTooComplex: Unable to query table rows. (hr=0x80040117, ec=-2147221225)” – reference here.
- “Mailbox Replication Proxy Service can’t process this request because it has reached the maximum number of active MRS connections allowed” – reference here.
A few more troubleshooting tips
MoveOptions Parameter
Often mailbox moves fail because of corrupt items or elements in a mailbox. These mailbox move failures can be avoided by excluding those (often corrupt) elements from being migrated.
The MoveOptions parameter (previously known as the SkipMoving parameter which is being deprecated) can be added to the onboard or offboard request from PowerShell with the values of:
‘SkipFolderRules, SkipFolderACLs, SkipFolderPromotedProperties, SkipFolderViews, SkipFolderRestrictions, SkipContentVerification, SkipPerObjectIndex’.
This will tell the migration to skip these elements when performing the move. We recommend you perform these skips under the guidance of Microsoft Support.
You can review a move report from a previously failed move attempt and get some clues on what exclusions you should consider making.
For example, this failure below means that we have a search folder on the source mailbox where the query (restriction) is too complex and cannot be created on the target.
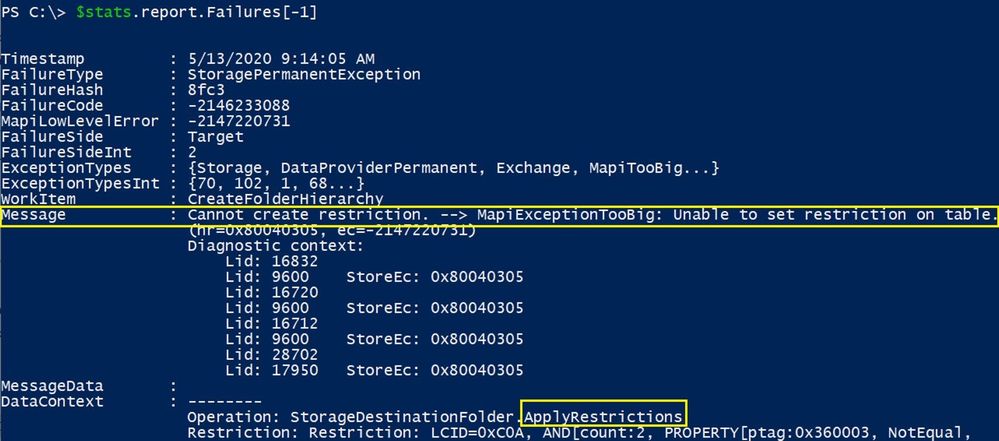
Sometimes the failure identifies the actual problematic source folder so you can look more at the DataContext content. You can then either delete the query on the source mailbox or just skip the migration of the queries (search folders) so that you can complete the migration:
Set-MoveRequest user@contoso.com -MoveOptions @{add=”SkipFolderRestrictions”}
Mailbox Integrity checks
If you migrate a mailbox (primary mailbox or archive) to Exchange Online and the size is bigger than 10GB, this is considered a large mailbox and the MRS will perform an ISinteg task to ensure integrity of the mailbox that is being moved.
If you suspect that your move is stuck on ISinteg task, you can check the move report in EXO PowerShell and search for all strings containing isinteg keyword:
$stats = Get-MoveRequestStatistics <user> -IncludeReport
$stats.report.Entries | where { [string] $_ -like “*IsInteg*” } | % {[string] $_}
If that shows completed, this means there are no issues. Otherwise, you can try running the same command MRS is using on your Exchange on-premises environment, in EMS:
New-MailboxRepairRequest <migration user identity> -CorruptionType MessageId
For more info on the New-MailboxRepairRequest cmdlet, you can check here.
Depending on the Exchange Server Version you can check then the status of the repair request.
For Exchange 2013 and later, use this cmdlet:
Get-MailboxRepairRequest -Mailbox <user identity>
For Exchange 2010 version, you would need to look in Event Viewer for the following events:
- Event 10047 when the repair request is started
- Event 10062 when a corruption is detected and repaired
- Event 10048 when the repair completes successfully
You can also try to move a mailbox locally from one server to another, remove the local move request and then retry migration of the mailbox to Exchange Online.
Testing MRS service
One utility that can be used for troubleshooting the mailbox move operation is the Test-MRSHealth cmdlet. One thing to realize is that it cannot be tested from Office 365 side since the cmdlet is not available to a tenant administrators. However, at least from my experience, I have never encountered a situation where MRS service would be stopped on the Office 365 side (and was not automatically recovered within seconds). We can use this utility to test the mailbox replication service health on-premises. Also on-premises, you can check if the MRSProxy is enabled on the EWS virtual directories and if EWS application pool is started in IIS manager.
Event Viewer Diagnostic logging
When performing a mailbox move, you can turn up diagnostic logging on the mailbox replication service or other component like asp.net to get better, more granular events in the event log on-premises.
In most situations, you don’t actually get useful events in the on-premises event viewer when troubleshooting an Exchange Online remote move due to the fact that those events would be written in the datacenter. The default event logging can provide you with enough information on what the issue would be, take for example event 1309 from ASP.NET where the description is self-explanatory: MRSproxy service being disabled.
If you do find a relevant event log for the affected Exchange Online remote move in the event viewer and this is related to MRS, you can turn up diagnostic logging for the MRS service with the following cmdlet:
Get-EventLogLevel ‘MSExchange Mailbox Replication*’ | Set-EventLogLevel -Level Expert
Then reproduce the issue or wait for it to be reproduced again and then check in the Event Viewer logs for any relevant events.
Tracking incoming failed requests from EXO
Especially useful in communication or timeout failures, there are 3 main logs to track the MRS requests on the Exchange on-premises servers in order for you to understand if an MRS Exchange Online request reached your Exchange server, or not. These often help us narrow down the issue to a most likely network device (in front of Exchange Server) that could terminate the connection and not pass it to Exchange Servers. Or if the request reaches the Exchange servers, we can see where this is stuck and get a better understanding on what’s the problem on the Exchange server on-premises.
Exchange on-premises server logs to track an EXO Incoming MRS request:
- HTTPerr logs: %SystemRoot%System32LogFilesHTTPERR
- IIS logs for Default Web Site (DWS): %SystemDrive%inetpublogsLogFilesW3SVC1 – UTC Timezone
The name of the IIS logs contains the date of the log, for example u_ex190930.log is from Sept 30, 2019.
- HTTPProxy logs for EWS (available in Exchange 2013 or later): %ExchangeInstallPath%LoggingHttpProxyEws
The name of the HTTPProxy logs contains the date and hour starting to log, for example HttpProxy_2019093014-10.LOG (10th log from Sept 30, 2019, starting hour 14:00 UTC)
Few things to mention here:
- Always correlate the timestamp of a failure HH:MM:SS in move report with these logs (IIS and HTTPProxy are in UTC timezone)
- A failed request will never have 200 Status code (if you see it with 200 in logs, it means you are not looking at the failed one). Note that for a request that times out, you might still be able to see it here with 200 status code and possibly a higher time-taken
- If you see the failed request in HTTPerr logs, this won’t probably be present in IIS logs or HTTPProxy logs – it is stuck in front of IIS, check the particular reason in HTTPerr logs and check for IIS misconfiguration
- If you see the failed requests in IIS logs , then you can do IIS failed request tracing on that status code and check further the detailed error in HttpProxy logs
This concludes Part 3 of these blog series. We will be talking about troubleshooting slow migrations next!
I would like to thank the following persons for contributing to this blog and for their time and patience to read this: Angus Leeming, William Rall, Brad Hughes, Chris Boonham, Ben Winzenz, Cristian Dimofte, Nicu Simion, Nino Bilic, Timothy Heeney
Mirela Buruiana
by Contributed | Oct 5, 2020 | Uncategorized
This article is contributed. See the original author and article here.
It was super busy month in September with normal fury of announcements but this month also included a lot of exiting news from Ignite. In the sections below, I have called out the Ignite announcements for each of the product areas. In addition, I have attached a deck that includes the Ignite news along with links to sessions.
General News
Microsoft report shows increasing sophistication of cyber threats
Industry-wide partnership on threat-informed defense improves security for all
Microsoft Security: Use baseline default tools to accelerate your security career
Microsoft Security—detecting empires in the cloud
Microsoft Security: 6 tips for enabling people-centric cybersecurity with security training
STRONTIUM: Detecting new patterns in credential harvesting
Azure Defender & Sentinel News
Ignite Announcements
Stay ahead of threats with new innovations from Azure Sentinel
- UEBA + Entity Profile
- Threat Intelligence
- Watchlists
- Enterprise-Wide Data Collection
- Machine Learning
- IoT/OT
Azure Defender for IoT: Agentless Security for OT
Azure Security Benchmark v2 is now available with expanded security control assessments
Protect multi-cloud workloads with new Azure security innovations
- CyberX integration for Azure Defender
- Multi-cloud security posture management for Azure Security Center
- Managed hardware security module for Azure Key Vault
- Additional service support for Customer Lockbox for Azure
- Double Encryption for data at rest and transit
Other Announcements
Azure Security Center—News and updates for September 2020
Analysing Web Shell Attacks with ASC data in Azure Sentinel
Enriching Windows Security Events with Parameterized Function
Auditing Azure Sentinel activities
Understanding Microsoft Teams Data Schema in Azure Sentinel – Analyst / Researcher View
Security Controls in Azure Security Center: Manage Access and Permissions
Security capabilities in Azure Kubernetes Service on Azure Stack HCI
Assigning Permissions in Azure Security Center
Secure your IoT Edge compute today with enclaves
What’s new: Office 365 Advanced Threat Protection connector in Public Preview
What’s new: Analytics FileHash entity hits GA!
Build a scalable security practice with Azure Lighthouse and Azure Sentinel
Azure Sentinel Incident Bi-directional sync with ServiceNow
How to Protect Office 365 with Azure Sentinel
Introducing the Azure Network Security Tech Community and Github Repo
What’s new: Azure DDoS Protection connector in Public Preview for Azure Sentinel
Security Alerts For Synapse Analytics In Azure Security Center
Microsoft Teams logs in Azure Sentinel (public preview)
How to integrate vulnerability management in Azure Sentinel
Continuously export security findings from vulnerability assessment solution recommendations
Security Controls in Azure Security Center: Enable Endpoint Protection
What’s New: Azure Firewall Connector in Public Preview!
Giving Specific Analysts Access to Specific Azure Sentinel Playbooks
Accelerate your adoption of SIEM using Azure Sentinel and a new offer from Microsoft
Microsoft 365 Security (All Up News)
Changes to improve security for Windows devices scanning WSUS
Force firmware code to be measured and attested by Secure Launch on Windows 10
M365 Identity & Device Protection (Azure AD, Intune)
Ignite Announcements
What’s new in Azure Active Directory at Microsoft Ignite 2020
- Azure AD Conditional Access API is now generally available in Microsoft Graph
- Azure AD Application Proxy so that in addition to configuring SSO to legacy on-premises apps, you can connect apps that use header-based authentication, the most popular legacy authentication protocol
Microsoft Endpoint Manager announces support for Windows Virtual Desktop machines
Introducing Microsoft Tunnel for remote access to corporate resources from iOS and Android
Other Announcements
New enhancements to Security Baselines in Microsoft Endpoint Manager
Azure Active Directory External Identities goes premium with advanced security for B2C
Securing a remote workforce with Zero Trust
M365 Defender (Defender for Office, Defender for Endpoint, Defender for Identity)
Ignite Announcements
Microsoft delivers unified SIEM and XDR to modernize security operations
Microsoft Defender for Endpoint adds depth and breadth to threat defense across platforms
- Mobile threat defense for iOS
-
Threat and vulnerability management for macOS will go into public preview this week
Announcing Priority Account Protection in Microsoft Defender for Office 365
Keeping users safe and productive with Microsoft 365 Apps for enterprise
- Antimalware Scan Interface (AMSI) integration for Excel 4.0 (XLM) macros
- Security Policy Advisor analyzes how individuals use Microsoft 365 Apps for enterprise and then recommends specific policies to boost an organization’s security profile.
- Enabling protected access to untrusted files
Announcing Attack Simulation Training in Microsoft Defender for Office 365
Other Announcements
Announcing Tamper Protection for Configuration Manager Tenant Attach clients
451 Research publishes a report about Microsoft Defender for Endpoint
Announcing new Endpoint Security Antivirus reports!
Microsoft Defender ATP Ninja Training: September 2020 update
M365 Compliance & Governance
Ignite Announcements
Continuing Momentum with Microsoft Information Protection (MIP)
- Integrations of MIP with Symantec, McAfee, Relativity, VMWare
Extending the Microsoft Compliance ecosystem with new connectors, APIs and built-in customizations
- Partnership with Globanet and Telemessage to expand our data connector coverage to 25 built-in connectors
- Microsoft Graph API for eDiscovery – Public Preview
- Microsoft Graph API for Teams Export – Public Preview
- New Power Automate connector integration with Insider Risk Management and Communication Compliance solutions
- Advanced eDiscovery now has improved workflows and support for linked content in emails or chat messages.
A unified approach to data loss prevention from Microsoft
- Extension of Microsoft data loss prevention to Microsoft Cloud App Security (MCAS)
- Microsoft Graph API for Teams DLP GA
Improving eDiscovery workflows and enhancing your forensic investigations
- 45 new and 11 improved sensitive information types, covering key regulations in Asia Pacific and in Europe.
- Automated on-premises network discovery
- Protecting sensitive information in Office apps GA
- Customer Key support for Teams
- Double key Encryption GA
Effectively managing insider risks with integrated collaboration solutions including Microsoft Teams
What’s new in Microsoft Information Governance and Records Management
- Create in-place retention policies for Yammer and Teams meeting recordings
- Manage regulatory records with strict immutability requirements
- Leverage SharePoint Syntex to manage records intelligently
- Fine-tune trainable classifiers with the new feedback loop capabilities
Improving eDiscovery workflows and enhancing your forensic investigations
- Support for collecting, reviewing and exporting linked content from OneDrive and SharePoint Online in Advanced eDiscovery (GA)
- First set of Graph APIs for Advanced eDiscovery (Public Preview)
- New audit events in Advanced Audit (GA)
- 10-year retention add-on in Advanced Audit (GA)
Other Announcements
Microsoft Advanced Compliance Solutions in Zero Trust Architecture
Improving eDiscovery workflows and enhancing your forensic investigations
Request for Manager Action using MCAS & Power Automate
Secure external collaboration using sensitivity labels
Enhanced regulatory, legal and forensic investigation capabilities now in the Government Cloud
Best practices to simplify governing employee access across your applications, groups and teams
by Contributed | Oct 5, 2020 | Azure, Technology, Uncategorized
This article is contributed. See the original author and article here.
We have updated the https://github.com/Azure-Samples/Azure-Stack-Hub-Foundation-Core repo with a new framework and set of tools that are intended to help Azure Stack Hub Operators accelerate their ramping up and provide starting tools they can use for various activities.
It now includes 3 main types of resources:
-
Learning Materials: slides, links to videos, and workshop materials
-
Tools: starting points for tools used by Azure Stack Hub Operators on day to day activities
-
SlideShare: slides from webcasts/presentations
We will update this data as we progress and welcome any feedback on how to improve them, in order to make them more relevant for Azure Stack Hub Operators.
Learning Materials
The Azure Stack Hub Foundation Core are a set of materials (PowerPoint presentations, workshops, and links to videos) aiming to provide Azure Stack Hub Operators the foundational materials required to ramp-up and understand the basics of operating Azure Stack Hub. These will build on the Azure Stack Hub Foundation Core – video series – Microsoft Tech Community.
Tools
The Azure Stack Hub Operators use a wide range of tooling to manage their infrastructure. The Tools folder provides scripts and snippets as starting point for automating operator tasks – from PowerShell scripts, to API calls, ARM templates, Azure integration, and all kinds of automation. This repo is intended to capture some of these tools and to provide them as example for others, as they are building their tooling as well. Most of these scripts are small snippets which can, and should be, included in your own automation. As most of them are generalized scripts, you will need to configure them according to your own environment.
SlideShare
As we run webcasts and presentations (like the “work from home” sessions ran in April 2020), the SlideShare folder will be used to share these slides and other information regarding these sessions.
ASR Failback Script
The ASR-failback-script tool helps automate the failback process, when using ASR to protect Azure Stack Hub VMs. The process is described in the Azure Site Recovery failback tool document.
by Contributed | Oct 5, 2020 | Uncategorized
This article is contributed. See the original author and article here.
We’re only just starting to understand the true potential of technology at the intersection of Artificial Intelligence, MLOps (Machine Learning & DevOps), Cloud Computing and Edge Computing – but the possibilities are endless.
For the past few years, our AI Engineers, Data Scientists and Cloud Advocates at Microsoft have been working with the University of Oxford to further the development of these technologies and further the practical application of these in the world.
The collaboration has resulted in the University of Oxford offering specific courses on AI and Cloud/Edge computing – and on the development of the AI Edge Engineer Learning Path on Microsoft Learn.
On the 1st October we brought together the team at Microsoft and the academics at University of Oxford that worked to build this learning path – watch the show to find out more about this free Learning Path, as well as some of the amazing applications of these technologies.
On this show we met:
-
Amy Boyd – host of this episode and Cloud Advocate for AI + Machine Learning at Microsoft. Amy has been working with the University of Oxford for a number of years and helped build the AI Edge Engineer Learning Path, as well as being a guest lecturer on the course at Oxford. She is also responsible for the Development of the Developer’s Guide to AI series of content, seen at Microsoft events around the world and also featured on Microsoft Learn.
-
Ajit Jaokar – Course Director: Artificial Intelligence: Cloud and Edge implementations at the University of Oxford. Ajit built the course at Oxford and is a Data Scientist at his company, feynlabs. He has also conducted AI courses in the London School of Economics (LSE), Universidad Politécnica de Madrid (UPM) and as part of the The Future Society at the Harvard Kennedy School of Government.
-
Ayşe Mutlu – Lead AI Tutor for Artificial Intelligence: Cloud and Edge implementations at the University of Oxford. Ayşe is an experience Data Scientist with a background in Engineering, Mixed Reality, IoT and Machine Learning. She was particularly instrumental in helping develop AI Edge content for Microsoft Azure.
-
Marina Fernandez – Analyst Developer at Anglo American and alumni of the Artificial Intelligence: Cloud and Edge implementations course. Marina is now a guest speaker and student mentor at the University of Oxford. She has over 15 years experience of Software Development, Business Analysis and Project Management.
-
Robert Wolf – Senior Web and Application Developer at Fundamentals Ltd. Robert is also an alumni of the Artificial Intelligence: Cloud and Edge implementations course and has over 26 years experience in IT & Software Engineering. He is now responsible for designing, build and maintaining Python based machine learning workflow and infrastructures and data engineering/management systems.
Here are the links shared on the show:
A huge thank you to all of the on-air team producer Adam Jackson and Salman Chishti for moderating the session.
by Contributed | Oct 5, 2020 | Azure, Technology, Uncategorized
This article is contributed. See the original author and article here.

Most of the time when we think about the basics of a detection research lab, it is an environment with Windows endpoints, audit policies configured, a log shipper, a server to centralize security event logs and an interface to query, correlate and visualize the data collected.
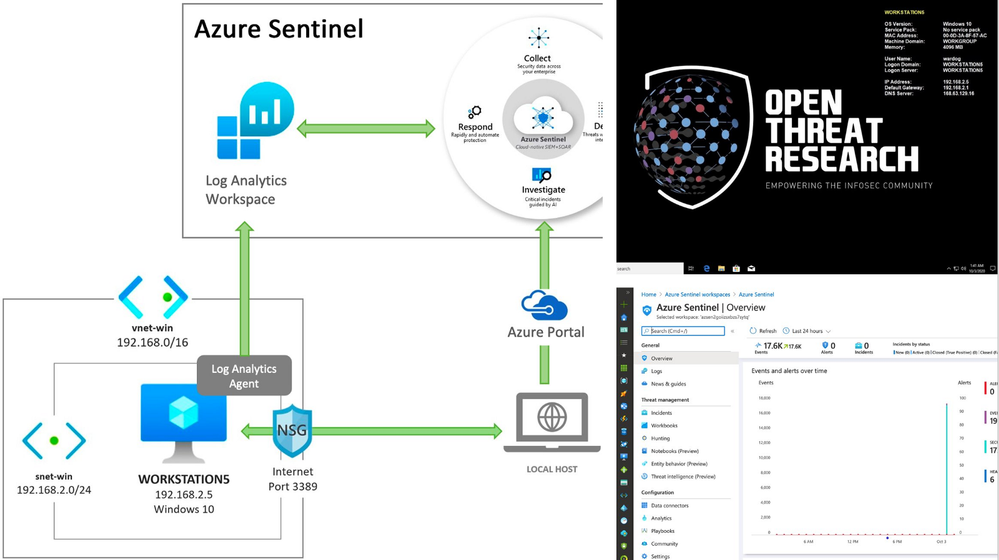
Recently, I started working with Azure Sentinel and even though there are various sources of data and platforms one could integrate it with, I wanted to learn and document how I could deploy an Azure Sentinel with a Windows lab environment in Azure for research purposes.
In this post, I show how to integrate an ARM template created in the previous post to deploy an Azure Sentinel solution with other templates to deploy a basic Windows network lab. The goal is to expedite the time it takes to get everything set up and ready-to-go before simulating a few adversary techniques.
This post is part of a four-part series where I show some of the use cases I am documenting through the open source project Azure Sentinel To-Go! . The other three parts can be found in the following links:
Azure Sentinel To-Go?

In a previous post (part 1), I introduced the project Azure Sentinel To-Go to start documenting some of the use cases that one could use an Azure Sentinel solution for in a lab environment, and how it could all be deployed via Azure Resource Manager (ARM) templates to make it practical and modular enough for others in the community to use.
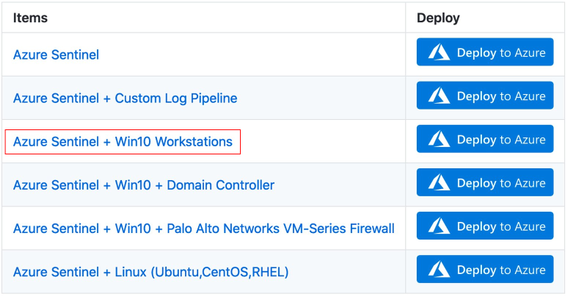
If you go to the project’s current deployment options, you can see some of the current scenarios you can play with. For this post, I am going to use the one highlighted below and explain how I created it:
First of all, I highly recommend to read these two blog post to get familiarized with the process of deploying Azure Sentinel via an ARM template:
A basic template to deploy an Azure Sentinel solution would look similar to the one available in the Blacksmith project:
https://github.com/OTRF/Blacksmith/blob/master/templates/azure/Log-Analytics-Workspace-Sentinel/azuredeploy.json
Extending The Basic Azure Sentinel Template
In order to integrate an Azure Windows lab environment with the basic Azure Sentinel ARM template, we need to enable and configure the following features in our Azure Sentinel workspace:
- Enable the Azure Sentinel Security Events Data Connector to stream all security events (Microsoft-Windows-Security-Auditing event provider) to the Azure Sentinel workspace.
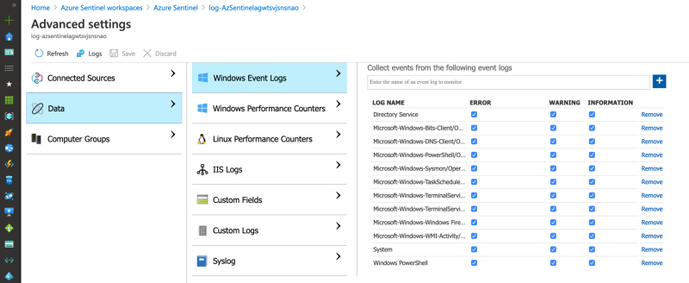
- Enable and stream additional Windows event providers (i.e Microsoft-Windows-Sysmon/Operational or Microsoft-Windows-WMI-Activity/Operational) to increase the visibility from a data perspective.
Of course, we also need to download and install the Log Analytics agent (also known as the Microsoft Monitoring Agent or MMA) on the machines for which we want to stream security events into Azure Sentinel. We will take care of that after this section.
1) Azure Sentinel + Security Events Data Connector
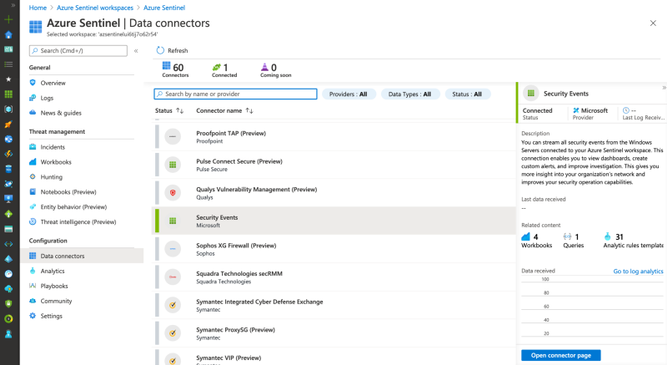
If you have an Azure Sentinel instance running, all you would have to do is go to Azure Portal>Azure Sentinel Workspaces>Data connectors>Security Events > Open connector page
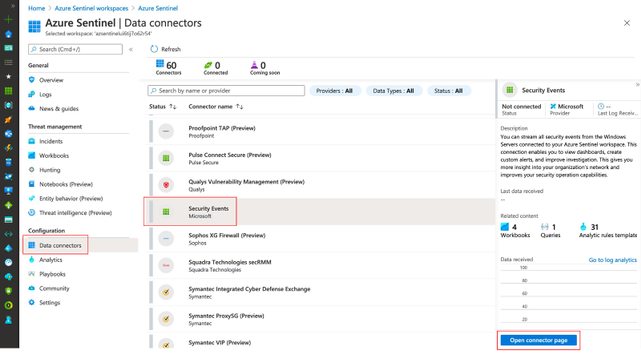
Then, you will have to select the events set you want to stream (All events, Common, Minimal or None)
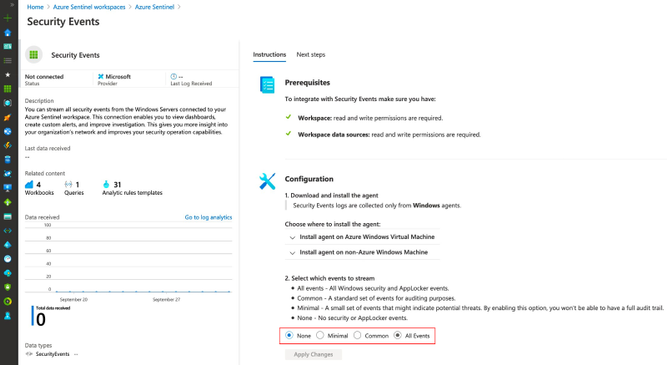
If you want to know more about each event set, you can read more about it here. The image below shows all the events behind each event set.
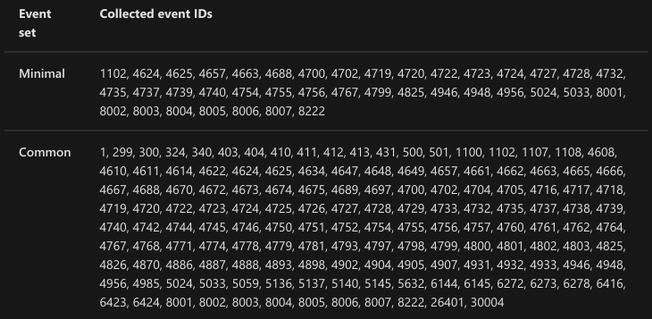 https://docs.microsoft.com/en-us/azure/sentinel/connect-windows-security-events
Once you select an event set and click on Apply Changes, you will see the status of the data connector as Connected and a message indicating the change happened successfully.
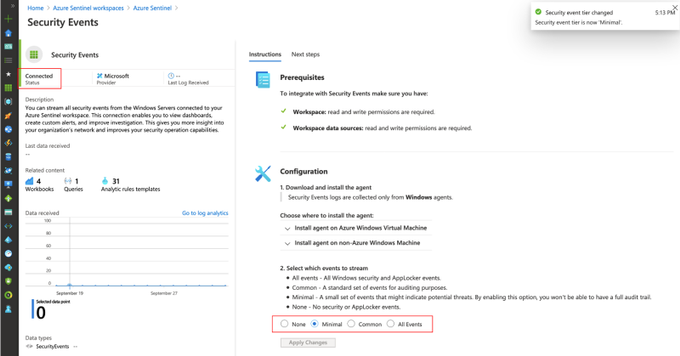
If you go back to your data connectors view, you will see the Security Events one with a green bar next to it and again with the Connected status.
Azure Resource Manager (ARM) Translation
We can take all those manual steps and express them as code as shown in the template below:
https://github.com/OTRF/Azure-Sentinel2Go/blob/master/azure-sentinel/linkedtemplates/data-connectors/securityEvents.json
The main part in the template is the following resource of type Microsoft.OperationalInsights/workspaces/dataSources and of kind SecurityInsightsSecurityEventCollectionConfiguration . For more information about all the additional parameters and allowed values, I recommend to read this document.
{
  "type": "Microsoft.OperationalInsights/workspaces/dataSources",
  "apiVersion": "2020-03-01-preview",
  "location": "[parameters('location')]",
  "name": "<workspacename>/<datasource-name>",
  "kind": "SecurityInsightsSecurityEventCollectionConfiguration",
  "properties": {
    "tier":  "<None,Minimal,Recommended,All>",
    "tierSetMethod": "Custom"
  }
}
2) Azure Sentinel + Additional Win Event Providers
It is great to collect Windows Security Auditing events in a lab environment, but what about other event providers? What if I want to install Sysmon and stream telemetry from Microsoft-Windows-Sysmon/Operational? Or maybe Microsoft-Windows-WMI-Activity/Operational?
There is not an option to do it via the Azure Sentinel data connectors view, but you can do it through the Azure Sentinel Workspace advanced settings (Azure Portal>Azure Sentinel Workspaces>Azure Sentinel>{WorkspaceName} > Advanced Settings) as shown below:
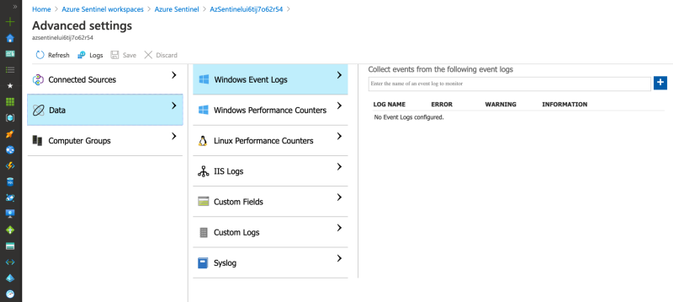
We can manually add one by one by typing the names and clicking on the plus sign.
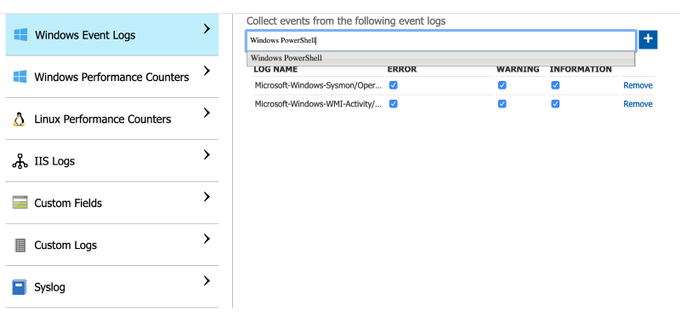
Azure Resource Manager (ARM) Translation
We can take all those manual steps and express them as code as shown in the template below:
https://github.com/OTRF/Azure-Sentinel2Go/blob/master/azure-sentinel/linkedtemplates/log-analytics/winDataSources.json
The main part in the template is the following resource of type Microsoft.OperationalInsights/workspaces/dataSources and of kind WindowsEvent. For more information about all the additional parameters and allowed values, I recommend to read this document.
{
  "type": "Microsoft.OperationalInsights/workspaces/dataSources",
  "apiVersion": "2020-03-01-preview",
  "location": "[parameters('location')]",
  "name": "<workspacename>/<datasource-name>",
  "kind": "WindowsEvent",
  "properties": {
    "eventLogName": "",
    "eventTypes": [
      { "eventType": "Error"},
      { "eventType": "Warning"},
      { "eventType": "Information"}
    ]
  }
}
In the template above, I use an ARM method called Resource Iteration to create multiple data sources and cover all the event providers I want to stream more telemetry from. By default these are the event providers I enable:
"System"
"Microsoft-Windows-Sysmon/Operational",
"Microsoft-Windows-TerminalServices-RemoteConnectionManager/Operational",
"Microsoft-Windows-Bits-Client/Operational",
"Microsoft-Windows-TerminalServices-LocalSessionManager/Operational",
"Directory Service",
"Microsoft-Windows-DNS-Client/Operational",
"Microsoft-Windows-Windows Firewall With Advanced Security/Firewall",
"Windows PowerShell",
"Microsoft-Windows-PowerShell/Operational",
"Microsoft-Windows-WMI-Activity/Operational"
"Microsoft-Windows-TaskScheduler/Operational"
Executing The Extended Azure Sentinel Template
We need to merge or link the previous two templates to the initial template . You might be asking yourself:
“Why are the two previous templates on their own and not just embedded within one main template?”
That’s a great question. I initially did it that way, but when I started adding Linux and other platform integrations to it, the master template was getting too big and a little too complex to manage. Therefore, I decided to break the template into related templates, and then deploy them together through a new master template. This approach also helps me to create a few template combinations and cover more scenarios without having a long list of parameters and one master template only. I use the Linked Templates concept which you can read more about here.
These are the steps to execute the template:
1) Download current demo template
https://github.com/OTRF/Blacksmith/blob/master/templates/azure/Log-Analytics-Workspace-Sentinel/demos/LA-Sentinel-Windows-Settings.json
2) Create Resource Group (Azure CLI)
You do not have to create a resource group, but for a lab environment and to isolate it from other resources, I run the following command:
az group create -n AzSentinelDemo -l eastus
-
az group create : Create a resource group
-
-n : Name of the new resource group
-
-l : Location/region
3) Deploy ARM Template (Azure CLI)
az deployment group create -f ./LA-Sentinel-Windows-Settings.json -g AzSentinelDemo
-
az deployment group create: Start a deployment
-
-f : Template that I put together for this deployment.
-
-g: Name of the Azure Resource group
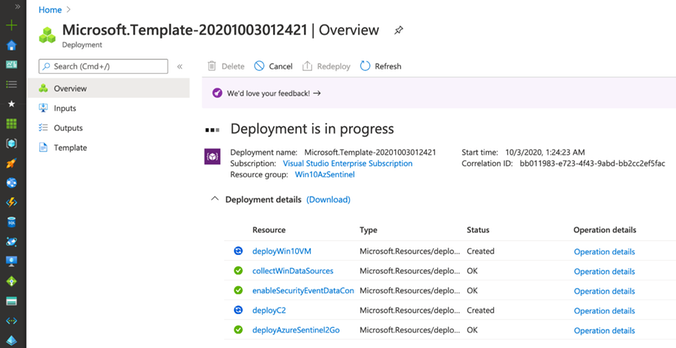
Monitor Deployment
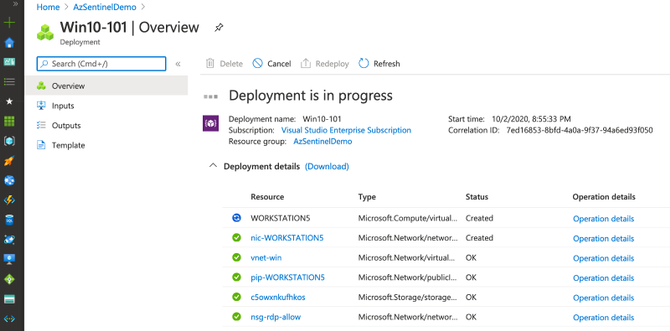
As you can see in the image below, multiple deployments were executed after executing the master template for this demo.

Check Azure Sentinel Automatic Settings (Data Connector)
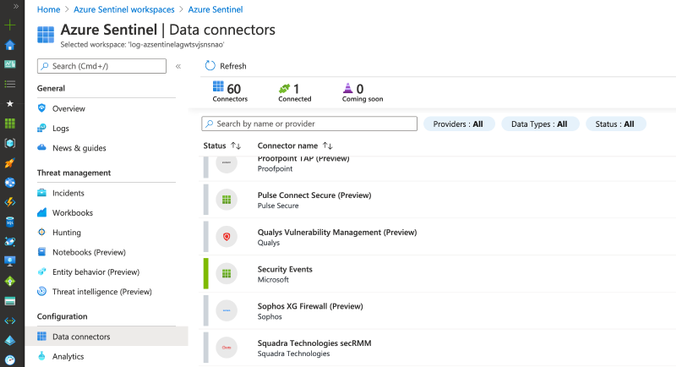
Check Azure Sentinel Automatic Settings (Win Event Providers)
Everything got deployed as expected and in less than 30 seconds!! Now, we are ready to integrate it with a Windows machine (i.e Azure Win10 VM).
Re-Using a Windows 10 ARM Template
Building a Windows 10 virtual machine via ARM templates, and from scratch, is a little bit out of scope for this blog post ( I am preparing a separate series for it), but I will highlight the main sections that allowed me to connect it with my Azure Sentinel lab instance.
A Win 10 ARM Template 101 Recipe
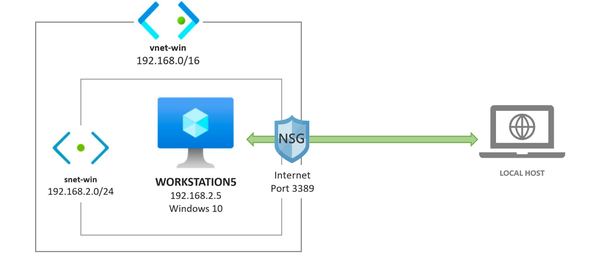
I created a basic template to deploy a Win10 VM environment in Azure. It does not install anything on the endpoint, and it uses the same ARM method called Resource Iteration , mentioned before, to create multiple Windows 10 VMs in the same virtual network.
https://github.com/OTRF/Blacksmith/blob/master/templates/azure/Win10/demos/Win10-101.json
Main Components/Resources:
One part of the virtual machine resource object that is important to get familiarized with is the imageReference properties section.
A Marketplace image in Azure has the following attributes:
-
Publisher: The organization that created the image. Examples: MicrosoftWindowsDesktop, MicrosoftWindowsServer
-
Offer: The name of a group of related images created by a publisher. Examples: Windows-10, WindowsServer
-
SKU: An instance of an offer, such as a major release of a distribution. Examples: 19h2-pro, 2019-Datacenter
-
Version: The version number of an image SKU.
How do we get some of those values? Once again, you can use the Azure Command-Line Interface (CLI) . For example, you can list all the offer values available for the MicrosoftWindowsDesktop publisher in your subscription with the following command:
> az vm image list-offers -p MicrosoftWindowsDesktop -o table
Location    Name
----------  --------------------------------------------
eastus      corevmtestoffer04
eastus      office-365
eastus      Test-offer-legacy-id
eastus      test_sj_win_client
eastus      Windows-10
eastus      windows-10-1607-vhd-client-prod-stage
eastus      windows-10-1803-vhd-client-prod-stage
eastus      windows-10-1809-vhd-client-office-prod-stage
eastus      windows-10-1809-vhd-client-prod-stage
eastus      windows-10-1903-vhd-client-office-prod-stage
eastus      windows-10-1903-vhd-client-prod-stage
eastus      windows-10-1909-vhd-client-office-prod-stage
eastus      windows-10-1909-vhd-client-prod-stage
eastus      windows-10-2004-vhd-client-office-prod-stage
eastus      windows-10-2004-vhd-client-prod-stage
eastus      windows-10-ppe
eastus      windows-7
Then, you can use a specific offer and get a list of SKU values:
> az vm image list-skus -l eastus -f Windows-10 -p MicrosoftWindowsDesktop -o table
Location    Name
----------  ---------------------------
eastus      19h1-ent
eastus      19h1-ent-gensecond
eastus      19h1-entn
eastus      19h1-entn-gensecond
eastus      19h1-evd
eastus      19h1-pro
eastus      19h1-pro-gensecond
eastus      19h1-pro-zh-cn
eastus      19h1-pro-zh-cn-gensecond
eastus      19h1-pron
eastus      19h1-pron-gensecond
Execute the Win 10 ARM Template 101 Recipe (Optional)
Once again, you can run the template via the Azure CLI as shown below:
az deployment group create -f ./Win10-101.json -g AzSentinelDemo --parameters adminUsername='wardog' adminPassword='<PASSWORD>' allowedIPAddresses=<YOUR-PUBLIC-IP
One thing to point out that is very important to remember is the use of the allowedIPAddresses parameter. That restricts the access to your network environment to only your Public IP address. I highly recommended to use it. You do not want to expose your VM to the world.
This will automate the creation of all the resources needed to have a Win 10 VM in azure. Usually one would need to create one resource at a time. I love to automate all that with an ARM template.
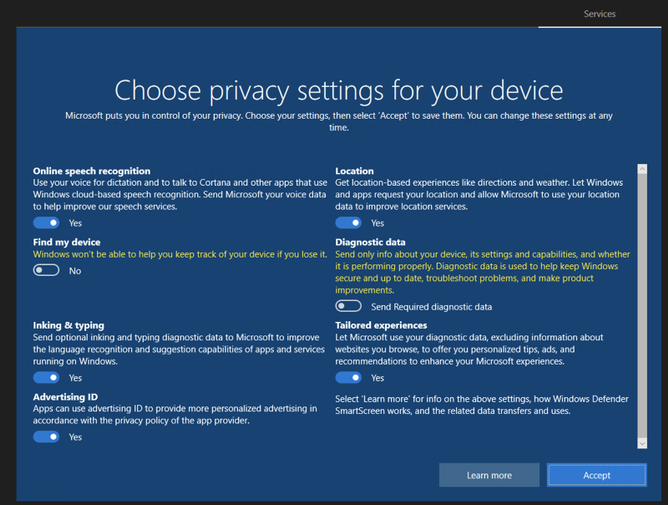
Once the deployment finishes, you can simply RDP to it by its Public IP address. You will land at the privacy settings setup step. This is a basic deployment. Later, I will provide a template that takes care of all that (Disables all those settings and prepares the box automatically).
You can delete all the resources via your Azure portal now to get ready for another deployment and continue with the next examples.
Extending the Basic Windows 10 ARM Template
In order to integrate the previous Win10 ARM template with the extended Azure Sentinel ARM template, developed earlier, we need to do the following while deploying our Windows 10 VM:
- Download and install the Log Analytics agent (also known as the Microsoft Monitoring Agent or MMA) on the machines for which we want to stream security events into Azure Sentinel from.
Win 10 ARM Template + Log Analytics Agent
I put together the following template to allow a user to explicitly enable the monitoring agent and pass workspaceId and workspaceKey values as input to send/ship security events to a specific Azure Sentinel workspace.
https://github.com/OTRF/Blacksmith/blob/master/templates/azure/Win10/demos/Win10-Azure-Sentinel.json
The main change in the template is the following resource of type Microsoft.Compute/virtualMachines/extensions. Inside of the resource properties, I define the publisher as Microsoft.EnterpriseCloud.Monitoring and of type MicrosoftMonitoringAgent. Finally, I map the workspace settings to their respective input parameters as shown below:
{
  "name": "<VM-NAME/EXTENSION-NAME>",
  "type": "Microsoft.Compute/virtualMachines/extensions",
  "apiVersion": "2019-12-01",
  "location": "[parameters('location')]",
  "properties": {
    "publisher": "Microsoft.EnterpriseCloud.Monitoring",
    "type": "MicrosoftMonitoringAgent",
    "typeHandlerVersion": "1.0",
    "autoUpgradeMinorVersion": true,
    "settings": {
      "workspaceId": "[parameters('workspaceId')]"
    },
    "protectedSettings": {
      "workspaceKey": "[parameters('workspaceKey')]"
    }
  }
}
Putting it All Together!
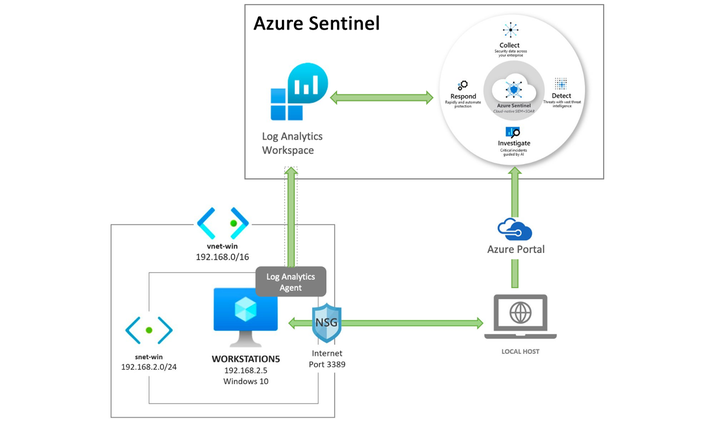
To recap, the following template should do the following now:
- Deploy an Azure Sentinel solution
- Enable the Azure Sentinel SecurityEvents data connector
- Enable more Windows event providers to collect more telemetry
- Deploy a Windows 10 virtual machine and its own virtual network.
- Install the Log Analytics Agent (Microsoft Monitoring Agent) in the Windows 10 VM.
Executing the ARM Template (Azure CLI)
az deployment group create -n Win10Demo -f ./Win10-Azure-Sentinel-Basic.json -g Win10AzSentinel --parameters adminUsername='wardog' adminPassword='<PASSWORD>' allowedIPAddresses=<PUBLIC-IP-ADDRESS>

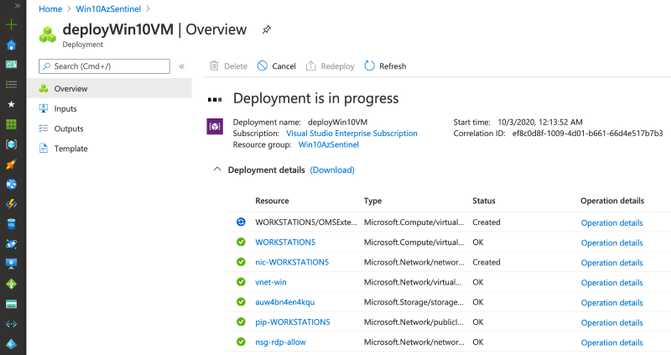
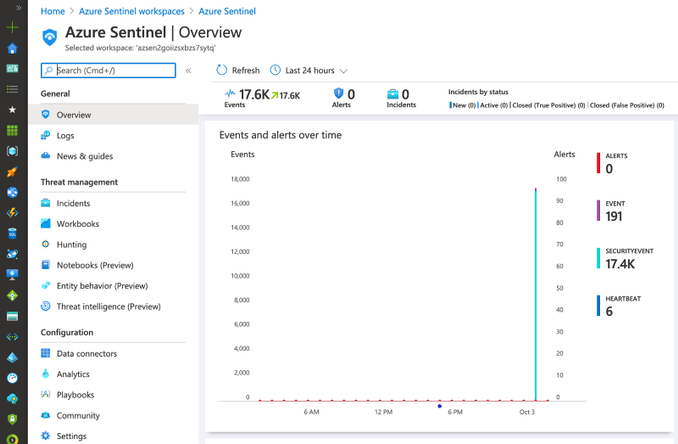
Once the deployment finishes (~10mins), you can go to your Azure Sentinel dashboard, wait a few mins and you will start seeing security events flowing:
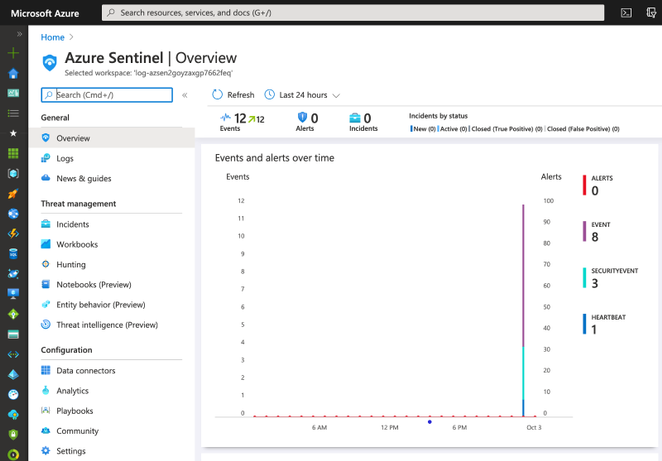
As you can see in the image above, we have events from SecurityEvent and Event tables. We can explore the events through the Logs option.
SecurityEvent
You can run the following query to validate and explore events flowing to the SecurityEvent table:
SecurityEvent
| limit 1
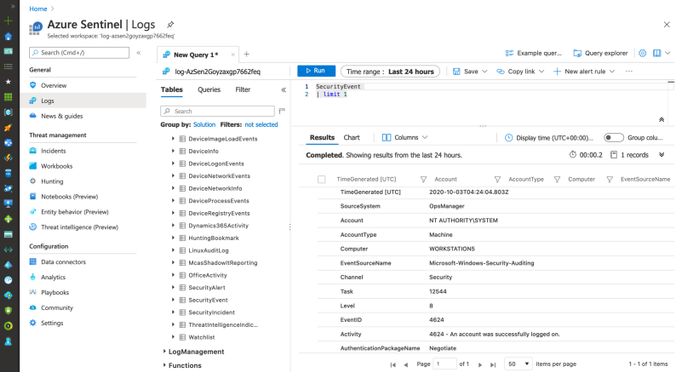
Event
The following basic query validates the consumption of more Windows event providers through the Event table:
Event
| summarize count() by EventLog, Source
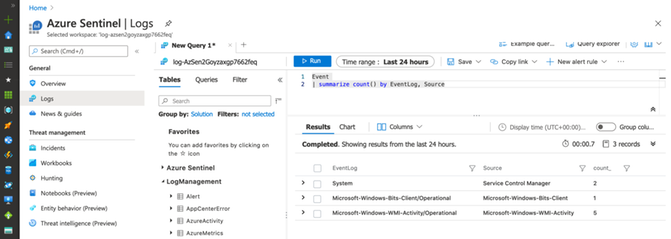
That’s it! Very easy to deploy and in a few minutes.
Improving the Final Template! What? Why?
I wanted to automate the configuration and installation of a few more things:
- New Firewall rules, Power options, Security Private settings, Disabling a few Windows 10 settings, PowerShell Remoting service, etc. I used the following script.
-
System Access Control List (SACL) known as Audit Rules on specific secured objects to generate more telemetry. I used the following script.
- Setting a wallpaper via Bginfo. I used the following script.
- Install AntiMalware extension on every Windows 10 VM via the following embedded resource. My way to configure Windows Defender exclusions.
- Install Sysmon on every Windows 10 VM via this script.
- Embed a Log Analytics Function option via the Azure Sentinel template to call a linked template and import a Sysmon function/parser.
- [Optional] Azure bastion host set up.
- [Optional] A Command and control (C2) framework. I wanted to have the option to deploy a C2 along with my setup and test a few things.
- [Optional] Virtual Network Peering between the Windows 10 Virtual Network and the C2 Virtual Network.
This final official template is provided by the Azure Sentinel To-Go project and can be deployed by clicking on the “Deploy to Azure” button in the repository as shown below.
 https://github.com/OTRF/Azure-Sentinel2Go
The Final Results!
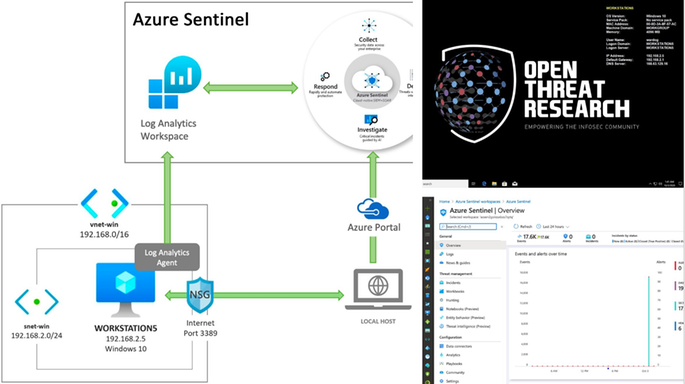
Azure Sentinel
An Azure Sentinel with security events from several Windows event providers flowing right from a Win10 VM.
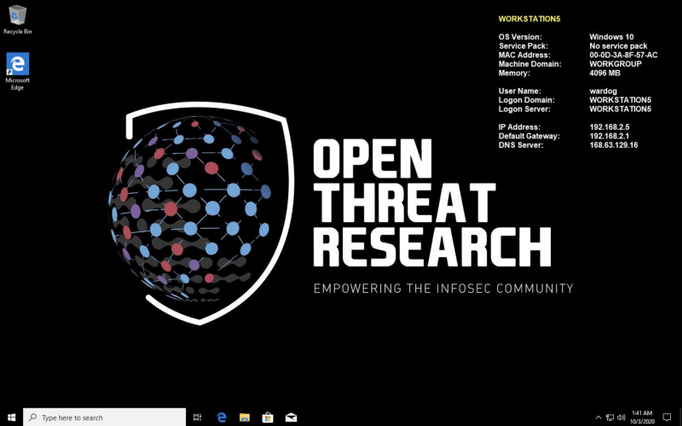
Windows 10 VM
A pre-configured Win10 VM ready-to-go with Sysmon installed and a wallpaper courtesy of the Open Threat Research community.
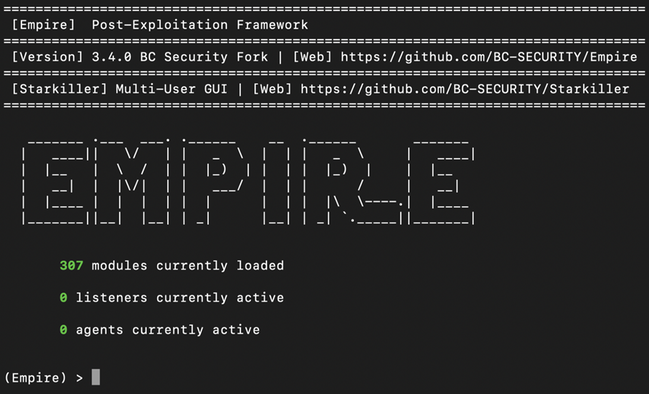
[Optional] Ubuntu — Empire Option Set
An Ubuntu 18 VM with Empire dockerized and ready-to-go. This is optional, but it helps me a lot to run a few simulations right away.
ssh wardog@<UBUNTU-PUBLIC-IP>
> sudo docker exec -ti empire ./empire
Having a lab environment that I can deploy right from GitHub and in a few minutes with One Click and a few parameters is a game changer.
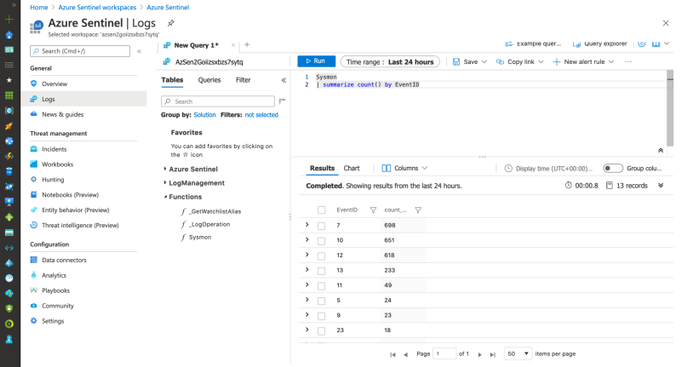
What you do next is up to you and depends on your creativity. With the Sysmon function/parser automatically imported to the Azure Sentinel workspace, you can easily explore the Sysmon event provider and use the telemetry for additional context besides Windows Security auditing.
Sysmon
| summarize count() by EventID
FQA:
How much does it cost to host the last example in Azure?
Azure Sentinel (Receiving Logs), Win10VM (Shipping Logs) and Ubuntu VM running for 24 hours was ~$3–$4. I usually deploy the environment, run my test, play a little bit with the data, create some queries and destroy it. Thefore, it is usually less than a dollar every time I use it.
What about Windows Event Filtering? I want more flexibility
Great question! That is actually a feature in preview at the moment. You can read more about Azure Monitor Agent and Data Collection Rules Public Preview here. This is a sample data collection rule where you can specify specific events and event providers. I wrote a basic one for testing as shown below:
"dataSources": {
  "windowsEventLogs": [
    {
      "name": "AuthenticationLog",
      "streams": [
        "Microsoft-WindowsEvent"
      ],
     "scheduledTransferPeriod": "PT1M",
     "xPathQueries": [
        "Security!*[System[(EventID=4624)]]"
     ]
    }
   ]
}
That will be covered in another blog post once it is more mature and is GA. xPathQueries are powerful!
I hope you liked this tutorial. As you can see in the last part of this post, you can now deploy everything with one click and a few parameters and through the Azure Portal. That is what the Azure Sentinel To-Go project is about. Documenting and creating templates for a few lab scenarios and share them with the InfoSec community to expedite the deployment of Azure Sentinel and a few resources for research purposes.
Next time, I will go over a Linux environment deployment, so stay tuned!
References
https://docs.microsoft.com/en-us/azure/virtual-machines/windows/cli-ps-findimage
https://docs.microsoft.com/en-us/azure/azure-resource-manager/templates/template-syntax
https://azure.microsoft.com/en-us/pricing/details/virtual-machines/windows/
https://docs.microsoft.com/en-us/windows/win32/secauthz/access-control-lists
https://docs.microsoft.com/en-us/azure/sentinel/connect-windows-security-events
https://docs.microsoft.com/en-us/sysinternals/downloads/sysmon
https://github.com/OTRF/Blacksmith/tree/master/templates/azure/Win10
https://github.com/OTRF/Azure-Sentinel2Go
https://github.com/OTRF/Azure-Sentinel2Go/tree/master/grocery-list/win10
From the Get-MigrationUser output, I can also see the RequestGuid is empty, so this also tells me that there is no move request / move report for this migration user. I can run Get-MoveRequest <user> or Get-MigrationUser -BatchId “Test Hybrid Migration” | Get-MoveRequest to confirm this.


Recent Comments