This article is contributed. See the original author and article here.
When your team members are working on multiple projects using Project for the Web, it can be difficult for them to know what tasks they are assigned, and when they should be completed across all their projects. This blog shows you how to create a My Tasks experience using Power Apps to help your team stay on track.
Step 1: Create a new View for Project in Power Apps
- Go to Powerapps.com and sign in.
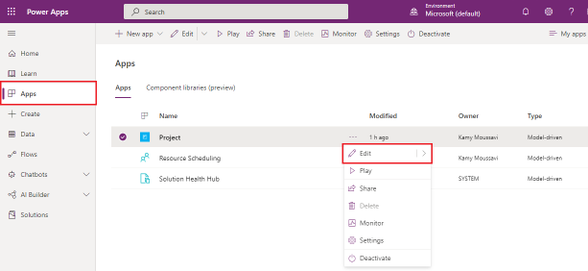
- Click on Apps on the left navigation menu.
- Locate the Project App in the Apps list and click the More Commands ellipses menu and click Edit.
4. Click the + Add button on the top left, and then select Views.
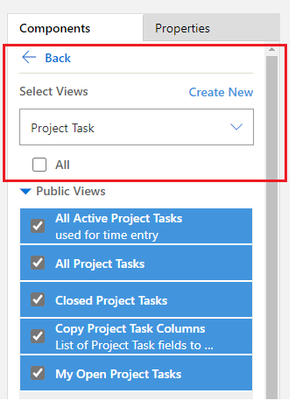
5. On the right options pane, use the drop-down menu to select Project Task.
6. Press the Create New button above the drop-down menu.
Step 2: Create a filter for Tasks Assigned to You
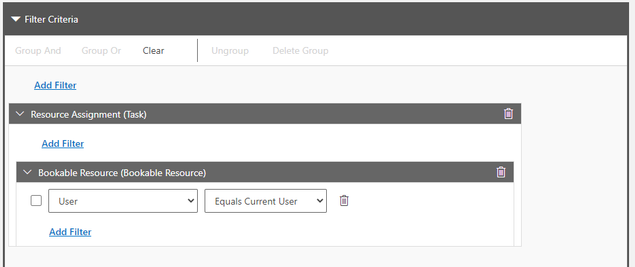
- Create a new filter by opening the Filter Pane and pressing Add Filter.
- Select Resource Assignment (Task) in the drop-down menu.
- In the Resource Assignment (Task) box, Press Add Filter.
- Select Bookable Resource (Bookable Resource) in the drop-down menu.
- In the Bookable Resource (Bookable Resource) box, Press Add Filter.
- Select User in the drop-down menu.
- In the drop-down menu that says Equals, select Equals Current User.
Step 3: Add Columns Attributes for more details on your View
- In the right pane, select the Components tab and press Column Attributes: Primary Entity.
- Drag and drop any new column attribute necessary for you in the Columns section in the bottom left.
- We recommend adding Project, Start Date, Due Date, % Complete.
- Once satisfied with this view, press Save on top right, the name your view My Tasks.

Step 4: Add the Project Task view to your Project Site Map
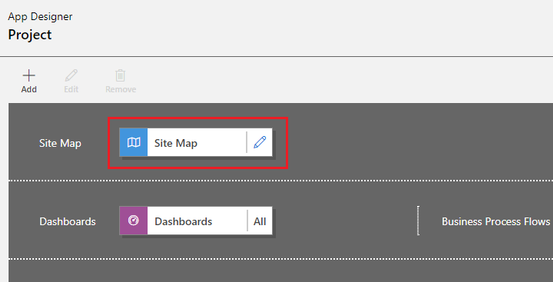
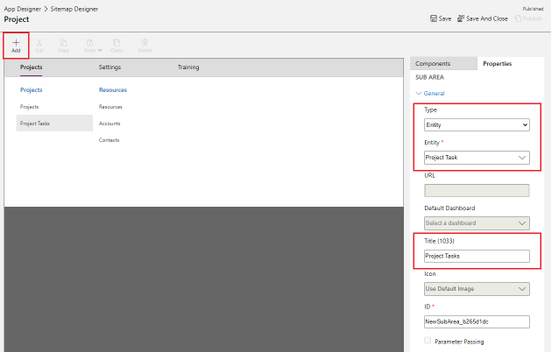
- On the App Designer landing page, press the edit icon on the Site Map (the first tile in the canvas)
2. Select the blue Projects text under the Projects Tab press + Add to add a Subarea.
3. Use the Type drop-down menu to select Entity.
4. Use the Entity drop-down menu to select Project Task.
5. In the Title text field, name this Entity Project Tasks.
6. Press Save, then Publish, then Save and Close.
Step 5: Try out your new My Tasks view in Project Power Apps
- In the App Designer landing page, press Play in top right to launch Project.
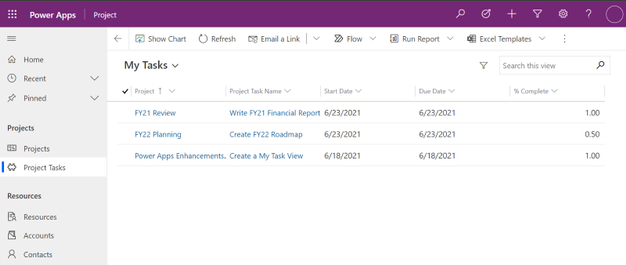
- Select the new Project Tasks subarea under Projects in the left menu.
- In the view selector at the top left defaulted to My Open Project Tasks, select your My Tasks view.
- Voila! You can now see all tasks assigned to you across all projects, and click either the task name or the project name to go the respective project.
FAQ
What license do users need to view this My Tasks view once it is created?
All users with Office, P1, P3 and P5 will be able to view this My Task View.
What license do I need to be able to create this My Tasks view?
Project P1, P3 and P5 all have access to Power Apps and can design this custom My Tasks view.
How can I add more details to the My Tasks view?
You can customize the view by going through Step 3 and adding any column attribute to this view.
Brought to you by Dr. Ware, Microsoft Office 365 Silver Partner, Charleston SC.


Recent Comments