This article is contributed. See the original author and article here.
This is the first in a series of articles which explore how to integrate Artificial Intelligence into a video processing infrastructure using off-the-market cameras and Intel OpenVino Model Server running at the edge. In the below sections we will learn some background trivia, hardware/software prerequisites for implementation, and steps to setup a production-ready AI enabled Network Video Recorder that has the best of both worlds – Microsoft and Intel.
What is a video analytics platform
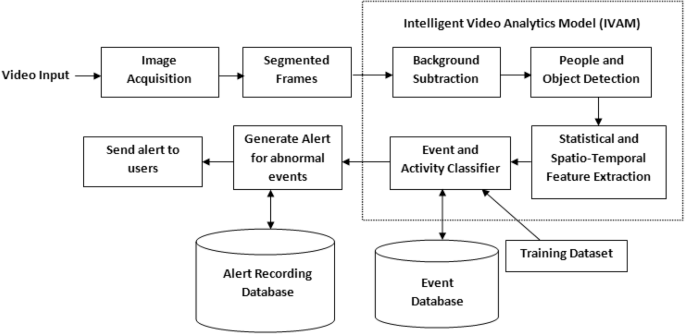
In the last few years, video analytics, also known as video content analysis or intelligent video analytics, has attracted increasing interest from both industry and the academic world. Video Analytics products add artificial intelligence to cameras by analyzing video content in real-time, extracting metadata, sending out alerts and providing actionable intelligence to security personnel or other systems. Video Analytics can be embedded at the edge (even in-camera), in servers on-premise, and/or on-cloud. They extract only temporal and spatial events in a scene, filtering out noise such as lighting changes, weather, trees and animal movements. Here is a logical flow of how it works.
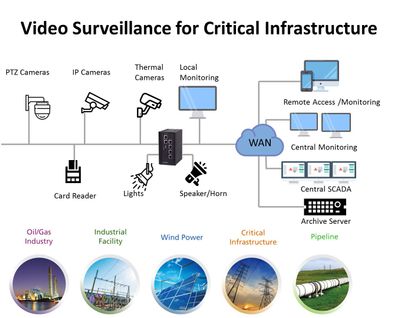
Let’s face it: on-premises and legacy video surveillance infrastructure are still in the dark ages. Physical servers often have limited virtualization integration and support, as well as racks upon racks of servers that clog up performance regardless of whether the data center is using NVR, direct-attached storage, storage area network or hyper-converged infrastructure. It’s been that way for the last 10, if not 20, years. Buying and housing an NVR for five or six cameras is expensive and time-consuming from a management and maintenance point of view. With great improvements in connectivity, compression and data transfer methods, a cloud-native solution becomes an excellent option. Here are some of the popular use cases in this field and digram of a sample deployment for critical infrastructure.
Common approaches for proposals to clients involve either a new installation (greenfield project) or a lift and shift scenario (brownfield project). Video intelligence is one industry where it becomes important to follow a bluefield approach – meant to describe a combination of both brownfield and greenfield, where some streams of information are already in motion and some will be new instances of technology. The reason is that the existing hardware and software installations are very expensive and although they are open to new ideas, they want to keep what is already working. The current article is about setting up this new technology in a way so it accepts pipelines, for inference and event generation, on live video for the above use cases in future.
The rise of AI NVRs
Video Intelligence was invented in 1942 by German engineer, Walter Bruch, so that he and others could observe the launch of V2 rockets on a private system. While its purpose has not drastically changed in the past 75 years, the system itself has undergone radical changes. Since its development, users’ expectations have evolved exponentially, necessitating the development of faster, better, and more cost-effective technology.
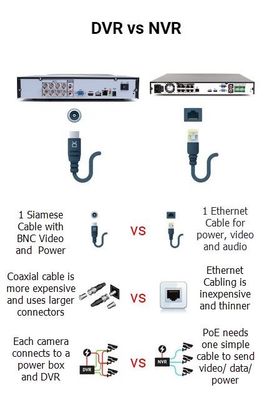
Initially, they could only watch through live streams as they happened— recordings would become available much later (VCR). Until the recent past these were analog devices using analog cameras and a Digital Video Recorder (DVR). Not unlike your everyday television box which used to run off these DVRs in every home! Recently, these have started getting replaced with Power Over Ethernet (PoE) enabled counterparts, running off Network Video Recorders (NVR). Here is a quick visual showing the difference between DVR and NVR.
AI NVR Video Analytics System is a plug-and-play turnkey solution, including video search for object detection, high-accuracy intrusion detection, face search and face recognition, license plate and vehicle recognition, people/vehicle counting, and abnormal-activity detection. All functions support live stream and batch mode processing, real-time alerts and GDPR-friendly privacy protection when desired. AI NVR overcomes the challenges of many complex environments and is fully integrated with AI video analytics features for various markets, including perimeter protection of businesses, access controls for campuses and airports, traffic management by law enforcement, and business intelligence for shopping centers. Here is a logical flow of an AI NVR from video capture to data-driven applications.

In this article we are going to see how to create such an AI NVR at the edge using Azure Video Analyzer (AVA) and Intel products.
Azure Video Analyzer – a one-stop solution from Microsoft
Azure Video Analyzer (AVA) is a brand new service to build intelligent video applications that span the edge and the cloud. It offers the capability to capture, record, and analyze live video along with publishing the results – video and/or video analytics. Video can be published to the edge or the Video Analyzer cloud service, while video analytics can be published to Azure services (in the cloud and/or the edge). With Video Analyzer, you can continue to use your existing video management systems (VMS) and build video analytics apps independently. AVA can be used in conjunction with computer vision SDKs and toolkits to build cutting edge IoT solutions. The diagram below illustrates this.
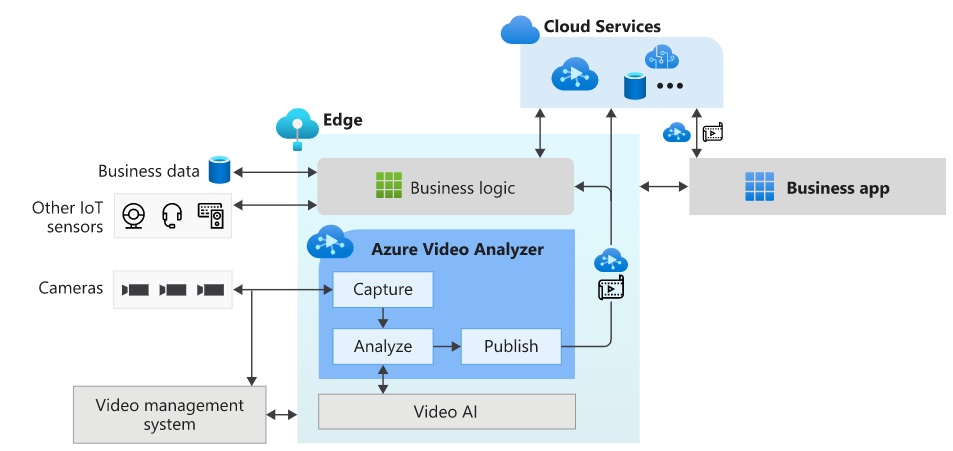
This is the most essential component of creating the AI NVR. As you may have guessed, in this article we are going to deploy an AVA module on IoT edge to coordinate between the model server and the video feeds through an http extension. You can ‘bring you own model’ and call it through either http or grpc endpoint.
Intel OpenVINO toolkit
OpenVINO (Open Visual Inference and Neural network Optimization) is a toolkit provided by Intel to facilitate faster inference of deep learning models. It helps developers to create cost-effective and robust computer vision applications. It enables deep learning inference at the edge and supports heterogeneous execution across computer vision accelerators — CPU, GPU, Intel® Movidius™ Neural Compute Stick, and FPGA. It supports a large number of deep learning models out of the box.
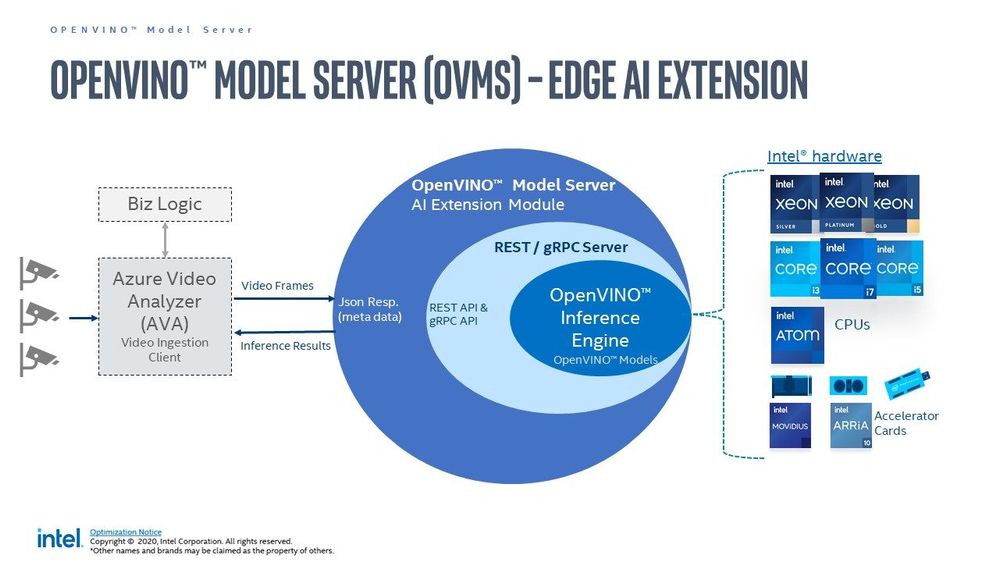
OpenVino uses its own Intermediate Representation (IR) (link)(link) format similar to ONNX (link), and works with all your favourite deep learning tools like Tensorflow, Pytorch etc. You can either convert your resultant model to openvino or use/optimize the available pretained models in the Intel model zoo. In this article we are specifically using the OpenVino Model Server (OVMS) available through this Azure marketplace module, Out of the many models in their catalogue I am only using those that count faces, vehicles, and people. These are identified by their call signs – personDetection, faceDetection, and vehicleDetection.
Prerequisites
There are some hardware and software prerequisites for creating this platform.
- ONVIF PoE camera able to send encoded RTSP streams (link)(link)
- Intel edge device with Ubuntu 18/20 (link)
- Active Azure subscription
- Development machine with VSCode & IoT Extension
- Working knowledge of Computer Vision & Model Serving
ONVIF PoE camera
ONVIF (the Open Network Video Interface Forum) is a global and open industry forum with the goal of facilitating the development and use of a global open standard for the interface of physical IP-based security products. ONVIF creates a standard for how IP products within video surveillance and other physical security areas can communicate with each other. This is different from propreitary equipment, and you can use all open source libraries with them. A decent quality camera like Reolink 410 is enough. Technically you can use wireless camera but I would not recommend that in a professional setting.
Intel edge device with Ubuntu
This can be any device with one or more Intel cpu. Intel NUC makes great low cost IoT edge device and even the cheap ones can handle around 10 cameras running at 30 fps. I am using a base model with Celeron processor priced at around 130$. The camera(s), device, and some cables are all you need to implement this. Optionally, like me, you may need a PoE switch or network extender to get connected. Check the wattage of the PoE to be at least 5 W, and bandwidth to be at least 20 mbps per camera. You also need to install Ubuntu Linux.
Active Azure subscription
Surely, you will need this one, but as we know Azure has this immense suit of products, and while ideally we want to have everything, it may not be practically feasible. For practical purposes you might have to ask for access to particular services, meaning you have to know ahead exactly which ones you want to use. We will need the following:
- Azure IoT Hub (link)
- Azure Container Registry (link)
- Azure Media Services (link)
- Azure Video Analyzer (link)
- Azure Streaming Analytics (link)(future article)
- Power BI / React App (link)(future article)
- Azure Linux VM (link)(optional)
Computer Vision & Model Serving
Generally this prerequisite takes a lot of engineering and is expensive. Thankfully the OVMS extension from Intel is capable of serving high quality models from their zoo, because without this you would have to do the whole flask/socket server thing and it wouldn’t be half as good. Whatever models you need you can mention their call sign and it will be served instantly for you at the edge by the extension. We will see more about this in the next article once things are setup. Note: we are making the platform in such a way that you can use Azure CustomVision or Azure Machine Learning models on this same setup in future with very minimal changes.
Reference Architecture
We are definitely living in interesting times when something as complex as video analytics is almost an OOTB feature! Below is a ready-to-deploy architecture recommended and maintained by Microsoft Azure for video analytics. Technically if you know what you are doing you can deploy this entire thing with the push of a few buttons. However, I found it to have a bit too much for a Minimum Viable Product (MVP) as it is ‘viable’ but not ‘minimum’ so to say.
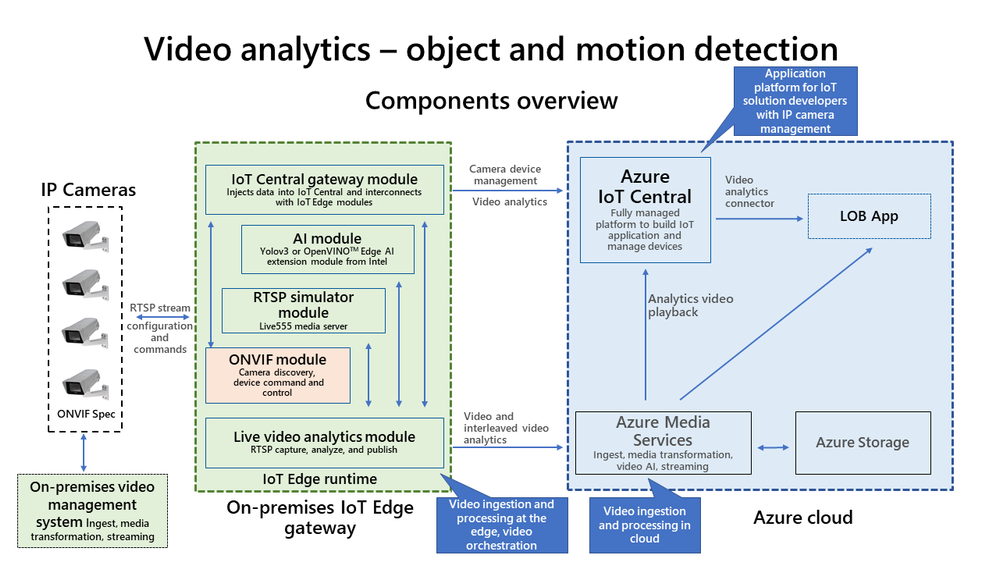
Here I present an alternate architecture that we followed, implemented, and got comparable results to the one above. This is a stripped down version of the official architecture, contains only the necessary components of a MVP for AI NVR, and is much easier to disect.
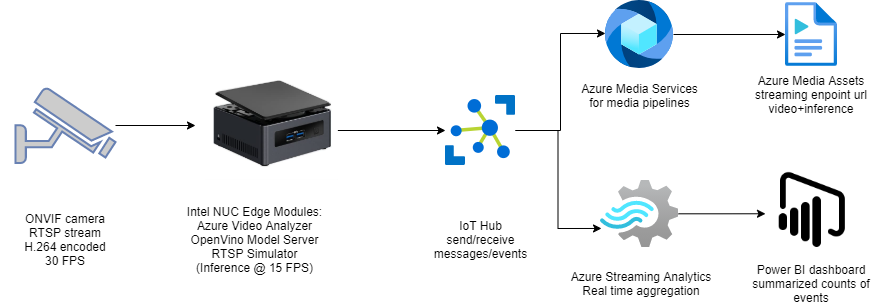 Notice it looks somewhat simliar to the logical flow of an AI NVR shown in one of the prior sections.
Inbound feed to the AI NVR
Before we go into the implementation I wanted to mention some aspects about the inputs and outputs of this system.
- Earlier we said the system needs RTSP input, even though there are other forms of streaming protocols such as RTMP(link), HTTP etc. However, we choose RTSP mostly because its optimized for viewing experience and scalability.
- For development purpose it is recommended to use the excellent RTSP Simulator provided by Microsoft.
- To display the video being processed use any of the following players.
- You can technically use a usb webcam and create your own RTSP stream(link)(link), However, underneath it uses GStreamer, RTSPServer, and pipelines. From my experience you should be careful using this method, especially since you will need understanding of hardware/software media encoding (e.g. H.264) and GStreamer dockerization
 .
. - One very interesting option that I used as a video source was the RTSP Camera Server app. This will instantly turn your smartphone camera into an RTSP feed that your AI NVR can consume
 !
! - Last, but not the least you should make sure that your incoming feed has the required resolution that your CV algorithms need. The trick is not to use too good cameras. 4 to 5 MP is fine for maintaining pixel distribution parity with available pretrained models.
Outbound events from the AI NVR
In Azure Video Analyzer, each inference object regardless of using HTTP-based contract or gRPC based contract follows the object model described below.
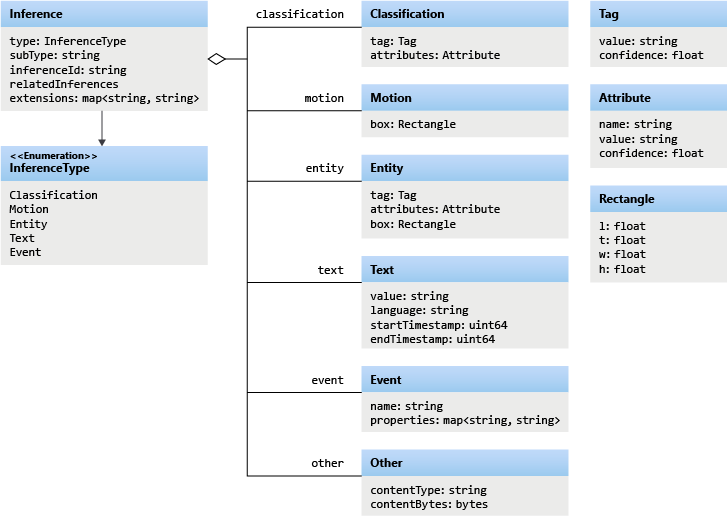
The example below contains a single Inference event with vehicleDetection. We will see more of these in a future article.
{
  "timestamp": 145819820073974,
  "inferences": [
    {
      "type": "entity",
      "subtype": "vehicleDetection",
      "entity": {
        "tag": {
          "value": "vehicle",
          "confidence": 0.9147264
        },
        "box": {
          "l": 0.6853116,
          "t": 0.5035262,
          "w": 0.04322505,
          "h": 0.03426218
        }
      }
    }
Apart from the inference events there are many other type of events, such as the MediaSessionEstablished event, which happens when you are recording the media either in File Sink or Video Sink.
[IoTHubMonitor] [9:42:18 AM] Message received from [avasampleiot-edge-device/avaedge]:
{
  "body": {
    "sdp": "SDP:nv=0rno=- 1586450538111534 1 IN IP4 XXX.XX.XX.XXrns=Matroska video+audio+(optional)subtitles, streamed by the LIVE555 Media Serverrni=media/camera-300s.mkvrnt=0 0rna=tool:LIVE555 Streaming Media v2020.03.06rna=type:broadcastrna=control:*rna=range:npt=0-300.000rna=x-qt-text-nam:Matroska video+audio+(optional)subtitles, streamed by the LIVE555 Media Serverrna=x-qt-text-inf:media/camera-300s.mkvrnm=video 0 RTP/AVP 96rnc=IN IP4 0.0.0.0rnb=AS:500rna=rtpmap:96 H264/90000rna=fmtp:96 packetization-mode=1;profile-level-id=4D0029;sprop-parameter-sets=XXXXXXXXXXXXXXXXXXXXXXrna=control:track1rn"
  },
  "applicationProperties": {
    "dataVersion": "1.0",
    "topic": "/subscriptions/{subscriptionID}/resourceGroups/{name}/providers/microsoft.media/videoanalyzers/{ava-account-name}",
    "subject": "/edgeModules/avaedge/livePipelines/Sample-Pipeline-1/sources/rtspSource",
    "eventType": "Microsoft.VideoAnalyzers.Diagnostics.MediaSessionEstablished",
    "eventTime": "2021-04-09T09:42:18.1280000Z"
  }
}
The above points are mentioned so as to show how some of the expected outputs look like. After all that, lets see how exactly you can create a foundation for your AI NVR.
Implementation
In this section we will see how we can use these tools to our benefit. For the Azure resources I may not go through the entire creation or installation process as there are quite a few articles on the internet for doing those. I shall only mention the main things to look out for. Here is an outline of the steps involved in the implementation.
- Create a resource group in Azure (link)
- Create a IoT hub in Azure (link)
- Create a IoT Edge device in Azure (link)
- Create and name a new user-assigned managed identity (link)
- Create Azure Video Analyzer Account (link)
- Create AVA Edge provisioning token
- Install Ubuntu 18/20 on the edge device
- Prepare the device for AVA module (link)
- Use Dev machine to turn on ONVIF camera(s) RTSP (link)
- Set a local static IP for the camera(s) (link)
- Use any of the players to confirm input streaming video (link)
- Note down RTSP url(s), username(s), and password(s)
- Install docker on the edge device
- Install VSCode on development machine
- Install IoT Edge runtime on the edge device (link)
- Provision the device to Azure IoT using connection string (link)
- Check IoT edge Runtime is running good on the edge device and portal
- Create an IoT Edge solution in VSCode (link)
- Add env file to solution with AVA/ACR/Azure details
- Add Intel OVMS, AVA Edge, and RTSP Simulator modules to manifest
- Create deployment from template (link)
- Deploy the solution to the device
- Check Azure portal for deployed modules running
Lets go some of the items in the list in details.
Steps 1 and 2 are common steps in many use cases and can be done by following this. For 3 you need to make sure you are creating an ‘IoT Edge‘ device and not a simple IoT device. Follow the link for 4 to create a managed identity. For 5 use the interface to create an AVA account. Enter a name for your Video Analyzer account. The name must be all lowercase letters or numbers with no spaces, and 3 to 24 characters in length. Fill in the proper subscription, resource group, storage account, and identity from previous steps. You should now be having a running AVA account. Use these steps to create ‘Edge Provisioninig Token‘ for step 6. Remember, this is just for AVA Edge, not to be confused with provisioning through DPS. For 7, ubuntu linux is good, the support for this in windows is a work in progress. After you create the account keep the following information on standby.
AVA_PROVISIONING_TOKEN="<Provisioning token>"
Step 8, although simple, is an important step in the process. All you actually need to do is to run the below command.
bash -c "$(curl -sL https://aka.ms/ava-edge/prep_device)"
However, underneath this there is a lot going on in preparation for the NVR. The Azure Video Analyzer module should be configured to run on the IoT Edge device with a non-privileged local user account. The module needs certain local folders for storing application configuration data. The RTSP camera simulator module needs video files with which it can synthesize a live video feed. The prep-device script in the above command automates the tasks of creating input and configuration folders, downloading video input files, and creating user accounts with correct privileges.
Steps 9,10, and 11 are for setting up your ONVIF camera(s). Things to note here are that you need to set static class C IP addresses for each camera, and set https protocol along with difficult-to-guess passwords. Again, take extra caution if you are doing this with wireless camera. I use VLC to confirm the live camera feed from each camera. You may think this is obvious or choose to automate this, but I have seen a lot of issues in either. I personally recommend clients to confirm feed/frame-rate from every camera manually using urls. VLC is my player of choice but you have many more choices.
Before you bring Azure into the picture, you must have all your RTSP urls ready and tested in setp 12. Here is an example rtsp url of the main feed. Notice the port number ‘554‘ and encoding ‘h264‘.
rtsp://username:difficultpassword@192.168.0.35:554//h264Preview_01_main
For 13 to 18 keep going by the book(links). For step 19, fill in your details in the following block and create the ‘env‘ file.
SUBSCRIPTION_ID="<Subscription ID>"
RESOURCE_GROUP="<Resource Group>"
AVA_PROVISIONING_TOKEN="<Provisioning token>"
VIDEO_INPUT_FOLDER_ON_DEVICE="/home/localedgeuser/samples/input"
VIDEO_OUTPUT_FOLDER_ON_DEVICE="/var/media"
APPDATA_FOLDER_ON_DEVICE="/var/lib/videoAnalyzer"
CONTAINER_REGISTRY_USERNAME_myacr="<your container registry username>"
CONTAINER_REGISTRY_PASSWORD_myacr="<your container registry password>"
For 20 add the following module definitions in your deployment json. This will cover Azure AVA, Intel OVMS, and RTSP Simulator. Also follow this for more details.
"modules": {
          "avaedge": {
            "version": "1.1",
            "type": "docker",
            "status": "running",
            "restartPolicy": "always",
            "settings": {
              "image": "mcr.microsoft.com/media/video-analyzer:1",
              "createOptions": {
                "Env": [
                  "LOCAL_USER_ID=1010",
                  "LOCAL_GROUP_ID=1010"
                ],
                "HostConfig": {
                  "Dns": [
                    "1.1.1.1"
                  ],
                  "LogConfig": {
                    "Type": "",
                    "Config": {
                      "max-size": "10m",
                      "max-file": "10"
                    }
                  },
                  "Binds": [
                    "$VIDEO_OUTPUT_FOLDER_ON_DEVICE:/var/media/",
                    "$APPDATA_FOLDER_ON_DEVICE:/var/lib/videoanalyzer"
                  ]
                }
              }
            }
          },
"openvino": {
            "version": "1.0",
            "type": "docker",
            "status": "running",
            "restartPolicy": "always",
            "settings": {
              "image": "marketplace.azurecr.io/intel_corporation/open_vino:latest",
              "createOptions": {
                "HostConfig": {
                  "Dns": [
                    "1.1.1.1"
                  ]
                },
                "ExposedPorts": {
                  "4000/tcp": {}
                },
                "Cmd": [
                  "/ams_wrapper/start_ams.py",
                  "--ams_port=4000",
                  "--ovms_port=9000"
                ]
              }
            }
          },
"rtspsim": {
            "version": "1.0",
            "type": "docker",
            "status": "running",
            "restartPolicy": "always",
            "settings": {
              "image": "mcr.microsoft.com/lva-utilities/rtspsim-live555:1.2",
              "createOptions": {
                "HostConfig": {
                  "Dns": [
                    "1.1.1.1"
                  ],
                  "LogConfig": {
                    "Type": "",
                    "Config": {
                      "max-size": "10m",
                      "max-file": "10"
                    }
                  },
                  "Binds": [
                    "$VIDEO_INPUT_FOLDER_ON_DEVICE:/live/mediaServer/media"
                  ]
                }
              }
            }
          }
}
21 to 23 are again the usual steps for all IoT solutions and once you deploy the template, you should have the following modules running as below.
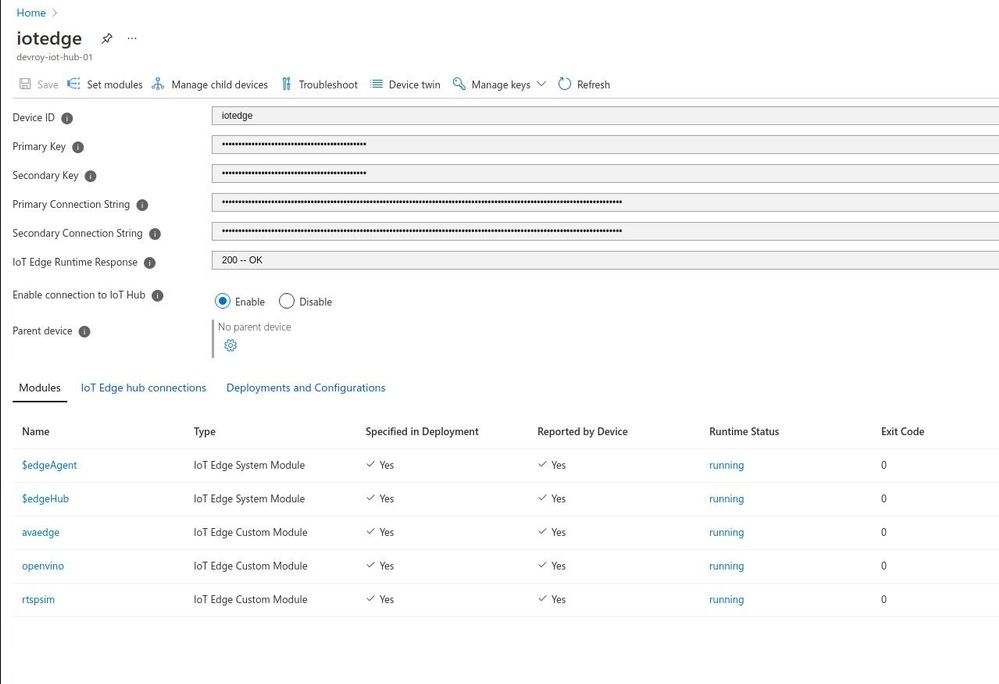
There, we have created the foundation for our Azure IoT Edge device to perform as a powerful AI NVR. Here ‘avaedge‘ is the Azure Video Analyzer service, ‘openvino‘ provides the model server extension, and ‘rtspsim‘ creates the simulated ‘live’ input video feed. In the next article we will see how we can use this setup to detect faces or maybe cars and stuff.
Future Work
I hope you enjoyed this article on setting up an AI enabled NVR for video analytics application. We love to share our experiences and get feedback from the community as to how we are doing. Look out for upcoming articles and have a great time with Microsoft Azure.
To learn more about Microsoft apps and services, contact us at contact@abersoft.ca or 1-833-455-1850!
Please follow us here for regular updates: https://lnkd.in/gG9e4GD and check out our website https://abersoft.ca/ for more information!
Brought to you by Dr. Ware, Microsoft Office 365 Silver Partner, Charleston SC.


Recent Comments