This article is contributed. See the original author and article here.
Enhancing User Experience with Timely Responses
Building a conversational bot using Azure Bot Composer offers a myriad of possibilities to create a seamless and engaging user experience. One such feature that can significantly enhance user interaction is introducing a custom delay between two messages. This small yet impactful addition can mimic human-like pauses, making conversations feel more natural and thoughtful.
This blog will guide you through the steps to introduce custom delays between messages in Azure Bot Composer.
Why Introduce a Delay?
Introducing delays between messages can serve several purposes:
- Natural Flow: Mimics human conversation, making interactions feel less robotic.
- Attention Management: Gives users time to read and process information before moving on to the next message.
- Contextual Relevance: Helps in maintaining the context, especially in scenarios where the bot provides detailed explanations or instructions.
- Expected wait time : It often happens that we might want to make an outbound call from Azure bot composer to outside and fetch a response back, it might also need some time to get the desired response, for example when we would like to fetch a token in return, in such scenarios we would like to introduce intentional delay
Setting Up Azure Bot Composer
Before we dive into introducing custom delays, ensure you have Azure Bot Composer installed and set up. You can download it from the official GitHub repository and follow the installation instructions provided.
Install Composer
Step-by-Step Guide to Introduce Custom Delays
Step 1: Open Your Bot Project
Launch Azure Bot Composer and open your existing bot project or create a new one. Navigate to the dialog where you want to introduce the delay.
Step 2: Add a New Action
Within your dialog, click on the ‘+ Add’ button to insert a new action. From the list of available actions, select ‘Send a response’. This is the message you want to introduce the delay.
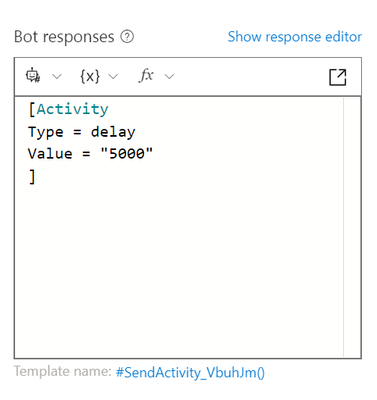
[Activity
Type = delay
Value = "5000"
]
Make sure to add this code as JSON, by clicking on view source code and then add above, it should look like :
Enter the message text you want to send after the delay. This could be any text, such as a follow-up question or additional information.
By default, the typing activity lasts for a short duration. To customize the delay, you can adjust the duration of the typing activity. Click on the typing activity and set the desired duration (in milliseconds) in the properties pane. For example, setting it to 3000 milliseconds will introduce a 3-second delay. Make sure to keep this value below 15 secs.
Step 3: Test Your Bot
Once you have configured the delay and follow-up message, it’s time to test your bot. Click on the ‘Test in Emulator’ button to launch the Bot Framework Emulator. Interact with your bot to ensure that the delay is working as expected, and the messages are being sent in the correct sequence.
Conclusion
Introducing custom delays between messages in Azure Bot Composer is a simple yet powerful way to enhance user experience. By following the steps outlined in this guide, you can create more natural and engaging conversations that keep users interested and informed.
Brought to you by Dr. Ware, Microsoft Office 365 Silver Partner, Charleston SC.

Recent Comments