This article is contributed. See the original author and article here.
Automating the deployment and configuration of Warehouse Management can be more efficient for big-scale deployments if you have a lot of devices to manage. One solution for this is using a mobile device management (MDM) solution such as Microsoft Intune, but not limited to it. To learn general information about using Intune to add apps, refer to the guide Add apps to Microsoft Intune.
Mobile Device Management (MDM) Perquisites
This article provides a demonstration of the practical deployment with Intune. It is imperative to ensure the availability of the following resources:
- Microsoft account, Google Account
- Azure Active Directory (Azure AD Premium P2 license)
- Microsoft Endpoint Manager admin center (aka Intune website)
- Certificate connector
- PFXImport Powershell and Visual Studio 2022
- Dedicated Windows PC for Certificate connector
- Warehouse Management app Connections.json
- Warehouse Management app Certificate for CBA
Setting up Warehouse Management app in
Endpoint Manager
Each MDM solution offers several methods for delivering an application to end devices, including delivering app binaries or from app stores. The preferred delivery method is through app stores, as it is simple and offers the most convenient way to receive updates.
Here is an example of how to configure it on Intune portal.
Android
Add the Warehouse Management app with Add button in the Apps -> Android section.

Select app type as Managed Google Play app. Use your Google account to log into Google Play, it requests only once the first time. In the window that opens, find Warehouse Management then click the Approve button and then the Sync button.

In the list of applications, select Warehouse Management, in the page that opens, select Assignments -> Edit.

On the assignments page, select the user groups for which this application is intended and save.

Windows
The setup process for Windows apps is like Android, except for selecting an app from the Microsoft Store.
Add a new app with Add button in the Apps -> Microsoft Store app (new).

Search for Warehouse Management

Apply user assignments.

Managed Configuration
The Warehouse Management app (available from version 2.0.41.0+) enables connection settings to be import as a managed configuration through an MDM solution, and the same ConnectionsJson configuration key is shared across all platforms.
As a prerequisite, you must have connection JSON file, described in the Create a connection settings file or QR code section.

Remember that it is necessary to have a single connection set as the default (IsDefaultConnection=true) for the first time the application instantly connects to the backend. If this is not done, the user will have to manually choose the initial connection from the available options.
Here is an example of how to configure it on Intune portal.
Android
On the Apps tab, select App Configuration policies -> Managed devices.

Define a name, platform, profile, and app.

To create an app configuration policy, you need to grant the following permissions: Camera, External storage (write), and External storage (read). Then, add a configuration key and choose the ConnectionsJson option from the dialog box that appears. Insert the contents of the Connections.json file as the value of the ConnectionsJson key. Finally, proceed to the subsequent steps and assign the relevant user groups.

Windows
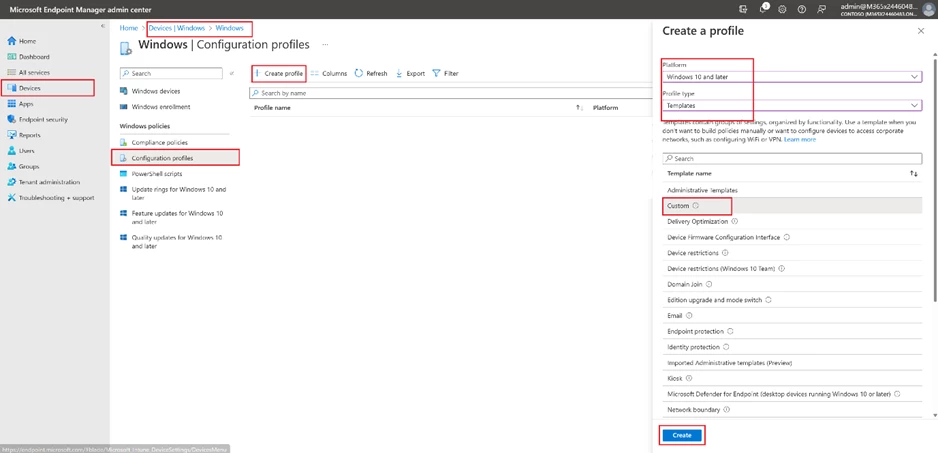
The Warehouse Managed for Windows requires a slightly different approach to deliver managed configuration. Navigate to the Devices section and choose Windows. This is where you will be able to view your Windows devices. Then, move to the Configuration Profiles section and create a custom profile by using templates for the Windows 10 platform.
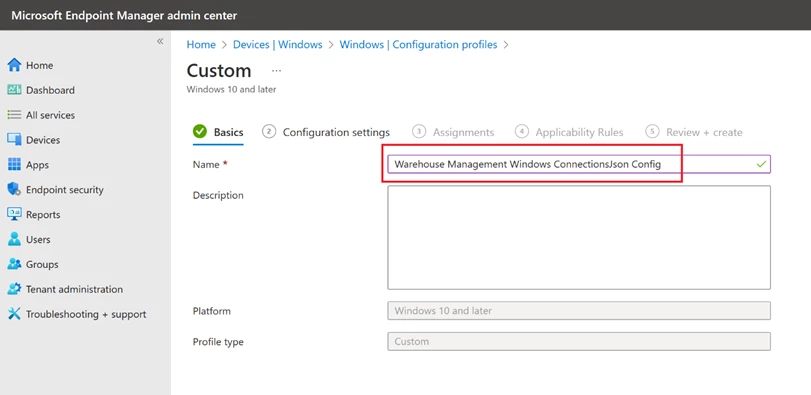
Define a name.
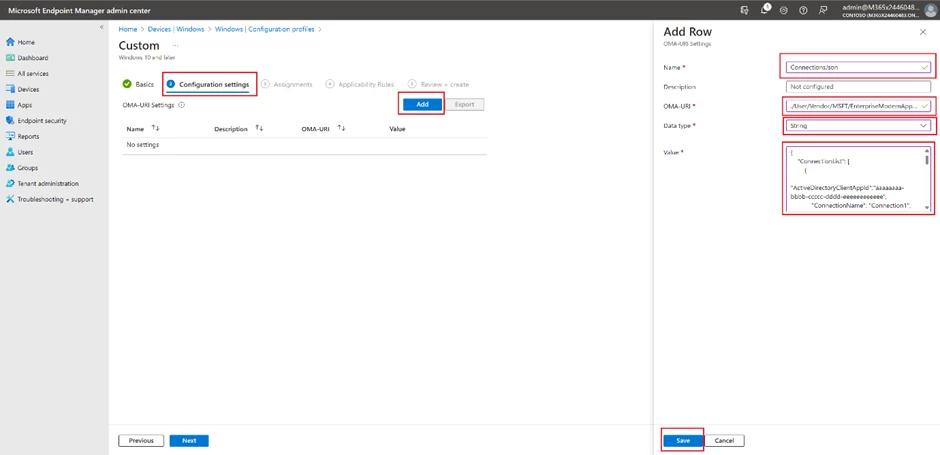
In the Configuration settings step, add a new OMA-URI Setting and complete all necessary fields. Enter “./User/Vendor/MSFT/EnterpriseModernAppManagement/AppManagement/AppStore/Microsoft.WarehouseManagement_8wekyb3d8bbwe/AppSettingPolicy/ConnectionsJson” in the OMA-URI field and insert the contents of your Connections.json file in the Value field. Finally, proceed to the subsequent steps and assign the relevant user groups.
Certificate-based authentication
Certificate-based authentication is widely used for secure and efficient method of authentication. In mass deployment scenarios, it is advantageous due to its ability to provide a secure access alongside the simplicity of certificate deployment to end devices. This helps in reducing the risk of security breaches, which can be a significant concern in large-scale deployments.
To use the Warehouse Management mobile app, you need to have the certificate stored on each device. If you’re using Intune to manage your devices, you can find additional instructions on how to handle certificates for authentication in the Use certificates for authentication in Microsoft Intune guide.
To utilize a Certificate-based authentication approach, you must obtain a self-signed certificate (.pfx) either through the Windows Server Certificate Authority or by using PowerShell. It’s important to ensure that the certificate is exported along with its private key and protected by a password.
The objective is to transfer the PFX certificate (.pfx) with the thumbprint specified in the ConnectionsJson to the target devices. To achieve this, utilize the PKCS imported certificate configuration profile, as it enables the delivery of the same certificate across devices.
Certificate import
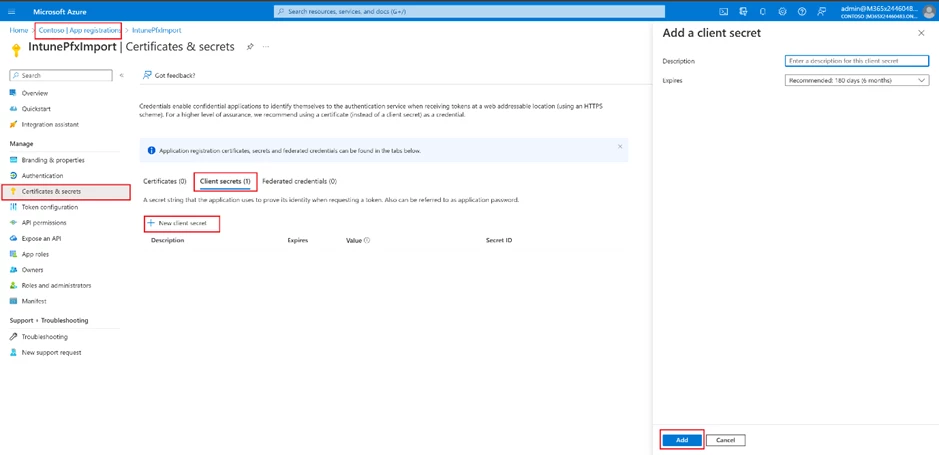
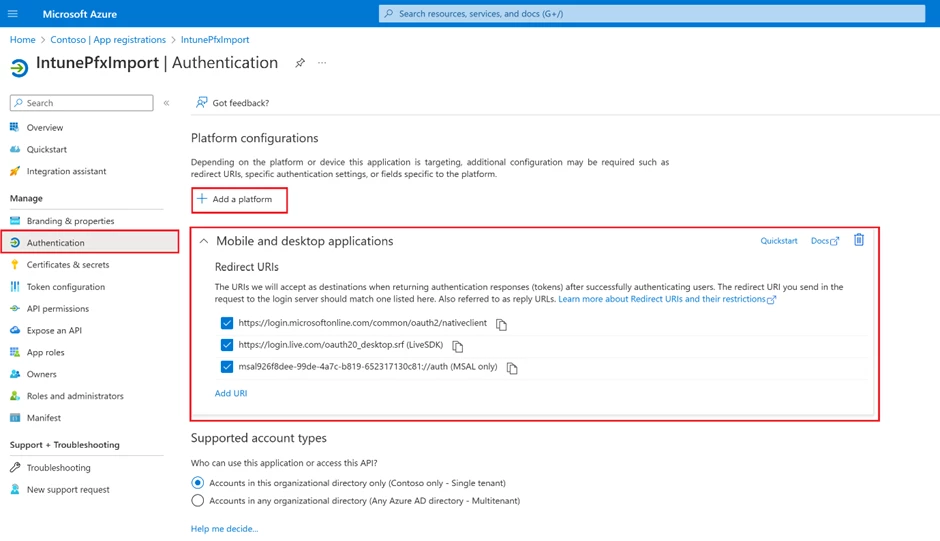
Create App registration in Azure Active Directory for PFXImport Powershell
Create new client secret on Certificates & secrets tab.
Add and configure Mobile and desktop applications on Authentication tab.
Build PFXImport
Download Visual Studio 2022.
Download PFXImport Powershell Project from GitHub.
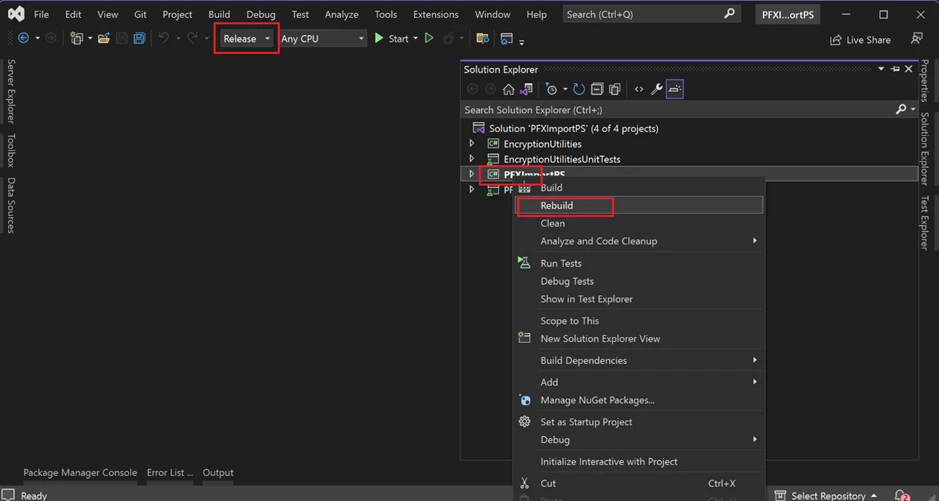
Open PFXImportPS.sln file, switch it to release mode, and build the project. You can find additional information by following the link.
Dedicated machine for Certificate Connector
Start up the designated machine and carry out all subsequent actions on it.
Copy your self-signed PXF certificate to the Certificate Connector machine.
Copy the project binaries to the machine. (~Intune-Resource-Access-developsrcPFXImportPowershellPFXImportPSbinRelease)
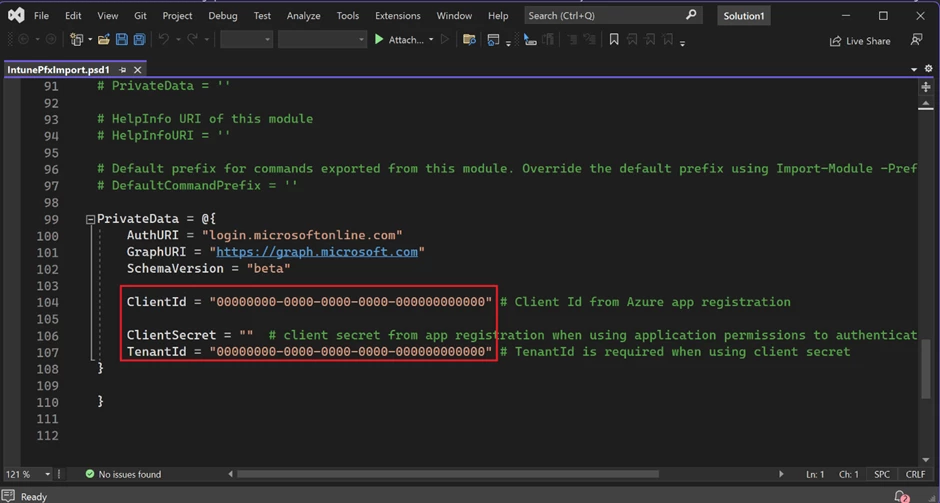
Modify IntunePfxImport.psd1 in Release folder file with data from App registration.
To install the Microsoft Intune Certificate Connector, locate the installation file under the Tenant administration tab in the Endpoint Manager.
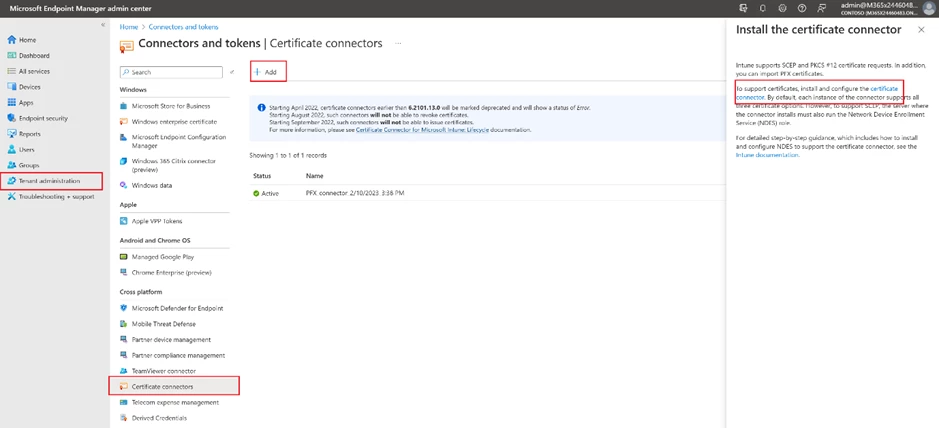
To install the Certificate Connector, transfer the installation file to the designated machine where it will be used and then run the file. During the installation process, be sure to select the “PKCS imported certificates” checkbox. Then sign into your Azure AD account using an admin user. As a result of successful installation, you will see a green checkmark on the Endpoint Manager page. You can find additional information by following the link.
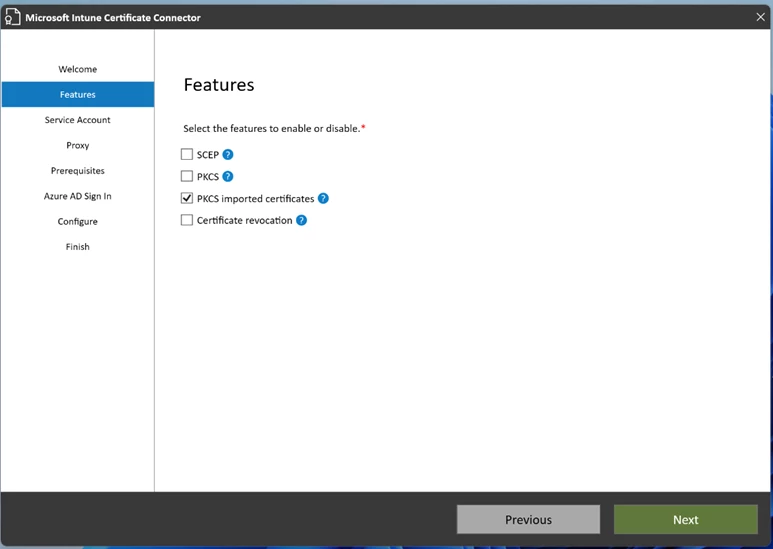
Import certificate with PFXImport Powershell
Run Powershell Terminal as administrator on the Certificate Connector machine.
Change folder to PFXImportPowershell release folder.
Run the following commands in the given sequence.
- Import-Module .IntunePfxImport.psd1
- Set-IntuneAuthenticationToken -AdminUserName ““
- Add-IntuneKspKey -ProviderName “Microsoft Software Key Storage Provider” -KeyName “PFXEncryptionKey”
- $SecureFilePassword = ConvertTo-SecureString -String “” -AsPlainText -Force
- $UserPFXObject = New-IntuneUserPfxCertificate -PathToPfxFile “C:.pfx” $SecureFilePassword “<END_USER@DOMAIN.COM>” “Microsoft Software Key Storage Provider” “PFXEncryptionKey” “smimeEncryption”
- Import-IntuneUserPfxCertificate -CertificateList $UserPFXObject
To deliver the certificate for additional end users, repeat steps 5 and 6 while including their logins.
Use the following command to validate the result.
Get-IntuneUserPfxCertificate -UserList “<END_USER@DOMAIN.COM>”
Additional information is available at the following link.
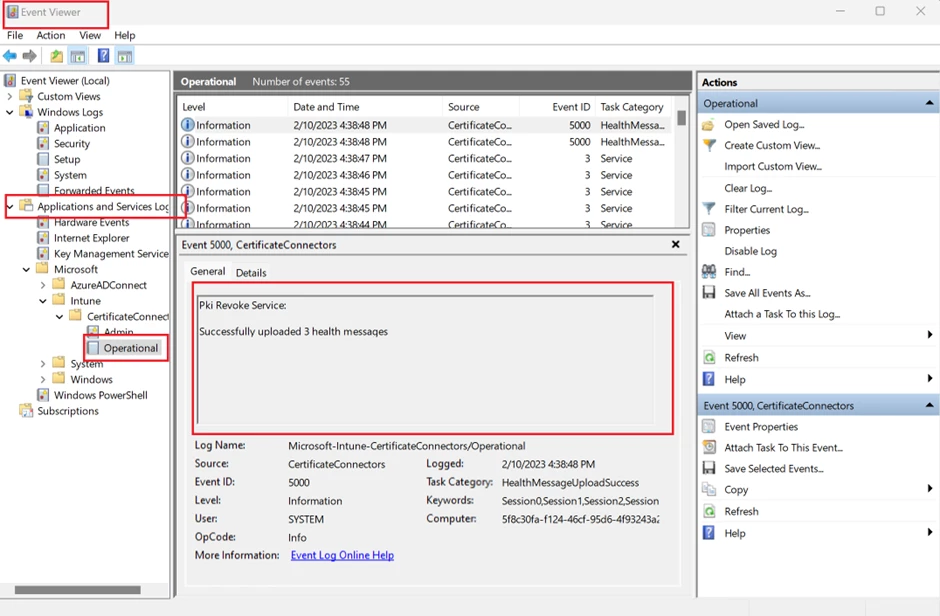
Troubleshooting: Use Windows Event Viewer to review the Certificate Connector logs.
Endpoint manager portal configurations
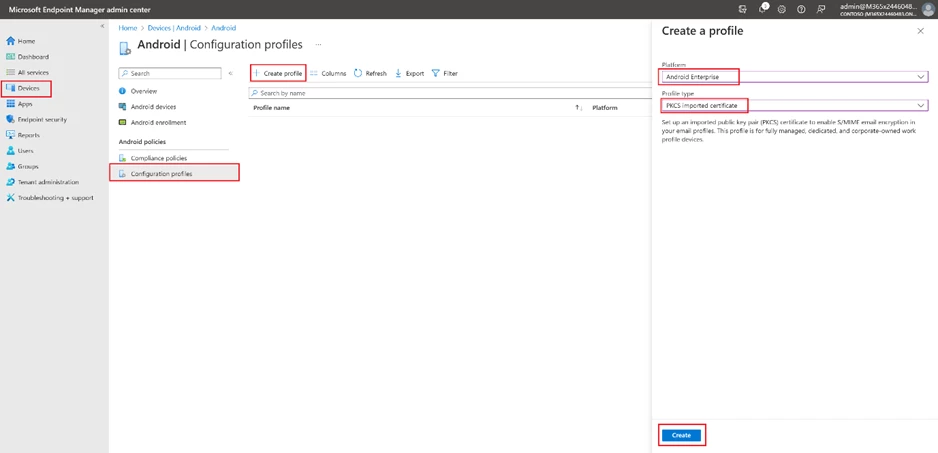
To create a new configuration profile, the process is the same across all platforms. Start by going to the Device tab, selecting the desired operating system, and clicking the “Create profile” button. Then, select “PKCS imported certificate” as the profile type (If the operating system is Android, also select the “Android Enterprise platform” option). Give the profile a name and description in the next step.
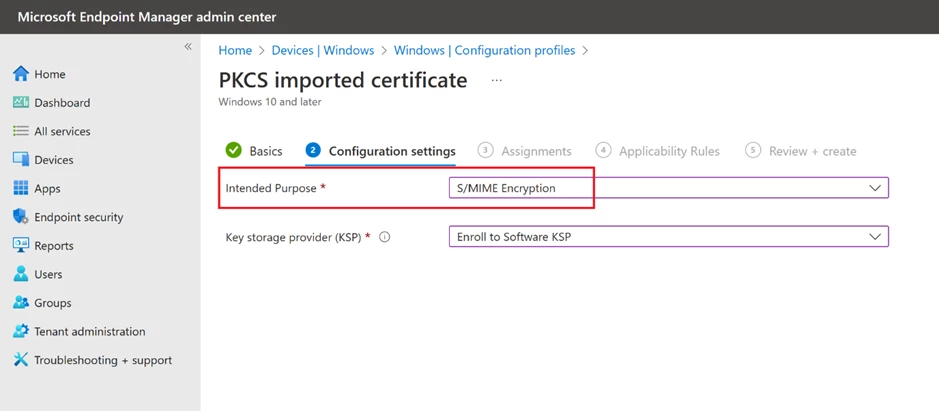
In the following step, choose “S/MIME Encryption” as the “Intended purpose” and finalize the process by assigning it to a user group (If the operating system is Windows, also select the “Enroll to Software KSP” option).
Use the configuration profile details page to validate the result.
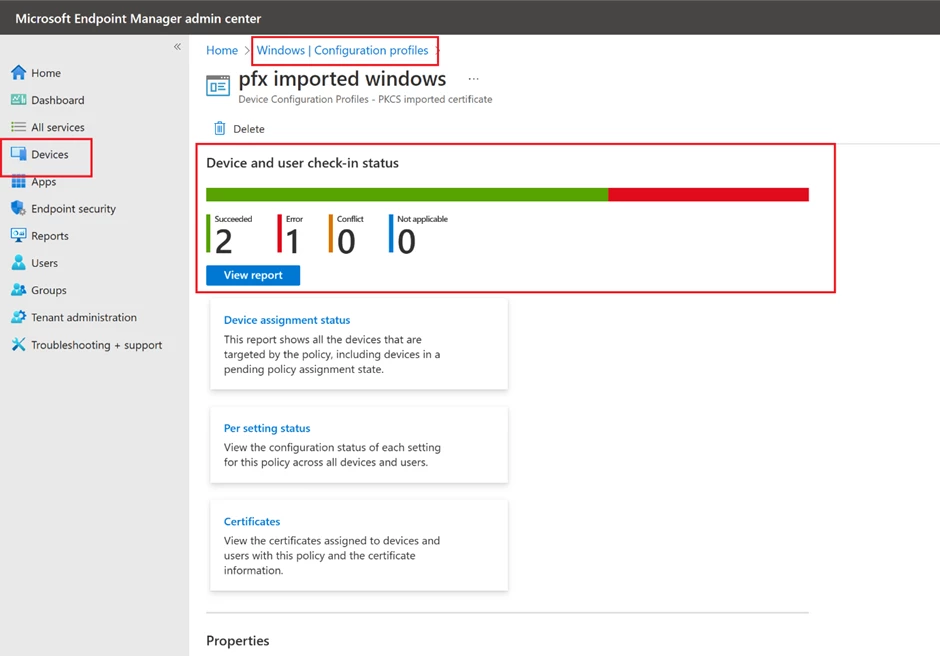
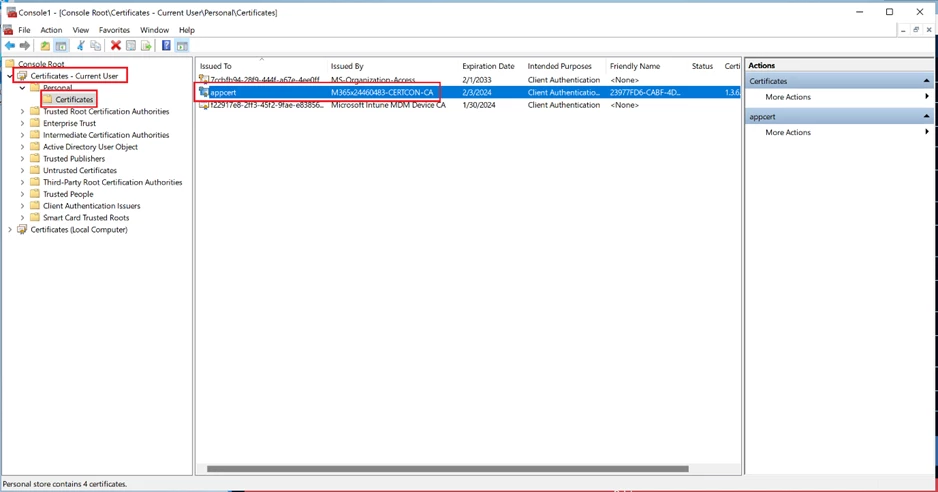
Another way to verify is to inspect the end devices. You can check the certificates using:
- the “Manage user certificates” option on Windows, or
- an app like “My certificates” to view installed certificates on Android. Please note, this app needs to be installed in the same way and the same work profile as Warehouse Management to access certificates distributed from Intune.
End Device Enrolment
Devices can be enrolled with the Company Portal app, depending on the type of device and platform, and these enrolment programs provide access to work or school resources. Enrolment involves registering with Microsoft Intune and applying organizational policies for security. The Company Portal app is accessible on multiple devices.
Android
You must install the Intune Company Portal app and log in to your company account.
Windows
Windows has several options to setup end user devices.
- With the Intune Company Portal app
- Login into “Access -> Access work” or school and login into “Accounts -> Email & accounts -> Add a work or school account” then reboot the device.
- Other options
Not yet a Supply Chain Management customer? Take a guided tour.
The post How to mass deploy Dynamics 365 Warehouse Management – Mobile App appeared first on Microsoft Dynamics 365 Blog.
Brought to you by Dr. Ware, Microsoft Office 365 Silver Partner, Charleston SC.


Recent Comments