This article is contributed. See the original author and article here.
Scenario:
In the browser, if you send a request to your Azure API management service, sometimes you might get the CORS error, detailed error message like:
Access to XMLHttpRequest at ‘https://xxxxx.azure-api.net/123/test’ from origin ‘https:// xxxxx.developer.azure-api.net’ has been blocked by CORS policy: No ‘Access-Control-Allow-Origin’ header is present on the requested resource.

This blog is intended to wrap-up the background knowledge and provide a troubleshooting guide for the CORS error in Azure API Management service.
Background Information:
What is CORS?
https://developer.mozilla.org/en-US/docs/Web/HTTP/CORS
Cross-Origin Resource Sharing (CORS) is an HTTP-header based mechanism that allows a server to indicate any other origins (domain, scheme, or port) than its own from which a browser should permit loading of resources.
An example in my case, when I try to test one of my API in my APIM developer portal. My developer portal ‘https://coolhailey.azure-api.net’ uses XMLHttpRequest to make a request for my APIM service ‘https://coolhailey.developer.azure-api.net’, two different domains.
How does CORS work?
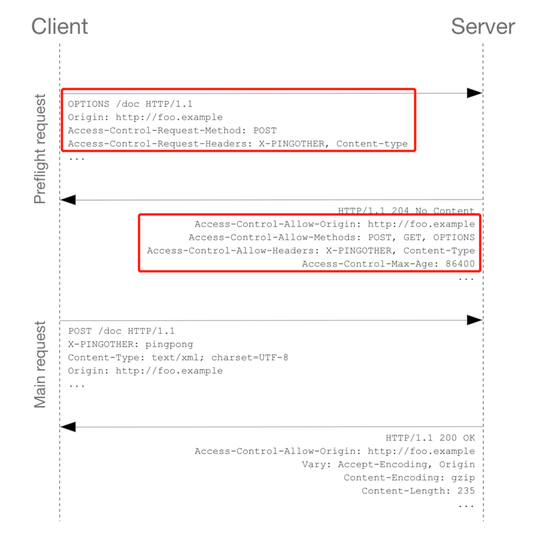
CORS relies on a mechanism by which browsers make a “preflight” request to the server hosting the cross-origin resource, in order to check that the server will permit the actual request. In that preflight, the browser sends headers that indicate the HTTP method and headers that will be used in the actual request. https://developer.mozilla.org/en-US/docs/Web/HTTP/CORS#preflighted_requests
Preflight: “preflighted” requests the browser first sends an HTTP request using the OPTIONS method to the resource on the other origin, in order to determine if the actual request is safe to send. Cross-site requests are preflighted like this since they may have implications to user data.
An example of valid CORS workflow:
Step 1: There will be an Options request first.
In the request header, the ‘Access-Control-Request-Headers’ and ‘Access-Control-Request-Method’ has been added.
Please pay attention to the response header: Access-Control-Allow-Origin. You might need to make sure the request origin URL has been added here. In my case, I am sending a request from my developer portal, so ‘https://coolhailey.developer.azure-api.net‘ needs to be added to the Access-Control-Allow-Origin field.
Then go to the real request, step 2.

Step 2: The real request starts.

Troubleshooting:
To troubleshoot the CORS issue with the APIM service, usually we need to prepare ourselves with the following aspects.
Checking if you have the CORS policy added to the inbound policy
You will need to navigate to the inbound policy and check if you have this <cors> element added.
Some example as the snapshot below:

here is a document for the CORS policy in APIM service
Understanding how CORS policy work in different scopes
If you have been using APIM policy before, you will notice that CORS policy can be added into the global level(All APIs) or the specific API level(An operation), which means that there are policies in APIs and there are also policies in specific operations. How does these policies work in different scopes?
The answer is that specific APIs and operations inherited the policies from their parent APIs, by using the <base/> element. By default, the <base/> element is added to all the sub APIs and operations. However by manually removing the <base/> from specific APIs and operations, the policies from the parent APIs won’t be inherited.
A default policy for an API and operation:

Calculating Effective Policies
We can use the tool ‘Calculate effective policy’, to get the current effective policies for a specific API/operation.
Navigate to the inbound policy for the specific API or operation, you will find the ‘Calculate effective policy’ button on the bottom right. Snapshot below:

Clicking on the botton, and choose the product you want to check, then you will find all the effective policies for the current API/Operation.

Common Scenarios:
Scenario 1: no <cors> policy enabled
If you want to apply the cors policy into the global level, you can add the <cors> policy at the ‘All APIs’ level.
In the allowed origins section, please make sure the origin URL which will call your APIM service, has been added.
<cors allow-credentials="true">
<allowed-origins>
<origin>the origin url</origin>
</allowed-origins>
<allowed-methods preflight-result-max-age="300">
<method>*</method>
</allowed-methods>
<allowed-headers>
<header>*</header>
</allowed-headers>
<expose-headers>
<header>*</header>
</expose-headers>
</cors>

In some cases, you may only want to apply <cors> policy to the API or Operation level. In this case, you will need to navigate to the API or Operation, add the <cors> policy into the inbound policy there.
Scenario 2: missing the <base> element into the inbound policyat different scopes
If you have enabled the <cors> policy at the global level, you would suppose all the child APIs or operations can work with cross region requests properly. However, things are not as expected if you’ve missed the <base> element for one of the child level policy.
For example, I have <cors> at the global level enabled, but for the ‘Get Test call’ Operation, the cors is not working.


In this case, your need to check the inbound policy for this specific Operation ‘Get Test call’ , and see if you have the <base> element here. If no, you will need to add it back into the inbound policy.

At the same time, you will need to check the inbound policy at the API level, which you can click the ‘All operations’, and make sure the <base> element is added at this different scope.

In my case, I find that I am missing the <base> element in the ‘Test API’ level, so my solution would be adding the <base> element here.
Scenario 3: <cors> policy after other policies
In the inbound policy, if you have other policies before the <cors> policy, you might also get the CORS error.
For example, in my scenario, navigate to the effective policy for the operation, there is a <rate-limit> policy right before the <cors> policy. The CORS setting won’t work as expected, since the rate-limit policy will be executed first. Even though I have <cors>, but it cannot work effectively.

In this case, I need to change the order of the inbound policy and make sure the <cors> is at the very beginning of my inbound policy, so that it will be executed first.
Scenario 4: product level CORS setting
Your product level policy setting can also affect your <cors> policy.
Please be noted that: when CORS policy applied at the product level, it only works when subscription keys are passed in query strings.
For one of my API, when I navigate to the calculate effective policies, and if I choose different Products, the inbound policies are completely different.
- When I choose Contoso product, I see <cors> setting working fine.

- However, when I choose a different product ‘Starter’, I have <rate-limit> and <quota> setting at the product level. These rate limit policies will be executed before the <cors> policy, which will result in the CORS error when I reach to the rate limit. This is actually a fake CORS error message, since the real problem comes with the rate limit.

- To avoid this kind of fake CORS error, you can navigate to the Starter product, and go to the Policies blade, then change the order of the inbound policies.
In my case, I just moved the <base/> element to the beganing of the inbound policy.

Brought to you by Dr. Ware, Microsoft Office 365 Silver Partner, Charleston SC.

Recent Comments