This article is contributed. See the original author and article here.
You’re about to kick-off another exciting project, this time you and your team will be working for the first time in a cloud based data solution using Azure Synapse Analytics. You want to benefit from your team’s past experience when deploying data solutions on-premises: to use DevOps as a preferred software development methodology, and to use three distinct environments: a Development environment that will serve as a playground, where features can be built, experimented and enhanced as needed; then an intermediate environment, UAT, where it is expected that all these features can be tested as a whole, integrated with other applications, quality ensured and approved by end users; last, a Production environment, where these features can be approved and exposed to users and applications.
In this article we are going to demonstrate how you can use Azure Synapse Analytics integrated with an Azure DevOps Git repository to achieve these goals.
Before you Start…
…make sure you have provisioned and configured the following Azure resources in your local environment:
Azure DevOps
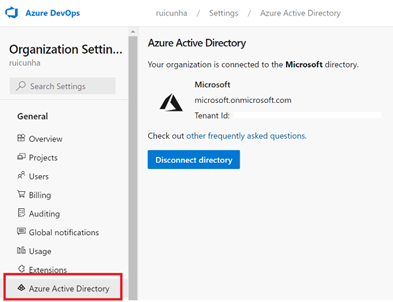
- Make sure you have an Azure DevOps Organization (https://aex.dev.azure.com/) that is connected to your Tenant’s AAD:
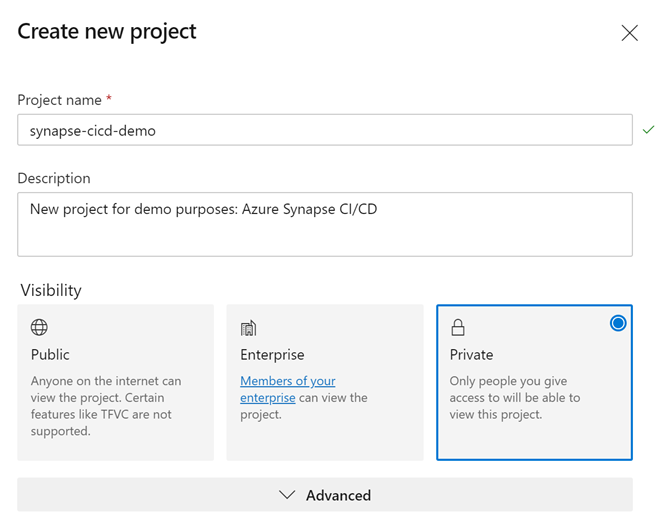
- Create a new project under your Azure DevOps Organization. Name the project “synapse-cicd-demo” and for demonstration purposes, keep the project visibility as “Private”. Select “Create” to provision your new project.
- Make sure you have installed the “Synapse Workspace Deployment” Microsoft extension in your Azure DevOps Organization. You can check this by navigating to your “Azure DevOps” home page and by clicking on “Organization settings” on the bottom left corner. From the left-menu , under “General” select “Extensions“. Look under the “Installed” extensions. If you don’t have the Synapse Workspace Deployment extension installed, just hit the “Browse Marketplace” button and search for “Synapse Workspace Deployment” (include double quotes in the search bar to narrow your search). Follow the installation instructions.
Azure Resource Groups
Create one Resource Group per environment, to logically hold and isolate the provisioned resources (DEV, UAT and PRD).
For each Resource Group, provide the following configuration values :
Resource Group Name: rg-cicddemo-<env_suffix>
Region: *Choose the region that is right for you
Azure Synapse Workspace
Create one Azure Synapse Workspace per environment (DEV, UAT and PRD). For each instance of Synapse Workspace, provide the following configuration values :
Workspace Name: syn-cicddemo-workspace-<env_suffix>
Resource Group: rg-cicddemo-<env_suffix>
Managed Resource Group: mrg-cicddemo-<env_suffix>
ADLS Gen2 Account Name: dlscicddemo<env_suffix>
File system name: fs-dlscicddemo-<env_suffix>
Important Note: When provisioning the Azure Synapse Workspace, keep the “Assign myself the Storage Blob Data Contributor role on the Data Lake Storage Gen2 account to interactively query it in the workspace.” option checked.

Storage Accounts
Create one ADLS Gen2 Storage Account per environment (DEV, UAT and PRD). For each instance, provide the following configuration values:
Resource Group: rg-cicddemo-<env_suffix>
Storage Account Name: stgcicddemo<env_suffix>
Performance: Standard
Account Kind: Storage V2
Replication: LRS

Azure Key Vault
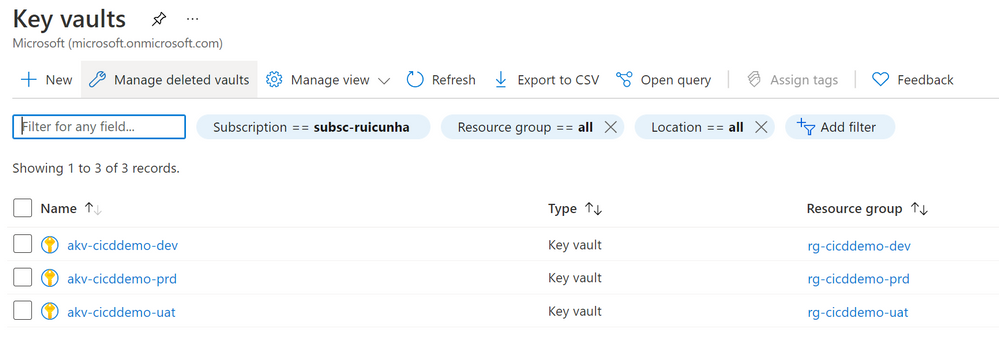
Create one instance of Azure Key Vault per environment (DEV, UAT and PRD).For each Key Vault instance, provide the following configuration values:
Resource Group: rg-cicddemo-<env_suffix>
Key vault Name: akv-cicddemo-<env_suffix>
Permission Model: Vault access policy
Add a new access policy:
Configure from template: Key & Secret Management
Key Permissions: Select only “Get” & “List”
Secret Permissions: Select only “Get” & “List”
Select principal: Select the Synapse Workspace principal “syn-cicddemo-workspace-<env_suffix>”
Add a new secret:
Upload options: Manual
Name: adls-blob-key
Value: Paste the connection string to your storage account stgcicddemo<env_suffix>.
Note:To obtain the connection string, navigate to the storage account resource page and under Settings, select “Access Keys“.
Select “Show keys” and copy the “Connection String” value under “Key1“.

Step 1 : Setup your code repository in Synapse Workspace
Before you proceed with your Synapse artifacts creation, you need to setup the Workspace code repository. Make sure you perform all the actions below using your Development Synapse Workspace only. The UAT and Production environments are Live Synapse Workspaces, they don’t need to be integrated with your Git Repository as changes to the features code are only made in the development workspace.
Follow these steps to start configuring your code repository:
- In your “syn-cicddemo-workspace-dev” Synapse Workspace, navigate to the “Manage Hub” and under “Source Control” select “Git Configuration“.
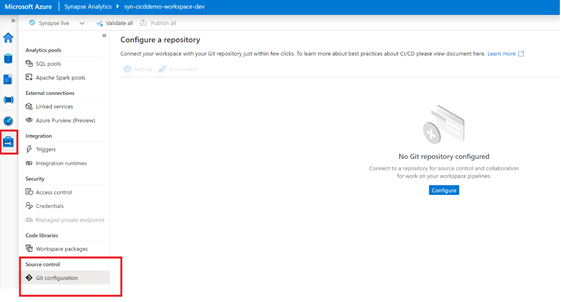
- Select “Configure” to start the configuration process.
- Select “Azure DevOps Git” as the Repository type and then select your Azure Active Directory. Hit the “Continue” button.
- Provide your “Azure DevOps organization name” , your “Project name” and your “Repository name” (both as “synapse-cicd-demo).
- When prompted for the “Collaboration Branch”, create a new branch and name it “master”. Keep the Publish branch as “workspace_publish” and your Root folder as “/“.
Note: If you have any existing resources in the workspace you can import those resources to the master branch by checking the “Import existing resources to repository” option. Otherwise you can keep this option unchecked.
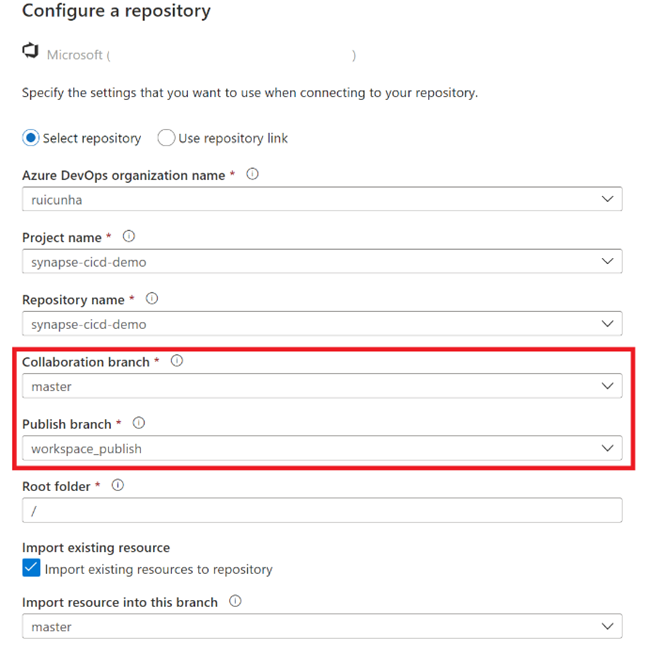
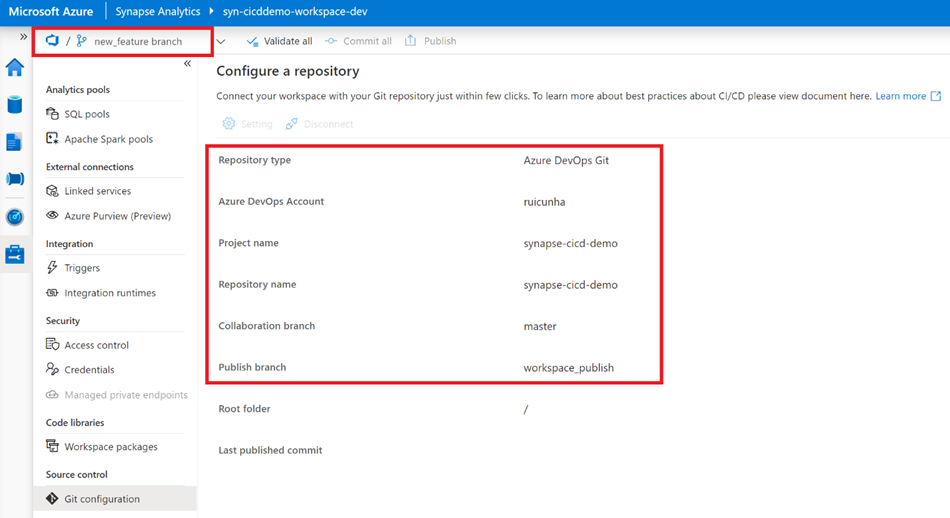
- Hit the “Apply” button to finish the repository configuration. When prompted to specify the working branch, choose to create a new branch as it will act as your new feature branch. As an example, you can name this working branch as “new_feature”. When you apply your settings you will end up with a similar configuration as below:
Step 2 : Create your artifacts in the Development Synapse Workspace
Now it’s time to have some artifacts created in the Development Workspace so they can be automatically deployed to the UAT environment and then to the Production environment. To achieve that, you need to perform the following steps:
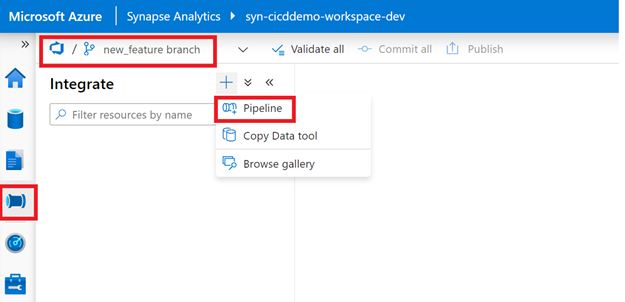
Important note: before you begin, make sure you are working under the “new_feature” branch.
- Navigate to the “Integrate” Hub and hit the (+) sign to create a new Pipeline.
- Rename the pipeline as “p_cicd_demo” and add a “Wait” activity just for demo purposes. When connected to a Git Repository you don’t need to publish your changes as you do in Synapse Live mode, you can commit (save) your changes by selecting “Commit”.
- Navigate to the “Manage Hub” and select “Linked Services” under “External Connections“. Create a new Linked Service and choose Azure Key Vault as the connector. Name your Linked Service as “LS_AKV” and specify the Base URL (you can get this URL from your Key Vault Overview page). Before you apply your changes, don’t forget to test your Linked Service connection.
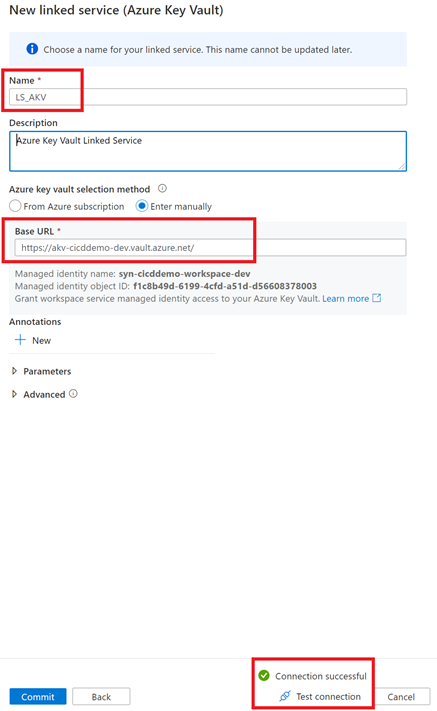
- The next step is to create a Linked Service to your storage account. Configure your Linked Service as follows:
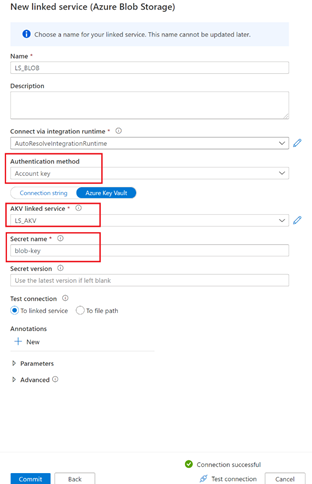
By completing this last step, you should have the following Workspace artifacts created in your “new_feature” branch ready to be delivered to the CI/CD Pipeline:
Pipeline: p_cicd_demo
Linked Services: LS_AKV (Azure Key Vault) and LS_BLOB (Azure Blob Storage)
Step 3 : CI/CD – Synapse Workspace
Now that you have created some Synapse Workspace artifacts to deploy, you need to shift your attention to the CI/CD aspect of Azure Synapse. First, you need to publish your new features into the collaboration branch (“master”) and deploy the ARM templates into the Azure DevOps Git repository (“workspace_publish” branch). These templates will be used to deploy your features in the UAT and PROD environments.
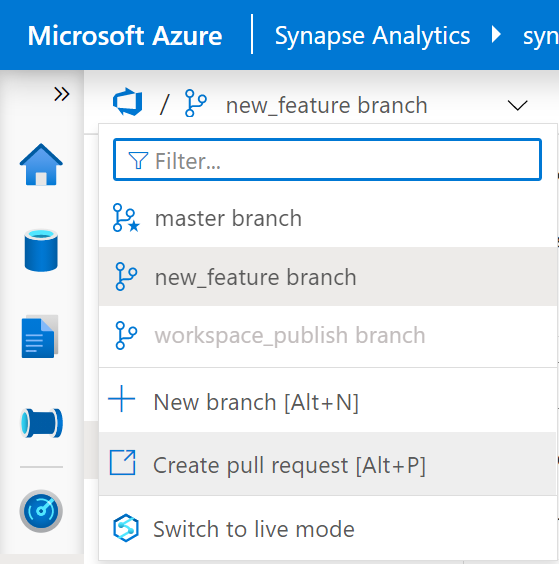
- Make sure you are using the “new_feature” branch and select “Create pull request”.
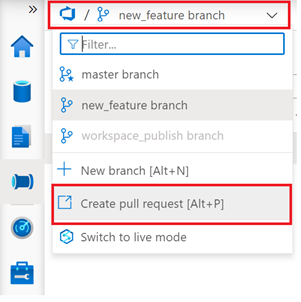
- You will be redirected to the “Pull Requests” page in your Azure DevOps project. Provide a title for your first pull request and then select “Create” .
- You can now proceed by (optionally) approving the pull request and by selecting “Complete” .
- Keep the default “Merge Type” settings as “Merge (no fast forward)” and select “Complete Merge”.
- After completing the pull request, it’s time to publish our changes to the Workspace and to generate and save the ARM templates in the publish branch (“workspace_publish”).
- Back to your Development Synapse Workpace, select the “master branch” and hit the “Publish” button.
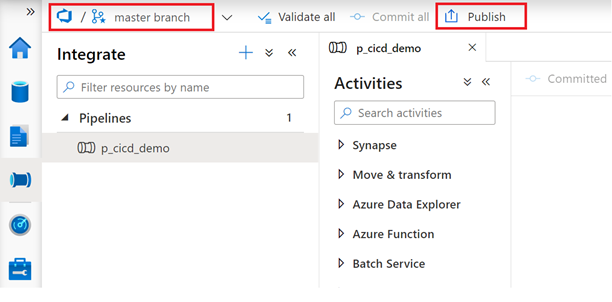
You can validate that your new artifacts are available in the workspace by switching to Synapse Live mode: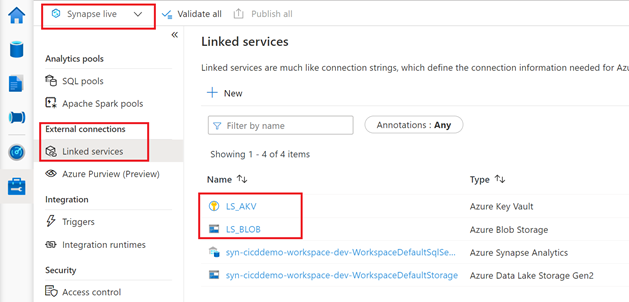
Step 4 : CI/CD – Azure DevOps
Now that you have your code in the Synapse Development Workspace ready to be deployed to a new target environment, it’s now time to prepare all the Azure DevOps configuration to automate this deployment.
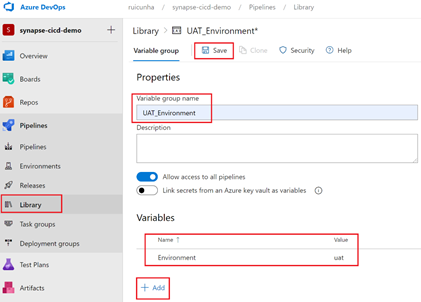
- Navigate to your Azure DevOps project page and from the left-menu, under “Pipelines“, select “Library“.
- Create two Variable Groups: one for UAT (UAT_Environment) and another one for PRD (PROD_Environment). During the configuration of these Variable Groups, add a new variable “Environment” and set the value as “uat” and “prd” respectively. Apply your changes by selecting “Save“.
- The next step is to create a Release Pipeline. From the left-menu, under “Pipelines“, select “Releases” and then select “New Pipeline“
- When prompted to “Select a template“, start with an “Empty Job” and then name the Stage 1 as “UAT“

- Select “Variables” tab and then select the “Pipeline variables” blade. As an example, you are going to add these variables below to your release pipeline. These variables are using the newly created Variable Group variable $(Environment) as it will be necessary when overriding template parameters during the deploy of the release to the target environment. Hit the “Save” button to apply your changes

- Now it’s time to add variable groups to our release pipeline. This is done by linking the Release Pipeline to the Variable Groups. In this case, you are going to link the new release pipeline to the “UAT_Environment” and “PROD_Environment” Variable Groups. Select the “Variable groups” tab.

- Hit the “Link variable group” button and select “UAT_Environment“. Under Variable group scope, select “Stages” and select the “UAT” stage. Select “Link” to apply your changes and then hit the “Save” action button to save your changes.
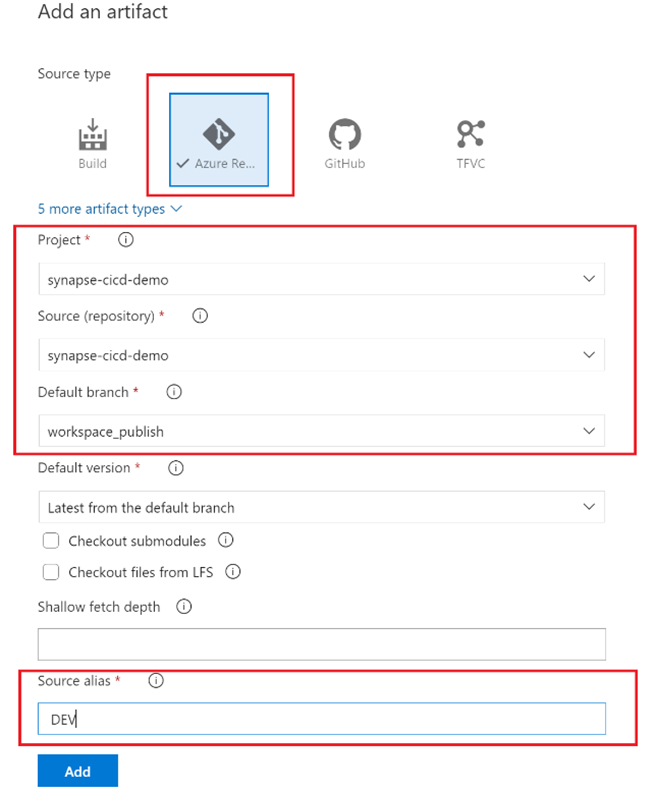
Note: You will link the “PRD_Environment” Variable Group later, when configuring the PRD stage. Just skip it for now. - Select the “Pipeline” tab and select “+ Add” to add an artifact to your Release Pipeline. Provide the following information and hit the “Add” to save your changes.
- To configure the “UAT” stage, select the “Tasks” tab. You are going to add a new task to the “Agent job“. Hit the “+” button to add a new task and then search for “Synapse Workspace Deployment“. Click on the Synapse task and select “Add” to add this extension to your Agent job.
- Under the “Agent job” blade, click on the “Synapse deployment task” and provide the following configuration settings:
Display Name: provide a name for your task
Template: specify your Workspace ARM template. Hit the (…) action button to navigate to your Artifact folder and select the “TemplateForWorkspace.json” file
Template parameters: repeat the same process as above, but now you have to select the “TemplateParametersForWorkspace.json” file
Synapse workspace connection type: provide your subscription (some authorization to configure an Azure service connection might be necessary so if that’s the case, hit the “Authorize” button.
Synapse workspace resource group: rg-cicddemo-$(Environment)
Synapse workspace name: syn-cicddemo-workspace-$(Environment)
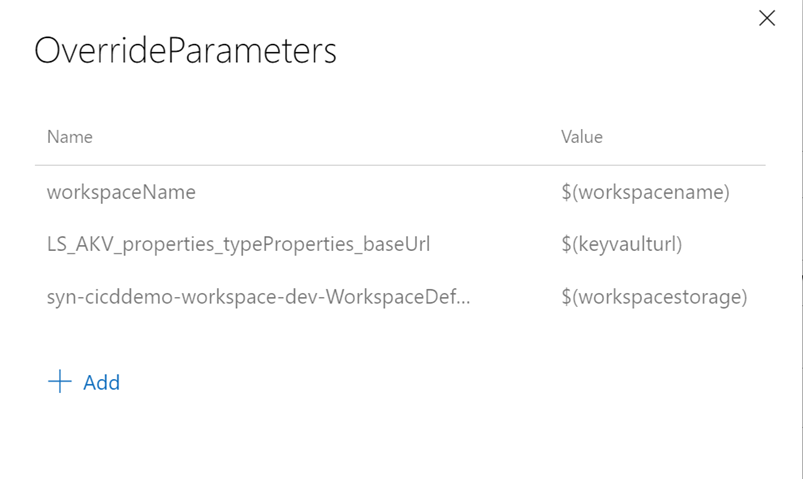
OverrideParameters: Specify any ARM parameters that you want to override when deploying from source to target environment. In this example, we will override the workspace name, the key vault URI and the workspace storage account URl. The parameter names can be found in workspace_publish branch (“TemplateParametersForWorkspace.json”).
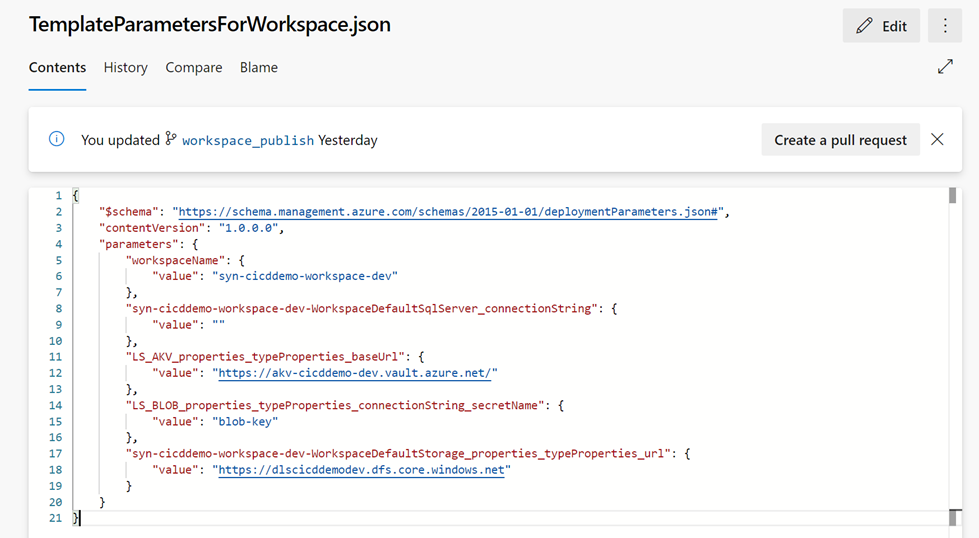
Important Notes:
$(workspacename) , $(keyvaulturl) and $(workspacestorage) : these are the Pipeline Variables you have creates in step 5.
$(Environment) is the Variable Group variable that you have created in step 2.
You don’t need to override the Blob Linked Service “LS_BLOB_properties_typeProperties_connectionString_secretName” parameter as the secret name “adls-blob-key” is the same for all environments (for example, it would be necessary to override this parameter if we had defined the secret name as adls-blob-key-dev for DEV, adls-blob-key-uat for UAT or adls-blob-key-prd for PROD). - Once you have completed the task configuration, from the upper right corner, hit the “Save” button and select “Create Release” to initiate the release deployment into the UAT environment.
- Click on the “UAT” stage and then select “Create” to create your new release. After creating your release, select “View Releases” and you should now see your new release “Release-1” under the “Releases” tab ready to be deployed. Now you can click on the “UAT” stage name under “Stages” header attribute.

- Hit the “Deploy” button to start the deploy of your release

- Keep track of the deploy progress by selecting the “Logs” tab. When the deploy gets finished, you can also download the logs for troubleshooting purposes. The deploy of your first release to the UAT Synapse Workspace will probably result in a similar error like shown in these figures:

Click on the error message above to expand the log window to get more details:
- Most likely this Authorization error is due to missing Synapse RBAC permissions in the target Synapse Workspace (UAT). You need to navigate to the UAT Synapse Workspace “Manage Hub“, select “Access Control” under “Security” and “+ Add” a role assignment to the Service Principal of Azure DevOps service.
- Select the “Synapse Artifact Publisher” role and then copy the Service Principal ID from the log error message and paste in the “Select user”. Make sure the Service principal is selected and then hit the “Apply” but to confirm your changes.
Important Note: To avoid facing a similar error when deploying to the PROD environment, you can repeat these Role Assignment steps in the PROD Synapse Workspace.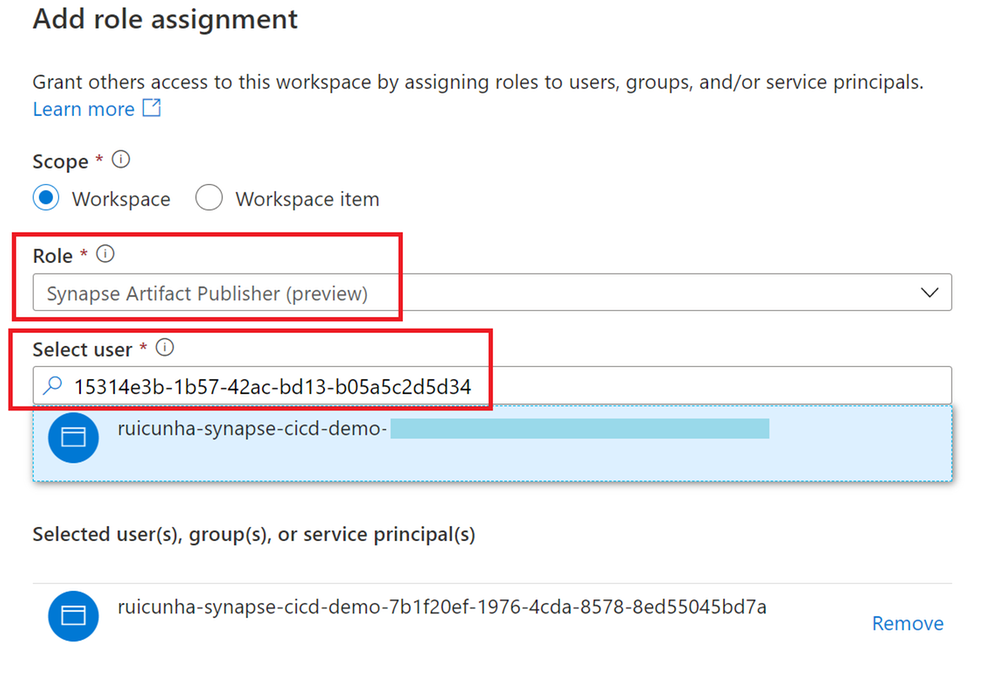
Back to the Azure DevOps Release page, we can hit again the “Deploy” button to redeploy the release. Check the “Logs” tab to confirm that all the steps were succeeded.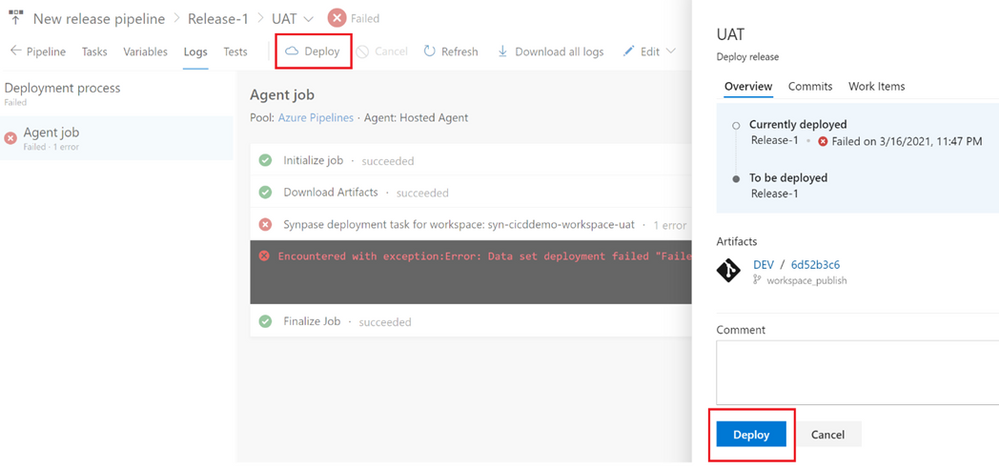

Step 5 : Validate your deploy in UAT Synapse Workspace
Now that your first release was successful, we need to validate the deployment to the UAT Synapse Workspace. Follow these steps:
- Use the Azure Portal to navigate to the UAT Synapse Workspace
- From the left-menu, select the “Integrate Hub” and confirm the deploy of the newly created pipeline “p_cicd_demo“
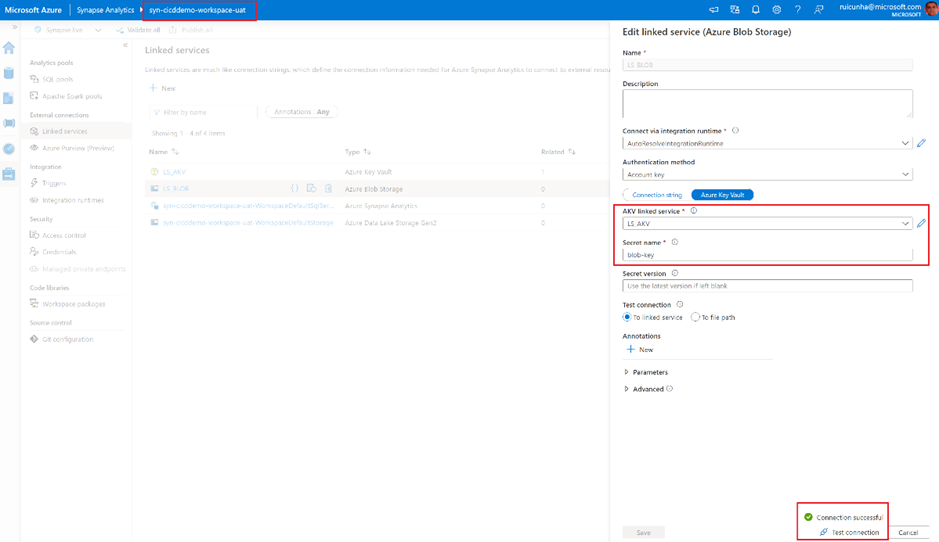
- Now select the “Manage Hub“, and confirm the deploy of the newly created Linked Services. Click on the Azure Key Vault Linked Service you will notice that the Base URL is now pointing to the UAT Key Vault address. Test your Linked Service connection to make sure everything is working as expected: you are connecting to the UAT Key Vault.
Step 6 : UAT Deploy Automation and Production release management
So far, you have successfully configured your DEV Synapse Workspace CI/CD integration and the manual release of your Synapse artifacts from the Development Environment to the UAT environment.
This step will help you automating the deploy of your Development features to the UAT environment and to have them manually approved and triggered to the final PROD environment:
- Navigate to your Azure DevOps Project, and from the left-menu, under “Pipelines“, select “Releases” and hit the “Edit” button to modify your “New release pipeline“
- Mouse over the UAT stage and hit the “Clone” icon to duplicate the UAT stage.
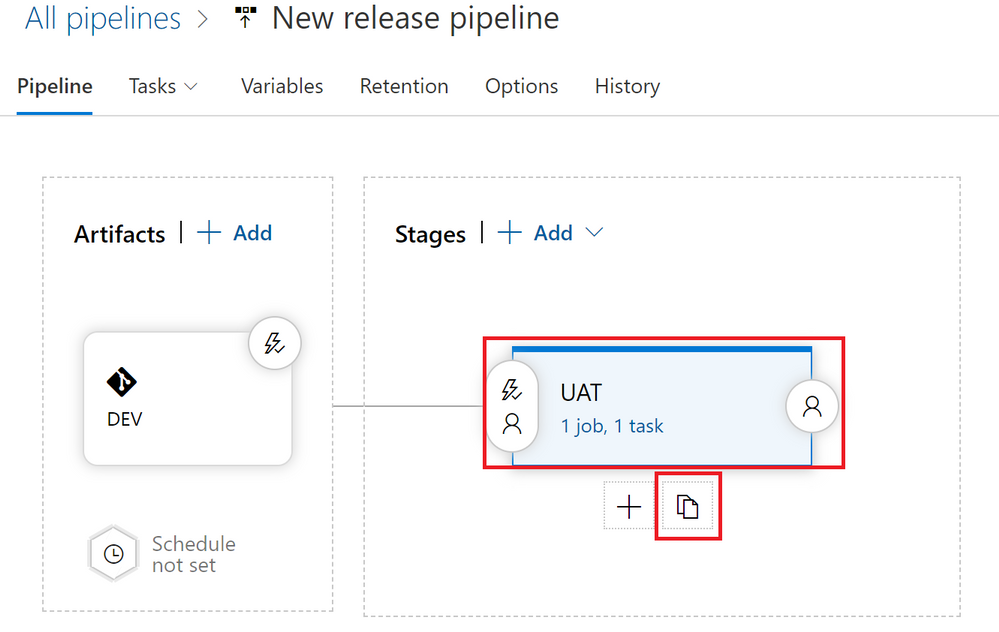
- Click on the “Copy of UAT” stage and rename it to “PROD“. Click on the “1 job, 1 task” link on the “PROD” stage.
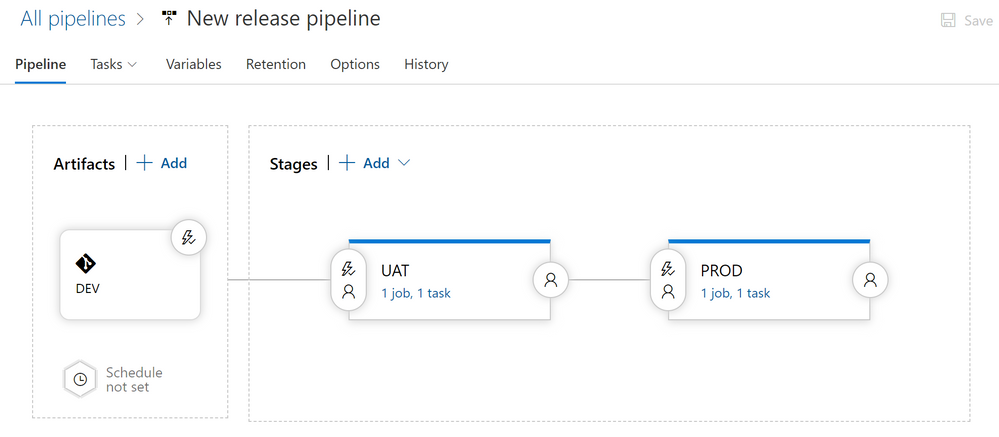
- Select the “Variables” tab and then select “Variable groups“. It’s now time to link the PRD_Environment variable group to the PROD stage. Hit the “Link variable group” button and select the “PRD_Environment” variable group. Make sure you select “PROD” stage under “Variable Group scope” option. Hit the “Link” button to apply your changes. Verify that the scope of each variable group is correct. To adjust the scope of your Variable Groups you just need to mouse over the Variable Group name and click the “More Actions…” button to modify the scope (figure below).

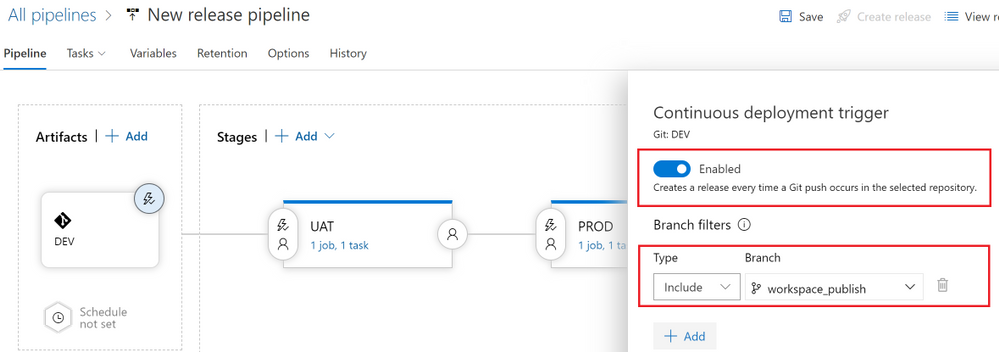
- Select the “Pipeline” tab. You are going to setup the deployment automation from DEV to UAT by clicking on the Thunderbolt icon on the “DEV” artifact (figure below).
- Enable the “Continuous deployment trigger” and under “Branch filters” select the “workspace_publish” branch. By doing this, a release to the UAT environment will be triggered only if there is a Git push that contains one or more commits to this branch. Hit the “Save” button to save your changes.
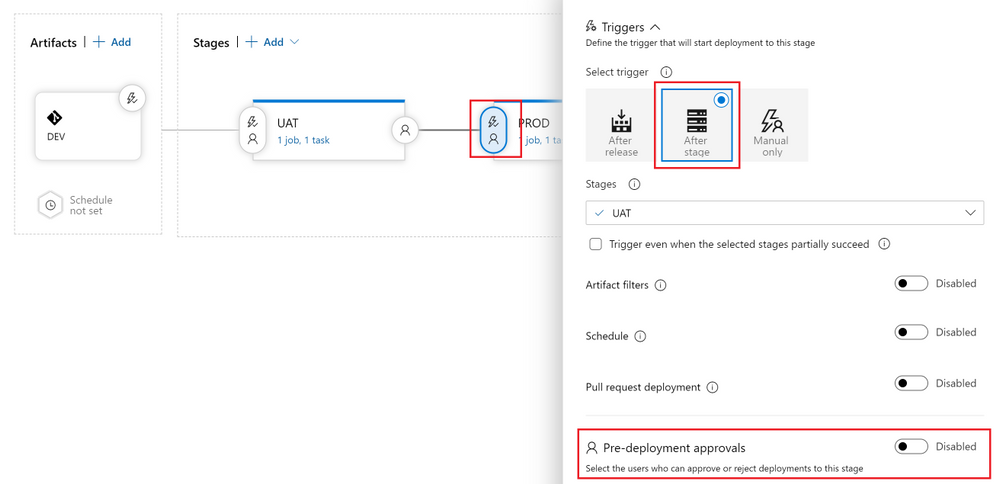
- Now click the “Pre-deployment conditions” icon on the “PROD” stage. To control the release to Production , in this example you will setup the user(s) (release manager(s)) responsible for approving or rejecting the deployment of your new features from UAT to PROD.
Under “Pre-deployment approvals“, specify the user(s) responsible for approving or rejecting the release to PROD environment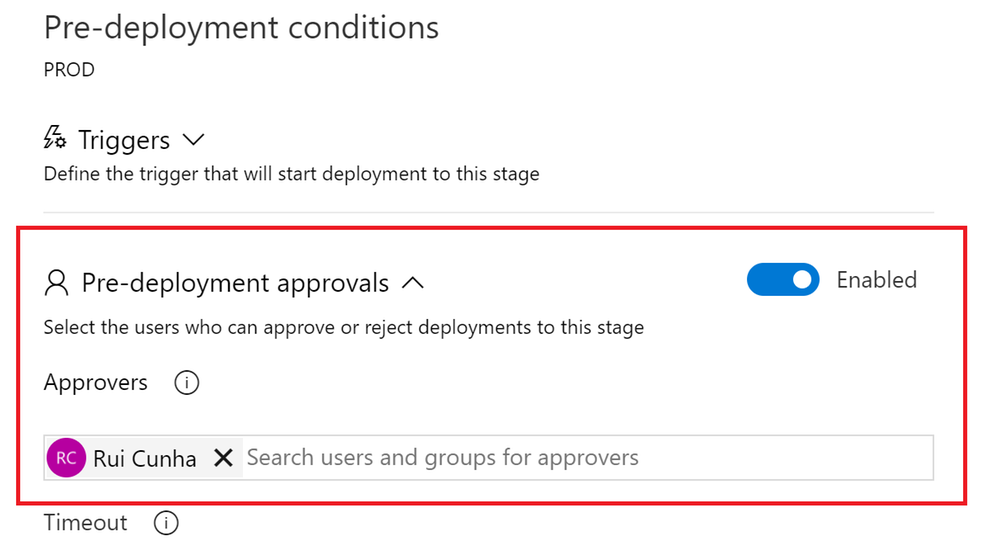
Close the “Pre-deployment conditions” form and select “Save” to apply your changes.
Step 7: End-to-End validation of your CI/CD pipeline
Now that you have configured your new release pipeline to deploy your DEV artifacts into UAT and PRD, it’s now time to make a final test and see how things work from an end-to-end perspective. As an example, execute the following actions:
- Open you DEV Synapse Workspace “syn-cicddemo-workspace-dev“, and make sure you select your “new_feature” branch. Edit you Azure Key Vault Linked Service. Type something like “This text will automatically appear in UAT and in PRD if manually approved” in the Linked Service description and save your changes.
- Select the option to create a new pull request:
- Select “Create” to proceed with the creation of the pull request, and then hit the “Complete” button. When prompted to complete the pull request, keep the default settings and select “Complete merge“.
- After completing the Pull Request, you can go back to your DEV Synapse Workspace and select your “master” branch. Hit the “Publish” button to deploy your changes to the Dev Workspace and to publish the ARM templates to your workspace_publish branch. This will trigger your UAT “Release-2“. As you can see, under “Stages” the UAT blue icon represents that the stage is in progress and the PROD stage has not started.

Once the UAT stage is completed, you will notice a blue icon in your PROD stage, and if you mouse over a tooltip will be displayed saying the release approval is pending.
- Hit the “PROD” button and then select “Approve“. A few seconds after your approval, the PROD stage will begin the release deployment to the Production Synapse Workspace. Wait a few seconds until you see both stage icons as successful:

- Now open the Production Synapse Workspace to confirm the deployment of Synapse Artifacts. Select the “Manage Hub” and under “External connections” select “Linked services“. Open the Linked Service to Azure Key Vault. You’ll notice the Linked Service Description as “This text will automatically appear in UAT and in PRD if manually approved” and you can test your Linked Service connection to the AKV url: “https://kv-cicddemo-prd.vault.azure.net/”.
Congratulations, you have successfully deployed your Synapse artifacts from the Development environment to the UAT and PROD environments!
Brought to you by Dr. Ware, Microsoft Office 365 Silver Partner, Charleston SC.


Recent Comments