This article is contributed. See the original author and article here.
The Cloud Service Extended Support is a new service type which is similar to classic Cloud Service. The biggest difference between them is that the new Cloud Service Extended Support is ARM (Azure Resource Manager) based resource and can be used with ARM features such as tags, policy, RBAC, ARM template.
About the migration from the classic Cloud Service to Cloud Service Extended Support, Azure officially provided a way called in-place migration. The detailed information can be found at: https://docs.microsoft.com/en-us/azure/cloud-services-extended-support/in-place-migration-portal.
In this blog, we will present how we can manually create a new Cloud Service Extended Support and deploy the same project into this new service. The classic Cloud Service project will have following features and after migration, all these features will be kept:
- Remote Desktop
- SSL certificate for HTTPS endpoints
- Using the same IP address before and after migration
The main advantage of manual migration
Before how to do this manual migration, let us highlight the main advantage of the manual migration:
- The name of the new Cloud Service Extended Support can be decided by yourself. You can use a user-friendly name such as CSEStest.
- Both of manual and in-place migration need the modification of the project code. During manual migration process, this modification is already included. With in-place migration process, it may be more difficult for you to modify the code.
- This manual migration process is using ARM template to deploy new resources. You can do some changes by your own idea such as enabling RDP Extension which is not enabled in classic Cloud Service. But the in-place migration does not allow you to do so. It will keep the same configuration.
Before you begin
There will be some additional points to do before we start the migration. Please have a check of following points carefully since it may cause unexpected issue if they are not matched:
- Follow the “Before you begin” part of the document to check if you are an administrator/coadministrator of the subscription.
- In subscription page of Azure Portal, check the resource providers Microsoft.Compute, Microsoft.Network and Microsoft.Storage are already registered.
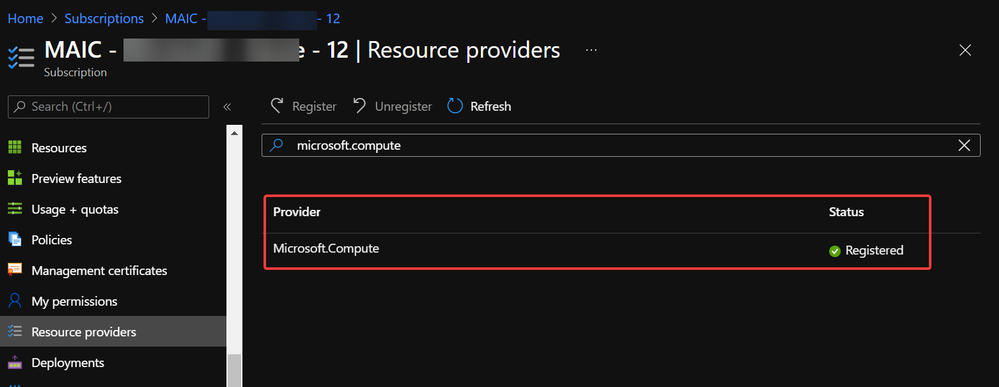 Example of resource provider registration
- We should have a running classic Cloud Service and its whole project code. If it is using certificate for any purpose (for HTTPS endpoint in this blog), that certificate in .pfx format and its password are also needed for the deployment.
With above 3 conditions, there should not be any other permission issue for this manual migration process. And for this process, a container in storage account is also required. If you do not have one yet, please follow this document to create one storage account and follow next 2 screenshots to create a new container.
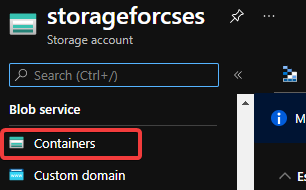 Create container 1
 Create container 2
Then, let us move on the main process.
Reserve the IP address of the classic Cloud Service and upgrade it to be used for Cloud Service Extended Support
In this example, my classic Cloud Service is testcstocses in resource group cstocses, in East US region.
- Use PowerShell command to keep the current IP address as a classic Reserved IP, with name ReservedIPCSES. The location must be the same as your classic Cloud Service location.
New-AzureReservedIP -ReservedIPName ReservedIPCSES -ServiceName testcstocses -Location "East US"
 Keep the IP to classic reserved IP
- Follow document to upgrade the generated classic Reserved IP to basic SKU Public IP (There is bug in script in official document)
a. Verify if the classic Reserved IP is still associated with the classic Cloud Service. If yes, check if we can remove the association. (By design, the newly generated classic reserved IP should be still associated with classic Cloud Service)
## Variables for the command ##
$name = 'ReservedIPCSES'

## This section is only needed if the Reserved IP is not already disassociated from any Cloud Services ##
$service = 'testcstocses'
Remove-AzureReservedIPAssociation -ReservedIPName $name -ServiceName $service

$validate = Move-AzureReservedIP -ReservedIPName $name -Validate
$validate.ValidationMessages
 PowerShell commands to verify association between classic Cloud Service and generated reserved IP
b. If the result in above screenshot is Succeeded, then run the following command to remove the link.
Move-AzureReservedIP -ReservedIPName $name -Prepare
Move-AzureReservedIP -ReservedIPName $name -Commit
 Upgrade classic Reserved IP to basic tier
The new generated Basic SKU Public IP will be in a new resource group called {publicipname}-Migrated.
 Migrated basic tier reserved IP
- Set a DNS name on this Public IP. (Optional but recommended since the new Cloud Service Extended Support will not offer a DNS name as classic Cloud Service)
 Configure DNS name on public IP
- Move the Public IP into the original resource group.
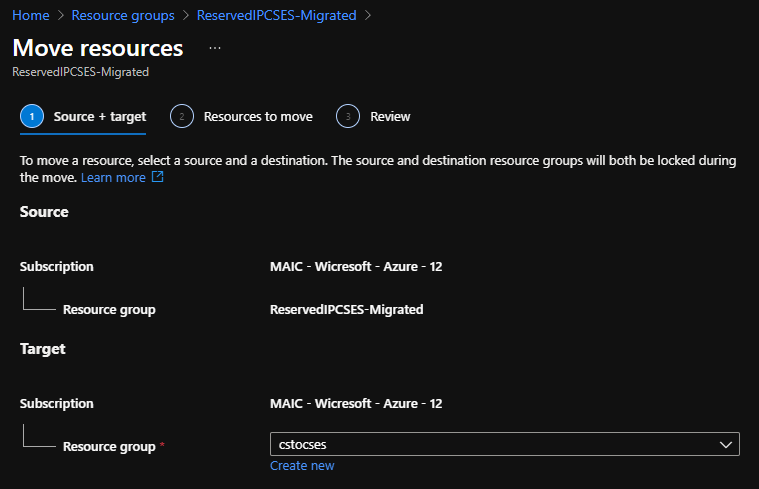 Move public IP to specific resource group 1
 Move public IP to specific resource group 2
- (Optional) If your original classic Cloud Service is using any certificate, create a Key Vault in the same region (East US in this example) and upload the .pfx format certificate.
 Create Key Vault 1
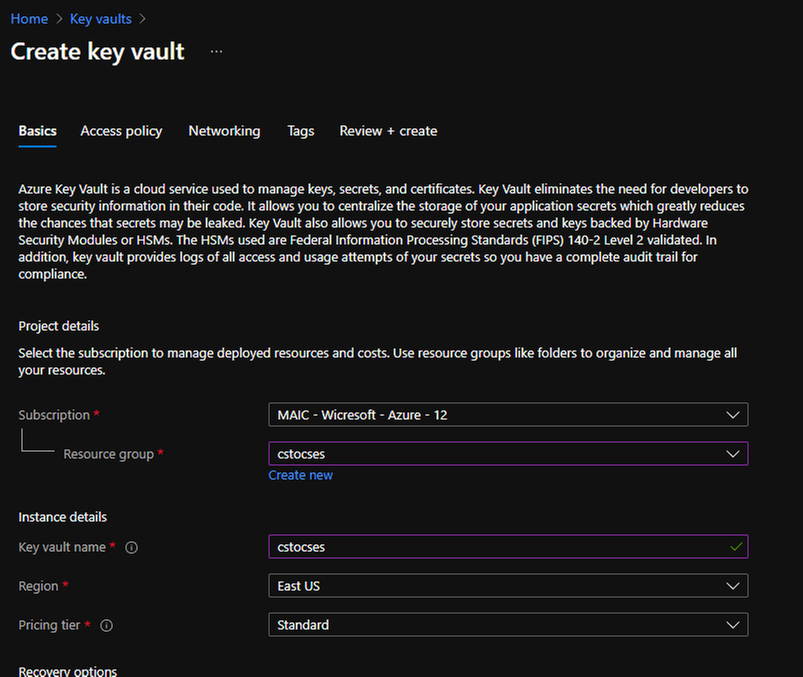 Create Key Vault 2
Do not forget to check this checkbox “Azure Virtual Machines for deployment” in Access policy page.
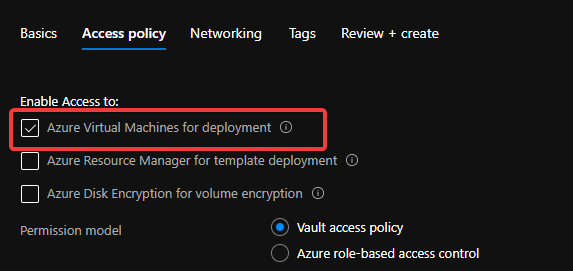 Create Key Vault 3
After creation of Key Vault, import the certificate.
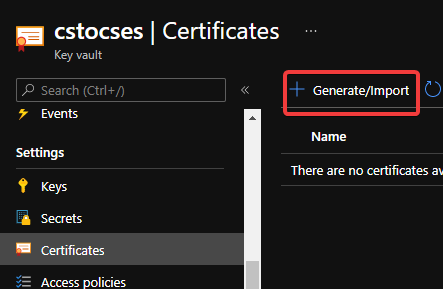 Upload certificate into Key Vault 1
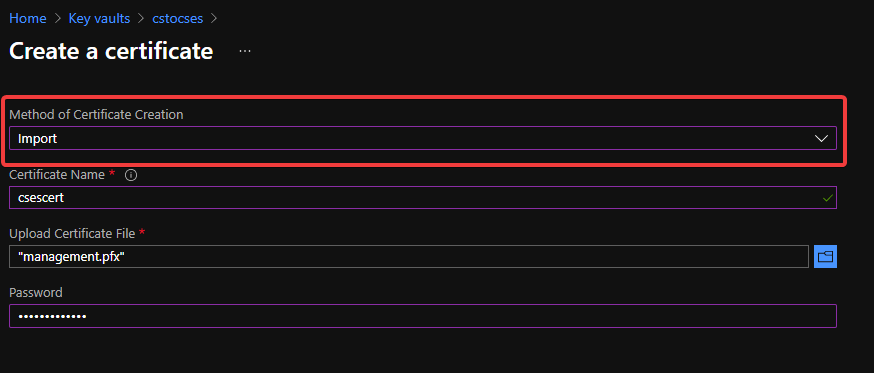 Upload certificate into Key Vault 2
 Upload certificate into Key Vault result
- Follow the official document to modify the classic Cloud Service code to make them match Cloud Service Extended Support requirement.
https://docs.microsoft.com/en-us/azure/cloud-services-extended-support/deploy-prerequisite
https://docs.microsoft.com/en-us/azure/cloud-services-extended-support/deploy-template
The yellow part is about the usage of the certificate. It is not necessary for all Cloud Service project.
The green part is the important information which we will use in following steps. Please take a note of it.
.csdef file
<?xml version=”1.0″ encoding=”utf-8″?>
<ServiceDefinition name=”AzureCloudService2″ xmlns=”http://schemas.microsoft.com/ServiceHosting/2008/10/ServiceDefinition” schemaVersion=”2015-04.2.6“>
<WebRole name=”WebRole1” vmsize=”Standard_D1_V2“>
<Sites>
<Site name=”Web”>
<Bindings>
<Binding name=”Endpoint1″ endpointName=”Endpoint1″ />
<Binding name=”HttpsIn” endpointName=”HttpsIn” />
</Bindings>
</Site>
</Sites>
<Endpoints>
<InputEndpoint name=”Endpoint1″ protocol=”http” port=”80″ />
<InputEndpoint name=”HttpsIn” protocol=”https” port=”443″ certificate=”Certificate1″ />
</Endpoints>
<Certificates>
<Certificate name=”Certificate1″ storeLocation=”LocalMachine” storeName=”My” permissionLevel=”limitedOrElevated”/>
</Certificates>
</WebRole>
</ServiceDefinition>
.cscfg file
<?xml version=”1.0″ encoding=”utf-8″?>
<ServiceConfiguration serviceName=”AzureCloudService2″ xmlns=”http://schemas.microsoft.com/ServiceHosting/2008/10/ServiceConfiguration” osFamily=”6″ osVersion=”*” schemaVersion=”2015-04.2.6“>
<Role name=”WebRole1“>
<Instances count=”1” />
<Certificates>
<Certificate name=”Certificate1″ thumbprint=”909011xxxxxxxxxx712303838613″ thumbprintAlgorithm=”sha1″ />
</Certificates>
</Role>
<NetworkConfiguration>
<VirtualNetworkSite name=”cstocsesvnet” />
<AddressAssignments>
<InstanceAddress roleName=”WebRole1″>
<Subnets>
<Subnet name=”WebRole1_subnet” />
</Subnets>
</InstanceAddress>
<ReservedIPs>
<ReservedIP name=”ReservedIPCSES” />
</ReservedIPs>
</AddressAssignments>
</NetworkConfiguration>
</ServiceConfiguration>
The thumbprint of the certificate can be found in Key Vault, Certificates page.
 Thumbprint of the certificate in Key Vault
- Package the project as we do for classic Cloud Service project. Then copy out the .cspkg and .cscfg files.
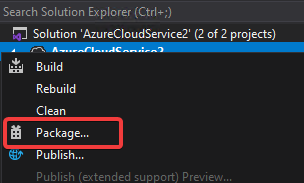 Package in Visual Studio
 Package result for a classic Cloud Service project (certificate isn’t from package process)
- Upload the .cscfg file and .cspkg file into a container of storage account.
 Upload .cspkg and .cscfg to Storage container
- After uploading, generate the SAS URL of these 2 files one by one. We can click on the file, switch to Generate SAS, click on Generate SAS token and URL and find the needed SAS URL at the end of the page.
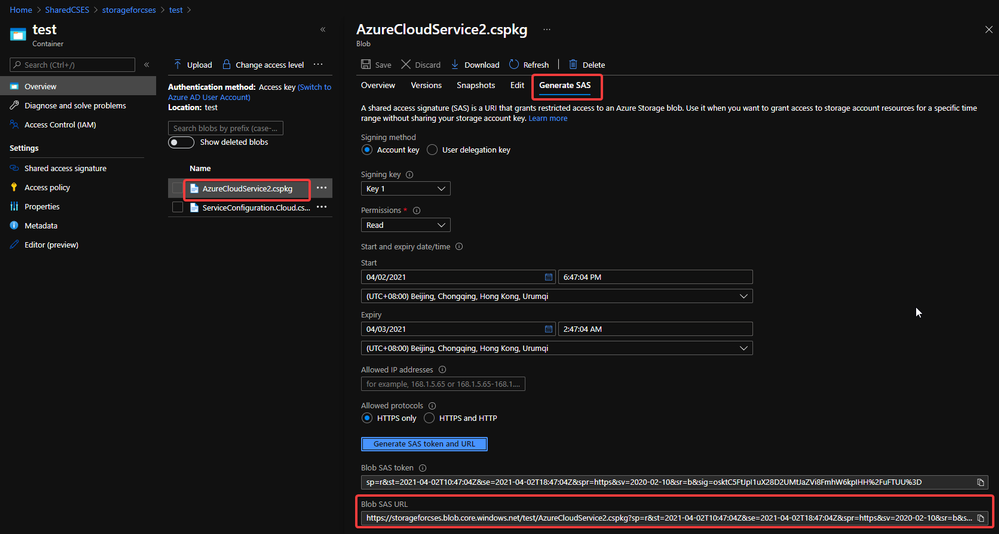 Generate SAS token of .cscfg and .cspkg
The generated SAS token should be like:
- (Optional) If you use Key Vault to save the certificate, please visit the Certificate page and click 2 times on the uploaded certificate. You’ll find a URL at the end of the page with format:
https://{keyvaultname}.vault.azure.net/secrets/{certificatename}/{id}
 Find secret URL of certificate 1
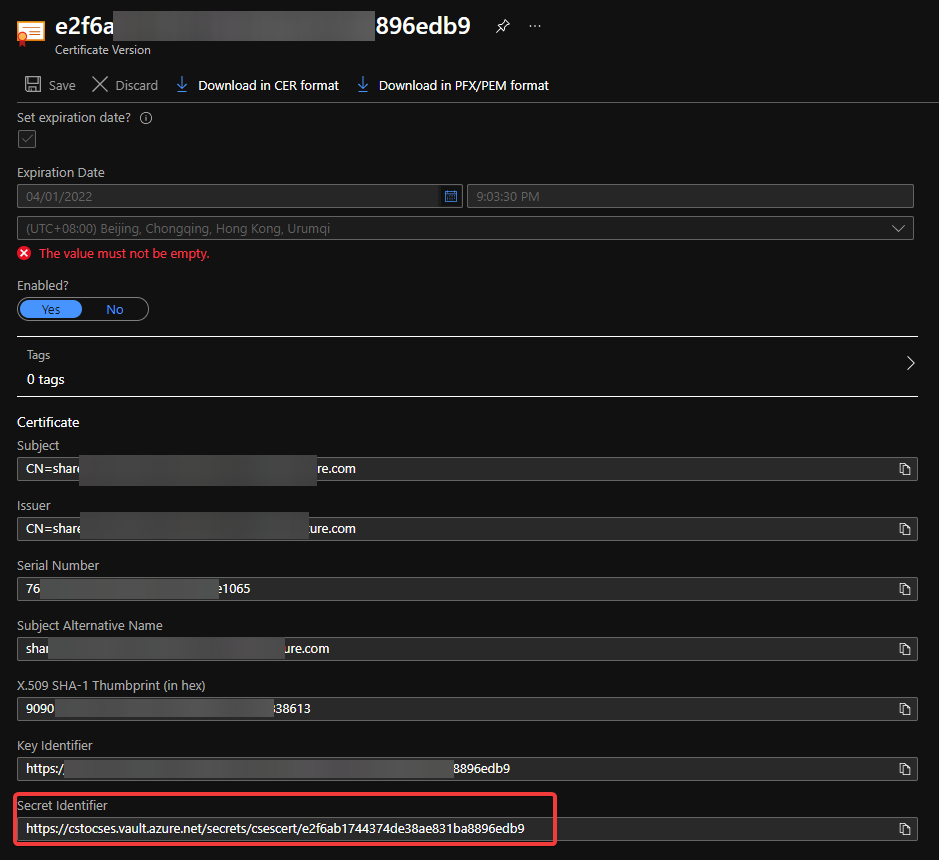 Find secret URL of certificate 2
Make a note of this URL for using it in next step. The following is my example: https://cstocses.vault.azure.net/secrets/csescert/e2f6ab1744374de38ae831ba8896edb9
Also, please make a note of the subscription ID, name of resource group where Key Vault is deployed and the Key Vault service name. These will also be used in next step.
- Please modify the following ARM template and parameters. And then save them into JSON format files. In my test, I saved into template.json and parameter.json.
Tips: The yellow parts are the optional parts. If you do not use any certificate, you can remove it from both template and parameter files. The green parts are the information noted from .csdef and .cscfg files. Please make sure they are the same and correct.
ARM template: (Except the above tips about certificate, no need to modify the ARM template file)
{
“$schema”: “https://schema.management.azure.com/schemas/2015-01-01/deploymentTemplate.json#“,
“contentVersion”: “1.0.0.0”,
“parameters”: {
“cloudServiceName”: {
“type”: “string”,
“metadata”: {
“description”: “Name of the cloud service”
}
},
“location”: {
“type”: “string”,
“metadata”: {
“description”: “Location of the cloud service”
}
},
“deploymentLabel”: {
“type”: “string”,
“metadata”: {
“description”: “Label of the deployment”
}
},
“packageSasUri”: {
“type”: “securestring”,
“metadata”: {
“description”: “SAS Uri of the CSPKG file to deploy”
}
},
“configurationSasUri”: {
“type”: “securestring”,
“metadata”: {
“description”: “SAS Uri of the service configuration (.cscfg)”
}
},
“roles”: {
“type”: “array”,
“metadata”: {
“description”: “Roles created in the cloud service application”
}
},
“vnetName”: {
“type”: “string”,
“defaultValue”: “csesVNet”,
“metadata”: {
“description”: “Name of vitual network”
}
},
“subnetSetting”: {
“type”: “array”,
“metadata”: {
“description”: “Setting of subnets”
}
},
“publicIPName”: {
“type”: “string”,
“defaultValue”: “contosocsIP”,
“metadata”: {
“description”: “Name of public IP address”
}
},
“upgradeMode”: {
“type”: “string”,
“defaultValue”: “Auto”,
“metadata”: {
“UpgradeMode”: “UpgradeMode of the CloudService”
}
},
“secrets”: {
“type”: “array”,
“metadata”: {
“description”: “The key vault id and certificates referenced in the .cscfg file”
}
},
“rdpPublicConfig”: {
“type”: “string”,
“metadata”: {
“description”: “Public config of remote desktop extension”
}
},
“rdpPrivateConfig”: {
“type”: “securestring”,
“metadata”: {
“description”: “Private config of remote desktop extension”
}
}
},
“variables”: {
“cloudServiceName”: “[parameters(‘cloudServiceName’)]”,
“subscriptionID”: “[subscription().subscriptionId]”,
“lbName”: “[concat(variables(‘cloudServiceName’), ‘LB’)]”,
“lbFEName”: “[concat(variables(‘cloudServiceName’), ‘LBFE’)]”,
“resourcePrefix”: “[concat(‘/subscriptions/’, variables(‘subscriptionID’), ‘/resourceGroups/’, resourceGroup().name, ‘/providers/’)]”
},
“resources”: [
{
“apiVersion”: “2019-08-01”,
“type”: “Microsoft.Network/virtualNetworks”,
“name”: “[parameters(‘vnetName’)]”,
“location”: “[parameters(‘location’)]”,
“properties”: {
“addressSpace”: {
“addressPrefixes”: [
“10.0.0.0/16”
]
},
“subnets”: “[parameters(‘subnetSetting’)]”
}
},
{
“apiVersion”: “2020-10-01-preview”,
“type”: “Microsoft.Compute/cloudServices”,
“name”: “[variables(‘cloudServiceName’)]”,
“location”: “[parameters(‘location’)]”,
“tags”: {
“DeploymentLabel”: “[parameters(‘deploymentLabel’)]”,
“DeployFromVisualStudio”: “true”
},
“dependsOn”: [
“[concat(‘Microsoft.Network/virtualNetworks/’, parameters(‘vnetName’))]”
],
“properties”: {
“packageUrl”: “[parameters(‘packageSasUri’)]”,
“configurationUrl”: “[parameters(‘configurationSasUri’)]”,
“upgradeMode”: “[parameters(‘upgradeMode’)]”,
“roleProfile”: {
“roles”: “[parameters(‘roles’)]”
},
“networkProfile”: {
“loadBalancerConfigurations”: [
{
“id”: “[concat(variables(‘resourcePrefix’), ‘Microsoft.Network/loadBalancers/’, variables(‘lbName’))]”,
“name”: “[variables(‘lbName’)]”,
“properties”: {
“frontendIPConfigurations”: [
{
“name”: “[variables(‘lbFEName’)]”,
“properties”: {
“publicIPAddress”: {
“id”: “[concat(variables(‘resourcePrefix’), ‘Microsoft.Network/publicIPAddresses/’, parameters(‘publicIPName’))]”
}
}
}
]
}
}
]
},
“osProfile”: {
“secrets”: “[parameters(‘secrets’)]”
},
“extensionProfile”: {
“extensions”: [
{
“name”: “RDPExtension”,
“properties”: {
“autoUpgradeMinorVersion”: true,
“publisher”: “Microsoft.Windows.Azure.Extensions”,
“type”: “RDP”,
“typeHandlerVersion”: “1.2.1”,
“settings”: “[parameters(‘rdpPublicConfig’)]”,
“protectedSettings”: “[parameters(‘rdpPrivateConfig’)]”
}
}
]
}
}
}
]
}
Parameters:
Tips:
- The location should be the same as all other services. East US in this example.
- packageSasUri and configurationSasUri are the SAS URLs which we noted in step 9.
- If we’re using multiple roles in the Cloud Service project, then we’ll also need to create multiple subnets matching every Cloud Service role. (We can also find an example of multiple role at https://github.com/Azure-Samples/cloud-services-extended-support/tree/main/101-cses-multirole-rdp)
For example:
“roles”: {
“value”: [
{
“name”: “WebRole1”,
“sku”: {
“name”: “Standard_D1_v2”,
“tier”: “Standard”,
“capacity”: “1”
}
},
{
“name”: “WorkerRole1”,
“sku”: {
“name”: “Standard_D1_v2”,
“tier”: “Standard”,
“capacity”: “2”
}
}
]
},
…
“subnetSetting”: {
“value”: [
{
“name”: “WebRole1_subnet”,
“properties”: {
“addressPrefix”: “10.0.0.0/24”
}
},
{
“name”: “WorkerRole1_subnet”,
“properties”: {
“addressPrefix”: “10.0.1.0/24”
}
}
]
},
- In the secrets part, sourceVault is the resource URI of your Key Vault. It’s constructed by /subscriptions/{subscription-id}/resourceGroups/{resourcegroup-name}/providers/Microsoft.KeyVault/vaults/{keyvault-name} And the certificateUrl is the one we noted in step 10.
- In rdpPublicConfig and rdpPrivateConfig, we only need to change the username and password we want to use to enable RDP. For example, here I use “admin” as username and “Password” as password.
{
“$schema”: “https://schema.management.azure.com/schemas/2015-01-01/deploymentParameters.json#“,
“contentVersion”: “1.0.0.0”,
“parameters”: {
“cloudServiceName”: {
“value”: “cstocses”
},
“location”: {
“value”: “eastus”
},
“deploymentLabel”: {
“value”: “deployment label of cstocses by ARM template”
},
“packageSasUri”: {
},
“configurationSasUri”: {
},
“roles”: {
“value”: [
{
“name”: “WebRole1“,
“sku”: {
“name”: “Standard_D1_v2“,
“tier”: “Standard”,
“capacity”: “1“
}
}
]
},
“vnetName”: {
“value”: “cstocsesVNet“
},
“subnetSetting”: {
“value”: [
{
“name”: “WebRole1_subnet“,
“properties”: {
“addressPrefix”: “10.0.0.0/24”
}
}
]
},
“publicIPName”: {
“value”: “ReservedIPCSES“
},
“upgradeMode”: {
“value”: “Auto”
},
“secrets”: {
“value”: [
{
“sourceVault”: {
“id”: “/subscriptions/4f27bec7-26bd-40f7-af24-5962a53d921e/resourceGroups/cstocses/providers/Microsoft.KeyVault/vaults/cstocses”
},
“vaultCertificates”: [
{
“certificateUrl”: “https://cstocses.vault.azure.net/secrets/csescert/e2f6ab1744374de38ae831ba8896edb9“
}
]
}
]
},
“rdpPublicConfig”: {
“value”: “<PublicConfig>rn <UserName>admin</UserName>rn <Expiration>4/2/2022 12:00:00 AM</Expiration>rn</PublicConfig>”
},
“rdpPrivateConfig”: {
“value”: “<PrivateConfig>rn <Password>Password</Password>rn</PrivateConfig>”
}
}
}
- Use PowerShell command to deploy the ARM template. (Not necessary by PowerShell. You can also use Azure Portal or Azure CLI to deploy the template)
Please remember to replace the resource group name and the path of the template and parameter JSON file in the command before running it.
New-AzResourceGroupDeployment -ResourceGroupName "cstocses" -TemplateFile "C:UsersjerryzDesktopCSES testdemotemplate.json" -TemplateParameterFile "C:UsersjerryzDesktopCSES testdemoparameter.json"
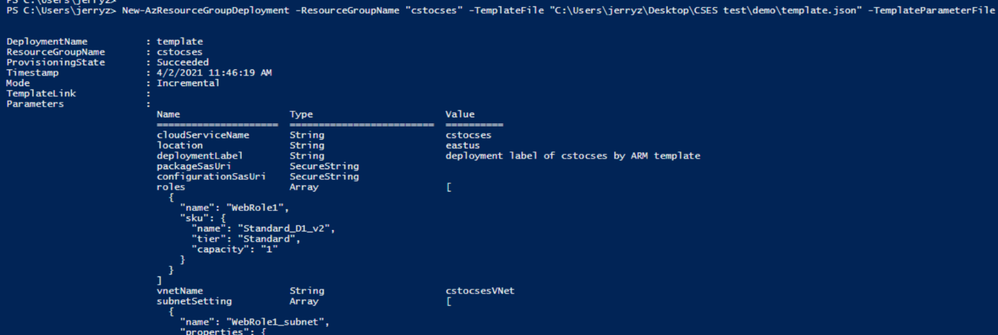 ARM template deployment result
Result: (The classic Cloud Service is deleted)
 All created resources in this process
Brought to you by Dr. Ware, Microsoft Office 365 Silver Partner, Charleston SC.


Recent Comments