This article is contributed. See the original author and article here.
This article summarizes various options that can be taken to modernize SQL Server Reporting Services and then provides a detailed step-by-step guide to bringing report server databases to Azure SQL Managed Instance.
Different Options for Modernization
If you run SQL Server Reporting Services for Business Intelligence capabilities on-premises, you may want to draw benefits by modernizing it in various ways based on the requirements in your enterprise. To achieve this, you have the following options to consider:
- If you want to leverage modern cloud approaches you can modernize SSRS combining various Infrastructure and Platform services. Here you can use SQL Managed Instance as a Platform Service in the backend for certain reporting services components, i.e., your report server databases, which is also the main discussion in this blogpost.
- Migrating SSRS directly to the Power BI Service is a great option if you have the ability to look into modernizing your actual reports.
- If you are required to stay on-premises, you can still modernize your BI landscape by moving from SSRS to Power BI Report Server.
This blogpost gives a very good overview for the different options.
Before getting into details regarding how Azure SQL Managed Instance can add value to your existing SSRS deployment and how you can migrate your report server databases onto this platform service, let’s briefly discuss the other options (i.e., the second and the third option above).
Enhancing your reporting capability with Power BI and promoting yourself to a full-fledged business analytics service
For sure, the most interesting modernizing approaches are the ones which are backed up with cloud functionalities within the Microsoft universe.
Here the best option could be moving to the Power BI Service that has the capability of hosting your paginated reports that you can migrate from your SSRS instance if you are licenced for Power BI Premium or have Power BI Premium per user license.
Hosting your existing paginated reports in Power BI requires a low-effort migration process. Please see this link for a detailed explanation how migration works for the paginated reports. This way you will be able to co-locate your highly formatted, pixel-perfect reports with the content that is generated via simplified self-service data analysis on the same platform. More than this, a complex semantic model can be defined as the report data source for paginated reports using the newly introduced XMLA Read/Write endpoint in Power BI Premium. This is one of the recent major features making Power BI a superset of Azure Analysis Services and would enhance the abilities around enterprise reporting scenarios even more when used together with paginated reports.
After bringing your SSRS reports to Power BI, you can also embed paginated reports into existing applications within your organization. So your former SSRS reports which you would be modernizing to Power BI paginated reports will also be enabled for embedding. Please take a look at this link to understand how this could be achieved.
With its ever growing capabilities and high pace of innovation, Power BI could well be the best service to be of greatest use for your current SSRS user base.
The “on-premises” option for modernization
If you have to stay on-premises, a good approach could be migrating Reporting Services to “Power BI Report Server“. This may be something particularly interesting especially if it is not currently viable to go to Azure, but you still desire to enable Self Service Reporting on-premise and offer interactive dashboarding with great visualization and reporting capabilities to your users.
Keeping SSRS and still drawing benefits from cloud
If you require staying with SSRS for some commercial or technical reason, you can bring your on-premise SSRS instances onto Azure VM’s and still draw benefits from being on the cloud in many different ways.
A Virtual Machine (VM) on Azure is a scalable computing resource giving the flexibility of virtualization without having to buy and maintain the physical hardware which runs it. Since this is an IaaS (Infrastructure as a service) approach, in this setup, you will need to maintain your VM by performing tasks for configuration, patching, and installing the software (SSRS) that runs on it.
On the Azure marketplace you can find pre-configured virtual machine images for Reporting Services. You can leverage additional benefits from moving to the cloud by selecting these. This enables you to easily see your different virtual machine workloads and manage them. It can also help make your workloads more efficient and enables an easier onboarding experience to the cloud.
With this IaaS setup you can host both your “report server” – stateless engine of the SSRS, and report server databases which are responsible for storing the metadata (ReportServer) and temporary report results (ReportServerTempDB) on the same machine. This can offer a good solution in terms of cost effectiveness, however you could be missing out on a higher performance for your reports by taking the next step in the journey which involves hosting the report server databases on Azure SQL Managed Instance which is a Azure SQL managed platform service (PaaS) !
To go to this stage you need to be using SQL Server 2017 Reporting Services or SQL Server 2019 Reporting Services. By moving to cloud for the report server databases you would be seizing advantages which comes from a fully managed service. Although offering near 100% compatibility with the latest SQL Server (Enterprise Edition) database engine, SQL Managed Instance preserves a very wide variety of PaaS capabilities such as automatic patching, version updates, built-in high availability with 99,99%-availably -SLA for critical workloads. This kind of setup would drastically reduce management overhead and the total cost of ownership and even protects you from losing data and reporting content due to human errors with its built in Point In Time Restore and through automated backups.
By moving your report server databases to an Azure SQL Managed Instance and separating your report server from the report server databases, you would not only be gaining the PaaS benefits stated above, but also achieving a better performance in most cases. In addition to this, if you already have business data on Azure SQL Managed Instance Databases, having SSRS using it, means no-extra cost solution with minimum migration effort.
How to migrate report server databases of an existing SSRS instance to Azure SQL Managed Instance
Assuming you already have an SSRS environment on-premise, the focus would be on the migration scenario in this blogpost rather than a green-field SSRS deployment, whereas the steps would be similar.
As the report server databases preserve metadata and intermediary results during runtime, an online migration doesn’t make much sense for a SSRS backend data migration. An offline migration would be the simplest way to go. After this migration has been completed, with an easy configuration change, you will be able to point your SSRS instance to your newly migrated SSRS databases on Azure SQL Managed Instance with a minimal downtime.
Step 1: Provision necessary resources in the cloud:
The first thing that you need to do is the provisioning of the necessary cloud services on Azure:
- A SQL Managed Instance to host your report server databases and
- A Storage account to host your database backup files during the migration.
You can create a SQL Managed Instance using the Azure Portal or create via Powershell. Using ARM templates for provisioning is the other option.
To provision a storage account on Azure you can again use the portal, powershell and the template options. Here the Azure CLI based creation is another alternative.
Step 2: Locate your report server databases:
After you have Azure SQL Managed Instance and the Azure Storage Account ready, connect to the machine running your SSRS instance. This could be an On-Premise server or an Azure VM.
Via SQL Server Management Studio (SSMS), you need to connect to the SQL Server instance currently hosting your report server databases. This can be the same SQL Server hosting the stateless engine of your SSRS or a separate SQL Server instance that you have used to host your report server databases.
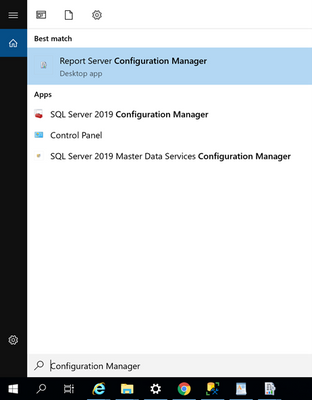
To find out where the current location of your of report server databases are, start the “Report Server Configuration Manager” on Windows from the desktop computer/server with the SSRS installation:
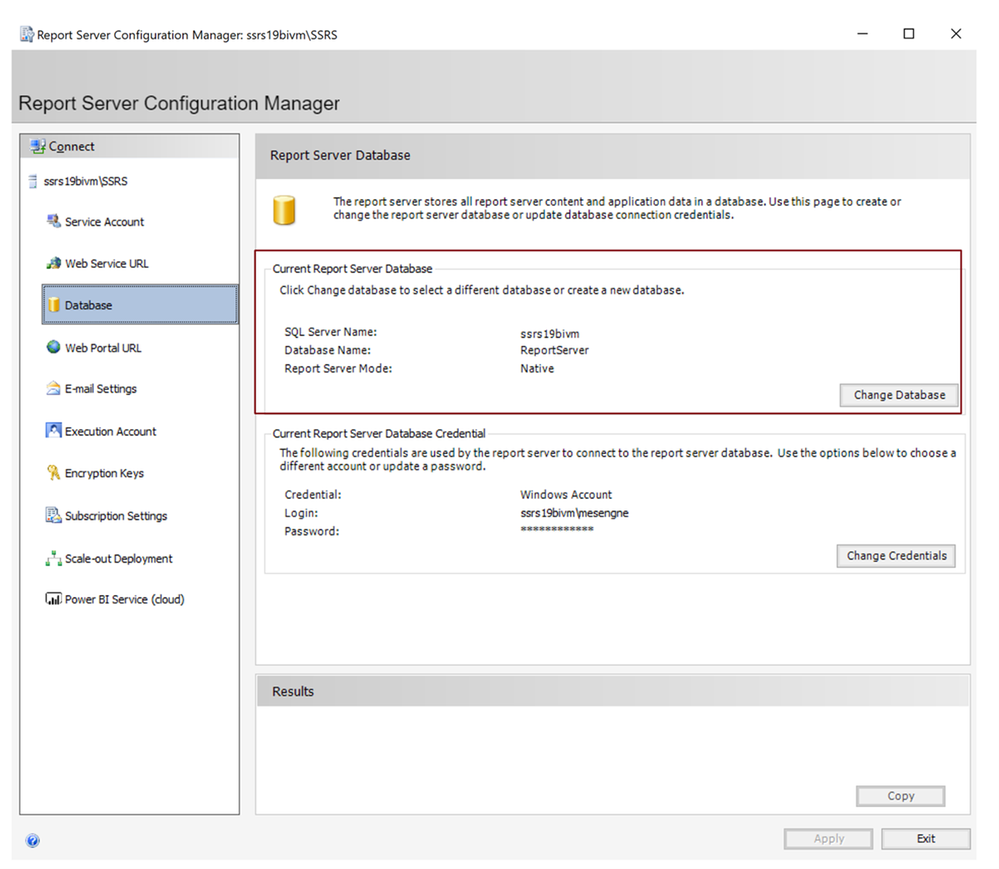
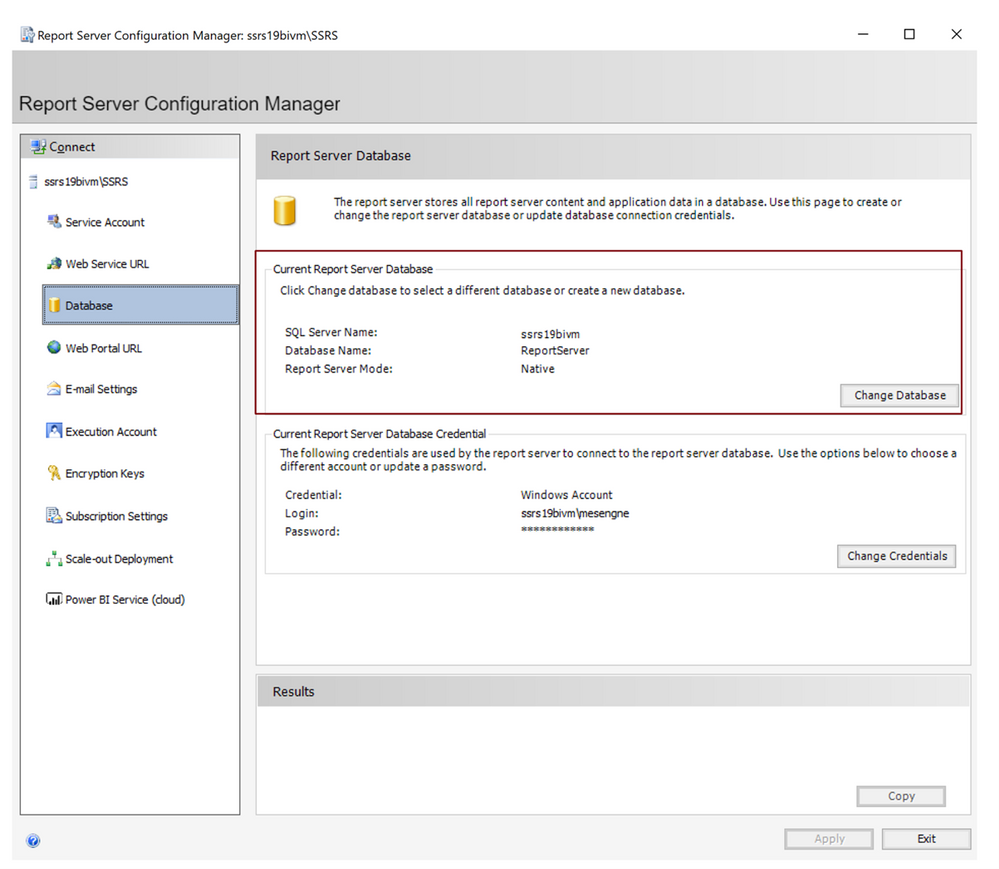
In “Report Server Configuration Manager” , switch to the “Databases” tab. You will see there where your current report server databases are located:
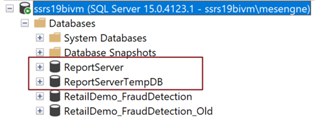
Using SSMS, connect to the SQL Server Instance and you will see the report server databases:
Step 3: Take a backup of your report server databases directly to Azure
First we need to take a backup of your databases to your storage account directly, using the SQL Server BackUp To URL functionality. This way your backup files in .bak format will be ready to be restored from your Managed Instance in the subsequent step:
(In order to gain access to your storage account, you need to generate a SAS (Shared Access Signature) token for your storage account. This can easily be done on the Azure Portal. Please take a look at this blog post to see how it works. This will be used as your key, when you want to access to the storage account from your local SQL Server during the backup process. Once you have your SAS token generated, you can carry on with the following steps.)
/*Create Credential to access Blob Storage*/
IF NOT EXISTS
(SELECT * FROM sys.credentials
WHERE name = 'https://<yourstorageaccountname>.blob.core.windows.net/<yourstorageaccountcontainername>')

CREATE CREDENTIAL [https://<yourstorageaccountname>.blob.core.windows.net/<yourstorageaccountcontainername>]
-- this name must match the container path, start with https and must not contain a trailing forward slash.
WITH IDENTITY = 'SHARED ACCESS SIGNATURE' ,
-- this is a mandatory string for the identity.
SECRET = <Your SAS token for the storage account that you can find on the Azure Portal>
-- This is the shared access signature token you need to generate and must start with ‘sv=’

/*Backup ReportServer Database*/
BACKUP DATABASE ReportServer
TO URL = 'https:// <yourstorageaccountname>.blob.core.windows.net/<yourstorageaccountcontainername>/ReportServer.bak';
GO

/*Backup ReportServerTempDB Database*/
BACKUP DATABASE ReportServerTempDB
TO URL = 'https:// <yourstorageaccountname>.blob.core.windows.net/<yourstorageaccountcontainername>/ReportServerTempDB.bak';
GO
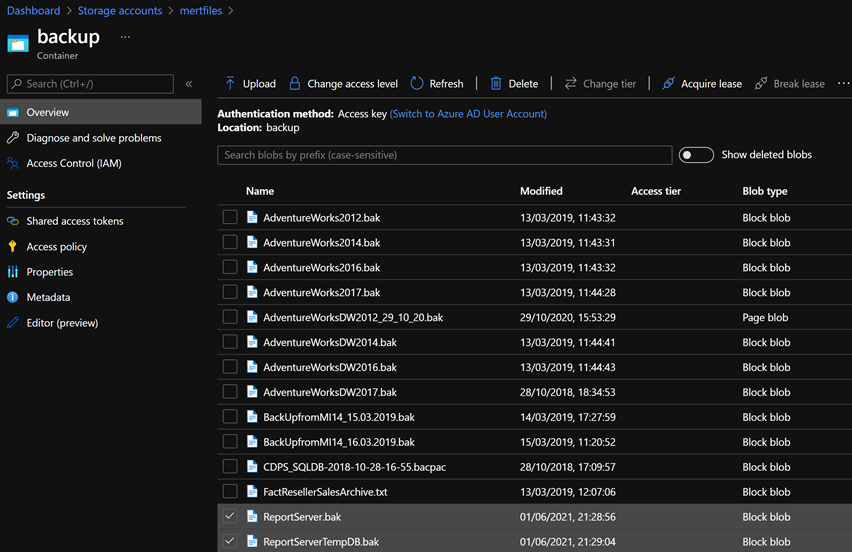
After you see that the “BACKUP DATABASE“ operation successfully processed, you can simply check the .bak files on your storage account. You will be finding the files on your Azure Storage Account in the respective container you named above. In my case it looked like this:
Step 4: Restore the report server databases in your Azure Managed Instance
The next step should be restoring these backup files to the Azure SQL Managed Instance that you have created for hosting the report server databases.
To accomplish this, connect to your Managed Instance via SSMS with public endpoints. If you don’t want your database to have public IP’s which is likely for an enterprise-scenario, an alternative to this would be configuring a VM to connect to Managed Instance or connecting from any machine which can access the Azure SQL Managed Instance vNet.
Since at the end you already would need to allow access to this SQL Managed Instance from your SSRS machine, you may also want to enable this communication now, For this:
- If SSRS is installed on a machine in your local datacenter, you need to allow connections from the local network hosting the SQL Server on Premise to your Managed Instance. (Please note that this kind of deployment – having SSRS Databases on a Managed Instance and SSRS itself on-premise – might result with the risk of a low performance during report viewing and consumption.)
- Or if you run SSRS on Azure VM you need to allow connections from this Azure VM (or from the VNet hosting this Azure VM) to the VNet hosting the Managed Instance.
There are multiple ways to enable this connection, however this is more of a networking topic which is out of the scope for this post. Please take a look at Connectivity architecture for Managed Instance and Azure networking documentation to understand this procedure and some common workarounds for potential issues.
After you establish a connection to your Managed Instance you need to restore the Reportserver.bak and ReportserverTempDB.bak files.
You need access to your Storage Account for these steps also. So you need to create credentials with the configured Shared Access Signature here as well. This is exactly the same step we have taken in the previous section on the local SQL Server when taking the backups. Then you need to Restore your databases:
/*Create Credential to access Blob Storage*/
IF NOT EXISTS
(SELECT * FROM sys.credentials
WHERE name = 'https://<yourstorageaccountname>.blob.core.windows.net/<yourstorageaccountcontainername>')

CREATE CREDENTIAL [https://<yourstorageaccountname>.blob.core.windows.net/<yourstorageaccountcontainername>]
-- this name must match the container path, start with https and must not contain a trailing forward slash.
WITH IDENTITY = 'SHARED ACCESS SIGNATURE',
-- this is a mandatory string. Do not change it.
SECRET = <Your SAS token for the storage account that you can find on the Azure Portal>
-- This must start with ‘sv=’ and is the shared access signature token

/*Restore ReportServer Database*/
RESTORE DATABASE ReportServer FROM URL = 'https://<yourstorageaccountname>.blob.core.windows.net/<yourstorageaccountcontainername>/ReportServer.bak'

/*Restore ReportServerTempDB Database*/
RESTORE DATABASE ReportServerTempDB FROM URL = 'https://<yourstorageaccountname>.blob.core.windows.net/<yourstorageaccountcontainername>/ReportServerTempDB.bak'
After you successfully do this, refresh your connection within SSMS to see the newly restored databases. You should see both of the databases on your SQL managed instance:
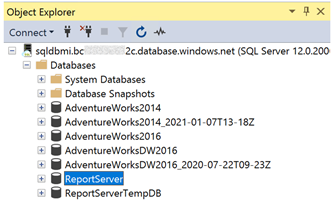
Step 5: Change Report Server Databases using Report Server Configuration Manager
Now that we have the content database and the temporary database available on the SQL Managed Instance, we can make the switch for these report server databases using the “Reporting Services Configuration Manager”. For this, open “Reporting Services Configuration Manager” again, switch to the Database tab and click the “Change Database” button:
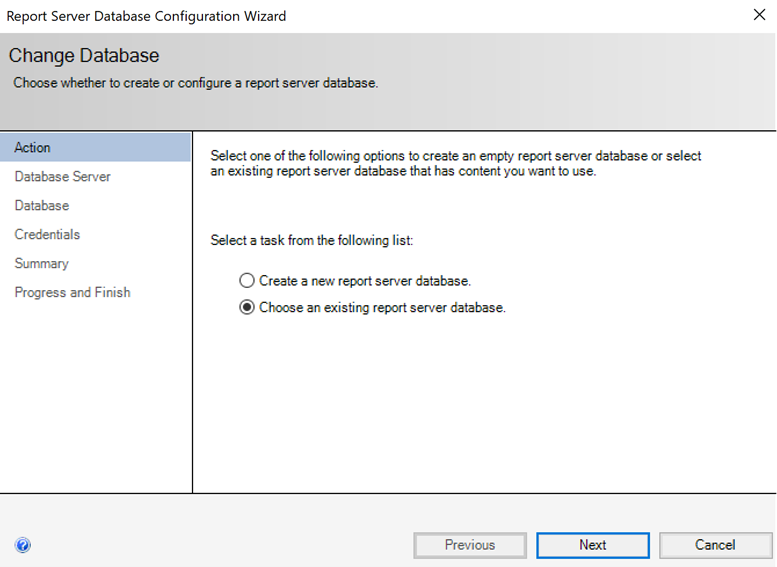
In the next screen select “Choose an existing report server database” and click next:
Provide the name for your SQL Managed Instance that you can find on the Azure portal under the Overview Tab:
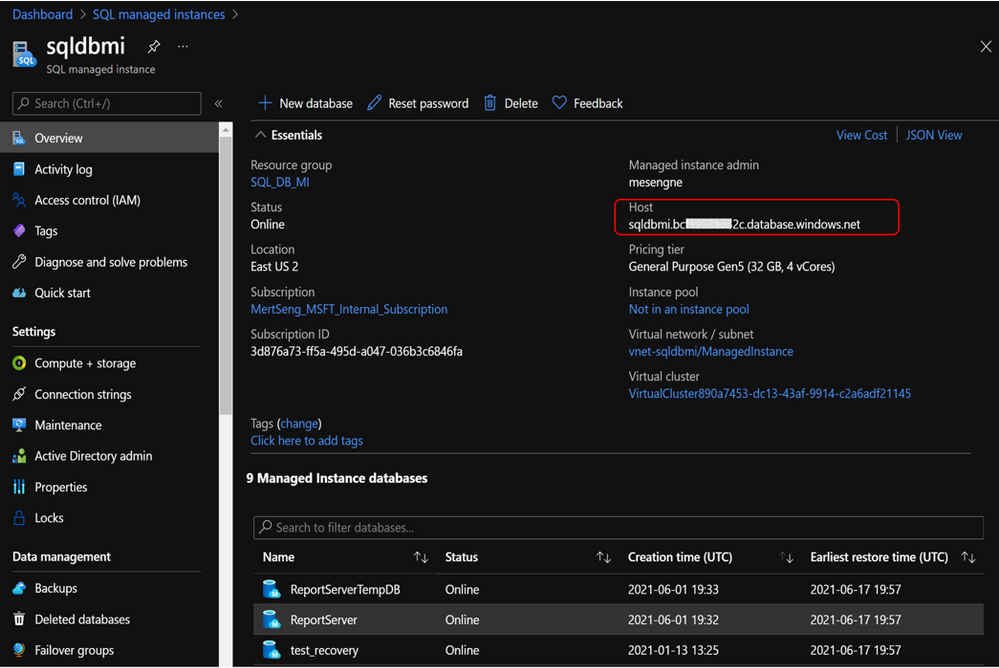
Insert this name to “Server Name” field in the Report Server Database Configuration Wizard and select “SQL Server Account Authentication” since within Azure SQL Managed Instance Windows Authentication is not yet supported and SSRS does not support Azure AD Authentication:
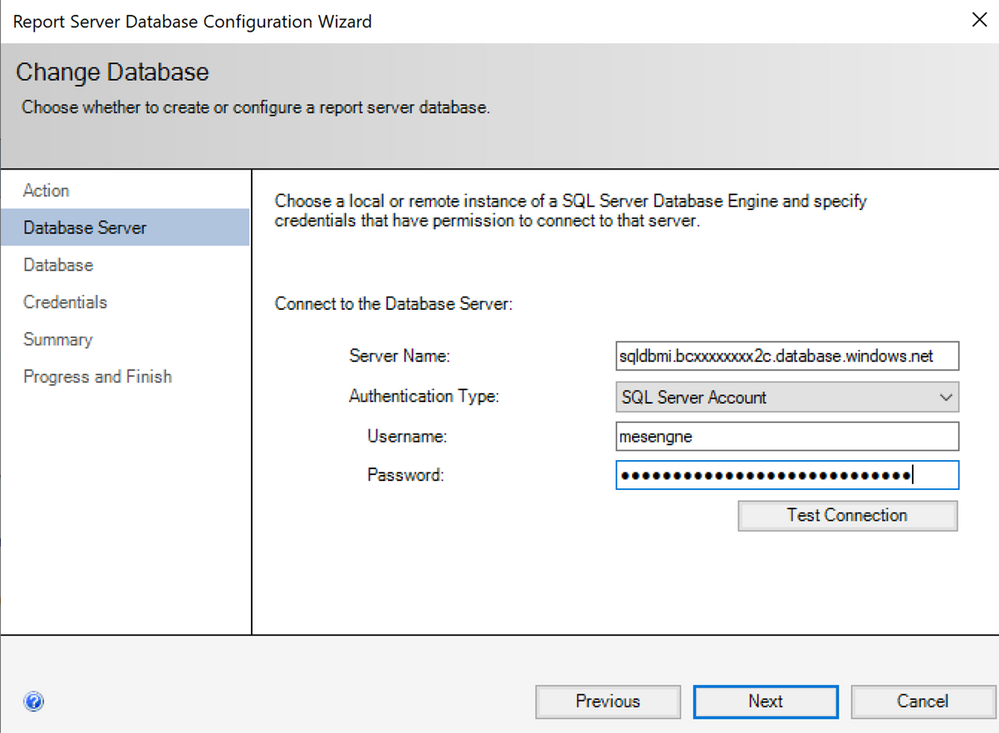
Click on “Test Connection” to see if you can connect with the provided details.
(If you encounter a connection error, you need to check the connectivity from the current machine to your Managed Instance. Please check the network configuration as we discussed before.)
If the connection succeeds, click next. In the next screen you need to select the report server database that you have restored on your managed instance:
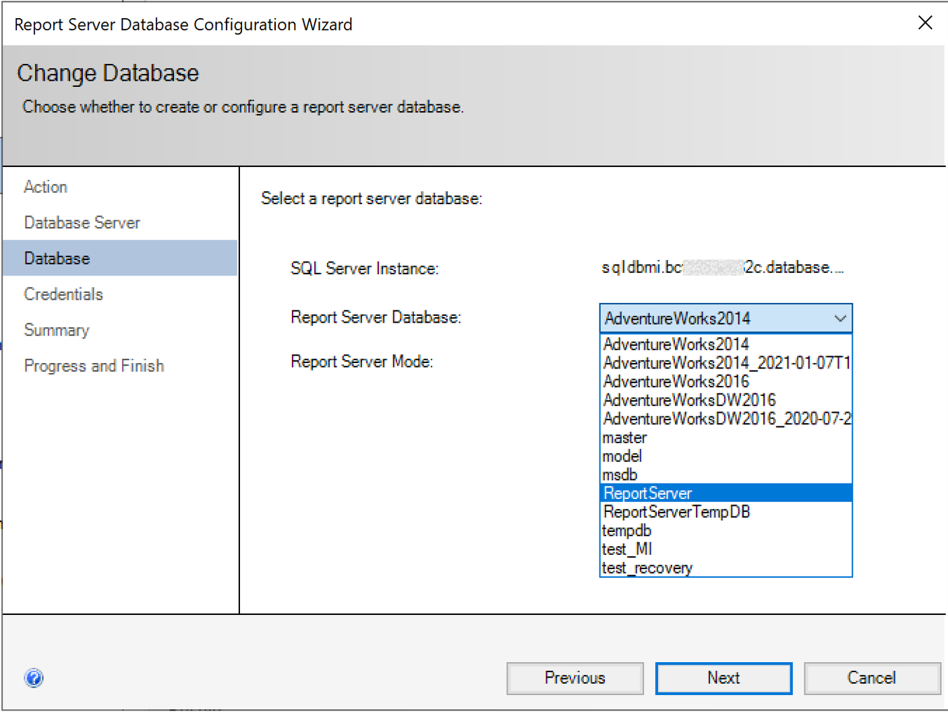
After your selection, credentials will be asked that report server will use to connect to the report server databases. Permission to access the ReportServer database should be granted to the account you specify. Here you need to provide “SQL Server Credentials” again and select next button. With other authentication methods, you would get an error, since the remote database will be a platform service in the cloud and Windows Authentication or Local Service Credentials won’t work in this case:
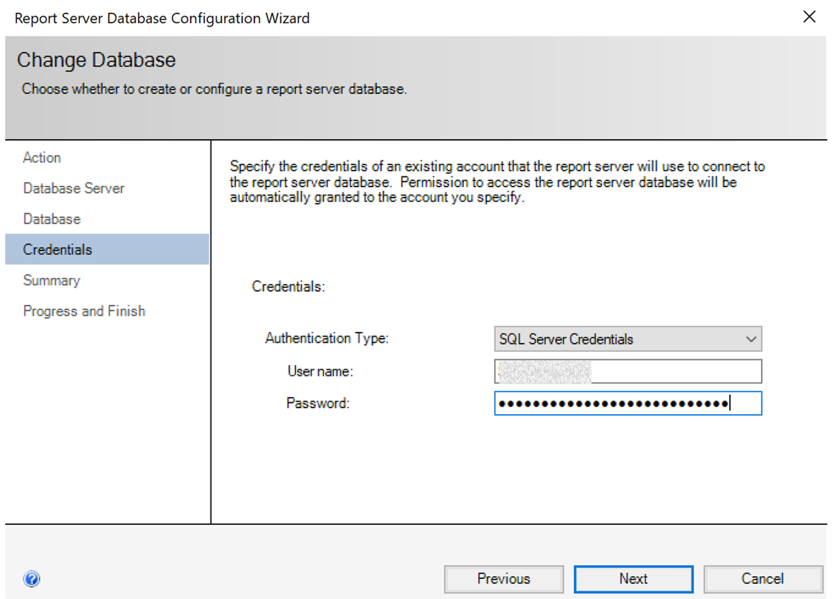
In the coming screen click “next” where you will see the summary for the connection information you provided.
If you click “next” in this screen, you will see the changes are applied in a couple of seconds and if you did everything correctly, you will see all the changes have been applied successfully.
If you click finish, you will see the report server being restarted and the current report server database will be changed in a way pointing to your Managed Instance now!
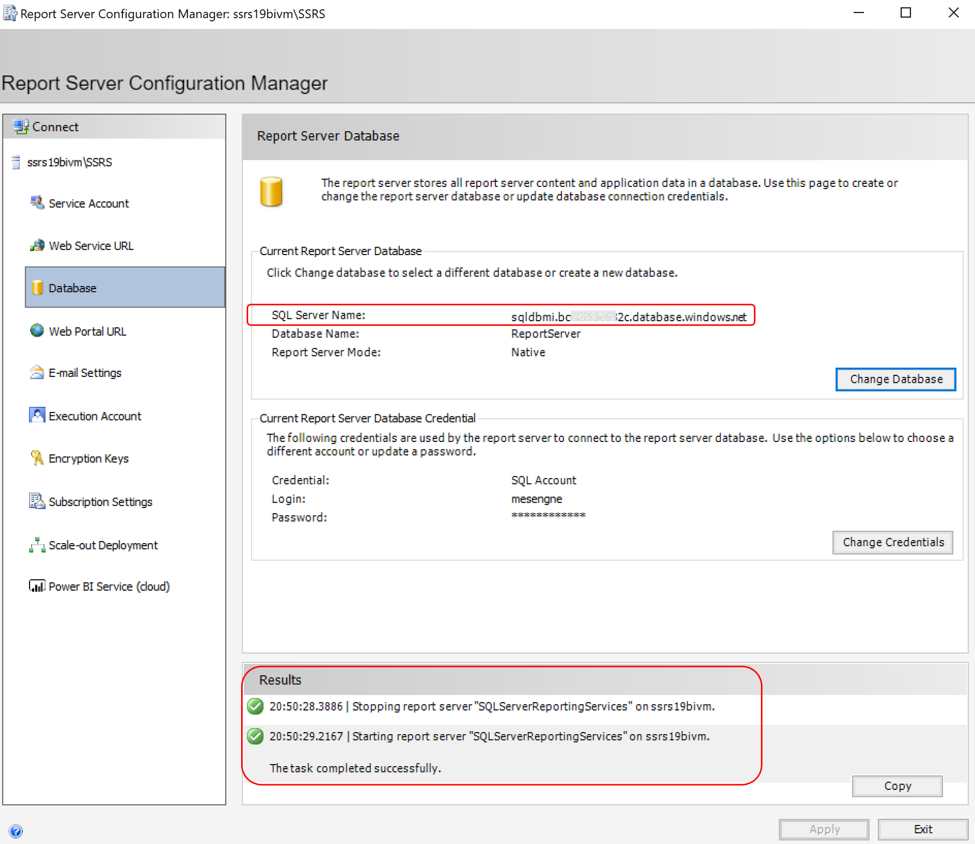
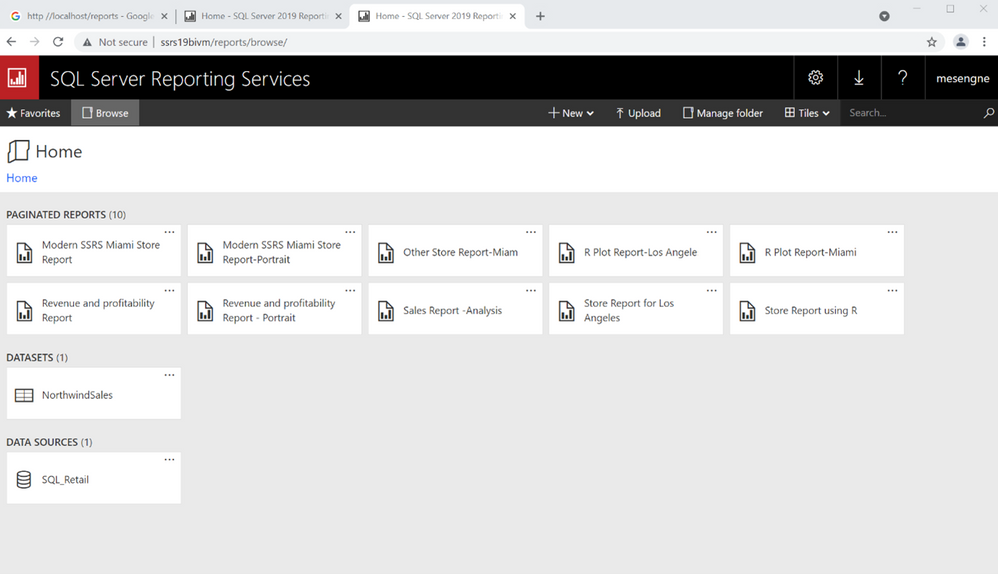
If you access your SSRS web Page on your browser using the URL provided for you SSRS environment, you will see that the whole content is still there, whereas in the backend your SSRS instance is reaching out to a cloud database for your report server databases that are now supported by the PaaS capabilities discussed above:
Hosting your business data on Managed Instance
You can take your modernizing efforts one step further and also migrate your application data or analytical workloads (such as your datawarehouses, datamarts etc.) to Managed Instance, since managed instance offers many comprehensive capabilities to host analytical and transactional workloads.
This move could potentially be even more promising if you look at all the values that you would get by using Azure SQL Managed Instance without sacrificing what you currently have with SQL Server, since you will still be dealing with the same SQL Server surface area that you are familiar with. You can even think of consolidating your databases with the report server databases on the same SQL Managed instance to create a cost-effective solution.
Summary
The most interesting modernizing approaches for SQL Server Reporting Services (SSRS) are the ones which are backed up by cloud functionality.
As mentioned at the start the best option could be moving directly to the Power BI Service that has the capability of directly hosting your paginated reports which you can easily migrate from your existing SSRS instance.
However if this is not an option for you, you can still leverage modern cloud approaches to modernize your existing SSRS architecture by combining various Infrastructure and Platform services within Azure. Here, using SQL Managed Instance as a Platform Service in the backend for your report server databases could be a great option for you. We have discussed the potential benefits of doing this, incl. how to bring the existing report server databases of SSRS to a SQL Managed Instance.
I hope you found this topic interesting and are exciting to try out the options of using modern Azure SQL Managed Instance for your SSRS backend needs.
Brought to you by Dr. Ware, Microsoft Office 365 Silver Partner, Charleston SC.


Recent Comments