This article is contributed. See the original author and article here.
Need to share a video with AUDIO during a Microsoft Teams meeting? What used to only be possible in Windows, is now also possible in MacOS!

In this work from home tip, Jeremy Chapman, from the Microsoft 365 team, will show you how to “Include Computer Sound” while sharing your desktop or app windows using a Mac or PC. At the time of release, this is a Public Preview feature in Microsoft Teams for MacOS, so we’ll also show how to get that enabled if you don’t see the options demonstrated.
QUICK LINKS:
00:34 — Demo in Teams to Include Computer Sound
01:40 — Demo of Including Computer Sound after sharing desktop
02:20 — What to do if you don’t see the Include Computer Sound options
02:56 — Enabling Preview Features in the Teams Admin Center
03:21 — Closing remarks
Link References:
Find more shows in our work from home series at https://aka.ms/WFHmechanics
Unfamiliar with Microsoft Mechanics?
We are Microsoft’s official video series for IT. You can watch and share valuable content and demos of current and upcoming tech from the people who build it at Microsoft.
- Subscribe to our YouTube: https://www.youtube.com/c/MicrosoftMechanicsSeries?sub_confirmation=1
- Join us on the Microsoft Tech Community: https://techcommunity.microsoft.com/t5/microsoft-mechanics-blog/bg-p/MicrosoftMechanicsBlog
- Watch or listen via podcast here: https://microsoftmechanics.libsyn.com/website
Keep getting this insider knowledge, join us on social:
- Follow us on Twitter: https://twitter.com/MSFTMechanics
- Follow us on LinkedIn: https://www.linkedin.com/company/microsoft-mechanics/
- Follow us on Facebook: https://facebook.com/microsoftmechanics/
Video Transcript:
Need to share a video with AUDIO during a Microsoft Teams meeting? Well, what used to only be possible in Windows is now also possible in MacOS. What I’ll show you today is currently in Public Preview, but depending on when you’re watching this, there is a pretty good chance you’ll see the controls I’ll demonstrate today in your Teams experience. If not, keep watching, and I will show you how to enable Public Preview, and if you don’t even see that, I’ll show you what your Teams admin needs to configure to make Public Preview available to you.
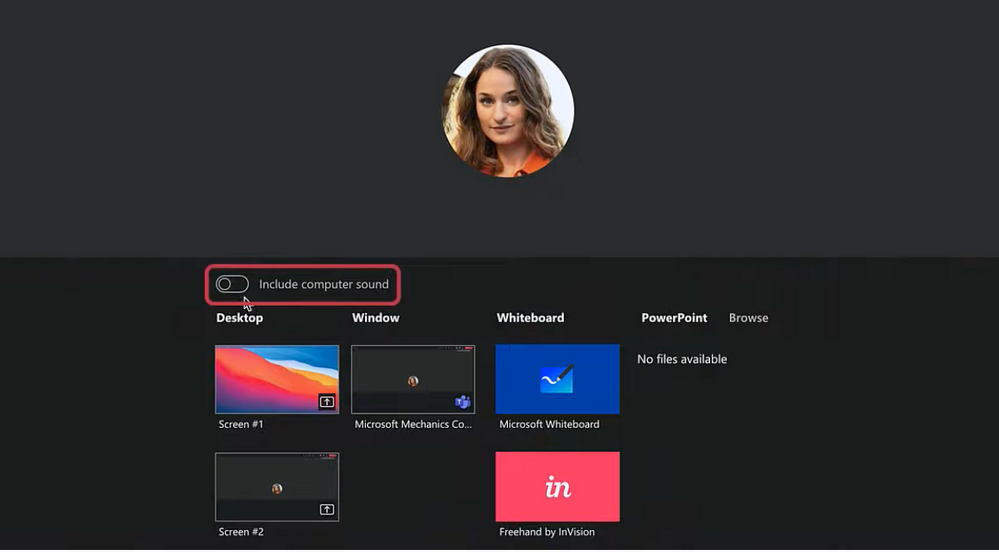
With that, let’s get started. I’m on a MacBook in a Teams meeting and I want to share a video running in YouTube, but this could anything or any app with sound running in a Mac or PC. When I hit the share tray, you’ll see I have the new option to “Include computer sound” that I can toggle on before sharing my desktop. So I’ll enable it, select my desktop in this case and hit play on my previous video explaining this process using Windows, which is by the way still more or less the same. Now let me switch over to Adele’s view and sound with the incoming audio, and you’ll hear the sound coming through.
One note here about my previous video, I said that MacOS will share audio without using this capability. That was true if audio is coming out of your Mac’s speakers. MacOS in this case is different from Windows, where Windows will usually succeed in noise-canceling speaker sound completely out. But this approach of sharing speaker audio doesn’t always work, if you’re wearing headphones, or just want the sound to be better than what you can achieve using the speakers and microphone pick-up. So, let’s switch back over to the Mac, and I’ll show you the second option to share or un-share computer sound during the meeting. If I move my cursor to the top of the screen, you’ll see another couple of screen sharing controls, I’ll pin this for now. Here I can use this little button between “Give control” and “Stop Presenting” to turn off or turn on sharing computer sound. The diagonal slash means it’s off and no slash means it’s on. Using that control means you don’t need to stop sharing, enable computer sound, then re-share your screen. Both of these control types are available in Windows and MacOS, so the same steps I just demonstrated apply to Windows as well. So now I’ll Leave the meeting.
OK, if you’ve made it this far and have realized this option isn’t available in your Teams app on MacOS, let me show you how to enable it. In Teams, click on your image in the upper right corner. Go to about, then if you DON’T have this checkmark next to Public Preview, click on it. Teams will ask to you restart the Teams app. Once you log back in, you’ll be on the Public Preview, then you should see the option to “Include computer sound” when sharing content. The very first time you try out that option on your Mac, it will ask you to install a driver, and after that it will work like I demonstrated earlier.
Finally, if you don’t even see the Public Preview option from before, that’s because your Teams admin doesn’t have this enabled in the Teams Admin Center. If you’re the Teams admin, you’ll find it under Teams, Update Policies, and “Show preview features”. Just turn that on, and you can scope it to only the users who really need it if you want — maybe that is your group of MacOS users — and they’ll see the options for enabling Public Preview appear soon.
So that was just another quick working from home tip, and to see more like this, check out aka.ms/WFHMechanics for more. Be sure to subscribe to our channel. And as always, thanks for watching!
Brought to you by Dr. Ware, Microsoft Office 365 Silver Partner, Charleston SC.


Recent Comments