Azure Kubernetes Service on Azure Stack HCI: deliver Storage Spaces Direct to containers

Azure Kubernetes Service on Azure Stack HCI: deliver Storage Spaces Direct to containers

This article is contributed. See the original author and article here.

Written by Cosmos Darwin, Senior PM on the Azure Edge & Platform team at Microsoft. Follow him on Twitter @cosmosdarwin.


The biggest news for Azure Stack HCI at Microsoft Ignite 2020 is the surprise announcement of the Azure Kubernetes Service coming to Azure Stack HCI. You can download the Preview right now. This new service dramatically expands the possibilities for IT and Ops teams, empowering you to easily run modern container-based applications on-premises, including stateful containers that require fast, fault tolerant persistent storage.


In this blog post, I’m going to explain how it works. I’ll describe the experience of setting up a Kubernetes cluster on Azure Stack HCI, present the storage architecture, and then containerize and deploy a sample app to demonstrate basics like dynamic provisioning and scale-out. I’ll introduce some Kubernetes concepts along the way, but that’s not the focus. If you’re interested in how you can use Storage Spaces Direct in the exciting new world of containers, read on!


Background


Before we start, it helps to understand the backstory: Kubernetes is hard to set up.


In recent years, containers have become the normal way to package and distribute new applications. Many organizations want to use Kubernetes to orchestrate their containers. Unfortunately, the only straightforward way to get Kubernetes has historically been to use a managed service in the public cloud, like Azure Kubernetes Service. But what if you need to deploy the app on your own servers, that you manage, on your premises? At Microsoft, we’re committed to helping you innovate anywhere with Azure. That’s why we build common tools that work across the cloud and the edge, and it’s why the Azure Kubernetes Service is coming to Azure Stack HCI.


OK, let’s get into it.


My lab environment


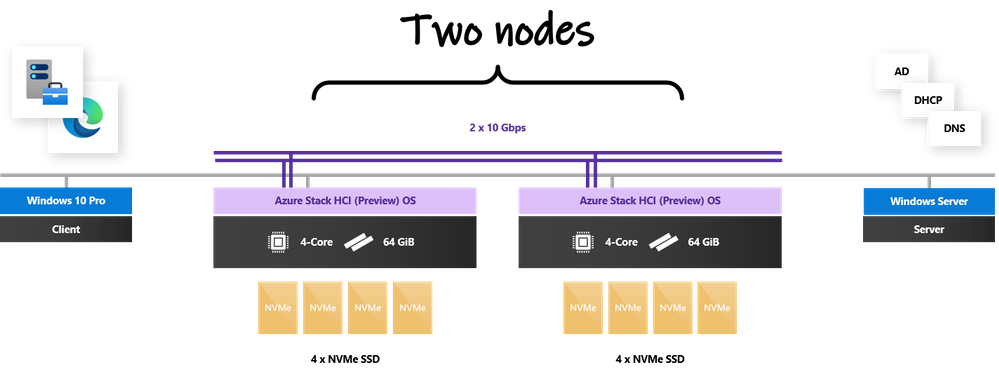
You don’t need a large hardware footprint to run the Azure Kubernetes Service. For this blog, I’m using an Azure Stack HCI cluster pretty close to the minimum spec: 2 nodes with 4 cores, 64 GiB of memory, and 4 x SSD drives each. If you watched my recent appearance on Azure Friday with Scott Hanselman, this configuration should sound familiar. Each node is running the latest Azure Stack HCI (Preview) operating system. (Missed that announcement? Watch my session from Microsoft Inspire in July.) There’s also a Windows 10 client machine with Windows Admin Center, and an Active Directory domain controller providing DNS and DHCP, on the same network.


my-env.png


Getting started: deploy the Azure Kubernetes Service


Before we can deploy a Kubernetes cluster, we first need to deploy the Azure Kubernetes Service itself. This step is only necessary on-premises: we are deploying our own instance of the control plane, running completely local to Azure Stack HCI. There’s no equivalent step in the public cloud because the control plane is already set up, years ago, by Microsoft.


Luckily, there’s a Windows Admin Center extension included with the Preview to make this easy. With the extension installed, navigate to your Azure Stack HCI cluster and select the “Azure Kubernetes Service” tool in the left menu. Provide the administrator credential, a cluster shared volume, and (implicitly) a range of IP addresses from your DHCP server, and it handles everything else. The installation takes about 30 minutes.


screenshot-1.png


With the installation complete, we can poke around the cluster and observe what’s new:


  • There’s an agent, visible in Get-Process, running on every host node
  • There’s a clustered service, visible in Get-ClusterResource, running on the host cluster
  • There are two virtual machines, visible in Get-VM or Windows Admin Center
  • Many files have been dropped into our cluster shared volume

screenshot-2.png


screenshot-3.png


Ready-made Kubernetes infrastructure


With the infrastructure in place, we’re ready to deploy our first Kubernetes cluster.


In Kubernetes, a cluster comprises at least one controller node and additional worker nodes. When you deploy a Kubernetes cluster in Azure public cloud, these nodes are simply virtual machines deployed in Azure. The Azure Kubernetes Service handles provisioning them for you and setting them up with a container runtime (e.g. Docker) and the kubelet agentry. Inside, the worker nodes run either Linux or Windows, depending on the container images you want to run.


This all works the same way on Azure Stack HCI: when you deploy a Kubernetes cluster, the on-premises Azure Kubernetes Service provisions on-premises virtual machines with either Linux or Windows inside. Just like in Azure public cloud, these virtual “container host” nodes are completely managed for you, even though they’re on-premises. Let’s try it.


This PowerShell cmdlet creates a new Kubernetes cluster:


New-AksHciCluster -clusterName demo -linuxNodeCount 2


(Alternatively, you can use Windows Admin Center if you prefer.)


Our new Kubernetes cluster named “demo” will have 2 worker nodes running Linux. We can create Windows worker nodes (to run Windows containers) with the -windowsNodeCount parameter. Notice that we didn’t need to provide an ISO or VHD, nor credentials, nor… any inputs at all. After a few short minutes, our new Kubernetes nodes are created and visible in Windows Admin Center:


screenshot-4.png


This push-button simplicity is the major benefit of Azure Kubernetes Service.


The first time you experience it on Azure Stack HCI, it’s honestly startling. Where did these virtual machines come from?! Closer inspection reveals that they’re running an operating system called “Common Base Linux – Mariner” that Microsoft quietly revealed last week on GitHub. Azure Kubernetes Service downloaded it for us. It’s an open-source Linux distribution that, like the rest of Azure Kubernetes Service on Azure Stack HCI, is supported and secured top-to-bottom by Microsoft. Very mysterious.


screenshot-5.png


More important than the nodes themselves is what’s going on inside them. Azure Kubernetes Service has configured an impressive amount of infrastructure to assemble these nodes into a robust, managed Kubernetes cluster. And it helpfully installed kubectl.exe, the Kubernetes CLI, on every node in the Azure Stack HCI host cluster.


We can use kubectl to explore Kubernetes. In PowerShell, run:


PS C:> kubectl get pod -A


We see more than a dozen pods!


NAMESPACE     NAME                                               READY   STATUS    RESTARTS   AGE
kube-system   coredns-868d587f84-dws2x                           1/1     Running   0          21m
kube-system   coredns-868d587f84-kr8sw                           1/1     Running   0          21m
kube-system   csi-msk8scsi-controller-5bb99d6f5b-x9rxm           5/5     Running   0          21m
kube-system   csi-msk8scsi-node-jfl9p                            3/3     Running   0          20m
kube-system   csi-msk8scsi-node-npqxm                            3/3     Running   0          12m
kube-system   etcd-demo-control-plane-v44qg                      1/1     Running   0          22m
kube-system   kube-apiserver-demo-control-plane-v44qg            1/1     Running   0          22m
kube-system   kube-controller-manager-demo-control-plane-v44qg   1/1     Running   0          22m
kube-system   kube-flannel-ds-amd64-9pxwn                        1/1     Running   0          21m
kube-system   kube-flannel-ds-amd64-brxz9                        1/1     Running   0          12m
kube-system   kube-flannel-ds-amd64-tjffx                        1/1     Running   0          20m
kube-system   kube-proxy-5s8kw                                   1/1     Running   0          12m
kube-system   kube-proxy-p9nbd                                   1/1     Running   0          20m
kube-system   kube-proxy-wfxfw                                   1/1     Running   0          21m
kube-system   kube-scheduler-demo-control-plane-v44qg            1/1     Running   0          22m
kube-system   moc-cloud-controller-manager-644b8d8688-4n84j      1/1     Running   0          21m


If you’ve used Kubernetes before, then you recognize many of these. Spot the four core components of the Kubernetes control plane: etcd, apiserver, controller, and scheduler; the Flannel plugin that fulfills the Container Network Interface (CNI); something with CSI in its name (hint: Container Storage Interface); and a few others.


On the other hand, if you’re new to Kubernetes, don’t feel overwhelmed. You don’t need to know any of this to succeed with Kubernetes on Azure Stack HCI. That’s the whole point: Azure Kubernetes Service handles it for you. I won’t get into Kubernetes infrastructure in this blog, but if you’re interested to learn more, consider reading one of the many excellent explainers out there, like this one.


Connecting the dots with Storage Spaces Direct


For our purposes, suffice to say that in Kubernetes, pods are the basic unit of compute and persistent volumes are the basic unit of storage. Pods comprise one or more containerized apps and consume resources like processor cycles and memory from worker nodes. They can also claim (request) access to one or more persistent volumes. Where do the persistent volumes come from?


Storage in Kubernetes depends on your environment. The Container Storage Interface (CSI) defines how storage providers can extend the core Kubernetes platform to offer convenient provisioning from an external storage system. For example, when you deploy Kubernetes in Azure public cloud, requests for storage are fulfilled by Azure Disks or Azure Files, depending on the specifics of your request. This works because Microsoft implemented two CSI drivers, azureDisk and azureFile, that Azure Kubernetes Service automatically installs for you.


To bring Kubernetes to Azure Stack HCI, our team implemented a new CSI driver.


The simplest way to try it out is what’s called static provisioning. In plain terms, this means to pre-create a Kubernetes persistent volume claim using administrator tools, even before deploying any pods. We can do this by authoring a short YAML file:


apiVersion: "v1"
kind: "PersistentVolumeClaim"
metadata:
  name: "bigvolume"
spec:
  resources:
    requests:
      storage: 100Gi
  accessModes:
    - "ReadWriteOnce


The primary way that administrators interact with Kubernetes is by applying YAML files to describe the desired state of the cluster. Kubernetes compares your YAML with the current reality, figures out what changes to make, and implements them. The YAML format is human-readable: ours defines an object of kind PersistentVolumeClaim named “bigvolume” with storage capacity up to 100 GiB and read/write access for one consumer at a time.


Save the YAML and use kubectl to apply it:


PS C:> kubectl apply -f pvc.yaml


To fulfill our claim, Kubernetes will provision a new persistent volume, or “pv” for short. We can see it with kubectl:


PS C:> kubectl get pv


Here’s the output:


NAME                   CAPACITY   ACCESS MODES   STATUS   CLAIM               STORAGECLASS   AGE
pvc-e11dbfa2-3fc1...   100Gi      RWO            Bound    default/bigvolume   default        1s


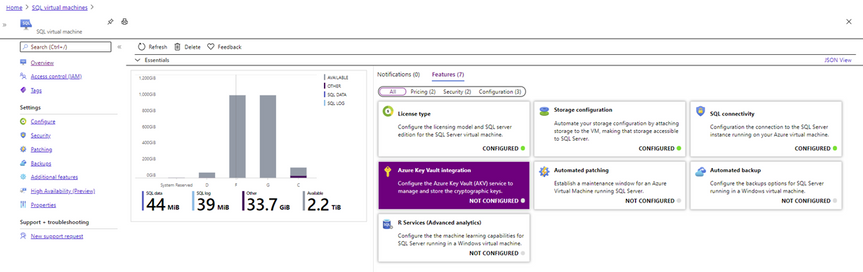
Moreover, we see it in Windows Admin Center – look at the Azure Stack HCI volume where we deployed Azure Kubernetes Service, before and after:


screenshot-6.png


Clearly, the provisioning worked: it’s consuming real capacity from our Azure Stack HCI storage pool.


But how! What sorcery made this happen?


Review: Azure Stack HCI storage architecture


As the baseline, let’s review the Azure Stack HCI storage architecture for traditional virtual machines:


(Tip: the numbers in this list correspond to the numbers in the diagram.)


1. An Azure Stack HCI cluster is comprised of physical OEM servers running our operating system

2. The servers are connected by high-speed Ethernet for the storage bus layer “back-end”

3. Every server contributes local SSD, HDD, and NVMe drives into a software-defined pool of storage

4. From the pool, virtualized data volumes are created with built-in resiliency (like RAID implemented in software)

5. Virtual machines running on the cluster store their virtual hard disk files in the data volumes

6. With like-local access to their files from any host, they can move around the cluster in response to failures or maintenance


architecture-part-1.png


There’s more to it – caching, striping, deduplication, etc. – but that’s the basic picture.


Azure Kubernetes Service on Azure Stack HCI builds on the same architecture, with just a few additions. That’s good news: if you understand Storage Spaces Direct, you’re already halfway to being an expert with Kubernetes on Azure Stack HCI, because steps 1-6 don’t change at all. Here’s the additional orchestration Azure Kubernetes Service provides:


7. Kubernetes, running inside the virtual nodes, receives a request for storage (e.g. from a newly scheduled pod)

8. It forwards the request to the new msvhd CSI driver, automatically installed by Azure Kubernetes Service

9. Our CSI driver makes the requests to the clustered Agent Service and the Node Agent on the volume owner node

10. The Node Agent creates a new VHDX file and attaches it to the worker node (virtual machine) that needs the storage

11. Inside the worker node, the new disk is discovered and formatted using EXT4 (Linux) or NTFS (Windows)

12. Kubernetes mounts the storage into the requesting pod’s container filesystem


architecture-part-2.png


Again, notice that this architecture is strictly additive: it builds on how Azure Stack HCI already works. This means that containerized apps benefit from all the beloved features of Storage Spaces Direct: RDMA-accelerated storage, server-side read/write caching, nested resiliency, mirror-accelerated parity, encryption at rest, deduplication and compression, self-balancing scale-out… it all just works.


To return to our example, using timestamps and file sizes, we can dig around and locate the VHD file that must correspond to “bigvolume” in Kubernetes. It’s tucked away here:


C:ClusterStorageVolume01imagesb79f1237ffe6c4b8ea899d6-fc71-11ea-91d4-02ec016a0003.vhdx


So, that’s the sorcery. :)


Dynamic storage provisioning


Our first example used static provisioning, one of two ways to get persistent storage in Kubernetes. The more common way is dynamic provisioning, where storage is created just-in-time as pods are scheduled. To facilitate dynamic provisioning, Kubernetes uses storage classes to represent and templatize different options (e.g. different media, or different resiliency, etc.) offered by the underlying storage.


For example, in Azure public cloud, Azure Kubernetes Service conveniently provides these out of the box:


PS C:> kubectl get sc
NAME                PROVISIONER                VOLUMEBINDINGMODE   ALLOWVOLUMEEXPANSION   AGE
azurefile           kubernetes.io/azure-file   Immediate           true                   1h
azurefile-premium   kubernetes.io/azure-file   Immediate           true                   1h
default (default)   kubernetes.io/azure-disk   Immediate           true                   1h
managed-premium     kubernetes.io/azure-disk   Immediate           true                   1h


Notice the “default” storage class, which enables someone to request storage without specific knowledge of the local environment.


On Azure Stack HCI, there’s a convenient default storage class too:


PS C:> kubectl get sc

NAME                PROVISIONER   VOLUMEBINDINGMODE   ALLOWVOLUMEEXPANSION   AGE
default (default)   msvhd         Immediate           true                   1h


With dynamic provisioning and default storage classes, Kubernetes can ensure that containers get the storage they expect (as described in their YAML file) regardless how they get scheduled, re-scheduled, scaled out, or otherwise moved. It even provides portability to/from the public cloud: when I apply pvc.yaml from earlier on Azure public cloud, I get 100 GiB of Standard SSD Azure Managed Disk. When I run the exact same YAML on Azure Stack HCI, I get 100 GiB of VHDX on my host cluster’s capacity media.


I don’t need to change my code at all.


Sample application


To exercise the basics, I’ve written a sample app that we can containerize and deploy to Kubernetes on Azure Stack HCI. My app is an extravagant 17 lines of Python code (on GitHub here) meaning it’s simplistic, for illustrative purposes only. All it does is query the time, query its own container ID, and then append how long it’s been running to /storage/log.txt once per minute. That’s it.


To containerize this app, I’ve taken three steps:


  1. On my local dev box, I authored a Dockerfile to package this app into a container image
  2. I pushed the container image into an Azure Container Registry in my subscription
  3. Finally, I authored several YAML files to describe how Kubernetes should run my container


steps-to-containerize.png


These files – demo.py, the Dockerfile, and the demo1/2/3.yaml Kubernetes manifests are literally all the code in this project.


The important point is that my app requires persistent storage.


Specifically, when my code starts, it expects writeable storage mounted at /storage.


Deploy the app


Let’s start with the simplest thing: demo1.yaml simply defines one PersistentVolumeClaim “myvolumeclaim” and one Pod “demo1” which mounts the volume.


demo1-yaml.png


Let’s apply the YAML:


PS C:> kubectl apply -f demo1.yaml


Moments later, just like that, Kubernetes has started running my app!


PS C:> kubectl get pod

NAME    READY   STATUS    RESTARTS   AGE
demo1   1/1     Running   0          27s


 More to the point, its requested storage was dynamically provisioned:


PS C:> kubectl get pv
NAME                    CAPACITY   ACCESS MODES   STATUS   CLAIM                   STORAGECLASS   AGE
pvc-d8781916-8d5b-...   1Gi        RWO            Bound    default/myvolumeclaim   default        27s


After a few minutes, we can get a shell to the container and get the content of the file it’s writing:


PS C:> kubectl exec demo1 -- cat ../storage/log.txt


As expected, we see one lonely container, writing hello once per minute:


[09:51:00 AM] Hello from container e5809e63...ca54e26e! I've been running for 0 minutes.
[09:52:00 AM] Hello from container e5809e63...ca54e26e! I've been running for 1 minutes.
[09:53:00 AM] Hello from container e5809e63...ca54e26e! I've been running for 2 minutes.
[09:54:00 AM] Hello from container e5809e63...ca54e26e! I've been running for 3 minutes.
[09:55:00 AM] Hello from container e5809e63...ca54e26e! I've been running for 4 minutes.


The app works – cool.


Can we scale it?


Scale out (run multiple container instances)


Kubernetes has convenient and powerful built-in mechanisms to scale apps. By far the most common is an abstraction called Deployment. Instead of describing each pod directly, you templatizes one or multiple pods and then specify how many identical replicas of each pod should be running. (There’s more to it, but that’s the gist.) You provide the target number of replicas in your YAML specification, and Kubernetes handles spinning up additional instances to meet your target.


demo2.yaml defines a Deployment of our sample app. We can start with:


spec:
  replicas: 1


With just 1 replica, this is equivalent to what we did before.


After verifying that it’s working, let’s make this edit to the YAML and re-apply:


spec:
  replicas: 5


Kubernetes detects our change and immediately starts creating 4 more instances of our app!


PS C:> kubectl get pod
NAME                    READY   STATUS              RESTARTS   AGE
demo2-bb9cb785b-4nrzt   1/1     Running             0          3m21s
demo2-bb9cb785b-8w76m   0/1     ContainerCreating   0          5s
demo2-bb9cb785b-f4mw5   0/1     ContainerCreating   0          5s
demo2-bb9cb785b-gsml2   0/1     ContainerCreating   0          5s
demo2-bb9cb785b-s8stg   0/1     ContainerCreating   0          5s


Notice that my YAML is structured such that all instances reference the same PersistentVolumeClaim – here’s the picture:


demo2-yaml.png


Because all 5 instances of our containerized app are accessing (and writing to) the same underlying storage, we expect to see their messages intermingled together. After a few minutes, we can get the contents of the /storage/log.txt file to confirm. And indeed, it works! For the first few minutes, from 10:00 AM until 10:03 AM, there is one single container (with ID ending in 8d3f6a82) writing once per minute. Then we scale out. From 10:04 onward, we see 5 containers with different IDs. One is from earlier, but 4 are new (running for 0 minutes). Thereafter, every minute on the minute, all 5 containers write in lockstep to the file:


[10:00:00 AM] Hello from container 735613d8...8d3f6a82! I've been running for 0 minutes.

[10:01:00 AM] Hello from container 735613d8...8d3f6a82! I've been running for 1 minutes.

[10:02:00 AM] Hello from container 735613d8...8d3f6a82! I've been running for 2 minutes.

[10:03:00 AM] Hello from container 735613d8...8d3f6a82! I've been running for 3 minutes.

[10:04:00 AM] Hello from container 735613d8...8d3f6a82! I've been running for 4 minutes.
[10:04:00 AM] Hello from container 03e68cc2...9369d18d! I've been running for 0 minutes.
[10:04:00 AM] Hello from container 1c93a862...f8e23339! I've been running for 0 minutes.
[10:04:00 AM] Hello from container 4f94949b...f8eb2df5! I've been running for 0 minutes.
[10:04:00 AM] Hello from container 08c7f504...e0345af8! I've been running for 0 minutes.

[10:05:00 AM] Hello from container 735613d8...8d3f6a82! I've been running for 5 minutes.
[10:05:00 AM] Hello from container 1c93a862...f8e23339! I've been running for 1 minutes.
[10:05:00 AM] Hello from container 03e68cc2...9369d18d! I've been running for 1 minutes.
[10:05:00 AM] Hello from container 4f94949b...f8eb2df5! I've been running for 1 minutes.
[10:05:00 AM] Hello from container 08c7f504...e0345af8! I've been running for 1 minutes.

[10:06:00 AM] Hello from container 735613d8...8d3f6a82! I've been running for 6 minutes.
[10:06:00 AM] Hello from container 08c7f504...e0345af8! I've been running for 2 minutes.
[10:06:00 AM] Hello from container 03e68cc2...9369d18d! I've been running for 2 minutes.
[10:06:00 AM] Hello from container 1c93a862...f8e23339! I've been running for 2 minutes.
[10:06:00 AM] Hello from container 4f94949b...f8eb2df5! I've been running for 2 minutes.


We’ve scaled our app, but what if we need to scale storage? Can we orchestrate that too?


Scale persistent storage with Stateful Sets


It’s reasonably common that when you containerize a stateful application, like a database, each instance may require its own persistent storage. One way to accomplish this is with the Kubernetes abstraction called StatefulSet. By templatizing both the pod and its storage claim, demo3.yaml showcases the value of dynamic provisioning. Now, each instance will get its own persistent volume, while still providing the same push-button scalability as before:


demo3-yaml.png


After we apply the YAML with Replicas: 5, we can see our statefulset. It’s diligently tracking 5/5 instances for us:


PS C:> kubectl get statefulset
NAME    READY   AGE
demo3   5/5     2m35s


Here are the 5 running pods, thoughtfully named and numbered by Kubernetes:


PS C:> kubectl get pod

NAME      READY   STATUS    RESTARTS   AGE
demo3-0   1/1     Running   0          3m
demo3-1   1/1     Running   0          3m
demo3-2   1/1     Running   0          2m
demo3-3   1/1     Running   0          2m
demo3-4   1/1     Running   0          1m


More to the point, each pod requested its own exclusive storage, so 5 persistent volume claims were provisioned:


PS C:> kubectl get pvc

NAME               STATUS   VOLUME                 CAPACITY   ACCESS MODES   STORAGECLASS   AGE
myvolume-demo3-0   Bound    pvc-09d32b8c-4373...   1Gi        RWO            default        3m
myvolume-demo3-1   Bound    pvc-09d32b8c-4373...   1Gi        RWO            default        3m
myvolume-demo3-2   Bound    pvc-09d32b8c-4373...   1Gi        RWO            default        2m
myvolume-demo3-3   Bound    pvc-09d32b8c-4373...   1Gi        RWO            default        2m
myvolume-demo3-4   Bound    pvc-09d32b8c-4373...   1Gi        RWO            default        1m


…and these claims were fulfilled concretely by creating 5 new VHDX files on Azure Stack HCI:


screenshot-7.png


Takeaway


Whew, that was a lot to take in.


As you can see, Azure Kubernetes Service on Azure Stack HCI delivers the same push-button experience for deploying a robust, managed Kubernetes infrastructure as in Azure public cloud, but now running completely on your servers, on your premises. To empower you to innovate anywhere with Azure, this new service is supported and secured top-to-bottom by Microsoft, and includes everything you need to run modern container-based apps on Azure Stack HCI, like the new CSI storage driver that mounts capacity from Storage Spaces Direct into Kubernetes pods. With support for dynamic provisioning using storage classes, volume expansion, and more, containerized apps can get the storage they need on Azure Stack HCI with few or no code changes.


You can run containers and virtual machines side-by-side on the same Azure Stack HCI cluster, and if you have an existing deployment of Azure Stack HCI, you can add Azure Kubernetes Service without redeploying your environment or buying new hardware. It’s an exciting time for Azure edge infrastructure, and a great day to start learning Kubernetes.


Please try out the Preview and let us know what you think!


– Cosmos


Acknowledgements


Thanks to Dinesh Kumar Govindasamy, Benjamin Armstrong, and Nick Maliwacki for their support with this blog post. In the spirit of full transparency, let me acknowledge that this blog glosses over a few minor things: (1) For illustrative effect, we set the msvhd storage class to provision fixed VHDs although the default is dynamic; (2) For demo1, to pull our image from my private Azure Container Registry, we supplied imagePullSecrets in our YAML, not shown; (3) For demo2, we used a NodeSelector to keep all 5 replicas on the same node, because ReadWriteMany access isn’t in the current Preview.

Boosting your in-tool productivity with Azure CLI

Boosting your in-tool productivity with Azure CLI

This article is contributed. See the original author and article here.

Welcome to another release of the Azure CLI! In this release, we will be sharing with you the latest feature improvements that will help boost in tool productivity. This includes:

  1. A newly refined error messages that is more human readable and legible.
  2. A new in-tool upgrade mechanism so you no longer must leave the tool to keep every dependency in sync and intact.
  3. A way to remember contextual information between Az CLI commands. This helps reduce the command length by eliminating parameters that are repeated in sequential CLI commands.
  4. A new –query-examples option that provide you contextual JMES query recommendations to help you get started with command querying.

You can download the latest official release from the Azure CLI page or the dev build from the GitHub Azure CLI homepage


New human readable error outputs with AI powered recommendations:

When we talk to CLI customers, we often hear that understanding output errors is difficult.  

As our first approach, we looked at client-side syntactical errors. We found that these are primarily caused by misspelling commands or typing in commands which do not exist for a particular resource. In partnership with our User Experience and Design teams we landed on a new 3 line output model of:

  1. What happened?
  2. Try this…
  3. Learn more…

We think that the additional information provided by ‘Try this’ and ‘Learn more’ can effectively guide you towards the correct commands and parameters.


In the screenshots below, you can see that the new error output is much cleaner and simpler; most importantly, it’s now human readable. In the case where the error message alone doesn’t provide sufficient context to unblock you on the issue, we hope you can leverage the follow up in tool recommendations that are made readily available to you:


blogignite_2.png

 Figure 1: Examples of new error output with contextual recommendations


blogignite_3.png

 Figure 2: Coming Soon: Prototype with better colorization and templating design


Convenient in tool az upgrade:

Az upgrade is another new feature that further enhances your in-tool convenience. The command name itself elaborates on what it does — enabling you to upgrade to the latest CLI version without having to leave the tool. To try it out, simply type in az upgrade in your terminal and the tool will auto-upgrade your core CLI version and all of your installed extensions to the latest version on your behalf, while checking and maintaining all the package dependencies.


Under the hood, az upgrade uses the package manager commands to perform the updates. Currently there are different commands you need to remember depending upon your operating system and package manager, for instance, sudo apt-get update && sudo apt-get install –only-upgrade -y azure-cli for deb packages on Ubuntu, sudo yum update azure-cli for RPM packages on CentOS,  and brew update && brew upgrade azure-cli for homebrew packages on macOS. Now you can simply use a single az upgrade command regardless of the platform you are using the Azure CLI.


blogignite_4.png

 Figure 3: UX of the new in tool az upgrade


Once you are on the latest version of the Azure CLI, you can also enable automatic upgrade.  To enable it simply apply the single configuration option via az config auto-upgrade.enable = yes. That way you’ll never have to worry about keeping up with the latest version of the tool. The Azure CLI will check new versions and prompt you with an update after any command finishes running once the update is available.


The prompt message and output messages during upgrade may interrupt your command result if it is assigned to some variable or in an automated flow. To avoid interruption, you can use az config auto-upgrade.prompt = no to allow the update to happen automatically without confirmation and only show warnings and errors during the upgrade. By default, all installed extensions will also be updated. You can disable extension update via az config auto-upgrade.all = no.


Note: Please wait for az upgrade to complete before proceeding to the next set of commands, else the new versions of the CLI (+extensions) may have breaking changes.


Advanced contextual support with az config param-persist:

We recently released a new way to set configuration options so that it’d be simpler and more intuitive as you work with the tool. We further extended its capabilities with yet another experimental feature named az config param-persist. Similar to how one could use the basic config/configure commands to set global static defaults, az config param-persist is a specific configurable mode that implicitly sets defaults in your current working directory for which the values would persist – this eliminates the need for you to re-specify arguments in CLI commands once they’ve been declared. Below is a before vs. after feature comparison:


blogignite_5.png

 Figure 4: before & after view of az config param-persist


With param-persist enabled on the right, we can see that once the values of resource group, location, and storage account have been specified in previous commands, they can now be omitted from subsequent commands, thereby reducing the number of potential error points when you interact with the tool. We currently support param-persist on a core set of parameters including resource group and vnet across all services as well as location, resource name, storage account support on functions and webapp. If you’re interested in helping us shape its future outlook – whether it be command naming, feature coverage, additional capabilities, and such; please do not hesitate to share your feedback here.


Helping you get started with JMES with –query-examples

The Azure CLI supports a mechanism to return specific fields out of the returned JSON object.  This uses JMESPath to specify the query.  While powerful, these queries can be complicated to write. Our last improvement is a new contextual –query-examples capabilities. This is a flag that could be appended to any az <resource> show or list commands for list of JMES query recommendations. This includes examples to query for a specific key, filter the output based on a set of conditions, and query for a set of commonly used functions. When you come across a specific query of interest, please be sure to wrap them in the double quotation marks (“ ”) and append them after the –query flag when performing the actual query. Below are some examples in action:


blogignite_6.png

Figure 5: Example usage of –query-examples with az group list


blogignite_7.png

Figure 6: Example of filtering/limiting recommendations that contain the texts ostype or resourcegroup


Once again, you can further config it with az config to i) limit the max num of inline recommendations with az config set query.max_examples; and ii) define the max length of help string and query string with az config set query.help_len and az config set query.examples_len.


One thing to note:  –query and –query-examples provide 2 distinct  functionalities. –query enables you to filter for specific info on the command output whereas –query-examples provide you contextual query recommendations. This is an experimental feature and we would love your feedback here.


Follow up with us

We’d love for you to try out these new experiences and share your feedback on their usability and applicability for your day-to-day use cases. All of the above features are here to lower your in tool friction and improve your productivity. If you’re interested, here is where you can learn more about new features in the ever improving Azure CLI.


Thank you

The CLI team


Introducing Azure Resource Mover: a seamless way to move between Azure regions

Introducing Azure Resource Mover: a seamless way to move between Azure regions

This article is contributed. See the original author and article here.

With over 60+ announced Azure regions across the world, more than any other cloud provider, we aim to provide customers with options to select the region that best suits their needs – whether that need is based on data residency or compliance requirementsservice offerings, technical and regulatory considerations, or just being closer to their customers. As we increase the number of new regions across the globe, and expand resiliency options with new Azure Availability Zones, we recognize the need to provide customers with the ability to move their IT resources to regions of their choice.  


At Microsoft Ignite this week, we are announcing Azure Resource Mover, a new free service in preview that enables customers to move multiple resources across public Azure regions to support their ever-evolving business needs. Azure Resource Mover greatly reduces customer time and effort needed to move resources across regions by providing a built-in dependency analysis, planning, and testing that ensures the resources are prepared to move and then successfully moved to the desired region. Azure Resource Mover also provides a seamless and consistent single pane of glass experience that allows move orchestration for a range of Azure resources (Azure VMs, Azure Virtual Network, Azure SQL DBs etc.). 

The automation and single-click move capability of the Azure Resource Mover allowed us to significantly reduce the time and effort needed to move IT resources across regions,” said Adam Iqbal, capital markets Azure project lead at Accenture. “The ability to rename resources and customize IP addresses in the target location are other important features that helped to streamline and simplify the process.”


Azure Resource Mover, available through the Azure portal, PowerShell, and SDKs with any Azure subscription, can be used to support a number of key business needs such as: 

  • Take advantage of new Azure region expansions to be closer to their end customers to reduce latency 
  • Increase availability and resiliency of their applications by moving to regions with Azure Availability Zones 
  • Meet the data residency and compliance requirements necessary for operating their businesses 
  • Consolidate workloads into single regions to support mergers and acquisitions 

Over the last year we have announced new datacenter regions in Qatar, Israel, Mexico, Spain, Poland, Italy, New Zealand and our latest addition in the United States with West US 3 in ArizonaWith Azure Resource Mover, customers have the ability to plan ahead and take advantage of these new regions whether that is to meet compliance or data residency requirements or better serve their customers.   

Sujay_0-1600881553695.png


Moving between Azure regions with confidence 

Azure Resource Mover streamlines the move process by identifying and analyzing any dependencies needed to plan the move. Customers can plan and test ahead as many times as needed so that when fully prepared, the move can be staged to happen during a planned scheduled downtime event. This enables customers to have full confidence when planning large scale moves. 

Customers can rest assured that all moves are orchestrated within the highly secure and encrypted Azure environment and Azure Resource Mover provides the user with the validation that the move is final prior to committing the move to the target region. The resources at the source region are left intact until the final move is completed so customers 

Moving multiple resources simultaneously through a single pane of glass that abstracts the underlying technology elements and following a consistent experience significantly reduces touchpoints, so there is less time spent learning various required for the move and can reduce overall time for the move from months to weeks or days depending on amount of data. 

We continue to hear from customers of the importance of having the flexibility to take advantage of Azure regions. We have designed Azure Resource Mover with customer feedback and experience in mind and invite customers to learn more about Azure Resource Mover here and leverage our technical documentation on how to get started. Azure Resource Mover currently supports moving resources from any public region to any other public region. The support to move across sovereign clouds will be available in the coming months. 

Public Preview of the Azure Schema Registry in Azure Event Hubs

Public Preview of the Azure Schema Registry in Azure Event Hubs

This article is contributed. See the original author and article here.

Today, we are proud to announce the public preview of the Azure Schema Registry in Azure Event Hubs.


In many event streaming and messaging scenarios, the event/message payload contains structured data that is either being de-/serialized using a schema-driven format like Apache Avro and/or where both communicating parties want to validate the integrity of the data with a schema document as with JSON Schema.


For schema-driven formats, making the schema available to the message consumer is a prerequisite for the consumer being able to deserialize the data, at all.


The Azure Schema Registry that we are offering in public preview as a feature of Event Hubs provides a central repository for schema documents for event-driven and messaging-centric applications, and enables applications to adhere to a contract and flexibly interact with each other. The Schema Registry also provides a simple governance framework for reusable schemas and defines the relationship between schemas through a grouping construct.


With schema-driven serialization frameworks like Apache Avro, externalizing serialization metadata into shared schemas can also help to dramatically reduce the per-message overhead of type information and field names included with every data set as it is the case with tagged formats such as JSON. Having schemas stored alongside the events and inside the eventing infrastructure ensures that the metadata required for de-/serialization is always in reach and schemas cannot be misplaced.


What do I need to know about the Azure Schema Registry support in Event Hubs?

Event Hubs adds the new schema registry support as a new feature of every Event Hubs Standard namespace and in Event Hubs Dedicated.


Inside the namespace, you can now manage “schema groups” alongside the Event Hub instances (“topics” in Apache Kafka® API parlance). Each of these schema groups is a separately securable repository for a set of schemas. Schema groups can be aligned with a particular application or an organizational unit.


The security boundary imposed by the grouping mechanism help ensures that trade secrets do not inadvertently leak through metadata in situations where the namespace is shared amongst multiple partners. It also allows for application owners to manage schemas independent of other applications that share the same namespace.


Each schema group can hold multiple schemas, each with a version history. The compatibility enforcement feature which can help ensure that newer schema versions are backwards compatible can be set at the group level as a policy for all schemas in the group.


An Event Hubs Standard namespace can host 1 schema group and 25 schemas for this public preview. Event Hubs Dedicated can already host 1000 schema groups and 10000 schemas.


In spite of being hosted inside of Azure Event Hubs, the schema registry can be used universally with all Azure messaging services and any other message or events broker.


For the public preview, we provide SDKs for Java, .NET, Python, and Node/JS that can de-/serialize payloads using the Apache Avro format from and to byte streams/arrays and can be combined with any messaging and eventing service client. We will add further serialization formats with general availability of the service.


The Java client’s Apache Kafka client serializer for the Azure Schema Registry can be used in any Apache Kafka® scenario and with any Apache Kafka® based deployment or cloud service.

The figure below shows the information flow of the schema registry with Event Hubs using the Apache Kafka® serializer as an example:


Azure Schema RegistryAzure Schema Registry


How does the Azure Schema Registry integrate with my application?

First, you need to create an Event Hubs namespace, create a schema group, and seed the group with a schema. This can either be done through the Azure portal or through a command line client, but the producer client can also dynamically submit a schema. These steps are explained in detail in our documentation overview.


If use Apache Kafka® with the Java client today and you are already using a schema-registry backed serializer, you will find that it’s trivial to switch to the Azure Schema Registry’s Avro serializer and just by modifying the client configuration:


props.put(ProducerConfig.VALUE_SERIALIZER_CLASS_CONFIG,
     com.microsoft.azure.schemaregistry.kafka.avro.KafkaAvroSerializer.class);
props.put("schema.registry.url", azureSchemaRegistryEndpoint);
props.put("schema.registry.credential", azureIdentityTokenCredential);


You can then use the familiar, strongly typed serialization experience for sending records and schemas will be registered and made available to the consumers as you expect:


KafkaProducer<String, Employee> producer = 
      new KafkaProducer<String, Employee>(props);
producer.send(new ProducerRecord<>(topic, key, new Employee(name)));


The Avro serializers for all Azure SDK languages implement the same base class or pattern that is used for serialization throughout the SDK and can therefore be used with all Azure SDK clients that already have or will offer object serialization extensibility.


The serializer interface turns structured data into a byte stream (or byte array) and back. It can therefore be used anywhere and with any framework or service. Here is a snippet that uses the serializer with automatic schema registration in C#:


var employee = new Employee { Age = 42, Name = "John Doe" };
string groupName = "<schema_group_name>";

using var memoryStream = new MemoryStream();
var serializer = new SchemaRegistryAvroObjectSerializer(client, groupName, new SchemaRegistryAvroObjectSerializerOptions { AutoRegisterSchemas = true });
serializer.Serialize(memoryStream, employee, typeof(Employee), CancellationToken.None);


Open Standards

Even through schema registries are increasingly popular, there has so far been no open and vendor-neutral standard for a lightweight interface optimized for this use-case.


The most popular registry for Apache Kafka® is external to the Kafka project and vendor-proprietary, and even though it still appears to be open source, the vendor has switched the license from the Apache license to a restrictive license that dramatically limits who can touch the code, and to run the registry in a managed cloud environment. Cloud customers are locked hard into that vendor’s cloud offering, in spite of the open-source “community” façade.


Just as with our commitments to open messaging and eventing standards like AMQP, MQTT, JMS 2.0 and CloudEvents, we believe that application code that depends on a schema registry should be agile across products and environments and that customer should be able to use the same client code and protocol even if the schema registry implementation differs.


Therefore, Microsoft has submitted the interface of the Azure Schema Registry to the Cloud Native Foundation‘s “CloudEvents” project in June 2020.


The purpose of the submission is the joint standardization in the CloudEvents Working Group (WG) to ensure that the same interface can be implemented by many vendors and that clients can uniformly access their “nearest” schema registry, because the CloudEvents WG exists to jointly develop interoperable federations of eventing infrastructure. The schema registry interface is not restricted to or in any way dependent on the CloudEvents specification, but in the other direction, the CloudEvents dataschema and datacontenttype attributes already anticipate the use of a schema registry for payload encoding.


The schema registry definition in CNCF CloudEvents is expected to still evolve in the working group, and we are committed to providing a compliant implementation with the 1.0 release within a short time of it becoming final.


Notes:

  • The Schema Registry feature is currently in preview and is available only in standard and dedicated tiers, not in the basic tier.
  • This preview is initially available in the West Central US region and is expected to be available in all other global regions by September 29, 2020.

Next Steps

Learn more about the Azure Schema Registry in Event Hubs in the documentation.

Rehost your SQL Server to Azure Virtual Machines for manageability and cost optimization

Rehost your SQL Server to Azure Virtual Machines for manageability and cost optimization

This article is contributed. See the original author and article here.

Running SQL Server on Azure Virtual Machines provides a suite of free manageability capabilities that are available only on Azure, and which make it easier to run in a cost effective, secured and optimized manner. Microsoft introduced the Azure SQL family of database services to provide customers with a consistent, unified experience across an entire SQL portfolio and a full range of deployment options from edge to cloud. As a SQL Server customer, you can migrate your SQL workloads to SQL Server on Azure Virtual Machines while making the most of your current SQL Server license investments and benefit from the manageability benefits that SQL Server virtual machines offer today. Running SQL Server on an Azure virtual machine provides the best lift-and-shift experience for workloads where OS-level access is required.


A SQL Server instance on an Azure Virtual Machine is the cloud equivalent of an on-premises SQL Server, running your mission critical applications on Azure. Azure offers unique Windows Server and SQL Server licensing benefits through Azure Hybrid Benefit, giving you the ability to run the same SQL Server with a better total cost of ownership (TCO), with low effort and great performance. Azure also offers that ability for you to automatically manage your Windows Servers using our recently announced Azure Automanage preview offering. Read more about it here.

How can you leverage these benefits?

All of the security, manageability and cost-optimization benefits mentioned above are enabled through the SQL Server IaaS Agent Extension. To ensure that you’re receiving full manageability benefits, this extension can be installed on a SQL Server virtual machine that is already running or any new SQL Server virtual machine that you create in the future.

The screenshot below shows the different manageability options that are enabled when the SQL Server IaaS extension is enabled.


SQL IaaS Extension CapabilitiesSQL IaaS Extension Capabilities


Optimize Cost

The SQL Server IaaS extension enables administrators to reduce cost and manage inventory with less effort. There are a number of cost optimization capabilities that a SQL Server administrator can leverage with SQL Server virtual machines which are made possible through our “License type” feature. As an administrator, you will have the ability to:

  • See all your SQL Server virtual machine deployments in a single dashboard to make inventory management easier
  • Get a snapshot of how many SQL Server on Azure Virtual Machines are leveraging Azure Hybrid Benefit
  • Switch between Pay-as-you-go and Azure Hybrid Benefit licensing models to optimize the use of your licenses in the cloud
  • Leverage FREE passive SQL Server core benefits that enable using Azure as a Disaster Recovery site for your on-premises SQL Server at no additional license cost for customers with Software Assurance or SQL Server subscription licenses
  • Leverage FREE passive SQL Server core benefits for High Availability and Disaster Recovery scenarios for primary replicas hosted in Azure for customers with Software Assurance or SQL Server subscription licenses
  • Run SQL Server Reporting Services virtual machines with Pay-as-you-go licensing or Azure Hybrid Benefits

The License type for a SQL Server virtual machine provides three options: Pay As You Go, Azure Hybrid Benefit and Disaster Recovery (as seen in the screenshot below). The Disaster Recovery toggle gives you the ability to leverage the free Disaster Recovery license type benefit without having to track the deployments separately, making license management and inventory a lot easier.


Configure hybrid DR using free SQL Server VM licensesConfigure hybrid DR using free SQL Server VM licenses


This benefit applies to all releases of SQL Server starting from SQL Server 2008 to SQL Server 2019 as long as you are using licenses covered with Software Assurance or subscription licenses. You can learn more about these benefits here.


As a SQL Server user, you will have the ability in the near future to deploy a SQL Server Reporting Services virtual machine for your BI reporting requirements and also leverage a flexible licensing model through Pay-as-you-go and Azure Hybrid Benefit licensing. Also, you can deploy your Power BI Report Server virtual machines with Azure Hybrid Benefit licenses which makes it easier to rehost your relational and reporting workloads into Azure.

Enhance Security

Security is a key area of interest for any database administrator who is responsible for securing and protecting business data stored in a SQL Server database. Sometimes compliance requirements drive security needs like encryption of data at rest. SQL Server on Azure Virtual Machines make security management easier through patching and easily implement encryption features for better security and compliance.


The Automated Patching feature allows a SQL Server administrator to select a maintenance window schedule for applying Important Windows Server and SQL Server updates that are distributed through the Windows Update channel. You have the ability to select the maintenance window duration and the start of the window.


Patch your Azure SQL VM using scheduled windowsPatch your Azure SQL VM using scheduled windows

The SQL connectivity feature allows you to do the following:

  • Set the port for the SQL Server instance to ensure that you are able to listen on another port other than a well-known port.
  • Configure the connectivity rules to make it as restrictive like allowing local connectivity only or opening it up to public internet for external applications and clients to connect to the SQL Server instance (see screenshot below).
  • Enable SQL Authentication for the SQL Server instance if your applications and users require this authentication method.
  • Configure Azure Key Vault for the SQL Server instance to leverage Key Vault for Transparent Database Encryption, Column Level Encryption and Always Encrypted features of SQL Server to enable encryption of data at rest and in motion.


Increase Uptime

SQL Server virtual machines provide various management capabilities to make configuration of the environment a lot easier for business continuity and disaster recovery scenarios.

The new High Availability feature allows you to create a new cluster or onboard an existing cluster, and then create the availability group, listener, and internal load balancer.


Configure High Availability easily with Azure SQL VMConfigure High Availability easily with Azure SQL VM


Additionally, SQL Server on Azure Virtual Machines also help you reduce your cost of deploying a highly available environment if you have Software Assurance or you are using SQL Server subscription licenses. Let us consider an example where you were running a SQL Server virtual machine topology having one primary replica, one synchronous passive secondary replica and one asynchronous passive replica. You would need to license only the primary replica. It is assumed that the number of cores on all three replicas are the same. The example below uses Always On Availability Group as the High Availability and Disaster Recovery feature, but you can leverage this benefit with other SQL Server features like Failover Cluster Instances, Log Shipping, Database Mirroring and Backup and Restore. More details available here.


The Automated Backup feature allows you to setup SQL Server backups with various options like encrypting backups, set a retention period, backup system databases, configuring a manual backup schedule or setting up an automated backup. This is great for SQL Server virtual machines where you don’t want to attach a backup software but just backup all the databases on the instance to support point-in-time restore for creating copies of the database environment or to recover from user errors.

Manageability

SQL Server on Azure Virtual Machines provides a number of free manageability benefits which make administration tasks for a SQL Server instance a lot easier. In addition to that a number of best practices are surfaced through the wizards to make SQL Server virtual machines run with the most optimal configurations.


SQL Server on Azure Virtual Machines provides the ability to simplify storage configuration while setting up the virtual machine through the use of pre-configured storage profiles as seen in the screenshot below. This ensures that you are picking the right storage configuration for your data, log and tempdb files. You can read more about it here.


Configure storage settings for your Azure SQL VMConfigure storage settings for your Azure SQL VM


Once the SQL Server virtual machine is running, you have the option of increasing the storage capacity of your disks and the wizard will help you determine if you are picking a configuration setting which could be the victim of a capacity limit (see highlighted section in screenshot below).


Configure your storage settings on Azure SQL VMConfigure your storage settings on Azure SQL VM


You also have the ability to manage your SQL Server virtual machines through the SQL Server IaaS extension through the use of Azure CLI or PowerShell. Azure Runbooks or Azure Automation scripts can be created to leverage these benefits at scale across a fleet of SQL Server virtual machines.

If you leverage in-database Machine Learning for your SQL Server instances, SQL Server virtual machines provide the ability to configuring advanced analytics for your instance.

Next Steps

Running SQL Server in an Azure virtual machine gives you the same capabilities and experience you are used to with on-premises SQL Server, plus the additional ease of use and management benefits available only on Azure. Ensure that your virtual machines are running the SQL Server IaaS Extension to enable all these benefits, and check out the following links for more information about running SQL Server in Azure virtual machines.