by Scott Muniz | Sep 23, 2020 | Azure, Technology, Uncategorized
This article is contributed. See the original author and article here.
Azure Synapse Analytics brings the worlds of data integration, big data, and enterprise data warehousing together into a single service for end-to-end analytics, at cloud scale. This week at Microsoft Ignite we announced several features that bring accelerated time to insight via new built-in capabilities for both data exploration and data warehousing.
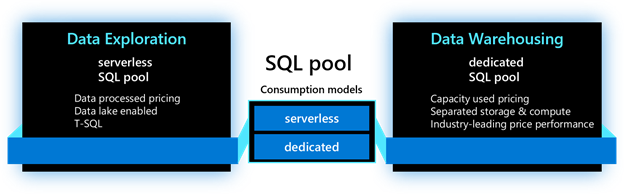
As we dive into each new feature, we will use the terminology below to identify where the feature is applicable. For the SQL capabilities in Azure Synapse Analytics, the main resource used is called a SQL pool. This resource has two consumption models: serverless and dedicated. The serverless model provides transparent compute consumption and is billed per data processed. The dedicated model allows use of dedicated compute, comes with capacity model and is billed per DWU-consumed. This new terminology will appear in the product soon.

Accelerate time to insight with:
-
Power BI performance accelerator for Azure Synapse Analytics (private preview)
Last year when we announced Azure Synapse Analytics, we promised to bring Microsoft’s data and BI capabilities together to deliver optimized experiences for our users. Today, we continue expanding on that promise with the announcement of the Power BI performance accelerator for Azure Synapse Analytics, a new self-managed process that enables automatic performance tuning for workloads and queries ran in Power BI.
As Power BI users run their queries and reports, the performance accelerator monitors those queries behind the scenes and optimizes their execution thus significantly improving query response times over the latest data. It analyzes all Power BI queries holistically and intelligently creates materialized views within the SQL engine while recognizing common query joins and aggregations patterns. As Power BI queries continue to execute, queries are automatically sped up and users observe increased query performance leading to quicker business insights. With new data being ingested into SQL tables, materialized views are automatically refreshed and maintained. Best of all, as more and more queries are being executed, the performance accelerator optimizes and adjusts the deployed materialized views to fine tune view design, all while reducing query execution times.
This feature can be enabled with a few clicks within the Synapse Studio. You can simply choose the frequency for executing the process and set the maximum storage to manage the size of the system-generated materialized views and it’s ready to start optimizing your Power BI workload.

The Power BI performance accelerator for Azure Synapse Analytics delivers a zero-management experience. It helps system administrators manage materialized views while allowing Power BI users to gain quick and up-to-date business insights.
This feature applies to dedicated model. To participate, submit your request here.
-
Azure Synapse Link for Azure Cosmos DB now includes Synapse SQL (public preview)
Azure Synapse Link connects operational data stores with high performance analytics engines in Azure Synapse Analytics. Using Synapse Link, customers can perform near real-time analytics directly over their data managed in Azure Cosmos DB without impacting the performance of their operational workloads.
Today, we are announcing the public preview of Azure Synapse Link for Azure Cosmos DB using Synapse SQL. This functionality is now available to all customers and is deployed worldwide. Customers can now use a serverless SQL pool in Azure Synapse Analytics to perform interactive analytics over Azure Cosmos DB data enabling quick insights and exploratory analysis without the need to employ complex data movement steps. Thanks to the rich T-SQL support for analytical queries and automatic schema discovery for data, it has never been easier to explore operational data by running ad-hoc and advanced analytical queries. Best of all, due to the rich and out-of-the-box ecosystem support, tools such as Power BI – and others – are just a few clicks away.

This feature applies to serverless model. To learn more, visit the Azure Synapse Link for Azure Cosmos DB documentation.
Note: this functionality will become available in the next few weeks.
-
Enhanced support for analyzing text delimited files (public preview)
Despite the availability and popularity of columnar file formats optimized for analytics, such as Parquet and ORC, most newly generated and legacy data is still in text delimited formats. With this in in mind, we are continuously improving the experience for delimited text data. To support immediate and interactive data exploration for this text data, the following enhancements are being introduced:
– Fast parser: The new delimited text parser (CSV version 2.0) provides significant performance improvement, ranging from 2X (querying smaller files) to up to 10X or more (querying larger files). This new performance improvement, based on novel parsing techniques and multi-threading, is available to all existing and newly provisioned Azure Synapse workspaces.
– Automatic schema discovery: With automatic schema discovery, OPENROWSET function can be used with CSV files without a need to define expected schema. As the system automatically derives the schema based on the data being queried, users can focus on the needed data insights leading to faster and easier data exploration.
– Transform as CSV: We have extended support for the CREATE EXTERNAL TABLE AS SELECT statement to enable storing query results in the delimited text format. This functionality enables multi-stage data transformation to be performed while keeping the data in delimited text format throughout its lifecycle.

This feature applies to serverless model. To learn more, visit the Azure Synapse SQL documentation.
Improve data loading performance and ease of use with:
-
COPY command (Generally Available)
Loading data into your data warehouse may not always be the easiest task. Defining the proper table structure to host your data, data quality problems, handling incorrect data and errors, and ingestion performance are among some of the typical issues customers face. We designed the COPY command to tackle these problems. The COPY command has become the default utility for loading data into data warehouses within Azure Synapse Analytics. In addition to bringing the COPY command into General Availability state, we have also added the following features:
– Automatic schema discovery: The whole process of defining and mapping source data into target tables is a cumbersome process, especially when tables contain large numbers of columns. To help with this, we are introducing built-in auto-schema discovery and an auto-table creation process (auto_create_table option in preview within COPY). When used, the system automatically creates the target table based on the schema of the Parquet files.
– Complex data type support: COPY command now supports loading complex data types stored in Parquet files which eliminates the previous need to manage multiple computes. When used together with the automatic schema discovery option, complex data types will automatically be mapped to nvarchar columns.
These new functionalities are also supported in partner products as well. Azure Stream Analytics, Azure Databricks, Informatica, Matillion, Fivetran, and Talend are among the products and services that support the new COPY command.
This feature applies to dedicated model. To learn more, visit the COPY documentation.
-
Fast streaming ingestion (Generally Available)
With the rise of IoT devices, both the amount and velocity of the data produced has increased dramatically. To make that data available for analysis and to reduce the time it takes to load and query this data within your data warehouse environments, we are announcing the General Availability of high throughput streaming data ingestion (and inline analytics) to dedicated SQL pools in Azure Synapse using Azure Stream Analytics. This new connector can handle ingestion rates exceeding 200MB/sec while ensuring very low latencies.
With Azure Stream Analytics, in addition to high throughput ingress, customers can use SQL to run in-line analytics such as JOINs, temporal aggregations, filtering, real-time time inferencing with pre-trained ML models, pattern matching, geospatial analytics and much more. It supports common formats such as JSON, and custom de-serialization capabilities to ingress and analyze any custom or binary streaming data formats. More details can be found in the announcement blog.
This feature applies to dedicated model. To learn more about high throughput streaming ingestion, visit our documentation.
Secure your sensitive data using:
-
Column-level Encryption (public preview)
As data gets moved to the cloud, securing your data assets is critical to building trust with your customers and partners. Azure Synapse Analytics already provides a breadth of options that can be used to handle sensitive data in a secure manner. We are expanding that support with the introduction of Column Level Encryption.
Column-level encryption (CLE) helps you implement fine-grained protection of sensitive data within a table (server-side encryption). With CLE, customers gain the ability to use different protection keys for different columns in a table, with each key having its own access permissions. The data in CLE-enforced columns is encrypted on disk, and remains encrypted in memory, until the DECRYPTBYKEY function is used to decrypt it. Azure Synapse Analytics supports using both symmetric and asymmetric keys.
This feature applies to dedicated model. To learn more, visit the Column Level Encryption documentation.
Improve productivity with expanded T-SQL support:
-
MERGE support (public preview)
During data loading processes, often there is a need to transform, prepare, and consolidate data from different and disparate data sources into a target table. Depending on the desired table state, data needs to be either inserted, updated, or deleted. Previously, this process could have been implemented using the supported T-SQL dialect. However, the process required multiple queries to be used which was costly and error prone. With the new MERGE support, Azure Synapse Analytics now addresses this need. Users can now synchronize two tables in a single step, streamlining the data processing using a single step statement while improving code readability and debugging.
This feature applies to dedicated model. For more details, see our MERGE documentation.
Note: this functionality will become available in the next few weeks.
-
Stored procedures support (public preview)
Stored procedures have long been a popular method for encapsulating data processing logic and storing it in a database. To enable customers to operationalize their SQL transformation logic over the data residing in their data lakes, we have added stored procedures support to our serverless model. These data transformation steps can easily be embedded when doing data ingestion with Azure Synapse, and other tools, for repeatable and reliable execution.
This feature applies to serverless model.
Note: this functionality will become available in the next few weeks.
-
Inline Table-Valued Functions (public preview)
Views have long been the go-to method for returning queryable table results in T-SQL. However, views do not provide the ability to parameterize their definitions. While user-defined functions (UDFs) offer the power to customize results based on arguments, only those that return scalar values had been available in Synapse SQL. By extending support for inline table-valued functions (TVFs), users can now return a table result set based on specified parameters. Query these results just as you would any table and alter its definition as you would a scalar-valued function.
This feature applies to both serverless and dedicated models. For more details, visit the CREATE FUNCTION documentation.
Note: this functionality will become available in the next few weeks, post deployment.
Try Azure Synapse Analytics today
by Contributed | Sep 23, 2020 | Azure, Technology, Uncategorized
This article is contributed. See the original author and article here.
Resource exemption will allow increased granularity for you to fine-tune recommendations by providing the ability to exempt certain resources from evaluation. With Azure Security Center’s Cloud Security Posture Management (CSPM) capabilities, we are offering a broad set of recommendations and security controls, that might be relevant for most, but not all customers. The only way to remove recommendations from the ASC dashboard and prevent them from influencing your Secure Score was to disable the whole related policy in the Azure Security Center Policy Initiative. That way, all resources were affected, meaning that once you switched off a policy, the particular recommendation that was derived from it, was never shown again for any resource. Now, with the new resource exemption capability, you can select which resource should no longer be evaluated against a particular recommendation, whereas others still are. It allows you to exempt a resource in case the resource is already healthy because it was resolved by other means that ASC does not identify, or because you’ve decided to accept the risk of not mitigating this recommendation for this resource.you have research and development environments for which you want to apply a not-so-strict baseline, whereas the rest of resources in the same subscriptions need to be fully protected. These are great examples for exempting these resources from evaluation with waiver as justification, whereas your production environments are still protected. Maybe you have a mix of Vulnerability Assessment solutions in your environment, some of which are not tracked by Azure Security Center. In this scenario, respective recommendation has already been remediated, and you can now create an exemption for these resources and select mitigated as justification.
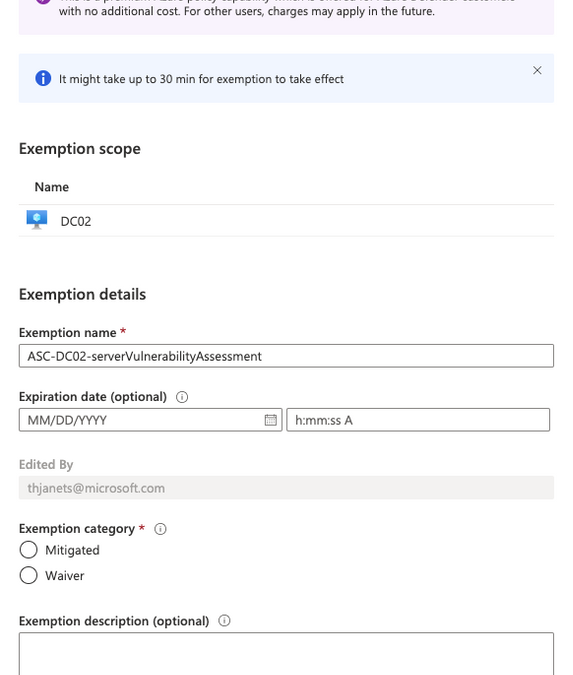
 Figure 1 – Create exemption blade
Our goal is to reduce alert-fatigue so that security analysts can focus on the highest priority recommendations. As a result, your secure score will not be impacted by exempted resources.
How does it work?
The process for exempting a resource from a recommendation is straightforward and explained in our official documentation. Basically, when working with a recommendation, you just have to click the ellipsis menu on the right side and then select create exemption.
 Figure 2 – Create exemption
From a technical perspective, when you create a resource exemption, the status of the particular assessment (the evaluation of a particular resource against a given recommendation) is changed. The properties of the assessment will contain the status code “NotApplicable”, the cause “Exempt” and a description, as shown in the screenshot below.
 Figure 3 – Assessment status after creating a resource exemption
At the same time, creating a resource exemption in ASC will create an Azure Policy exemption, a new capability the resource exemption feature in ASC relies on. That said, there are several ways to programmatically work with resource exemptions.
Resource exemption and automation
Knowing that an assessment is changed, and a new policy exemption is created every time you create a resource exemption in ASC, you have several ways of programmatically interacting with the resource exemption feature.
Azure Resource Graph
Assessments in Azure Security Center are continuously exported to Azure Resource Graph, giving you a great starting point for automation. ARG is a database that keeps a set of information which is gathered from different resources, giving you a very fast option to query information instead of separately pulling it from our REST APIs. Eli Koreh showed in his article how easy it is to create custom dashboards for ASC powered by ARG. You can find a list of starter query samples for Azure Resource Graph in the documentation.
To give you an idea of how to work with resource exemption in an ARG query, I’ve created the following sample, that will return a list of all resource exemptions that have been created in your environment:
SecurityResources
| where type == 'microsoft.security/assessments' and properties.status.cause == 'Exempt'
| extend assessmentKey = name, resourceId = tolower(trim(' ',tostring(properties.resourceDetails.Id))), healthStatus = properties.status.code, cause = properties.status.cause, reason = properties.status.description, displayName = properties.displayName
| project assessmentKey, id, name, displayName, resourceId, healthStatus, cause, reason
You can tune that query according to your needs, but it’s great as is for a quick overview on all exemptions you have created in your environment.
Resource Exemption and REST API
When a resource exemption in ASC is created, an exemption in the ASC Policy Initiative assignment is created. This is why you can leverage the Microsoft.Authorization/policyExemptions API to query for existing exemptions. This API is available as of version 2020-07-01-preview.
A GET call against the REST URI https://management.azure.com/subscriptions/<your sub ID>/providers/Microsoft.Authorization/policyExemptions?api-version=2020-07-01-preview will return all exemptions that have been created for a particular subscription, similar to the output shown below:
{
  "value": [
    {
      "properties": {
        "policyAssignmentId": "/subscriptions/<yourSubID>/providers/Microsoft.Authorization/policyAssignments/SecurityCenterBuiltIn",
        "policyDefinitionReferenceIds": [
          "diskEncryptionMonitoring"
        ],
        "exemptionCategory": "waiver",
        "displayName": "ASC-vmName-diskEncryptionMonitoring-BuiltIn",
        "description": "demo justification",
        "expiresOn": "2020-09-22T22:00:00Z"
      },
      "systemData": {
        "createdBy": "someone@company.com",
        "createdByType": "User",
        "createdAt": "2020-09-22T09:27:23.7962656Z",
        "lastModifiedBy": "someone@company.com",
        "lastModifiedByType": "User",
        "lastModifiedAt": "2020-09-22T09:27:23.7962656Z"
      },
      "id": "/subscriptions/<yourSubID>/resourceGroups/<yourRG>/providers/Microsoft.Compute/virtualMachines/<vmName>/providers/Microsoft.Authorization/policyExemptions/ASC-vmName-diskEncryptionMonitoring-BuiltIn",
      "type": "Microsoft.Authorization/policyExemptions",
      "name": "ASC-vmName-diskEncryptionMonitoring-BuiltIn"
    }
  ]
}
You can find further information about Policy Exemptions in the Azure Policy documentation.
(Workflow) automation with Logic Apps
Azure Security Center’s workflow automation feature is great for both, automatically reacting on alerts and recommendations, as well as manually triggering an automation in case you need it. I have created a sample playbook to request a resource exemption, that I want to explain a bit further below:
Request a resource exemption
In order to be able to create a resource exemption in ASC, your user account needs to be granted elevated access rights, such as Security Admin. In enterprise environments that we are working with, we often see that Azure subscriptions are given to people who are responsible for their own set of resources, but security is still owned by a central team. In this scenario, you don’t want to necessarily give every resource owner the right to create a resource exemption, but still, for justified reasons, someone should be allowed to request an exemption. To make this process easier and to fit it into your approval process, I’ve created a Logic App that can manually be triggered from the recommendation blade and allows you to request an exemption. Once a resource owner is checking recommendations and wants to exempt a resource, they can do it by clicking the Trigger Logic App button. The screenshot below shows the easy process:
 Figure 4 – Request resource exemption process
- Select one or several resources to be exempted from the recommendation you are currently investigating.
- Click the Trigger Logic App button
- Select the Request-ResourceExemption Logic App (or whatever name you give it when deploying it)
- Click the Trigger button
The Logic App leverages the When an ASC recommendation is created or triggered trigger and will then send an email and a Teams message to the subscription’s security contact(s). This email and message will contain information about the resource, the recommendation, and a link that, once clicked, will lead you directly to a portal view that enables you to immediately create the requested resource exemption. You can find this playbook in our Azure Security Center GitHub repository, from where you can one-click deploy it to your environment.
 Figure 5 – content of the request email
You can also use this sample playbook as a starting point for customizations according to your needs. For example, if you want to create a ServiceNow or JIRA ticket with that workflow, you can simply add a new parallel branch with the Create a new JIRA issue or the Create ServiceNow Record actions:
 Figure 6 – add parallel branches for JIRA and/or ServiceNow to the Logic App
Next Steps
Resource Exemption in Azure Security Center now gives you a way to exempt resources from a recommendation in case it has already been remediated by a process not monitored by Azure Security Center, or in case your organization has decided to accept the risk related to that recommendation. You can easily build your own automations around that feature or leverage the sample artifact we have published in the Azure Security Center GitHub community. You can also publish your own automation templates in the community, so others can benefits from your efforts, as well. We have started a GitHub Wiki so you can easily learn how to publish your automations.
Now, go try it out and let us know what you think! We have published a short survey so you can easily share your thoughts around this new capability and the automation artifact with us.
Special thanks to Miri Landau, Senior Program Manager for reviewing this article.
by Contributed | Sep 23, 2020 | Azure, Technology, Uncategorized
This article is contributed. See the original author and article here.
Azure SQL Managed Instance is a fully managed, secure, and always up-to-date SQL instance in the cloud, providing an ideal destination for modernizing your SQL Server applications at scale. SQL Managed Instance is part of the Azure SQL family of database services which include virtual machines and managed databases. Since its inception, Azure SQL Managed Instance (SQL MI) has been continuously improved based on customer feedback, aiming to meet critical requirements of organizations that migrate and modernize their applications in Azure.
In that spirit we are excited to announce several important capabilities coming to preview or general availability during Ignite 2020, which will bring significant improvements across multiple product aspects: performance, security and compliance, management experience, programmability surface area and application compatibility. This blog post gives you a quick summary of these new capabilities which will help you achieve more with Azure SQL Managed Instance.
Performance
General Availability: Major performance improvements for Azure SQL Managed Instances
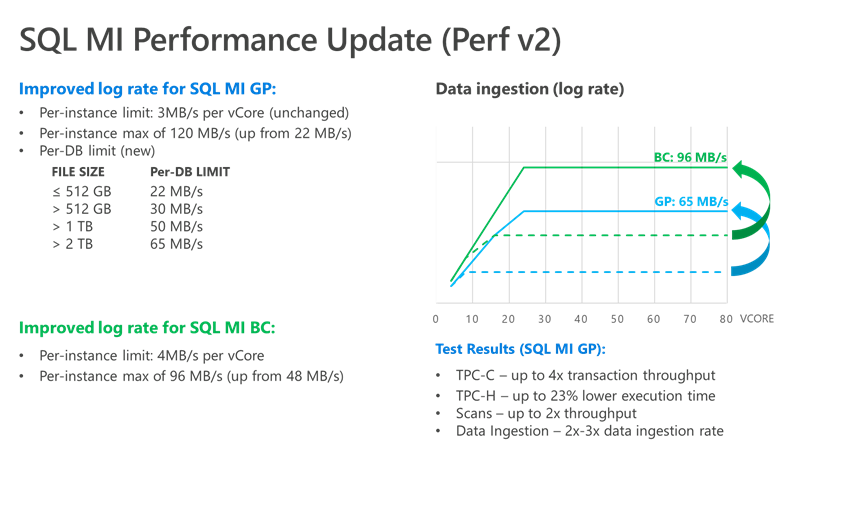
We are thrilled to announce a set of major performance improvements for Azure SQL Managed Instances, which enable you to migrate your more performance-hungry database workloads to Azure SQL Managed Instance. These improvements include more than doubled transaction log write throughput for General Purpose and Business Critical instances and superior data/log IOPS for Business Critical instances. Increased performance predictability and stability for General Purpose service tier through better integration and enhanced tempdb performance are also included. These performance improvements are automatically enabled for all existing and future Azure SQL Managed Instances at no extra charge.

General Availability: Global virtual network peering support for Azure SQL Managed Instance
To provide you with an easier network configuration, all managed instances created in empty subnets will be hosted on virtual clusters that are enabled for access over global virtual network peering connections. This enables you to pair managed instances in a failover group configuration, in an easy and performant way, by simply connecting virtual networks in two different regions. By utilizing the global virtual network peering for your managed instances, you will save time through easy network configuration and offload your gateways from database replication traffic.

Compliance
General Availability: Configurable Backup Storage Redundancy option for data residency compliance
Now in general availability, locally-redundant and zone-redundant storage options have been added to Azure SQL Managed Instance, providing more flexibility and choice. These backup storage alternatives give cost-effective options for ensuring data is protected in case of planned and unplanned events.
In addition, if you need to meet specific data residency requirements and ensure that your data does not leave region of database deployment, this option will help you stay compliant.
Use Azure portal to configure backup storage redundancy easily or automate setting desired options in your PowerShell and Azure CLI scrips. For more information, see our Tech Community blog.
Easier management experience
General Availability: Enhanced management experience for Azure SQL Managed Instance
Azure SQL Managed Instance provide management operations that you can use to automatically deploy new managed instances, update instance properties, and delete instances when no longer needed. Most of the management operations in SQL Managed Instance are long-running but until now it was not possible for customers to get detailed information about operation status and progress in an easy and transparent way.
Through the introduction of a new CRUD API, the SQL Managed Instance resource is now visible from when the create request is submitted. In addition, the new OPERATIONS API adds the ability to monitor management operations, see operation steps, and take dependent actions based on operation progress.
Check out this blog post to learn how to effectively utilize new APIs in real-word scenarios.

Preview: Azure Active Directory (AAD) authentication configuration with non-admin privileges
Users can now assign groups to Directory Readers role in Azure Active Directory. This change will promote ease of use when setting up Active Directory Admin for Azure SQL Database and Managed Instance.
Effectively, AAD auth configuration for individual managed instances does not require Global Admin or Privileged Role admin’s action anymore.
With this change, setting AAD authentication managed instances will be much simpler and streamlined in large organizations.
At the high level, improved process will look like this:
- Global Admin or Privileged Role Admin:
- Creates new Azure AD group where managed identities of Azure SQL Managed Instances will reside and assign “Directory Readers” role to this group. This action needs to be performed once per Azure AD tenant.
- Assigns group owners to the group – any Azure AD users without specific roles.
- Group owners then can add managed identity of an instance to the group.
Programmability and application compatibility
Preview: Machine Learning on Azure SQL Managed Instance
Machine Learning Services with support for R and Python languages now include preview support on Azure SQL Managed Instance. When using Machine Learning Services in Azure SQL Managed Instance, you can run R and Python scripts to do data preparation and processing, train machine learning models in database, and deploy your models and scripts into production in stored procedures.

General Availability: Hosting catalog databases for all supported versions of SSRS in Azure SQL Managed Instance
Now in general availability, Azure SQL Managed Instance can host catalog databases for all supported versions of SQL Server Reporting Services (SSRS). Last year, SQL Server 2019 Reporting Services introduced native support for hosting catalog databases in SQL Managed Instance. Now you can also use SQL Managed Instance to host catalog databases for earlier supported versions of SSRS.
This is especially useful for fast migration of existing reporting solutions to SQL Managed Instance, without the need to test and adopt the latest version of SSRS. It also helps you get quick business benefits and then modernize further at your own pace.
To learn how to configure your SQL Managed Instance to host catalog databases for earlier supported versions of SSRS, visit the Tech Community blog.
Preview coming soon: Distributed database transactions spanning multiple Azure SQL Managed Instances
Distributed database transactions spanning multiple Azure SQL Managed Instances will be available in next few weeks. This will enable frictionless migration of existing applications and development of modern, multi-tenant applications relying on vertically or horizontally partitioned database architecture.
By utilizing distributed transactions, you will save time when migrating existing applications that require this capability as it eliminates the need to change application code and to perform extensive testing. If you develop new applications, you can benefit from partitioning data into multiple databases to overcome current sizing limitations of Azure SQL Managed Instance, while utilizing distributed transactions to keep partitioned data in a consistent state.
During preview, two methods of running distributed transactions will be supported using BEGIN DISTRIBUTED TRANSACTION statement from Transact-SQL code and using TransactionScope class from .NET code.
Check out Azure Updates to stay tuned with the upcoming public preview announcement!

Recently added features
We would like also to remind you about a couple of useful features that were recently added to Azure SQL Managed Instance. Visit the links below to learn how to utilize them in your application scenarios:
Get started today!
- Get started quickly with Azure SQL Managed Instance using resources from our landing page on Azure.com.
- Find out more about how to migrate, modernize, and develop applications faster with Azure SQL by registering for our digital event Transform Your Applications with Azure SQL.
- Find out how SQL Managed Instance reduces management overhead with its virtually hands-free administration and gives you a low total cost of ownership in this Forrester Total Economic Impact Report.
- Read customer stories to learn how other customers utilize Azure SQL Managed Instance to improve their business
- Try SQL Managed Instance today and let us know what you think! Feel free to submit your comments on this blog or to post product ideas and vote for existing suggestions at Managed Instance feedback page.
by Contributed | Sep 23, 2020 | Azure, Technology, Uncategorized
This article is contributed. See the original author and article here.
Together with the Azure Stack Hub team, we are starting a journey to explore the ways our customers and partners use, deploy, manage, and build solutions on the Azure Stack Hub platform. Together with the Tiberiu Radu (Azure Stack Hub PM @rctibi), we created a new Azure Stack Hub Partner solution video series to show how our customers and partners use Azure Stack Hub in their Hybrid Cloud environment. In this series, as we will meet customers that are deploying Azure Stack Hub for their own internal departments, partners that run managed services on behalf of their customers, and a wide range of in-between as we look at how our various partners are using Azure Stack Hub to bring the power of the cloud on-premises.
Today, I want you to introduce you to Azure Stack Hub Partner Byte. Join our Australian partner Byte as we explore how they are using the Azure Stack products to simplify operations, accelerate workload deployment, and enable the teams to focus on creating value rather than “keeping the lights on”.
Links mentioned through the video:
I hope this video was helpful and you enjoyed watching it. If you have any questions, feel free to leave a comment below. If you want to learn more about the Microsoft Azure Stack portfolio, check out my blog post.
by Contributed | Sep 23, 2020 | Azure, Technology, Uncategorized
This article is contributed. See the original author and article here.
SAP IQ High-Availability can be achieved with IQ Multiplex architecture [ SAP Note 2477758], but not when deployed in NLS mode. As per the SAP First Guidance for SAP IQ 16.x, here, Multiplex Architecture is not available/evaluated for the SAP-NLS solution. This blog discusses one of the solutions to achieve SAP IQ-NLS Highly Available Solution using Azure NetApp Files on SLES 12.x.
Overview
High availability architecture allows an application to be resilient against hardware failure and to minimise downtime during maintenance activities. Many customers use SAP IQ to store historical data by extracting the old data from the SAP BW system to optimise the performance of the SAP BW system & achieve overall lower cost. It is significant to implement SAP IQ highly-available architecture to ensure data is online when required by the business processes. We have worked with our partners [Accenture, Microsoft, SAP, SUSE] & customers to develop a highly available SAP IQ-NLS solution using Pacemaker along with other Clustering Components & Azure NetApp Files to eliminates a single point of failure. With this architecture servers [VM’s] are continuously monitored, and the workload is transferred to a healthy server when a fault or failure occurs using Azure Standard Load Balancer. The application is automatically restarted on a known healthy system to maintain business continuity and minimize unplanned downtime.
There is no official SAP IQ-NLS HA architecture reference from SAP or SUSE, and therefore, a custom solution must be created to achieve a solution to meet customer needs. The complete solution has been built and tested on the Microsoft Azure Cloud.
Architectural Overview

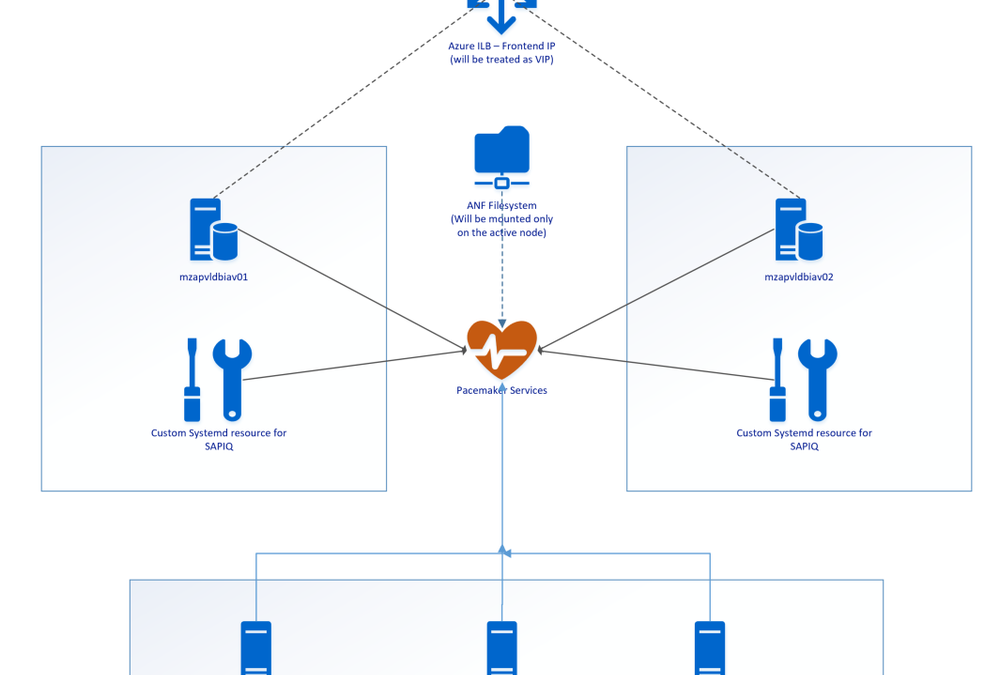
SAP IQ High-Availability Architecture on Azure VMs using Azure NetApp Files on SUSE Linux Enterprise Server.
Above SAP IQ-NLS Architecture contains:
- Two Azure VMs (mzapvldbiav01 & mzapvldbiav02) running with SLES 12 SP4 for SAP.
- Three Azure VMs (mzapvlapsbd01, mzapvlapsbd02 & mzapvlapsbd03) running with SLES 12 SP4 for SAP with iSCSI Components which will be used as STONITH (SBD Devices) for Pacemaker Cluster Fencing.
- iav-ilb-sybase : Azure load balancer which will monitor health probe port and forward the traffic to the node where this health probe port is active.
The Cluster includes following resources:
- systemd:sapiq : Cluster resource for custom systemd service controlling sapiq database. Custom Systemd unit file which will take care of Start, Stop and Health check for Sybase IQ Database.
- azure_lb_health_probe : Cluster resources which create and listens custom port only on the active node.
- pri-ip_vip_63 : Cluster resource for floating IP which will be running only on the active node and works as virtual IP.
- anf_filesystem : Cluster resource containing shared azure netapp filesystem information to enable mounting filesystems only on the active node
- email-agent : Cluster resource which will trigger an email to recipients if any resource changes status like start, stop etc.
Installation & Configuration Steps
- Configuring iSCSI Target Servers
- Create iSCSI devices on iSCSI target server
- iSCSI Discovery on Cluster Nodes
- Set up SBD Device on Cluster Nodes
- Preparing operating system on cluster nodes
- Cluster Installation
- Joining Nodes to Cluster
- Tuning Cluster Configuration
- Preparing Custom Scripts for systemd service
- ANF Shared Filesystem Configuration
- Cluster Configuration
1. Configuring iSCSI Target Servers
Reference Link: https://docs.microsoft.com/en-us/azure/virtual-machines/workloads/sap/high-availability-guide-suse-pacemaker#set-up-iscsi-target-servers
The following Steps needs to be repeated on all iSCSI Target Servers
Step 1: Update SLES
Step 2: Remove packages
|
sudo zypper remove lio-utils python-rtslib python-configshell targetcli
|
Step 3: Install iSCSI target packages
|
sudo zypper install targetcli-fb dbus-1-python
|
Step 4: Enable the iSCSI target service
|
sudo systemctl enable targetcli
sudo systemctl start targetcli
|
2. Create iSCSI devices on iSCSI target server
Reference Link: https://docs.microsoft.com/en-us/azure/virtual-machines/workloads/sap/high-availability-guide-suse-pacemaker#create-iscsi-device-on-iscsi-target-server
The following Steps needs to be repeated on all iSCSI Target Servers
Step 1: Create the root folder for sbd devices
Step 2: Create the SBD device for Cluster Nodes on all iSCSI target servers
|
targetcli backstores/fileio create sbdiav /sbd/sbdiav 50M write_back=false
|
|
targetcli iscsi/ create iqn.2006-04.sbd01.domain.net:iav
|
- Adding iSCSI disks to the TPG
|
targetcli iscsi/iqn.2006-04.sbd01.domain.net:iav/tpg1/luns/ create /backstores/fileio/sbdiav
|
- Allow iSCSI initiators to connect to the iSCSI target.
|
targetcli iscsi/iqn.2006-04.sbd01.domain.net:iav/tpg1/acls/ create iqn.1996-04.de.suse:01:19b9f6iav01
|
|
targetcli iscsi/iqn.2006-04.sbd01.domain.net:iav/tpg1/acls/ create iqn.1996-04.de.suse:01:19b9f6iav02
|
Step 3: Save the targetcli changes
|
sudo targetcli saveconfig
|
Step 4: Confirm the changes
Step 5: Perform Steps 1 – 4 on all iSCSI Target Servers with their respective iqn.
|
targetcli iscsi/ create iqn.2006-04.xxx.domain.net:iav
|
3. iSCSI Discovery on Cluster Nodes
Reference Link: https://docs.microsoft.com/en-us/azure/virtual-machines/workloads/sap/high-availability-guide-suse-pacemaker#set-up-sbd-device
Step 1: Enable the iSCSI and SBD services on Cluster Nodes.
|
sudo systemctl enable iscsid
sudo systemctl enable iscsi
sudo systemctl enable sbd
|
Step 2: Change the initiator name on Cluster Nodes
|
sudo vi /etc/iscsi/initiatorname.iscsi
|
Initiator name should be unique on each server.
Step 3: Restart the iSCSI service on Cluster Nodes
|
sudo systemctl restart iscsid
sudo systemctl restart iscsi
|
Step 4: Connect the iSCSI devices
|
iscsiadm -m discovery –type=st –portal=170.162.93.128:3260
|
|
iscsiadm -m node -T iqn.2006-04.sbd03.domain.net:iav –login –portal=170.162.93.128:3260
|
|
iscsiadm -m node -p 170.162.93.128:3260 –op=update –name=node.startup –value=automatic
|
Step 5: Verify iSCSI Sessions
Step 6: Verify if disks are available on Cluster Nodes
Step 7: Retrieve the IDs of the iSCSI devices on Cluster Nodes
|
ls -l /dev/disk/by-id/scsi-* | grep 3600*
|
4. Set up SBD Device on Cluster Nodes
Reference Link: https://docs.microsoft.com/en-us/azure/virtual-machines/workloads/sap/high-availability-guide-suse-pacemaker#set-up-sbd-device
Step 1: Create the SBD Device on Cluster Nodes
|
sudo sbd -d /dev/disk/by-id/scsi-360014052328283facd444a1994a65cf2 -1 60 -4 120 create
|
Step 2: Adapt the SBD Config on First Node in the Cluster
|
sudo vi /etc/sysconfig/sbd
|
Populate the following parameters within the sbd file
|
[…]
SBD_DEVICE=”/dev/disk
/by-id/scsi-36001405afb0ba8d3a3c413b8cc2cca03;/dev/disk/by-id/scsi-360014053fe4da371a5a4bb69a419a4df”
[…]
SBD_PACEMAKER=”yes”
SBD_STARTMODE=”clean”
SBD_DELAY_START=”yes”
|
Note: SBD_STARTMODE=”clean”, this will not allow any node to join to the cluster once node is fenced or rebooted. This is part of the Solution Requirement.
Step 3: Create the softdog configuration file
|
echo softdog | sudo tee /etc/modules-load.d/softdog.conf
|
Step 4: Now load the module
5. Preparing Operating System on cluster nodes
Reference Link: https://docs.microsoft.com/en-us/azure/virtual-machines/workloads/sap/high-availability-guide-suse-pacemaker#cluster-installation
Step 1: Perform system update on all Cluster Nodes
Step 2: Install components needed for Cluster resources on all Cluster Nodes
Step 3: Configure the operating system on all Cluster Nodes
Increase the maximum allowed processes
Edit the configuration file
|
sudo vi /etc/systemd/system.conf
|
Change the DefaultTasksMax
to
Activate this setting
|
sudo systemctl daemon-reload
|
Test if the change was successful
|
sudo systemctl –no-pager show | grep DefaultTasksMax
|
Step 4: Reduce the size of the dirty cache on all Cluster Nodes
Change/set the following settings
|
vm.dirty_bytes = 629145600
vm.dirty_background_bytes = 314572800
|
Step 5: Configure NTP on all cluster nodes and confirm
stop ntpd daemon
edit the /etc/ntp.conf to make appropriate entries of NTP servers.
|
server xxx.xxx.xxx.xxx iburst
|
Now start the ntp daemon.
check the NTP status
6. Cluster Installation
Reference Link: https://docs.microsoft.com/en-us/azure/virtual-machines/workloads/sap/high-availability-guide-suse-pacemaker#cluster-installation
Step 1: Install Cluster on first node
|
ha-cluster-init –name cls_iqdb_iav
|
Step 2: Respond to the following on-screen instructions
|
# /root/.ssh/id_rsa already exists – overwrite (y/n)? n
# Address for ring0 [10.0.0.6] Press ENTER
# Port for ring0 [5405] Press ENTER
# SBD is already configured to use/dev/disk/by-id/scsi-36001405afb0ba8d3a3c413b8cc2cca03 – overwrite (y/n)? n
# Do you wish to configure an administration IP (y/n)? n
|
7. Joining Nodes to Cluster
Reference Link: https://docs.microsoft.com/en-us/azure/virtual-machines/workloads/sap/high-availability-guide-suse-pacemaker#cluster-installation
Step 1: Add Secondary node to cluster
Step 2: Respond to the following on-screen instructions
|
Do you want to continue anyway (y/n)? y
IP address or hostname of existing node (e.g.: 192.168.1.1) []xxx.xxx.xxx.xxx
root/.ssh/id_rsa already exists – overwrite (y/n)? y
|
8. Tuning Cluster Configuration
Reference Link: https://docs.microsoft.com/en-us/azure/virtual-machines/workloads/sap/high-availability-guide-suse-pacemaker#cluster-installation
Step 1: Change hacluster password on all cluster nodes
Step 2: Adjust corosync settings on First Node
|
sudo vi /etc/corosync/corosync.conf
|
Change token to 30000 and consensus to 36000
|
[…]
token: 30000
token_retransmits_before_loss_const: 10
join: 60
consensus: 36000
max_messages: 20
|
Restart the corosync service
|
sudo service corosync restart
|
9. Preparing Custom Scripts for systemd service
Step 1: Create Systemd Service which can initiate start and stop scripts of the SAP IQ DB and place it under /etc/systemd/system/
|
vi /etc/systemd/system/sapiq.service
|
sapiq.service should contain the following
|
[Unit]
Description=SAP IQ DB
[Service]
Type=simple
ExecStart=/bin/bash /usr/bin/sapiq_start.sh
ExecStop=/bin/bash /usr/bin/sapiq_stop.sh
Restart=on-failure
[Install]
WantedBy=multi-user.target
|
When Start initiated on sapiq.service, the following script will be called
|
ExecStart=/bin/bash /usr/bin/sapiq_start.sh
|
When Stop initiated on sapiq.service, the following script will be called
|
ExecStop=/bin/bash /usr/bin/sapiq_stop.sh
|
Step 2: Creating sapiq_start.sh & sapiq_stop.sh
sapiq_start.sh:
|
#!/bin/bash
runuser -l siqiav -c ‘start_siq’
sleep 20
while [ 1 ]
do
pid=$(ps -ef | grep iqsrv16 | grep -v grep | awk ‘{print $2}’)
if [ “$pid” != “” ]
then
echo “Process iqsrv16 is running”
dsn=$(runuser -l siqiav -c ‘dbping -d -c dsn=SAPIQDB_IAV’ | grep Connected | awk ‘{print $1}’)
if [ “$dsn” == “Connected” ]
then
echo “Database can be reached using DBPING with DSN”
else
echo “iqsrv16 Process is there but unable to ping DSN using DBPING…. Exiting”
exit
fi
else
echo “Process iqsrv16 is not there…. Exiting”
exit
fi
sleep 3
done
|
Note: Contact your NLS Admin for DSN Value (SAPIQDB_IAV, in this case) and replace the same in the above script.
sapiq_stop.sh:
|
runuser -l siqiav -c ‘stop_siq’
|
The above two scripts should be placed under /usr/bin
10. ANF Shared Filesystem Configuration
Reference Link: https://docs.microsoft.com/en-us/azure/virtual-machines/workloads/sap/sap-hana-scale-out-standby-netapp-files-suse#operating-system-configuration-and-preparation
Step 1: Prepare the OS for running SAP IQ NLS on NetApp Systems with NFS
Create configuration file /etc/sysctl.d/netapp-hana.conf for the NetApp configuration settings.
|
vi /etc/sysctl.d/netapp-hana.conf
|
|
Within the file, keep the below entries
|
net.core.rmem_max = 16777216
net.core.wmem_max = 16777216
net.core.rmem_default = 16777216
net.core.wmem_default = 16777216
net.core.optmem_max = 16777216
net.ipv4.tcp_rmem = 65536 16777216 16777216
net.ipv4.tcp_wmem = 65536 16777216 16777216
net.core.netdev_max_backlog = 300000
net.ipv4.tcp_slow_start_after_idle=0
net.ipv4.tcp_no_metrics_save = 1
net.ipv4.tcp_moderate_rcvbuf = 1
net.ipv4.tcp_window_scaling = 1
net.ipv4.tcp_timestamps = 1
net.ipv4.tcp_sack = 1
|
Step 2: Create configuration file /etc/sysctl.d/ms-az.conf with Microsoft for Azure configuration settings.
|
vi /etc/sysctl.d/ms-az.conf
|
|
Within the file, keep the below entries
|
ipv6.conf.all.disable_ipv6 = 1
net.ipv4.tcp_max_syn_backlog = 16348
net.ipv4.ip_local_port_range = 40000 65300
net.ipv4.conf.all.rp_filter = 0
sunrpc.tcp_slot_table_entries = 128
vm.swappiness=10
|
Step 3: Adjust the sunrpc settings
|
vi /etc/modprobe.d/sunrpc.conf
|
|
Within the file, keep the below entries
|
options sunrpc tcp_max_slot_table_entries=128
|
Step 4: Ensure to set the NFS domain in /etc/idmapd.conf on the VM to match the default domain configuration on Azure NetApp Files: defaultv4iddomain.com.
11. Cluster Configuration
Following cluster resources needs to be configured
- Floating IP: Configure Virtual IP which is always available on active node. Here we need to use frontend IP address of Azure Load balancer as Floating IP in Cluster.
|
primitive pri-ip_vip_63 IPaddr2
params ip=170.162.92.63 cidr_netmask=24 nic=eth0
op monitor interval=0
|
- Health Probe Port: Configure 61000 as health probe port which is always available on active node. Azure Load Balancer always monitor this port and sends the traffic to the node where this port is running.
|
primitive azure_lb_health_probe azure-lb
params port=61000
|
- Systemd Service: Cluster Primitive which controls start & stop operations of SAP IQ Database.
|
primitive pri-sapiq_systemd systemd:sapiq
op start timeout=40 interval=0
op stop timeout=40 interval=0
op monitor timeout=100 interval=10
|
- ANF Shared Filesystems: Individual Cluster Primitive for each ANF Shared filesystem for log, system, dbspace & database. These four filesystems will be shared between two cluster nodes.
|
primitive anf_filesystem Filesystem
params device=”170.162.118.4:/Database” directory=”/usr/sap/IAV” fstype=nfs options=”rw,vers=4,minorversion=1,hard,sync,timeo=600,rsize=65536,wsize=65536,intr,noatime,lock,_netdev,sec=sys”
op stop timeout=60s interval=0
op start timeout=60s interval=0
op monitor interval=20s timeout=40s
|
- Email Alerting: One of the easiest ways to get notifications of any cluster resource events is to add a ClusterMon resource. Whenever any resource is started or stopped, the ClusterMon resource will send notification to the custom script which will trigger email to configured recipients.
|
primitive email-agent ClusterMon
params extra_options=”-E /usr/bin/crm_email.sh -e xxxx@xxxx.com”
|
|
And clone the resource “email-agent”
|
clone cln_email-agent email-agent
|
|
Post-Configurations
Create the custom script and place under /usr/bin
Within the file, place the following content
|
#!/bin/bash
MAIL_TO=”xxxx@xxxx.com”;
SUBJECT=”!!! ATTENTION NEEDED !!! CLUSTER-ALERT on ${CRM_notify_node}”;
echo “$MESSAGE”|mailx -s “$SUBJECT” “$MAIL_TO” <<EOF
———————– CLUSTER EVENT TRIGGERED:
Node: ${CRM_notify_node}
Resource Affected: ${CRM_notify_rsc}
Action on Resource: ${CRM_notify_task}
———————– CURRENT CLUSTER STATUS:
$(crm status)
—————————————————
This mail has been generated automatically
EOF
|
|
- Grouping of Resources: Grouping of resources will make all child resources to start or stop together on same node.
Grouping resources which includes ANF Filesystem, Floating IP, Health Probe Port & Systemd service. In this case, group name is “grp_anf-sapiq_systemd-azure_lb-vip_6” with migration threshold set to 1**.
|
group grp_anf-sapiq_systemd-azure_lb-vip_63 anf_filesystem pri-sapiq_systemd azure_lb_health_probe pri-ip_vip_63
meta target-role=Started migration-threshold=1
|
** Migration threshold will allow resource to restart on failure with the provided value on the same node.
- Order Constraint: As the group containing systemd resource rely on shared file system to start the database, file system group should start before the group with systemd resource then health probe and virtual IP must start.
|
order ord_anf-sapiq_systemd-azure_lb-vip_63 inf: anf_filesystem pri-sapiq_systemd azure_lb_health_probe pri-ip_vip_63
|
- Resource Stickiness: This is to prevent healthy resources from being moved around the cluster.
|
rsc_defaults rsc-options:
resource-stickiness=1000
|
Note: Defaults don’t apply to resources which overwrite them with their own defined resource stickiness value.
Complete CRM Configuration as follows
primitive anf_filesystem Filesystem
params device=”170.162.118.4:/Database” directory=”/usr/sap/IAV” fstype=nfs options=”rw,vers=4,minorversion=1,hard,sync,timeo=600,rsize=65536,wsize=65536,intr,noatime,lock,_netdev,sec=sys”
op stop timeout=60s interval=0
op start timeout=60s interval=0
op monitor interval=20s timeout=40s
mzapvldbiav01:~ # crm configure show pri-ip_vip_63
primitive pri-ip_vip_63 IPaddr2
params ip=170.162.92.63 cidr_netmask=24 nic=eth0
op monitor interval=0
mzapvldbiav01:~ # crm configure show grp_anf-sapiq_systemd-azure_lb-vip_63
group grp_anf-sapiq_systemd-azure_lb-vip_63 anf_filesystem pri-sapiq_systemd azure_lb_health_probe pri-ip_vip_63
meta target-role=Started migration-threshold=2
mzapvldbiav01:~ # crm configure show
node 1: mzapvldbiav02
node 2: mzapvldbiav01
primitive anf_filesystem Filesystem
params device=”170.162.118.4:/Database” directory=”/usr/sap/IAV” fstype=nfs options=”rw,vers=4,minorversion=1,hard,sync,timeo=600,rsize=65536,wsize=65536,intr,noatime,lock,_netdev,sec=sys”
op stop timeout=60s interval=0
op start timeout=60s interval=0
op monitor interval=20s timeout=40s
primitive azure_lb_health_probe azure-lb
params port=61000
primitive email-agent ClusterMon
params extra_options=”-E /usr/bin/crm_email.sh -e ramesh.petla@accenture.com”
meta target-role=Started
primitive pri-ip_vip_63 IPaddr2
params ip=170.162.92.63 cidr_netmask=24 nic=eth0
op monitor interval=0
primitive pri-sapiq_systemd systemd:sapiq
op start timeout=60 interval=0
op stop timeout=60 interval=0
op monitor timeout=100 interval=10
primitive stonith-sbd stonith:external/sbd
params pcmk_delay_max=30s
meta target-role=Started
op start interval=0
group grp_anf-sapiq_systemd-azure_lb-vip_63 anf_filesystem pri-sapiq_systemd azure_lb_health_probe pri-ip_vip_63
meta target-role=Started migration-threshold=2
clone cln_email-agent email-agent
order ord_anf-sapiq_systemd-azure_lb-vip_63 inf: anf_filesystem pri-sapiq_systemd azure_lb_health_probe pri-ip_vip_63
property cib-bootstrap-options:
have-watchdog=true
dc-version=”1.1.19+20181105.ccd6b5b10-3.16.1-1.1.19+20181105.ccd6b5b10″
cluster-infrastructure=corosync
cluster-name=cls_iqdb_iav
stonith-enabled=true
last-lrm-refresh=1594989262
maintenance-mode=false
rsc_defaults rsc-options:
resource-stickiness=1000
op_defaults op-options:
timeout=600
record-pending=true
Monitoring and Managing the Cluster
CRM Status: The status of the cluster can be checked by issuing command “crm status”

CRM Monitoring: Real time changes in the cluster can be monitored continuously by issuing command “crm_mon” on any node which is part of cluster.

The above similar things can be monitored using HAWK Web Console.
To access HAWK Console, enter the following URL with username “hacluster”
|
https:// 170.162.92.63:7630/
|
where 170.162.92.63 is the ip address of any cluster node or virtual IP.
Resources Status:

Node Status:

Node Cleanup Script: Whenever nodes reboots because of Kernel Panic or any other issues, run the crm_node_cleanup.sh script which is placed under /usr/bin to clean the node so that it can join to Cluster.
For mzapvldbiav01:
|
#!/bin/bash
sbd -d /dev/disk/by-id/scsi-360014052328283facd444a1994a65cf2 message mzapvldbiav01 clear
sbd -d /dev/disk/by-id/scsi-360014052752bf5ef8d14b308cf29c3f5 message mzapvldbiav01 clear
sbd -d /dev/disk/by-id/scsi-3600140557a61ec52d994744872c42246 message mzapvldbiav01 clear
crm cluster start
crm_mon
|
For mzapvldbiav02:
|
#!/bin/bash
sbd -d /dev/disk/by-id/scsi-360014052328283facd444a1994a65cf2 message mzapvldbiav02 clear
sbd -d /dev/disk/by-id/scsi-360014052752bf5ef8d14b308cf29c3f5 message mzapvldbiav02 clear
sbd -d /dev/disk/by-id/scsi-3600140557a61ec52d994744872c42246 message mzapvldbiav02 clear
crm cluster start
crm_mon
|
The above scripts are made only for saving time, otherwise, one can run individual commands to clear node messages.
Testing Scenarios
Scenario 1: Stop database on mzapvldbiav01
Stop the IQ DB on database mzapvldbiav01 gracefully. This should failover the database into mzapvldbiav02 and promote it as a master.
The cluster detects the stopped primary IQ database (on mzapvldbiav01) and marks the resource failed. The cluster promotes the secondary IQ NLS database (on mzapvldbiav02) to take over as primary. The cluster migrates the IP address to the new primary (on mzapvldbiav02). The cluster “failed actions” are cleaned up after following the recovery procedure.
Before Test: Cluster Status

Stopping Database:

After Failover:

Resource Cleanup: As the resource pri-sapiq_systemd is failed to restart on mzapvldbiav01, need to perform resource cleanup on mzapvldbiav01 for pri-sapiq_systemd. So next time if mzapvldbiav02 is down for some reason, resource can migrate to mzapvldbiav01 without any issues.

Cockpit View:

Scenario 2: Crash mzapvldbiav01
Simulate a site crash situation using kernel panic (echo ‘b’ > /proc/sysrq-trigger) on database server mzapvldbiav01. This should failover the cluster resources to mzapvldbiav02.
The cluster detects the failure on mzapvldbiav01 and declares it UNCLEAN. The cluster fences mzapvldbiav01. The cluster declares the failed node mzapvldbiav01 as OFFLINE. The cluster promotes the secondary IQ database on mzapvldbiav02 as active.
Before Test: Cluster Status

Simulate Kernel Panic on mzapvldbiav01:

After Failover:

As SBD fencing is used, we need to clear reset message on mzapvldbiav01 once root cause for kernel panic is identified and fixed. The reset message can be cleared with the help of the script /usr/bin/crm_node_cleanup.sh on respective nodes.

After Cleanup:

The node mzapvldbiav01 status will change to Online from Offline.
Cockpit View:

Troubleshooting
Resource Fail count Cleanup: Resource needs to be cleaned if any resource has failed errors like follows

In the above screenshot, we have errors associated with systemd resource “pri-sapiq_systemd”
|
crm resource cleanup pri-sapiq_systemd
|
Clearing Temporary Constraints: When we move any resource to other node manually, then location constraints will be created. These needs to be cleared if we need cluster to handle resource movement operations automatically.
|
crm resource clear pri-sapiq_systemd
|

Log Files:
Pacemaker Log File:
The systemd journal can be used to retrieve Pacemaker logs:
|
journactl -lf -u pacemaker
|

Alternatively, /var/log/messages can be referred for other errors
Decision Tree


Recent Comments