
by Scott Muniz | Sep 22, 2020 | Azure, Technology, Uncategorized
This article is contributed. See the original author and article here.
We are delighted to announce the availability of a major release for solutions to run Oracle WebLogic Server (WLS) on Azure Linux Virtual Machines. The release is jointly developed with the WebLogic team as part of the broad-ranging partnership between Microsoft and Oracle. The partnership also covers joint support from Oracle/Microsoft and a range of Oracle software running on Azure. Software available under the partnership includes Oracle WebLogic, Oracle Linux and Oracle Database as well as interoperability between Oracle Cloud Infrastructure (OCI) and Azure. This major release covers various common use cases for WLS on Azure, such as base image, single working instance, clustering, load balancing via App Gateway, database connectivity and integration with Azure Active Directory. WLS is a key component in enabling enterprise Java workloads on Azure. Customers are encouraged to evaluate these solutions for full production usage and reach out to collaborate on migration cases.
Use Cases and Roadmap
The partnership between Oracle and Microsoft was announced in June of 2019. Under the partnership, we announced the initial release of the WLS on Azure Linux Virtual Machines solutions at Oracle OpenWorld 2019. The solutions facilitate easy lift-and-shift migration by automating boilerplate operations such as provisioning virtual networks/storage, installing Linux/Java resources, setting up WLS as well as configuring security with a network security group. The initial release supported a basic set of use cases such as single working instance and clustering. In addition, the release supported a limited set of WLS and Java versions.
This release expands the options for operating system, Oracle JDK, and WLS combinations. The release also automates common Azure service integrations for load-balancing, databases and security. The database integration feature supports Azure PostgreSQL, Azure SQL as well as the Oracle Database running on OCI or Azure. The release is aimed to enable a majority of WLS on Azure Linux Virtual Machines migration cases.

A subsequent release by the end of calendar year 2020 will deliver distributed logging via Elastic Stack as well as distributed caching via Oracle Coherence. Oracle and Microsoft are also working on enabling similar capabilities on the Azure Kubernetes Service (AKS) using the WebLogic Kubernetes Operator.
Solution Details
There are four offers available to meet different scenarios.
- Single Node
- This offer provisions a single Virtual Machine and installs WLS on it. It does not create a domain or start the Administration Server.
- This is useful for scenarios with highly customized domain configuration.
- Admin Server
- This offer provisions a single Virtual Machine and installs WLS on it. It creates a domain and starts up the Administration Server, which allows you to manage the domain.
- Cluster
- This offer creates an n-node highly available cluster of WLS Virtual Machines, ready for Java EE session replication. The Administration Server and all managed servers are started by default, which allow you to manage the domain.
- Dynamic Cluster
- This offer creates a highly available and scalable dynamic cluster of WLS Virtual Machines. The Administration Server and all managed servers are started by default, which allow you to manage the domain.
The solutions will enable a variety of robust production-ready deployment architectures with relative ease, automating the provisioning of most critical components quickly – allowing customers to focus on business value add.

These offers are Bring-Your-Own-License. They assume you have already procured the appropriate licenses with Oracle and are properly licensed to run offers in Azure.
You have a choice of pre-validated, supported OS/JDK/WLS stacks. The offers enable both Java EE 7 and Java EE 8, letting you choose from a variety of base images including WebLogic 12.2.1.3.0 with JDK8u131/251 and Oracle Linux 7.4/7.6 or WebLogic 14.1.1 with JDK11u01 on Oracle Linux 7.6. All base images are also available on Azure on their own. The standalone base images are suitable for customers that require very highly customized Azure deployments.
Summary
Customers interested in WLS on Azure Virtual Machines should explore the solutions, provide feedback and stay informed of the roadmap, including upcoming WLS enablement on AKS. Customers can also take advantage of hands-on help from the engineering team behind these offers. The opportunity to collaborate on a migration scenario is completely free while the offers are under active initial development.
by Scott Muniz | Sep 22, 2020 | Azure, Technology, Uncategorized
This article is contributed. See the original author and article here.
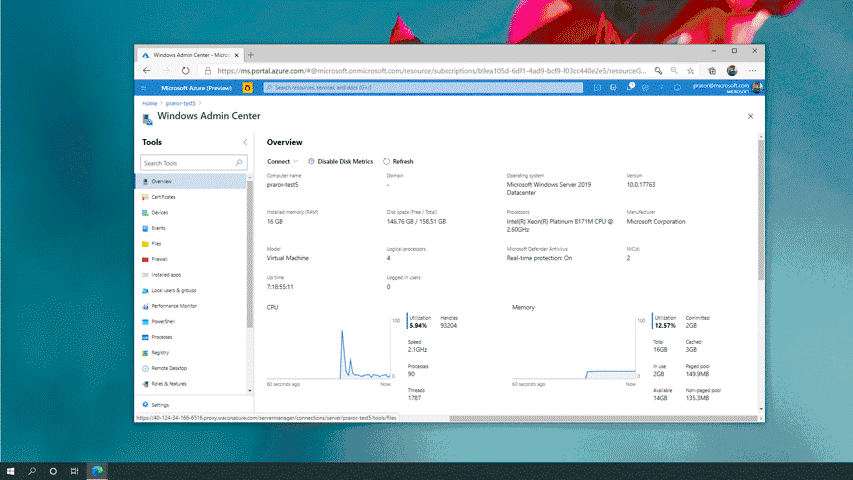
Windows Admin Center, your favorite server management tool, is now available in preview in Azure. This new capability allows you to manage the Windows Server OS running on Azure IaaS VMs seamlessly and at a more granular level. This in-built functionality provides the opportunity for greater oversight of your workloads right from the Azure Portal.

Get the job done with simplicity and convenience
Windows Admin Center in Azure unlocks incredible capabilities for the Azure Portal by providing you with an interface to manage the OS of your Windows Server VMs. In the past, the Azure Portal provided a singular view for VM management, giving access to only infrastructure level management. With the addition of Windows Admin Center, we have opened up opportunities for true granular virtual machine management. This will reduce the need for you to Remote Desktop into your Azure VM for administration offering the same experience for VMs with or without a GUI.
Familiar UI
You can now configure, troubleshoot, and perform maintenance tasks with the same Windows Admin Center UI that you know and love using on your Windows Server in your datacenters. Manage your files, view expired certificates, monitor performance, view critical events, use an in-browser RDP session and so much more without leaving the Azure Portal. We now provide cloud capabilities that were once only available to Windows Admin Center users on-premises.
Always up to date
We are continuously adding new capabilities to improve the experience of our customers. On Azure, Windows Admin Center is always kept up to date with the latest and greatest features. In addition, as we enter public preview, Windows Admin Center will be backed by the support infrastructure that provides reliability for all other Azure services. You now have a great way to manage your Windows Server virtual machines in Azure.
Get started
Windows Admin Center in the Azure Portal is available to all Windows Server customers on Azure running Windows Server 2016 or 2019 virtual machines in the public cloud.
Join the preview today!
Please email all questions and feedback to wacazp@microsoft.com.
Learn more
New to Windows Admin Center? Check out this intro video.
Already a Windows Admin Center pro? Check out our blog post announcing general availability of Windows Admin Center v2009 and these skilling videos from Ignite 2020.
by Scott Muniz | Sep 22, 2020 | Azure, Technology, Uncategorized
This article is contributed. See the original author and article here.
Azure Sphere and cellular connectivity
Cellular connectivity is one of the most common functions that customers wish to take advantage of when developing secured IoT solutions. Cellular connectivity is naturally applicable to scenarios in which Wi-Fi or Ethernet connectivity is not readily available. However, we have also seen that cellular connectivity can deliver tremendous value even in places where Ethernet or Wi-Fi are present. For instance, cellular connectivity can simplify device setup and provisioning by removing the dependency on the configuration of local network infrastructure; cellular can sidestep technical or policy obstacles and accelerate deployments.
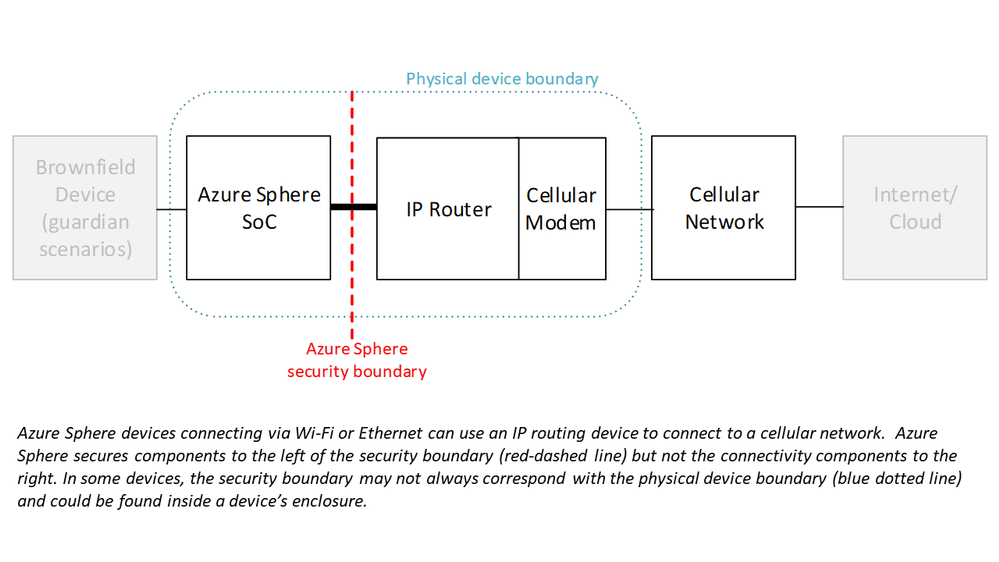
Although Azure Sphere currently supports connecting through Ethernet and Wi-Fi networks only, it can be a useful building block for a cellular solution. You can introduce cellular connectivity by pairing the Azure Sphere device with a cellular-capable router device. This allows you to take advantage of Azure Sphere’s software update infrastructure, certificate-based authentication, and Azure integration while connecting over cellular.
When using this kind of architecture, it’s extremely important to be aware that there is a security boundary between the Azure Sphere elements and the cellular connectivity elements. Azure Sphere security does not extend beyond its own Wi-Fi or Ethernet interface. Therefore, you will want to be certain that the non-Azure Sphere parts of your solution are adequately and properly secured to ensure that the overall system (and not just the parts running on or behind Azure Sphere) is robust against security threats.

Common cellular risks
Connecting a device to the internet through a cellular-enabled router introduces many similar network security risks that are present whenever you connect through other routing devices, such as the Wi-Fi access points or routers found in home and business environments. In these configurations, Azure Sphere is unable to protect the external hardware from threats like being the target of a denial-of-service attack or becoming a part of a botnet. Although the Azure Sphere parts of the system remain secured, the overall device might not be able to reach the Internet, interrupting critical functions like device telemetry and updates. This can affect your business or the customer experience you are trying to deliver.
To avoid any potentially disruptive surprises, it is critical that you identify the boundary between Azure Sphere and the cellular connectivity elements. On some devices this boundary may be difficult to spot, but this boundary is always present. For elements outside of the Azure Sphere security boundary, you should make sure that the manufacturer of the hardware, as well as the cellular service provider, offers the appropriate level of security, services, and support for your use case. For a deep-dive about evaluating the security boundaries and risks of the Azure Sphere cellular connectivity architecture please read our paper, “Cellular connectivity options immediately available to users of Azure Sphere.”
What Solutions are Available Now?
The Azure Sphere ecosystem includes a wide range of solutions representing different levels of integration between Azure Sphere and cellular connectivity. These solutions range from cellular connectivity modules suitable for additional customization to complete cellular Guardian devices ready for connection to brownfield equipment.
Although the options for introducing cellular connectivity to an IoT device may seem varied, fundamentally, the security boundary will be the same. Clearly understanding this boundary—where Azure Sphere security stops—and the security risks that remain to be resolved by you, your system integration partner, or your network provider will help you deliver the most secure and robust solution for your organization or for your customers.
by Scott Muniz | Sep 22, 2020 | Azure, Technology, Uncategorized
This article is contributed. See the original author and article here.
Azure Data Explorer and Power Apps
Today’s Mission… marry the awesomeness of Azure Data Explorer and Power Apps
Introduction
For this exercise, imagine a customer with the following characteristics:
- Large and growing collection of streaming data in Azure Data Explorer
- A desire to build a low code, highly functional app to make use of this data
Objectives
The following Step-by-Step Instructions will lead to successful completion of the following objectives:
- Instantiate Resources … prepare required Azure resources
- Create App … demonstrate connection to Azure Data Explorer data parameterization, retrieval, and presentation
Technologies
This write-up assumes you have a Microsoft Azure subscription, Power Platform license and pre-requisite knowledge about the following technologies:
Caveats
Before we get started, some expectation setting…
- The instructions below are not a complete path to a production solution… they were prepared with the intention of conveying basic knowledge and providing a foundation that you could tailor to fit your environment, standards, etc.
- Keep a watchful eye on incurred costs … consider a daily assessment and use of budgets / alerts
- Azure interface and functionality evolve rapidly; the snips below will become dated over time
Step-by-Step Instructions
Instantiate Resources
First, we will quickly run through creation of the basic resources we will need to complete this exercise. Although you can use existing Azure resources in your subscription, consider creating resources specific to this exercise to provide for future maintenance, cost analysis, reporting, etc.
Resource Group
Create this resource to group related resources, provide for simplified cost accounting and enable bulk housekeeping.
On the “Create a resource group” page, enter values for the following form items:
|
Subscription
|
Self-explanatory
|
|
Resource Group
|
Enter a name that is meaningful for you (and aligned with your naming standards)
|
|
Region
|
Select a region appropriate for your situation; take into consideration that some regions {e.g. West US and East US} see higher demand than others
|
Review settings on remaining tabs {e.g. Tags}. No additional settings are required for this exercise.
Click the “Review + create” button, validate, and then click the Create button. Allow time for processing.
Data Explorer
Use the Azure Portal to create an Azure Data Explorer Cluster.
On the “Create an Azure Data Explorer Cluster” page, enter values for the following form items:
|
Subscription
|
Self-explanatory
|
|
Resource Group
|
Select the resource group created in the prior step
|
|
Cluster Name
|
Enter a name that is meaningful for you (and aligned with your naming standards)
|
|
Region
|
Select the value used during Resource Group creation
|
|
Workload
|
Select “Compute optimized” from the dropdown
|
|
Size
|
Select “Extra Small (2 cores)” from the dropdown
|
|
Compute Specifications
|
This should be auto populated with “Standard_D11_v2” based on the Workload and Size selections
|
|
Availability Zones
|
Confirm default selection, “(none)”
|
Review settings on remaining tabs {e.g. Tags}. No additional settings are required for this exercise.
Click the “Review + create” button, validate, and then click the Create button. Allow time for processing.
Add Database
Use the Azure Portal to add an Azure Data Explorer Database.
In the newly created Data Explorer Cluster, click the “+ Add database” button.
On the “Create an Azure Data Explorer Database” popout, enter values for the following form items:
|
Database Name
|
Enter a name that is meaningful for you (and aligned with your naming standards)
|
|
Retention Period (in days)
|
Confirm the default value, 3650
|
|
Cache Period (in days)
|
Confirm the default value, 31
|
Click the Create button. Allow time for processing.
Sample Data
Follow the instructions in the “Quickstart: Ingest sample data into Azure Data Explorer” article (https://docs.microsoft.com/en-us/azure/data-explorer/ingest-sample-data) to populate sample data that we can surface in Power Apps.
Review the results so you are familiar with the data for later sections.
Power Apps
This write-up assumes that you already have a working instance of the Power Platform with necessary licensing. If not, you can get started at https://powerapps.microsoft.com/en-us/
If you are already set up, click “Sign In”.
Create Connection
Navigate to https://make.preview.powerapps.com/
Expand Data in the left-hand navigation to and click on Connections in the resulting options.
Click the “+ New connection” button.
Select “Azure Data Explorer…” in the resulting options.
Click the Create button on the “Azure Data Explorer” popup. Provide credentials as required.
|
|
Good Job!
You have successfully completed Objective #1: Instantiate Resources
|
Create App
Objective: Demonstrate connection to Azure Data Explorer data parameterization, retrieval, and presentation
Navigate to Power Apps and then Apps in the left-hand navigation.
Click the “+ New app” button in the menu bar and then Canvas from the resulting dropdown.
Click the “Tablet layout” button in the “Blank app” section.
Add Connector
Click on the Data icon on the left-hand navigation. Expand Connectors and click on “Azure Data Explorer” in the resulting options.
You should see a new area called “In your app” with “Azure Data Explorer” now included.
Advanced Settings
Click File in the menu bar. Click Save in the left-hand navigation.
Enter a meaningful name for your app. Click the Save button in the lower-right.
Click Settings in the resulting left-hand navigation.
Click “Advanced settings”, scroll through the resulting options and find “Dynamic schema”. Turn this feature on and restart the app as required.
Add Dropdown
Click Insert in the menu bar. Click Input in the resulting sub menu bar. Click “Drop down” in the resulting dropdown.
Click on the Advanced tab in the right-hand popout.
Populate the Items input box with: [“CALIFORNIA”,”MICHIGAN”]
With the dropdown still selected, select OnChange from the Property dropdown in the formula bar.
Enter the following formula:
ClearCollect(
Results,
AzureDataExplorer.listKustoResultsPost(
“https://adxpadec.westus2.kusto.windows.net“,
“adxpaded”,
“StormEvents | where State == ‘” & Dropdown1.SelectedText.Value & “‘ | take 5”
).value
)
Click the “Capture schema” button. Allow time for processing.
Add Data Table
Click Insert in the menu bar. Click “Data table” in the resulting sub menu bar. Re-position the data table and consider adding a border for visibility.
Click on the Properties tab in the right-hand popout. Select Results from the “Data Source” dropdown.
Click the “Edit fields” link. Click “+ Add field” in the resulting popout. Select desired fields. Click the Add button.
Confirm Success
Click the “Preview the app” button in the upper-right of the screen.
Try the dropdown, scroll through the data table, and confirm successful data retrieval and presentation.
|
|
Good Job!
You have successfully completed Objective #2: Create App
|
Reference
- Quickstart: Ingest sample data into Azure Data Explorer
https://docs.microsoft.com/en-us/azure/data-explorer/ingest-sample-data
- Authoring formulas with dynamic schema in Power Apps
https://powerapps.microsoft.com/en-us/blog/authoring-formulas-with-dynamic-schema-in-power-apps/

Recent Comments