
by Scott Muniz | Sep 11, 2020 | Azure, Technology, Uncategorized
This article is contributed. See the original author and article here.
A fully automated DevOps deployment of an synchronous pattern with Azure Integration Services. Setup with services like: API Management, Logic Apps, Key Vault (to store connections strings and keys for API Connections), Cosmos DB, Application Insights (for logging and monitoring API Management) and Log Analytics (for logging metrics from Logic Apps).
Here is the GitHub repository with all resources used in this tutorial: https://github.com/pascalvanderheiden/ais-sync-pattern
The architecture is based on the Basic Enterprise integration pattern: https://docs.microsoft.com/en-us/azure/architecture/reference-architectures/enterprise-integration/basic-enterprise-integration
I’ve used API Management GUI to create the API. And, I’ve used the Extract Tool to create the definition for my API: https://github.com/Azure/azure-api-management-devops-resource-kit
https://azure.microsoft.com/en-us/blog/build-a-ci-cd-pipeline-for-api-management/
You can also use the API Management Extension in Visual Studio Code, it has the Extract tool embedded in the extension.
Azure Architecture

The architecture uses Logic Apps to orchestrate the API workflow and API Management to create and publish the API. This architecture is sufficient for basic integration scenarios where the workflow is triggered by synchronous calls to backend services. A more sophisticated architecture using queues and events builds on this basic architecture (https://github.com/pascalvanderheiden/ais-async-pattern)
This architecture focusses on retrieving data from a Cosmos DB and returning that query in the response.
In this case I’ve used Cosmos DB to get the messages from, but this can be replace with any backend application / database.
In DevOps with the build pipeline all shared resources are deployed. The release pipeline deploys the specific services needed for this pattern. In this way are able to deploy, by cloning, multiple sync pattern, using the same shared components for cost optimization.
In this DevOps project I’ve made it possible to deploy to 3 environments by choice. So, you can deploy to a dev, staging and production environment in the DevOps project. There are 3 build pipelines which will provide the deployment of completely separate environments. All shared components are deployed in the build pipelines. In the release pipeline we will do a staged deployment of each environment, with a approval in between. This way you can choose if you want to deploy duplicate environments or not.

Step by Step installation
Before we hit it off
This integration returns data from Cosmos DB. This database is not pre-populated. You can implement the asynchronous pattern first, to get data in via the API (https://github.com/pascalvanderheiden/ais-async-pattern). Or you can just add data manually via the Data Explorer in the Azure Portal. There is a sample JSON included in this repository.
Another important note: if you’ve already implemented the asynchronous pattern (https://github.com/pascalvanderheiden/ais-async-pattern), this tutorial will be complementary to that setup.
Step 1: In the Azure Portal create a Service Principal
In the Azure Cloud Shell (https://shell.azure.com:(
- az ad sp create-for-rbac –name [your-service-principal-name]
Copy the JSON Output! We’ll be needing this information to create the service connection in Azure DevOps.
Step 2: Generate your Azure DevOps Project for Continuous Integration & Deployment with the Azure DevOps Generator
The project is split-up into 2 pieces; shared resources & integration specific resources. Enabling you to extend your project with more integration and re-using the shared resources for cost efficiency.
You can find the documentation on the Azure DevOps Generator here: https://vstsdemodata.visualstudio.com/AzureDevOpsDemoGenerator/_wiki/wikis/AzureDevOpsGenerator.wiki/58/Build-your-own-template
Step 3: In Azure DevOps, create a service connection
- Login with your account Azure DevOps. Go to the Project Settings of the DevOps Project you’ve created in step 2.
- Go to Service Connections*.
- Create a new service connection, choose Azure Resource Manager, next.
- Select Service Principal (manual).
- Fill in the Subscription Id, Subscription Name.
- Copy the appId from step 1 in “Service Principal Id” and the password from step 1 in “Service Principal key”. Give the service connection a name and verify the connection.
- Tick “Grant access permission to all pipelines. Save.
Step 4: In Azure DevOps, update the Variables Group.
- Go to Pipelines, Library. Click on the Variable group “Shared Resources”.
- Tick “Allow access to all pipelines.
- Update the values of the variables to match your naming conventions needs. I’ve put in some generic naming, but you need to update the variables. Otherwise, the creation of some services will fail, because they’ve been already used.
- The variable “KVCOSMOSDBLABEL” is used as a label for Key Vault to retrieve the connection string and key for API Connections. Leave that as it is: “aissharedcosmosdb”
- Do the same for the “Environments” Variable group.
- Don’t forget to save.
Step 5: In Azure DevOps, update the Build pipeline and Run it.
- Go to Pipelines, Pipelines.
- Select “Build AIS shared resources-env1-CI”, Edit.
- In Tasks, select the Tasks which have the explanation mark “Some settings need attention”, and update Azure Subscription to your Service Principal Connection.
- In Variables, update the variables to match your naming conventions needs. Keep in mind to pick unique naming for exposed services. I’ve put in some generic naming, but you need to update the variables. Otherwise, the creation of some services will fail, because they’ve been already used.
- Repeat this for “Build AIS shared resources-env2-CI” and “Build AIS shared resources-env3-CI”.
- Save & queue.
- Click the Agent Job to check the progress. Check if everything is create correctly, because of the unique naming for some services. And because it’s fun :)
- Keep in mind that the CLI scripts will check if the resource is already created, before creating. I’ve used an ARM Template for the deployment of the Application Insights, because I wanted to automatically integrate it with the API Management Instance I’ve just created. This is not yet supported in AZ CLI.
Step 6: In Azure DevOps, add the Key Vault secret to the variables.
- Go to Pipelines, Library. Add Variable group. Give it a name, something like “Key Vault Secrets Environment 1”.
- Tick “Allow access to all pipelines.
- Tick “Link secrets from an Azure key vault as variables”.
- Update the Azure Subscription to your Service Principal Connection.
- Select the Key vault name. If your build pipeline ran succesfully, you can select your Key vault. Add variables, and it will popup with the secret we’ve created earlier: “aissharedcosmosdb”. Select it one by one, OK. And Save.
- Do this for each environment.
Step 7: In Azure DevOps, update the Release pipeline and Run it.
- Go to Pipelines, Releases.
- Select “Release AIS Synchronous pattern-CD”, Edit.
- In Tasks, select the Tasks which have the explanation mark “Some settings need attention”, and update Azure Subscription to your Service Principal Connection.
- In Variables, update the variables to match the naming you used in the Build pipeline.
- In Variables groups, link the “Key Vault Secrets” variable groups, by clicking the Link button. Scope it to the specific environment stage.
- In the Pipeline, Click on the Pre-deployment conditions (blub next to each stage), and Check Pre-deployment approvals and enter your e-mail as approver.
- Save & Create Release.
Step 8: Go to your API Management Instance and test the API
In the Azure Portal, just go to API Management, APIs, click your new API, Click the operation GET and click the tab “Test” and click Send.
by Scott Muniz | Sep 10, 2020 | Azure, Technology, Uncategorized
This article is contributed. See the original author and article here.
My customer is having On-premises Hadoop environment with a data volume of approximately 80 Petabytes. As they started evaluating Azure to store their cognizant data which will be extracted from the On-Premises Hadoop environment and will be loaded to Azure Storage.
This cognizant data will be then further processed and analyze using Azure Synapse Analytics
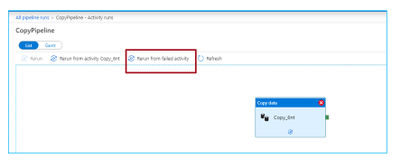
We started evaluating this cognizant data which is coming close to 5 Petabytes. And this volume needs to be loaded to the Azure Data Lake Storage Gen 2 for further processing.
- As Azure Data Factory had already proved to be one of the best tools to do data migration between data lake by its performance, robustness, and cost-effective mechanism to migrate data at scale. Some of the customers have successfully migrated petabytes of data consisting of hundreds of millions of files from On-premises to Azure via ADF with a sustained throughput of 2 GBps and higher.
With the latest resume copy feature, customers can get benefits when they are loading very large data with control the process on data migration, and saving effort and time on data partitions or any solutions explicitly created for high resilience.
Below is the way how to resume the copy activity from the last failure point at file level:

More guidance on best practices of using ADF for data lake migration:
Use Azure Data Factory to migrate data from your data lake or data warehouse to Azure
Use Azure Data Factory to migrate data from an on-premises Hadoop cluster to Azure Storage
Azure Data Factory copy activity documentation
Data Factory offers two basic approaches for migrating data from on-premises HDFS to Azure. You can select the approach based on your scenario.
- Data Factory DistCp mode (recommended): In Data Factory, you can use DistCp (distributed copy) to copy files as-is to Azure Blob storage (including staged copy) or Azure Data Lake Store Gen2. Use Data Factory integrated with DistCp to take advantage of an existing powerful cluster to achieve the best copy throughput. You also get the benefit of flexible scheduling and a unified monitoring experience from Data Factory. Depending on your Data Factory configuration, copy activity automatically constructs a DistCp command, submits the data to your Hadoop cluster, and then monitors the copy status. We recommend Data Factory DistCp mode for migrating data from an on-premises Hadoop cluster to Azure.
- Data Factory native integration runtime mode: DistCp isn’t an option in all scenarios. For example, in an Azure Virtual Networks environment, the DistCp tool doesn’t support Azure ExpressRoute private peering with an Azure Storage virtual network endpoint. In addition, in some cases, you don’t want to use your existing Hadoop cluster as an engine for migrating data so you don’t put heavy loads on your cluster, which might affect the performance of existing ETL jobs. Instead, you can use the native capability of the Data Factory integration runtime as the engine that copies data from on-premises HDFS to Azure.
Network security- By default, Data Factory transfers data from on-premises HDFS to Blob storage or Azure Data Lake Storage Gen2 by using an encrypted connection over HTTPS protocol. HTTPS provides data encryption in transit and prevents eavesdropping and man-in-the-middle attacks.
Security recommendations for Blob storage
Azure Storage encryption for data at rest
- Azure Databox: Use Data Box family of products such as Data Box, Data Box Disk, and Data Box Heavy to move large amounts of data to Azure when you’re limited by time, network availability, or costs. All data is AES-encrypted, and the devices are wiped clean after upload in accordance with NIST Special Publication 800-88 revision 1 standards
Migrate from on-prem HDFS store to Azure Storage with Azure Data Box


- Azure Import/Export service– Azure Import/Export service is used to securely import large amounts of data to Azure Blob storage and Azure Files by shipping disk drives to an Azure datacenter.
by Scott Muniz | Sep 10, 2020 | Azure, Technology, Uncategorized
This article is contributed. See the original author and article here.
The Azure Sphere OS quality update 20.09 is now available for evaluation in the Retail Eval feed. The retail evaluation period provides 14 days for backwards compatibility testing. During this time, please verify that your applications and devices operate properly with this release before it’s deployed broadly via the Retail feed. The Retail feed will continue to deliver OS version 20.08 until we publish 20.09 in two weeks.
The 20.09 release includes the following enhancements and bug fixes in the Azure Sphere OS. It does not include an updated SDK.
- Fixed a bug that caused devices with duplicate TKS images installed in the firmware partition to reboot after a software update.
- Fixed a bug that caused random reconnect issues from IoT Hub.
- Fixed a bug that caused memory leak in libcurl.
- Fixed a bug that caused an SPI read/write over 2K to fail.
- Reduced default TCP socket buffer size, and allowed users to set the buffer size to a value greater than 11K.
- Linux Kernel upgrade to 5.4.59.
For more information on Azure Sphere OS feeds and setting up an evaluation device group, see Azure Sphere OS feeds.
If you encounter problems
For self-help technical inquiries, please visit Microsoft Q&A or Stack Overflow. If you require technical support and have a support plan, please submit a support ticket in Microsoft Azure Support or work with your Microsoft Technical Account Manager. If you would like to purchase a support plan, please explore the Azure support plans.
by Scott Muniz | Sep 10, 2020 | Azure, Technology, Uncategorized
This article is contributed. See the original author and article here.
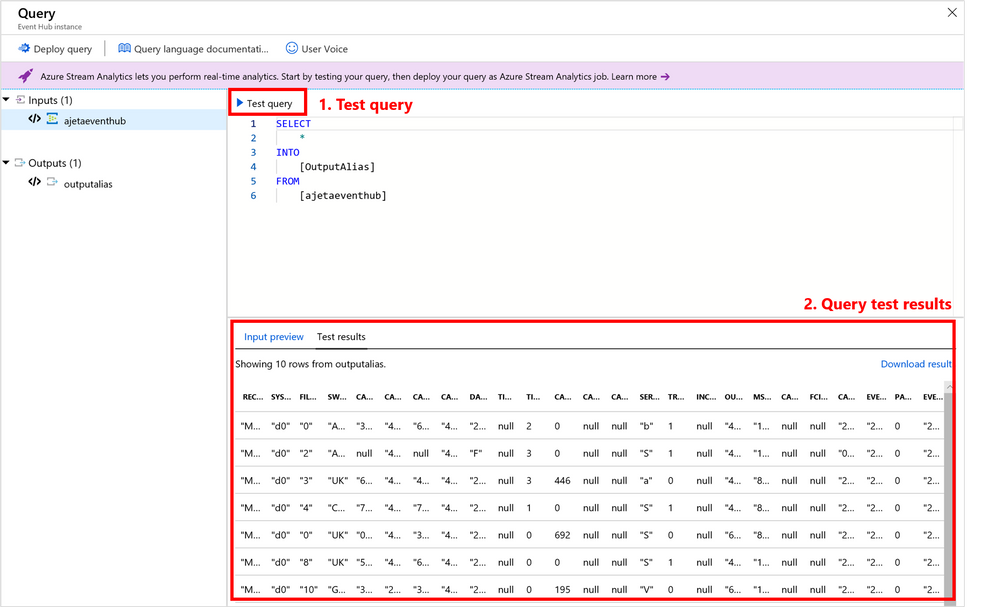
Azure Stream Analytics service makes it easy to ingest, process, and analyze streaming data from an events source (Event Hub/IoT Hub/Blob Storage), enabling powerful insights to drive real-time actions. But before you publish your Stream Analytics query to cloud to run 24×7, do you know you can test your query 3 different ways?
Benefits of testing the query
Here are the key benefits of testing your query:
- Development productivity: Fast iteration to test and fix the query in a single box environment
- Test before deploying: You can test the query logic with live data or local data without deploying to the cloud
- Query behavior consistency: For live input, the queries will output the same results
- Fast results: You can view query results in < 4seconds
- Free: Test your query for free
Here are 3 ways you can test your query
| |
1. Azure Portal |
2. VS Code |
3. Visual Studio |
| Platform type |
Web client |
Editor |
IDE |
| Query execution |
Test runs in the cloud without charge |
Test runs on your machine
|
Test runs on your machine
|
|
Test scenario 1
Local data (JSON/CSV)
- You can test your Stream Analytics query by using a local file.
|
Yes |
Yes |
Yes |
|
Test scenario 2
Sample data
- You can test your Stream Analytics query against snapshot/sample of live stream input.
|
Yes
(Event Hub, IoT Hub, Blob Storage)
SQL reference data supported
|
No |
No |
|
Test scenario 3
Live data
- You can test your Stream Analytics query against live stream input.
|
No |
Yes
(Event Hub, IoT Hub, Blob Storage)
Blob/SQL reference data supported
|
Yes
(Event Hub, IoT Hub, Blob Storage)
Blob/SQL reference data supported
|
|
Job diagram availability while testing the query
|
No |
Yes
You can view the data & metrics of each query step in each intermediate result set to find the source of an issue.
|
Yes
You can view the data & metrics of each query step in each intermediate result set to find the source of an issue.
|
| Documentation |
Local data
Sample data
Job diagram |
Local data
Live data
Job diagram
|
Local data
Live data
Job diagram
|
|
Limitations
|
No support for Event ordering in testing.
C# UDFs and deserializers not supported.
Local input size <2 MB for testing.
Queries with <1 min execution time are supported for testing. |
Support for Event ordering.
C# UDFs and deserializers support expected by end of year.
|
Support for Event ordering
C# UDFs and deserializers are supported.
|
1. Azure Portal
 Test your query in Azure portal by using a local file or sample of live data
2. VS Code
 Test your query in VS Code by using a local file or live data
 Use Job Diagram to see intermediate results
3. Visual Studio
 Test your query in VS Code by using a local file or live data
Query testing should only be used for functional testing purposes. It does not replace the performance and scalability tests you would perform in the cloud. This testing feature should not be used for production purposes since running in a local environment doesn’t guarantee any service SLA.
Feedback and engagement
Engage with us and get early glimpses of new features by following us on Twitter at @AzureStreaming.
The Azure Stream Analytics team is highly committed to listening to your feedback and letting the user’s voice influence our future investments. We welcome you to join the conversation and make your voice heard via our UserVoice page
by Scott Muniz | Sep 10, 2020 | Azure, Technology, Uncategorized
This article is contributed. See the original author and article here.
Azure Lab Services provides many features that help you to minimize costs while providing students lab environments that they can access from anywhere, any time of day. These features are optimized when you structure your labs so that you use one lab per class. Adopting this lab structure when you move from a physical lab will also help you select the appropriate VM size to use.
Problem
Usually a physical lab is shared by students from multiple classes. As a result, all of the classes’ software applications are installed together at once on each computer. When a class uses the lab, students only run a subset of the applications that are relevant to their class.
This type of physical computer lab often leads to increased hardware requirements:
- A large disk size may be required to install the variety of applications that are needed by the classes that are sharing the lab.
- Some applications require a larger VM size compared to others. When all of these applications are installed together in the same lab, each computer must have sufficient hardware to run the most compute-intensive applications. This level of hardware is essentially wasted for classes that only use the lab to run applications that require less memory and compute power.
Solution
Azure Lab Services is designed to use hardware more efficiently so that you only pay for what your students actually need and use.
With Azure Lab Services, labs are structured to be more granular:
- One lab is created for each class (or session of a class).
- On the lab’s image, only the software applications that are needed by that specific class are installed.
This structure helps to lessen the disk size that is needed (Azure Lab Services’ currently supports a disk size of 127 GB). Also, this helps you identify the appropriate VM size based on the workloads that students are expected to perform for each class.
In addition, the following features are designed to minimize costs when you create one lab per class:
- Schedules are used to automatically start and stop all VMs within a lab according to each class’s schedule.
- Quotas allow you to control the amount of time that each class’s students can access VMs outside of their scheduled hours.
Last but not least, access to each individual lab is controlled – students are only granted access to labs for classes that they are enrolled in.
Example
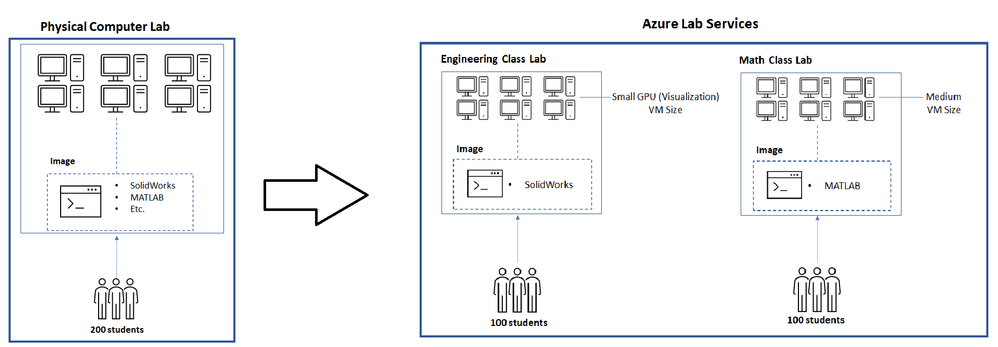
Let’s assume we’re moving a physical lab to Azure Lab Services and that the physical lab is shared by multiple classes such as:
- An engineering class that uses SolidWorks with 100 students enrolled.
- A math class that uses MATLAB that also has 100 students enrolled.
Since our physical lab is shared by the above two classes, each computer has both SolidWorks and MATLAB installed along with various other common applications, such as Word, Excel, etc. Also, it’s important to note that SolidWorks is more compute-intensive since it typically requires a GPU.
To move this physical lab to Azure Lab Services, we will:
- Create two labs; one for the engineering class and another for the math class.
- Create two images; one with SolidWorks installed and another with MATLAB.
Since SolidWorks requires a GPU, the lab for this uses the Small GPU (Visualization) VM size. However, MATLAB only requires a Medium VM size.
The image below shows how the structure changes when moving this physical lab to Azure Lab Services.

Cost Analysis
An important point from the above example is that the cost per usage hour for the two VM sizes is substantially different:
- Small GPU (Visualization) provides high compute-power and as a result, the cost is $1.60 per usage hour (or 160 lab units).
- Medium provides less compute power but is suitable for many types of classes; it costs only $0.55 per usage hour (or 55 lab units).
You save costs by creating separate labs using the smallest VM size that is needed for each class.
To see the savings, let’s estimate that each student will use their VM for a total of 10 hours and compare costs for using a single lab vs. separate labs.
A single lab using the Small GPU (Visualization) size that is shared by students from both the engineering and math classes is estimated to cost the following:
- 10 hours * 200 students * $1.60 = $3200
Separate labs that use the Small GPU (Visualization) size for engineering and Medium size for math are estimated to cost the following:
- Engineering class lab
- 10 hours * 100 students * $1.60 cost per hour for Small GPU (Visualization) = $1600
- Math class lab
- 10 hours * 100 students * $0.55 cost per hour for Medium = $550
The total of both the engineering and math labs is $2150.
By structuring the labs to be more granular, this results in a cost savings of $1050! Also, keep in mind that you only pay for the number of hours that your students actually use their VMs. If students use their VMs less than this, the actual costs will be lower.
Helpful Tips
When you start using Azure Lab Services, IT and faculty should coordinate early in the planning process to:
- Identify the specific software applications that each class requires.
- Understand the workloads that students will perform using the lab.
This information is needed to choose the appropriate VM size when you create a lab and to set up the image on the template VM.
To ensure that you choose the appropriate VM size, we recommend starting with the minimum VM size that meets the hardware requirements for your applications. Then, have faculty connect to a lab VM to validate common workloads that students will perform to ensure the performance and experience is sufficient. It’s helpful to refer to the Class Types which show real-world examples of how to set up applications for classes along with the recommended VM size.
Also, Shared Image Gallery is useful for creating and storing custom images. This allows you to create an image once and reuse it to create multiple labs.
We hope that you find this post helpful as you start moving your physical labs to Azure Lab Services.
Thanks!

Recent Comments