by Scott Muniz | Jul 29, 2020 | Alerts, Microsoft, Technology, Uncategorized
This article is contributed. See the original author and article here.
Howdy folks!
Today we’re announcing the public preview of Azure AD Application Proxy (App Proxy) support for the Remote Desktop Services (RDS) web client. Many of you are already using App Proxy for applications hosted on RDS and we’ve seen a lot of requests for extending support to the RDS web client as well.
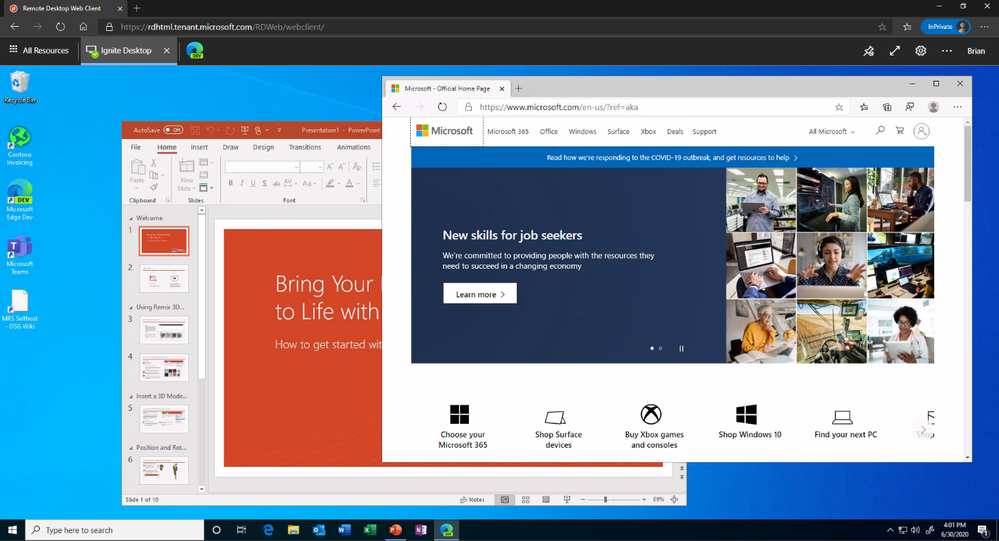
With this preview, you can now use the RDS web client even when App Proxy provides secure remote access to RDS. The web client works on any HTML5-capable browser such as Microsoft Edge, Internet Explorer 11, Google Chrome, Safari, or Mozilla Firefox (v55.0 and later). You can push full desktops or remote apps to the Remote Desktop web client. The remote apps are hosted on the virtualized machine but appear as if they’re running on the user’s desktop like local applications. The apps also have their own taskbar entry and can be resized and moved across monitors.
 Launch rich client apps with a full desktop like experience
Why use App Proxy with RDS?
RDS allows you to extend virtual desktops and applications to any device while helping keep critical intellectual property secure. By using this virtualization platform, you can deploy all types of applications such as Windows apps and other rich client apps as-is with no re-writing required. By using App Proxy with RDS you can reduce the attack surface of your RDS deployment by enforcing pre-authentication and Conditional Access policies like requiring Multi-Factor Authentication (MFA) or using a compliant device before users can access RDS. App Proxy also doesn’t require you to open inbound connections through your firewall.
Getting started
To use the RDS web client with App Proxy, first make sure to update your App Proxy connectors to the latest version, 1.5.1975.0. If you haven’t already, you will need to configure RDS to work with App Proxy. In this configuration, App Proxy will handle the internet facing component of your RDS deployment and protect all traffic with pre-authentication and any Conditional Access policies in place. For steps on how to do this, see Publish Remote Desktop with Azure AD Application Proxy.
 How Azure AD App Proxy works in an RDS deployment
Configure the Remote Desktop web client
Next, complete setup by enabling the Remote Desktop web client for user access. See details on how to do this at Set up the Remote Desktop web client for your users. Now your users can use the external URL to access the client from their browser, or they can launch the app from the My Apps portal.
As always, we’d love to hear any feedback or suggestions you may have. Please let us know what you think in the comments below or on the Azure AD feedback forum.
Best regards,
Alex Simons (@alex_a_simons)
Corporate Vice President Program Management
Microsoft Identity Division
Learn more about Microsoft identity:
by Scott Muniz | Jul 29, 2020 | Alerts, Microsoft, Technology, Uncategorized
This article is contributed. See the original author and article here.
Many organisations have established their data-lake on Azure to manage their end to end data analytics estate. In some cases, organisations’ customers/partners leverage other cloud providers and we want to meet them wherever they are, after all Azure is an open and versatile platform.
If the partner or customer is already using Azure, there are a myriad of options to move data into their estate. Azure Data Share however stands out as its geared towards these cross-tenant data sharing use-cases. It allows users to create invitations, define T&Cs, define snapshot frequency and type (incremental/full), and revoke shares.
Pulling data into Azure from other clouds is also rather straight-forward using one of Azure Data Factory’s 90+ copy-activity connectors, including AWS, GCP, Salesforce, Oracle and many more.
Some of these connectors support being used as a source (read) and sink (write). Azure native services, Oracle, SAP, and some others can be used as source and sink. However, not all connectors support this, in which case developers can default to the generic connectors such as ODBC, filesystem, and SFTP connectors.
In this blog I want to outline another approach using spark to read and write selected datasets to other clouds such as GCS or S3. However, this methodology applies to really any service that has a spark or Hadoop driver. This gives us bidirectional on-demand access to any cloud storage. As data is read into memory we can join, filter, aggregate data as needed from multiple environments.
Caveat emptor, as data egresses you may be subject to network costs.
Pre-Reqs
- Azure subscription, Azure Databricks (ADB) workspace, and Azure Data Factory
- Google Cloud Platform subscription
Google Cloud
- Create a service account https://console.cloud.google.com/iam-admin/serviceaccounts/ > ad/nt > create key with type json > keep the json doc safe
- Go to https://console.cloud.google.com/storage/ > create bucket (single region, standard storage) > add “Storage Object Admin” permission to service account created in step 1. > upload a test csv file
Azure
- Navigate to your Azure Databricks workspace (or create one via Quickstart Guide)
- Upload your GCS service account json to DBFS storage, you can use the Databricks CLI
databricks fs cp ./myspecialkey.json "dbfs:/data"
- Create a cluster using the 6.5 Databricks runtime (includes Apache Spark 2.4.5, Scala 2.11) with the following Spark Config:
spark.hadoop.fs.gs.auth.service.account.json.keyfile /dbfs/data/myspecialkey.json
spark.hadoop.fs.gs.impl com.google.cloud.hadoop.fs.gcs.GoogleHadoopFileSystem
spark.hadoop.fs.gs.project.id {Your-GCP-Project-ID}
spark.hadoop.fs.gs.auth.service.account.enable true
spark.databricks.pyspark.trustedFilesystems com.google.cloud.hadoop.fs.gcs.GoogleHadoopFileSystem,com.databricks.adl.AdlFileSystem,com.databricks.s3a.S3AFileSystem,shaded.databricks.org.apache.hadoop.fs.azure.NativeAzureFileSystem,shaded.databricks.v20180920_b33d810.org.apache.hadoop.fs.azurebfs.SecureAzureBlobFileSystem
Note: the spark.databricks.pyspark.trustedFilesystems is needed to work around org.apache.spark.api.python.PythonSecurityException exception.
- Once the cluster is created add Google’s GCS connector as a library
- Clusters > {your cluster} > Libraries > Install New > Maven > Coordinates: com.google.cloud.bigdataoss:gcs-connector:1.5.2-hadoop2
- Make note of the version, other versions cause inflection and IOException errors as Databricks uses Hadoop 2.x. Later versions of Databricks runtimes (7.1+) may move to Hadoop 3.
- At this point we can simply use ls, cp, mv, rm to move data across between ADLS storage and GCS. Note: I set up credential pass-through in my cluster which authenticated me to my data-lake using my SSO/Active Directory credentials.
dbutils.fs.cp("abfss://{filesystem}@{yourADLSaccount}.dfs.core.windows.net/movies/","gs://{yourGCSbucket}/",True)

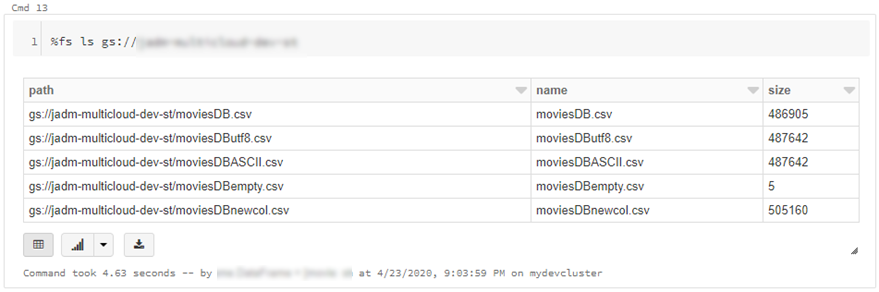
- We can also read individual files/folders into a data-frame.
df = spark.read.csv("gs://{yourGCSbucket}/{somefile} ", header=True)
This will read data directly from your GCS bucket, note this may incur GCP egress costs.

- From here the cloud is the limit, we can define spark tables across multiple environments and query across them as if it were all co-located. Don’t forget however, that spark has to import all the data into memory which may impact performance and egress costs.
%sql
CREATE TABLE adlsstest (movie long, title string, genres string, year long, rating long, RottonTomato string) USING CSV LOCATION "abfss://{filesystem}@{yourADLSaccount}.dfs.core.windows.net/movies/moviesDB.csv";
CREATE TABLE gstest (movie long, title string, genres string, year long, rating long, RottonTomato string) USING CSV LOCATION "gs://{yourGCSbucket}/moviesDB.csv";
CREATE VIEW myview AS
  SELECT *,'adls' AS src FROM adlsstest
  UNION ALL
  SELECT *,'gcs' as src FROM gstest

Automation
From here it is a piece of cake to parameterise and automate movement of data. We can set up an Azure Data Factory pipeline to pass parameters into the Azure Databricks notebooks to do stuff. In this example I copy all files from a specified ADLS directory into a GCS target directory.
- Create a new notebook in Databricks using the code at the end
- Navigate to your Azure Data Factory (or create one via Quickstart Guide)
- Create a pipeline with a Databricks activity (here’s a guide)
- In the Data Factory pipeline create 3 parameters: sourcedir, targetdir, and myfile. Define some default values using the respective ABFSS and GS formats:

- Add the notebook path and map the pipeline parameters to the notebook parameters under Azure Databricks activity > Settings

- Click Debug, you can optionally modify the parameter values > Click Ok > As its running click on details (spectacles icon) and view notebook output

- Head back to your GCP portal, and you will see the files appear in GCS

As we are accessing ADLS from an automated job we cannot use credential passthrough. My colleague Nicholas Hurt wrote a great piece discussing different approaches to authenticating to ADLS from ADB.
I am using a service principal for this demo. Azure documentation outlines how to set this up. Also, I set up a secret scope using the Databricks CLI and stored the service principal key there.
# authenticate using a service principal and OAuth 2.0
spark.conf.set("fs.azure.account.auth.type", "OAuth")
spark.conf.set("fs.azure.account.oauth.provider.type", "org.apache.hadoop.fs.azurebfs.oauth2.ClientCredsTokenProvider")
spark.conf.set("fs.azure.account.oauth2.client.id", "YOUR-APPLICATION-ID")
spark.conf.set("fs.azure.account.oauth2.client.secret", dbutils.secrets.get(scope = "mykeys", key = "mysp"))
spark.conf.set("fs.azure.account.oauth2.client.endpoint", "https://login.microsoftonline.com/YOUR-TENANT-ID/oauth2/token")

# readdf=spark.read.format("csv").option("header", "true").load("abfss://fs1@.dfs.core.windows.net/movies/moviesDB.csv")
dbutils.widgets.text("sourcedir", "","")
sourcedir = dbutils.widgets.get("sourcedir")
print ("Param -'sourcedir':", sourcedir)

dbutils.widgets.text("targetdir", "","")
targetdir = dbutils.widgets.get("targetdir")
print ("Param -'targetdir':", targetdir)

dbutils.widgets.text("myfile", "","")
myfile = dbutils.widgets.get("myfile")
print ("Param -'myfile':", myfile)

##dbutils.fs.cp("abfss://fs1@.dfs.core.windows.net/movies/","gs:///",True)
dbutils.fs.cp(sourcedir,targetdir,True)
##df = spark.read.csv("gs:///moviesDB.csv",header=True)
df = spark.read.csv(myfile,header=True)
Conclusion
Using this approach, we can move data between different storage providers if they provide a compatible jar. In fact, this will work across S3, GCS, BigQuery and many more.
Further we discussed how to automate the process to tie in with broader Azure data orchestration. This approach augments multi-cloud, on-prem data integration capabilities available out of the box with Azure Data Factory.
I should call out that this approach does not support mounts, however that is a minor limitation.
by Scott Muniz | Jul 29, 2020 | Alerts, Microsoft, Technology, Uncategorized
This article is contributed. See the original author and article here.
please help us share the new animation showing Azure Data Explorer at a glance.
We had planned to have a real life movie with our customers, but COVID-19 decided otherwise. We made some adjustments, and here are the results! Please enjoy and please share.
In 2.5 minutes you’ll get a full explanation of What Azure Data Explorer is and when to use it.
YouTube
LinkedIn
Azure Data Explorer Docs
Free online Courses:
- How to Start with Microsoft Azure Data Explorer
- Exploring Data in Microsoft Azure Using Kusto Query Language and Azure Data Explorer
- Microsoft Azure Data Explorer – Advanced KQL
Enjoy.


by Scott Muniz | Jul 28, 2020 | Alerts, Microsoft, Technology, Uncategorized
This article is contributed. See the original author and article here.
This article is the 5th part of the Zero to Hero with App Service series. This article assumes you have completed the first article.
If you would like to customize your web app and have a domain name other than “azurewebsites.net”, you can add a custom domain to your web app. Moreover, you can secure your custom domain with a free certificate with App Service Managed Certificates, which will give your customers peace of mind when browsing your website.
Prerequisite
Before you can add a custom domain to your web app, you need to have purchased a custom domain already. If you don’t have a custom domain, you can buy one through App Service Domains, which you can get started with the App Service Domains section of the article . If you already have your own custom domain, proceed to the adding a custom domain to your web app section of the article.
App Service Domains
App Service Domains lets you create and manage domains hosted on Azure DNS through the Azure portal. The domain can be used for services such as Web Apps, Traffic Manager, and etc.. Purchasing an App Service Domain also provides the added benefit of privacy protection: your personal data will be protected from the WHOIS public database for free. This is often costs extra with other domain registrars. This product can auto-renew your domains and it integrates easily with your web apps.
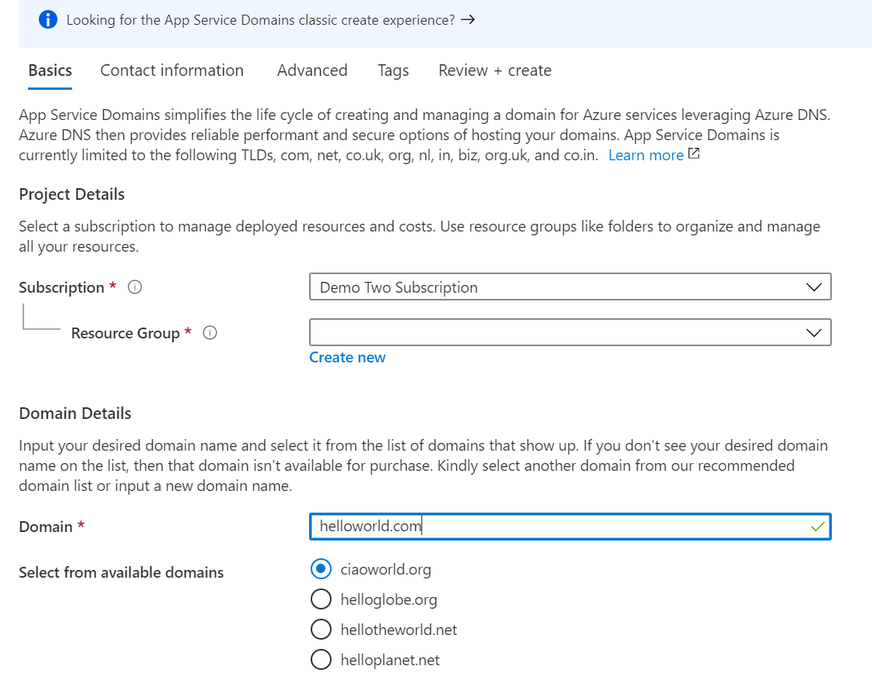
To create your App Service Domain, you can click on this link here or you can head to the Azure portal and search for “App Service Domain”.

In the domain search bar, type the domain name you would like to purchase. If you don’t see the name in the list of available domains, then the domain isn’t available for purchase. However, you can choose from the suggested list of available domains or enter a new domain you would like to purchase. In the “Contact information” tab, enter your personal information. Then in the “Advanced” tab, choose whether you want to set up auto-renew for the domain. Domain auto-renew prevents accidental loss of domain ownership after expiration. Lastly, decide whether you would like to add privacy protection at no extra charge. Go to “Review + create” to review the legal terms, verify the domain information, and click “Create”. Once your domain has successfully been created, proceed to the adding a custom domain to your web app section of the article.
Adding a custom domain to your web app
To add a custom domain to your web app, you will need to update your domain’s DNS records. If you purchased an App Service Domain, the DNS records will be updated for you automatically and you can proceed to verifying and adding a custom domain section. Otherwise, you will need to work on updating DNS records .
Updating DNS records
You will need to get the custom domain verification ID of your web app. This token will be used to verify the domain ownership. You can get this value in the “Custom domains” tab of your web app.

Once you have the ID, go to the domain provider of your domain. In the DNS records, create a CNAME and a TXT Record. As an example, if you want to map your ‘www’ subdomain, refer to the chart below:
| Record Type |
Host |
Value |
| CNAME |
www |
.azurewebsites.net |
| TXT |
asuid.www |
Custom Domain Verification ID |
Your DNS records page should look something like the following example:

Verifying and adding custom domain
After updating your DNS records (if not using App Service Domain):
- Go to your App Service and navigate to the “Custom domain” section under “Settings”.
- Click on the “Add custom domain” button
- Enter the domain that you would like to use
- Click “Validate”
- If you correctly updated your DNS records and the DNS changes have propagated, you will see the option to “add custom domain”. Otherwise, return to the previous updating DNS records section to make sure you have correctly updated your DNS records. Click “add custom domain”.

Once the custom domain has successfully been added to your web app, you will see it under the list of “Assigned Custom Domains”. You can navigate to your web app using these domain names.
If you are interested in securing your custom domain, proceed to the following section on Creating an App Service Managed Certificate .
Creating an App Service Managed Certificate
If you would like to secure your custom domain at no cost, you can create an App Service Managed Certificate and bind it to your domain. With Managed Certificates, you don’t have to worry about renewals, as the certificate is automatically renewed for you!
Go to your web app resource and navigate to the “TLS/SSL settings” section under “Settings”. Click on the “Private Key Certificates” blade and look for the “Create App Service Managed Certificate” button.

Select the domain from the dropdown menu that you would like to create a certificate for and click “Create”.

Once the certificate has been created, you will see that it in the list of your private certificates on the “TLS/SSL Settings” blade. In order to use this certificate to secure your domain, you will need to bind this certificate to your domain, which will be explained in the next section of binding your certificate to your web app .

Binding Your Certificate to Your Web App
The final step to securing your domain is to bind your certificate to the domain. In the Portal, go to your web app and navigate to the “Custom domain” section under “Settings”. Look for the domain you want to secure from the list of “Assigned Custom Domains” and click “Add binding”.

In the following blade…
- Select the correct custom domain
- Select the App Service Managed Certificate you’ve just created from the dropdown menu
- Select “SNI SLL” for the TLS/SSL Type
- Click “Add Binding”

Once the binding has successfully been created, you will see a green checkmark and the word “Secure” beside your custom domain under the “Assigned Custom Domains” list.
Summary
Congratulations! In this article, you have successfully added and secured a custom domain for your App Service! Your users can now reach your web site at the new domain, and their browser will let them know that the site is secured.
Helpful Resources
by Scott Muniz | Jul 28, 2020 | Alerts, Microsoft, Technology, Uncategorized
This article is contributed. See the original author and article here.
We are excited to share several new Azure Migration-related assets to help you navigate cloud migration, learn about best practices, and understand tooling options available from Microsoft.
- Cloud Migration Simplified E-Book Learn about the cloud migration journey, with our tried and true framework for a successful migration and migration best practices, along with guidance on how to navigate all of the tools and resources provided by Microsoft and partners.
- Azure Migrate E-Book Learn how to discover, assess, and migrate infrastructure, applications, and data to the cloud with Microsoft’s first-party migration service, Azure Migrate.
- Virtual Machine Migration Learning Path Get step-by-step instructions along with video demos on how to migrate virtual machines and apps to Azure using Azure Migrate, including guided set up, assessment, and migration.

Recent Comments