by Scott Muniz | Jul 21, 2020 | Alerts, Microsoft, Technology, Uncategorized
This article is contributed. See the original author and article here.
I’ve done a few posts recently around using GraphQL, especially with Azure Static Web Apps, and also on some recent streams. This has led to some questions coming my way around the best way to use GraphQL with Azure.
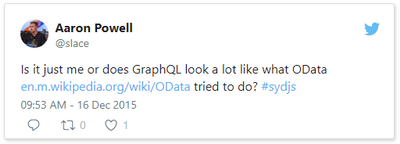
Let me start by saying that I’m by no means a GraphQL expert. In fact, I’ve been quite skeptical of GraphQL over the years.

This tweet here was my initial observation when I first saw it presented back in 2015 (and now I use it to poke fun at friends now) and I still this there are some metis in the comparison, even if it’s not 100% valid.
So, I am by no means a GraphQL expert, meaning that in this series I want to share what my perspective is as I come to looking at how to be do GraphQL with Azure, and in this post we’ll look at how to get started with it.
Running GraphQL on Azure
This question has come my way a few times, “how do you run GraphQL on Azure?” and like any good problem, the answer to it is a solid it depends.
When I’ve started to unpack the problem with people it comes down to wanting to find a service on Azure that does GraphQL, in the same way that you can use something like AWS Amplify to create a GraphQL endpoint for an application. Presently, Azure doesn’t have this as a service offering, and to have GraphQL as a service sounds is a tricky proposition to me because GraphQL defines how you interface as a client to your backend, but not how your backend works. This is an important thing to understand because the way you’d implement GraphQL would depend on what your underlying data store is, is it Azure SQL or CosmosDB? maybe it’s Table Storage, or a combination of several storage models.
So for me the question is really about how you run a GraphQL server and in my mind this leaves two types of projects; one is that it’s a completely new system you’re building with no relationship to any existing databases or backends that you’ve got* or two you’re looking at how to expose your existing backend in a way other than REST.
*I want to point out that I’m somewhat stretching the example here. Even in a completely new system it’s unlikely you’d have zero integrations to existing systems, I’m more point out the two different ends of the spectrum.
If you’re in the first bucket, the world is your oyster, but you have the potential of choice paralysis, there’s no single thing to choose from in Azure, meaning you have to make a lot of decisions to get up and running with GraphQL. This is where having a service that provides you a GraphQL interface over a predefined data source would work really nicely and if you’re looking for this solution I’d love to chat more to provide that feedback to our product teams (you’ll find my contact info on my About page). Whereas if you’re in the second, the flexibility of not having to conform to an existing service design means it’s easier to integrate into. What this means is that you need some way to host a GraphQL server, because when it comes down to it, that’s the core piece of infrastructure you’re going to need, the rest is just plumbing between the queries/mutations/subscriptions and where your data lives.
Hosting a GraphQL Server
There are implementations of GraphQL for lots of languages so whether you’re a .NET or JavaScript dev, Python or PHP, there’s going to be an option for you do implement a GraphQL server in whatever language you desire.
Let’s take a look at the options that we have available to us in Azure.
Azure Virtual Machines
Azure Virtual Machines are a natural first step, they give us a really flexible hosting option, you are responsible for the infrastructure so you can run whatever you need to run on it. Ultimately though, a VM has some drawbacks, you’re responsible for the infrastructure security like patching the host OS, locking down firewalls and ports, etc..
Personally, I would skip a VM as the management overhead outweighs the flexibility.
Container Solutions
The next option to look at is deploying a GraphQL server within a Docker container. Azure Kubernetes Service (AKS) would be where you’d want to look if you’re looking to include GraphQL within a larger Kubernetes solution or wanting to use Kubernetes as a management platform for your server. This might be a bit of an overkill if it’s a standalone server, but worthwhile if it’s part of a broader solution.
My preferred container option would be Azure Web Apps for Containers. This is an alternative to the standard App Service (or App Service on Linux) but useful if you’re runtime isn’t one of the supported ones (runtimes like .NET, Node, PHP, etc.). App Service is a great platform to host on, it gives you plenty of management over the environment that you’re running in, but keeps it very much in a PaaS (Platform as a Service) model, so you don’t have to worry about patching the host OS, runtime upgrades, etc., you just consume it. You have the benefit of being able to scale both up (bigger machines) and out (more machines), building on top of an backend system allows for a lot of scale in the right way.
Azure Functions
App Service isn’t the only way to run a Node.js GraphQL service, and this leads to my preference, Azure Functions with Apollo Server. The reason I like Functions for GraphQL is that I feel GraphQL fits nicely in the Serverless design model nicely (not to say it doesn’t fit others) and thus Functions is the right platform for it. If the kinds of use cases that you’re designing your API around fit with the notion of the on-demand scale that Serverless provides, but you do have a risk of performance impact due to cold start delays (which can be addressed with Always On plans).
Summary
We’re just getting started on our journey into running GraphQL on Azure. In this post we touched on the underlying services that we might want to look at when it comes to looking to host a GraphQL server, with my pick being Azure Functions if you’re doing a JavaScript implementation, App Service and App Service for Containers for everything else.
As we progress through the series we’ll look at each piece that’s important when it comes to hosting GraphQL on Azure, and if there’s something specific you want me to drill down into in more details, please let me know.
This post was originally posted on www.aaron-powell.com.
by Scott Muniz | Jul 21, 2020 | Alerts, Microsoft, Technology, Uncategorized
This article is contributed. See the original author and article here.
Azure Monitor for SAP Solutions builds on native Azure capabilities like Log Analytics and Workbooks to meet the monitoring needs for the teams managing the SAP on Azure estate. The solution also allows for easy creation of custom visualisations and custom alerting, Azure Monitor for SAP Solutions ships with default Workbooks than can either be used out of the box or extended to meet your requirements.
Today Service Providers often have credentials in the customers environments (Tenants) which they use to logon and manage the customers infrastructure, the consequence of this is that in order to manage another customers environment the service provider’s technician will need to re-authenticate with the credentials they are given to the new customer. With Azure Lighthouse it is possible to reduce the context switching by providing delegated access to the customer environment using the Service Provider’s credentials and not the customer specified credentials.
Combining Azure Monitor for SAP Solutions with Azure Lighthouse a service provider can monitor the metrics of their SAP Solution using native Azure tooling and aggregate that across tenants.
For more information on how to use these two technologies together please read the attached whitepaper
by Scott Muniz | Jul 21, 2020 | Alerts, Microsoft, Technology, Uncategorized
This article is contributed. See the original author and article here.
The Azure Sentinel Ninja training is not static and always updated. If you want to refresh your knowledge and get updated, here is the list of updates for you:
(Missed the June update?)

by Scott Muniz | Jul 21, 2020 | Alerts, Microsoft, Technology, Uncategorized
This article is contributed. See the original author and article here.
As enterprises are working to reduce their attack surface area, one area that is often overlooked is the potential database vulnerabilities and detection of anomalous activity that could indicate a sign of intrusion. In the series of blog post, we will walk you through different scenarios on, how Azure Security Center protects SQL server hosted on either Azure VMs, Azure Arc and On-prem.
Advanced Data Security (ADS) is one of many features that is included in Azure Security Center and falls under Cloud Workload Protection Platform (CWPP) capability (read this article to understand CWPP). Advanced data security for SQL machines is an extension of Azure Security Center’s advanced data security package that’s already available for Azure SQL Databases, Synapse, and SQL Managed Instances. This feature (by the time this blog was written it was in public preview) brings the same level of protection that were introduced for SQL servers on Azure VMs which includes SQL Injection vulnerabilities, brute-force against SQL credentials, and much more.
Cloud security posture management and proactive threat protection with Azure Security Center helps SOC (Security Operation Center) operators to get handle on threats and keep pace with attackers and Advanced Data Security (ADS) for SQL servers on Azure Virtual Machines, is a unified package for advanced SQL security capabilities which is in public preview at the time of this writing.
This public preview feature that was announced last year includes functionalities for identifying and mitigating potential database vulnerabilities and detecting anomalous activities that could indicate threats to your database:
- Vulnerability Assessment
- Advanced Threat Protection
Breakthroughs in big data and machine learning make it possible for Security Center to detect anomalous database access and query patterns, SQL injection attacks, and other threats targeting your SQL databases in Azure. With Azure Security Center you receive alerts on suspicious activity and recommended actions for investigating and mitigating these threats.
Advanced Data Security pricing aligns with Azure Security Center standard tier, where each protected server or managed instance is counted as one node. Newly protected resources qualify for a free trial of Security Center standard tier. For more information, see the Azure Security Center pricing page.
In this blog post, we will be covering how Azure Security Center protects SQL IaaS machines hosted on Azure.
1. SQL server on an Azure VM
SQL Server on Azure Virtual Machines enables you to use full versions of SQL Server in the cloud without having to manage any on-premises hardware. SQL Server virtual machines (VMs) also simplify licensing costs when you pay as you go. Refer this article for more understanding, plus instructions to spin the Azure SQL VM.
As a prerequisite, make sure the optional bundle (SQL servers on Machine) is enabled in Security Center’s pricing and settings page (Subscription) as shown in ‘Image 1’

Image 1: Pricing settings in Security Center
If you have Auto-provisioning turned on (Refer, Image 2), Azure Security Center will automatically provision the Log Analytics Agent on the Azure VMs.

Image 2 : Auto Provisioning
In an instance where you don’t have Auto-Provisioning turned on, you would have to manually install the agent. Refer this article for step-by-step process of the installation.
You may choose to collect the data in a default workspace that Azure Security Center creates or select your own workspace. Advanced Data Security for SQL servers on machines will be enabled on all SQL servers connected to the selected workspace. The protection will be fully active after the first restart of the SQL Server.
In this sample scenario, a SQL IaaS VM (sqlserver) was provisioned. Azure Security Center installed the Log Analytics agent and started gathering data to provide security recommendations for your SQL VM under Recommendations section (as shown in ‘Image 3’). Furthermore, you can select the security option at the left pane and view recommendations from Security Center and alternatively, you may navigate to Azure Security Center for more information on a recommendation. You can enable threat protection for Azure SQL Database SQL servers at either the subscription level or resource level.

Image 3: Recommendations
You can also filter just the SQL recommendations (Data & Storage hive) from Resource security hygiene section (as shown in the Image 4)

Image 4: Data & Storage
Make sure to address and review all security recommendations for the SQL databases. In my example, I have these unhealthy resources which is grouped beautifully by Severity.
1.1 Executing the Attack
Hackers are always trying to find workloads that are exposed to the Internet and databases that are very common target. As part of this type of attack, it is common to see scanning to discover public IP addresses that have SQL workloads running on it, and once they find that they will move forward to try to crack their password using different methods, such as brute force attack. “Brute Force”, which is a type of attack that attempts to calculate or guess valid username/password combinations to gain unauthorized access to a host. Oftentimes, the sheer amount of Brute Force attempts can effectively result in DDoS of the targeted system. In case threat actors can compromise the SQL database and gain access to it, they will likely find a wealth of valuable information that includes, personally identifiable information, credit card numbers, intellectual property, etc. Even if the database does not have much information, a successful attack on an insecurely configured SQL installation can be leveraged to get full system admin privileges.
For this example, a PowerShell script was utilized to simulate a SQL brute force attack against a SQL database that is connected to the Azure Security Center.
The brute force attempts occurred over TCP port 1433, which was exposed on a public facing interface. TCP port 1433 is the default port for SQL server.
Note: It is a very common recommendation to change the SQL default port 1433, this may impart a “false sensation of security”, because many port scanning tools can scan a “range” of network ports and eventually find SQL listening on ports other than 1433.
The PowerShell script used in this case is simulating the attack by trying to login with ‘sa’ account and trying with a list of commonly used password defined in the text file or the inline array of the script. (In a real-world scenario, once the attacker finds TCP/UDP ports open, it starts to brute force the login with the set of most common passwords used by database administrators to perform a successful attack)
Assuming the attack was successful, Azure Security Center was able to detect and report the attack under Security alerts dashboard as shown in the ‘Image 5’

Image 5 : Security Alerts
You can further investigate the alert to view more information of the affected VM name, activity name, Environment, state of alert and more. The first step is to click on the alert itself, and see how many instances does that alert has occurred, as show in the ‘Image 6’

Image 6 : Brute Force attempt alert
You can further select the attacked resource to understand the extent and the details of the attack. Alert details will give you more information that could help during investigation of a security alert, such as, IP addresses, related processes, user accounts and more. ‘Image 7’ below has an example of how this looks like:

Image 7 : Security Alert details
When you further navigate to the “Take action” tab in the right pane, you can benefit from information like, remediation steps for this alert to mitigate the threat, prevent future attacks by applying the security recommendations and increase security posture.
You can create a logic app defining a workflow automation so that, when an alert is created in Security Center and if it matches the evaluation criteria that you’ve configured in an automation, then the logic app triggers. For example, you might want your Logic App to run when a security alert that contains “SQL” is generated. You can also run Logic Apps manually when viewing a security alert or any recommendation that offers Quick Fix remediation.
You will also notice the option to Suppress the future alerts with similar characteristics if the alert is not relevant for your organization as highlighted below in ‘Image 8’

Image 8: Suppress Similar Alerts
It is recommended to configure Azure subscription(s) to receive future alerts and email notifications from Azure Security Center. Please refer to the article that explains how to configure the email settings. Below is an example of the email alert received from ASC when this SQL incident was detected:

Image 9: Email Notification
In the next blog posts, we will discuss on how you can leverage Azure Security Center to protect your SQL IaaS VMs hosted on Azure Arc and On-premises. Stay Tuned!!
Special thanks to:
Yuri Diogenes, Senior PM, CxE Security – ASC Team for reviewing this post.
by Scott Muniz | Jul 21, 2020 | Alerts, Microsoft, Technology, Uncategorized
This article is contributed. See the original author and article here.
Managed Identity are automatically managed by Azure and enable you to authenticate to services that support Azure AD authentication, without needing to insert credentials into your code. You can learn more about this in the following document: how to connect with Managed Identity to Azure Database for MySQL
The blog will outline how to use Function App System Managed Identity to connect to Azure Database for MySQL.
- Step 1: Configure Azure AD Authentication for MySQL
- Step 2:Enable Managed Identity for the Function App
- Step 3: Find the Managed Identity GUID and then create a user in MySQL
- Step 4: Writing code for function app
- Step 5: Test the function app
Step 1: Configure Azure AD Authentication for MySQL
First, we need to make sure that the Azure Database for MySQL is configured for Azure AD authentication. If your server is not already configured, follow the steps in this how-to guide: Use Azure Active Directory for authentication with MySQL
Step 2: Enable Managed Identity for the Function App
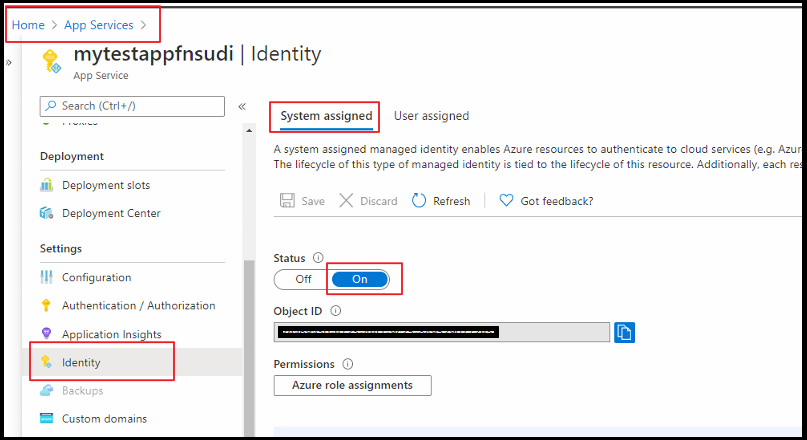
Next, enable Managed identify for a Function app. For this you need to log in to the Azure Portal and then select the Function App which you will be using. Select Identity under Settings. Change the Status to On.

Step 3: Find the Managed Identity GUID and then create a user in MySQL
Next, create a MySQL user for your Managed Identity. For this we need to get the application ID. For that, go to Azure Active Directory from the Azure portal and then go to Enterprise Applications.

Once you select the application, you can will be able to copy the Application ID.

Once you have the Application ID, log in to Azure Database for MySQL using the AAD login and execute the below query. This query ensures the managed identity now has access when authenticating with the username myuser. Replace the Application ID (GUID) in the query with your own.
SET aad_auth_validate_oids_in_tenant = OFF;
CREATE AADUSER 'myuser' IDENTIFIED BY 'cc5e6297-6bdc-4608-9ab5-ddb0c81e2a7e';
--I would also recommend to GRANTS necessary permission in DB
GRANT SELECT, INSERT, UPDATE, DELETE, CREATE, DROP, RELOAD, PROCESS, REFERENCES, INDEX, ALTER, SHOW DATABASES, CREATE TEMPORARY TABLES, LOCK TABLES, EXECUTE, REPLICATION SLAVE, REPLICATION CLIENT, CREATE VIEW, SHOW VIEW, CREATE ROUTINE, ALTER ROUTINE, CREATE USER, EVENT, TRIGGER ON *.* TO 'myuser'@'%' WITH GRANT OPTION;
FLUSH PRIVILEGES;
Step 4: Writing code for the Function app
Next, let’s see how to get an access token using the Function app System managed identity and use it to call Azure Database for MySQL. Azure Database for MySQL natively supports Azure AD authentication, so it can directly accept access tokens obtained using managed identities for Azure resources. When creating a connection to MySQL, you pass the access token in the password field.
Here’s a .NET code example of opening a connection to MySQL using an access token. This code must run on the Function App to access the Function App system-assigned managed identity’s endpoint. .NET Framework 4.6 or higher or .NET Core 2.2 or higher is required to use the access token method.
Please note the community MySQL Connector/NET (MySql.Data)does not support cleartext plugin. You can use MySqlConnector instead.
The below is a sample code. Replace the values of “Servername”, “User”, and “Database” with your own server credentials.
using System;
using System.IO;
using System.Threading.Tasks;
using Microsoft.AspNetCore.Mvc;
using Microsoft.Azure.WebJobs;
using Microsoft.Azure.WebJobs.Extensions.Http;
using Microsoft.AspNetCore.Http;
using Microsoft.Extensions.Logging;
using Newtonsoft.Json;
using MySqlConnector;
using Microsoft.Azure.Services.AppAuthentication;

namespace myfunappmysqlapp1
{
    public static class mysqlapp
    {
        private static string Host = "<Servername>.mysql.database.azure.com";
        private static string User = "myuser@<Servername>";
        private static string mydatabase = "db";
        [FunctionName("mysqlapp")]
        public static async Task<IActionResult> Run(
            [HttpTrigger(AuthorizationLevel.Anonymous, "get", "post", Route = null)] HttpRequest req,
            ILogger log)
        {
            log.LogInformation("C# HTTP trigger function processed a request.");

            /*Gettting the Token*/
            var sqlServerTokenProvider = new AzureServiceTokenProvider();
            var SqlAccessToken = await sqlServerTokenProvider.GetAccessTokenAsync("https://ossrdbms-aad.database.windows.net");
            //log.LogInformation(SqlAccessToken); /*For troubleshooting in case you need to print the token */
            log.LogInformation("Connecting to database.");

            //
            // Open a connection to the MySQL server using the access token.
            //
            var builder = new MySqlConnectionStringBuilder
            {
                Server = Host,
                Database = mydatabase,
                UserID = User,
                Password = SqlAccessToken,
                SslMode = MySqlSslMode.Required,

            };

            using (var conn = new MySqlConnection(builder.ConnectionString))
            {
                log.LogInformation("Opening connection using access token...");
                await conn.OpenAsync();

                using (var command = conn.CreateCommand())
                {
                    command.CommandText = "SELECT VERSION()";

                    using (var reader = await command.ExecuteReaderAsync())
                    {
                        while (await reader.ReadAsync())
                        {
                            log.LogInformation("nConnected!nnMySQL version: {0}", reader.GetString(0));
responseMessage = reader.GetString(0);
                        }
                    }
                }
            }

             responseMessage = "The versions is Azure Database for Mysql is:" + responseMessage;
            return new OkObjectResult(responseMessage);
        }
    }
}
Step 5: Test the Function app
Once you publish the Application, you can test the with the following steps below.
From the Azure Portal, go to Function App you published and select Functions.

Once the Function is selected, you can select Code+Test and click on Test/Run.

Click on Run on the on the pop up window

You can see the output in terminal for App Insights.

We can see that we connected to the database and could successfully run the query.
Hope this helps!
Sudheesh Narayanaswamy
Technical Support Engineer

Recent Comments