by Contributed | Dec 1, 2023 | Technology
This article is contributed. See the original author and article here.
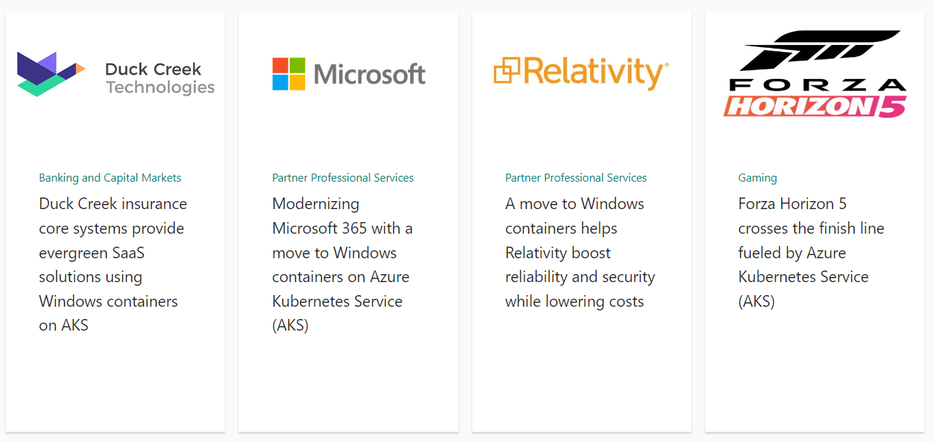
We have published a new page on Azure to highlight Windows Container customer stories on AKS with M365 (supporting products like Office and Teams), Forza (XBOX Game Studios), Relativity and Duck Creek.
If you are looking for a way to modernize your Windows applications, streamline your development process, and scale your business with Azure, you might be interested in learning how other customers have achieved these goals by using Windows Containers on Azure Kubernetes Service (AKS).
Windows Containers on AKS is a fully managed Kubernetes service that allows you to run your Windows applications alongside Linux applications in the same cluster, with seamless integration and minimal code modifications. Windows Containers on AKS offers a number of benefits, such as:
- Reduced infrastructure and operational costs
- Improved performance and reliability
- Faster and more frequent deployments
- Enhanced security and compliance
- Simplified management and orchestration
Stay tuned for new stories that will be published soon, featuring customers from new industries and with new scenarios using Windows Containers.
In the meantime, we invite you to check out the Windows Container GitHub repository, where you can find useful resources, documentation, samples, and tools to help you get started. You can also share your feedback, questions, and suggestions with the Windows Container product team and the community of users and experts.
by Contributed | Nov 30, 2023 | Technology
This article is contributed. See the original author and article here.
Introduction
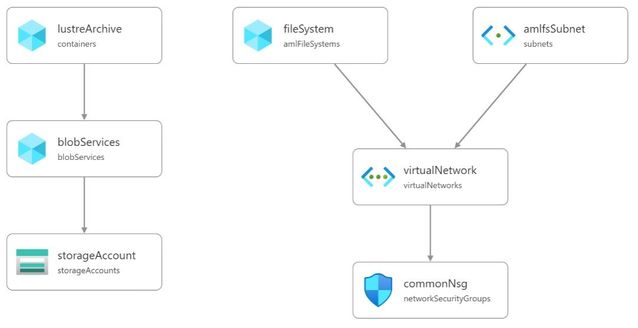
This blog post walks through how to setup an Azure Managed Lustre Filesystem (AMLFS) that will automatically synchronise to an Azure BLOB Storage container. The synchronisation is achieved using the Lustre HSM (Hierarchical Storage Management) interface combined with the Robinhood policy engine and a tool that reads the Lustre changelog and synchronises metadata with the archived storage. The lfsazsync repository on GitHub contains a Bicep template to deploy and setup a virtual machine for this purpose.
Disclaimer: The lfsazsync deployment is not a supported Microsoft product you are responsible for the deployment and operation of the solution. There are updates that need applying to AMLFS that will require a Support Request to be raised through the Azure Portal. These updates could effect the stabaility of AMLFS and customer requiring the same level of SLA should speak to their Microsoft representative.
Initial Deployment
The following is required before running the lfsazsync Bicep template:
- Virtual Network
- Azure BLOB Storage Account and container (HNS is not supported)
- AMLFS deployed without HSM enabled
The lfsazsync repository contains a test/infra.bicep example to create the required resources:
To deploy, first create a resource group, e.g.
TODO: set the variables below

resource_group=

location=

az group create –name $resource_group –location $location
Then deploy into this resource group:
az deployment group create –resource-group $resource_group –template-file test/infra.bicep
Note: The bicep file has parameters for names, ip ranges etc. that should be set if you do not want the default values.
Updating the AMLFS settings
Once deployment is complete, navigate to the Azure Portal, locate the AMLFS resource and click on “New Support Request”. The following shows the suggested request to get AMLFS updated:

The lctl commands needed are listed here.
Deploying Azure BLOB Storage Synchronisation
The lfsazsync deployment sets up a single virtual machine for all tasks. The HSM copytools could be run on multiple virtual machines to increase transfer peformance. The bandwidth for archiving and retrieval is constrained to approximately half the network bandwidth available to the virtual machine. It is important to note that the same network will be utilized for both accessing the Lustre filesystem and accessing Azure Storage. This should be considered when deciding the virtual machine size. The virtual machine sizes and expected network performance is available here.
The Bicep template has the following parameters:
Parameter |
Description |
|---|
subnet_id |
The ID of the subnet to deploy the virtual machine to |
vm_sku |
The SKU of the virtual machine to deploy |
admin_user |
The username of the administrator account |
ssh_key |
The public key for the administrator account |
lustre_mgs |
The IP address/hostname of the Lustre MGS |
storage_account_name |
The name of the Azure storage account |
storage_container_name |
The container to use for synchonising the data |
storage_account_key |
A SAS key for the storage account |
ssh_port |
The port used by sshd on the virtual machine |
github_release |
Release tag where the robinhood and lemur will be downloaded from |
os |
The OS to use for the VM (options: ubuntu2004 or almalinux87) |
The SAS key can be generated using the following Azure CLI command:
# TODO: set the account name and container name below

account_name=

container_name=
start_date=$(date -u +”%Y-%m-%dT%H:%M:%SZ”)

expiry_date=$(date -u +”%Y-%m-%dT%H:%M:%SZ” –date “next month”)
az storage container generate-sas

   –account-name $account_name

   –name $container_name

   –permissions rwld

   –start $start_date

   –expiry $expiry_date

   -o tsv
The following Azure CLI command can be used to get the subnet ID:
# TODO: set the variable below

resource_group=

vnet_name=

subnet_name=
az network vnet subnet show –resource-group $resource_group –vnet-name $vnet_name –name $subnet_name –query id –output tsv
The following Azure CLI command can be used to deploy the Bicep template (as an alterative to setting environment variables, the parameters could be set in a parameters.json file):
# TODO: set the variables below

resource_group=

subnet_id=

vmsku=”Standard_D32ds_v4″

admin_user=

ssh_key=

lustre_mgs=

storage_account_name=

storage_container_name=

storage_sas_key=

ssh_port=

github_release=”v1.0.1″

os=”almalinux87″
az deployment group create

    –resource-group $resource_group

    –template-file lfsazsync.bicep

    –parameters

        subnet_id=”$subnet_id”

        vmsku=$vmsku

        admin_user=”$admin_user”

        ssh_key=”$ssh_key”

        lustre_mgs=$lustre_mgs

        storage_account_name=$storage_account_name

        storage_container_name=$storage_container_name

        storage_sas_key=”$storage_sas_key”

        ssh_port=$ssh_port

        github_release=$github_release

        os=$os
After this call completes the virtual machine will be deployed although it will take more time to install and import the metadata from Azure BLOB storage into the Lustre filesystem. The progress can be monitored by looking at the /var/log/cloud-init-output.log file on the virtual machine.
Monitoring
The install will set up three systemd services for lhsmd, robinhood and lustremetasync. The log files are located here:
- ‘lhsmd’: /var/log/lhsmd.log
- ‘robinhood’: /var/log/robinhood*.log
- ‘lustremetasync’: /var/log/lustremetasync.log
Default archive settings
The synchronisation parameters can be controlled through the Robinhood config file, /opt/robinhood/etc/robinhood.d/lustre.conf. Below are some of the default settings and their locations in the config file:
Name |
Default |
Location |
|---|
Archive interval |
5 minutes |
lhsm_archive_parameters.lhsm_archive_trigger |
Rate limit |
1000 files |
lhsm_archive_parameters.rate_limit.max_count |
Rate limit interval |
10 seconds |
lhsm_archive_parameters.rate_limit.period_ms |
Archive threshold |
last modified time > 30 minutes |
lhsm_archive_parameters.lhsm_archive_rules |
Release trigger |
85% of OST usage |
lhsm_archive_parameters.lhsm_release_trigger |
Small file release |
last access > 1 year |
lhsm_archive_parameters.lhsm_release_rules |
Default file release |
last access > 1 day |
lhsm_archive_parameters.lhsm_release_rules |
File remove |
removal time > 5 minutes |
lhsmd.lhsmd_remove_rules |
To update the config file, edit the file and then restart the robinhood service, systemctl restart robinhood.
The lustremetasync service is processing the Lustre ChangeLog continuously. Therefore, actions will happen immediately unless there is a lot of IO all at once where it may take a few minutes to catch up. The following operations will be handled:
Create/delete directories
Directories are created in BLOB storage as an empty object with the name of the directory. There is metadata on this file to indicate that it is a directory. The same object is deleted when removed on the filesystem.
Create/delete symbolic links
Symbolic links are create in BLOB storage as an empty object with the name of the symbolic link. There is metadata on this file to indicate that it is a symbolic link and this contains the path that it is linking to. The same object is deleted when removed on the filesystem.
Moving files or directories
Moving files or directories requires everything being moved to be restored to the Lustre filesystem. The files are then marked as dirty in their new location and the existing files are deleted from BLOB storage. Robinhood will handle archiving the files again in their new location.
Updating metadata (e.g. ownership and permissions)
The metadata will only be updated for archived files that isn’t modified. Modified files will have the metadata set when Robinhood updated the archived file.
References
by Contributed | Nov 29, 2023 | Technology
This article is contributed. See the original author and article here.
Welcome to an introduction of the concepts and simple approach required for executing a successful Proof of Concept (PoC) for Microsoft Defender External Attack Surface Management (Defender EASM). This article will serve as a high-level guide to help you execute a simple framework for evaluating Defender EASM, and other items to consider when embarking on the journey to understand the Internet exposed digital assets that comprise your external attack surface, so you can view risks through the same lens as a malicious threat actor.
Planning for the PoC
To ensure success, the first step is planning. This entails understanding the value of Defender EASM, identifying stakeholders who need to be involved, and scheduling planning sessions to determine use cases & requirements and scope before beginning.
For example, one of the core benefits of the Defender EASM solution is that it provides high value visibility to Security and IT (Information Technology) teams that enables them to:
- Identify previously unknown assets
- Prioritize risk
- Eliminate threats
- Extends vulnerability and exposure control beyond the firewall
Next, you should identify all relevant stakeholders, or personas, and schedule in 1-2 short planning sessions to document the tasks and expected outcomes, or requirements. These sessions will establish the definition of success for the PoC.
Who are the common stakeholders that should participate in the initial planning sessions? The answer to that question will be unique to each organization, but some common personas include the following:
- Vulnerability Management Teams
- IT personnel responsible for Configuration Management, Patching, Asset Inventory Databases
- Governance, Risk, & Compliance (GRC) Teams
- (Optional) GRC aligned Legal, Brand Protection, & Privacy Teams
- Internal Offensive Penetration Testing and Red Teams
- Security Operations Teams
- Incident Response Teams
- Cyber Threat Intelligence, Hunting, and Research Teams
Use Cases & Requirements
Based on the scope, you can begin collaborating with the correct people to establish use cases & requirements to meet the business goals for the PoC. The requirements should clearly define the subcomponents of the overarching business goals within the charter of your External Attack Surface Management Program. Examples of business goals and high-level supporting requirements might include:
- Discover Abandoned Assets
- Resulting from Mergers, Acquistions, or Divestitures
- Insufficient Asset Lifecycle Management in Dev/Test/QA Environments
- Identification of Vulnerabilities
- Lack of Patching or Configuration Management
- Assignment of Ownership to Assets
- Line of Business or Subsidiary
- Based on Geographic Location
- On-Prem vs Cloud
- Reporting, Automation, and Defender EASM Data Integrations
- Use of a reporting or visualization tool, such as PowerBI
- Logic Apps to automate management of elements of your attack surface
Prerequisites to Exit the Planning Phase
- Completion of the Planning Phase!
- Configure an Azure Active Directory or personal Microsoft account. Login or create an account here.
- Set up a Free 30-day Defender EASM Trial
– Visit the following link for information related to setting up your Defender EASM attack surface today for free.
- Deploy & Access the Defender EASM Platform
– Login to Defender EASM
– Follow the deployment Quick Start Guide
Measuring Success?
Determining how success will establish the criteria for a successful or failed PoC. Success and Acceptance Criteria should be established for each requirement identified. Weights may be applied to requirements, but measuring success can be as simple as writing out criteria as below:
Requirement: Custom Reporting
Success Criteria: As a vulnerability manager, I want to view a daily report that shows the assets with CVSSv2 and CVSSv3 scores of 10.
Acceptance Criteria:
- Data must be exported to Kusto
- Data must contain assets & CVSS (Common Vulnerability Scoring System) scores
- Dashboards must be created with PowerBI and accessible to user
- Dashboard data must be updated daily
Validation: Run a test to validate that acceptance criteria has been met.
Pass / Fail: Pass
Executing the PoC
Implementation and Technical Validation
We will now look at five different use cases & requirements, define the success and acceptance criteria for each, and validate that the requirements are met by observing the outcome of each in Defender EASM.
Use Case 1: Discover Unknown Assets, Finding Shadow IT
Success Criteria: As a member of the Contoso GRC team, I want to identify Domain assets in our attack surface that have not been registered with the official company email address we use for domain registrations.
Acceptance Criteria:
- Defender EASM allows for searches of Domain WHOIS data that returns the “Registrant Email” field in the result set.
Validation:
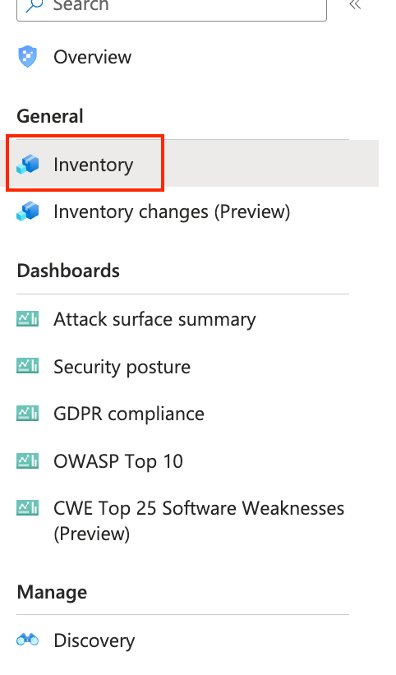
- Click the “Inventory” link on the left of the main Defender EASM page.

Figure: Launch the inventory query screen
- Execute a search in Defender EASM that excludes Domains registered with our official company email address of ‘domainadmin@constoso.com’ and returns all other Domains that have been registered with an email address that contains the email domain ‘contoso.com’.

Figure: Query for incorrectly registered Domain assets
- Click on one of the domains in the result set to view asset details. For example, “woodgrovebank.com” domain.
- When the asset details open and confirm that the domain ‘woodgrovebank.com’ is in the upper left corner.
- Click on the “Whois” tab.
- Note that this Domain asset has been registered with an email address that does not match the corporate standard (i.e., “employeeName@contoso.com”) and should be investigated for the existence of Shadow IT.

Figure: WHOIS asset details
Resources:
Use Case 2: Abandoned Assets, Acquisitions
Success Criteria: As a member of the Contoso Vulnerability Management team, who just acquired Woodgrove Bank, I want to ensure acquired web sites using the domain “woodgrovebank.com” are redirected to web sites using the domain “contoso.com”. I need to obtain results of web sites that are not redirecting as expected, as those may be abandoned web sites.
Acceptance Criteria:
- Defender EASM allows for search of specific initial and final HTTP (Hypertext Transfer Protocol) response codes for Page assets
- Defender EASM allows for search of initial and final Uniform Resource Locator (URL) for Page assets
Validation:
- Run a search in Defender EASM that looks for Page assets that have:
- Initial response codes that cause HTTP redirects (i.e., “301”, “302”)
- Initial URLs that contain “woodgrovebank.com”
- Final HTTP response codes of “200”
- Final URL, post HTTP redirect, that do not contain “contso.com”

Figure: Query for incorrect page redirection
- Click one of the Page assets in the result set to see the asset details.

Figure: Page asset overview
- Validate:
- Initial URL contains “woodgrovebank.com”
- Initial response code is either “301” or “301”
- Final URL does not contain “contoso.com”
- Final response code is “200”
Resources:
Use Case 3: Identification of Vulnerabilities, Lack of Patching or Configuration Management
Success Criteria: As a member of the Contoso Vulnerability Management team, I need the ability to retrieve a list of assets with high priority vulnerabilities and remediation guidance in my attack surface.
Acceptance Criteria:
- Defender EASM provides a dashboard of prioritized risks in my external attack surface
- Defender EASM provides remediation guidance for each prioritized vulnerability
- Defender EASM provides an exportable list of assets impacted by vulnerability
Validation:
- From the main Defender EASM page, click “Attack Surface Summary” to view the “Attack Surface Summary” dashboard
- Click the link that indicates the number of assets impacted by a specific vulnerability to view a list of impacted assets

Figure: Attack Surface Insights Dashboard
- Validate that Defender EASM provides additional information about vulnerabilities and remediation guidance.
- Click the link in the upper right corner titled “Download CSV report” and validate the contents within

Figure: Vulnerability remediation details
Resources:
Use Case 4: Assignment of Ownership to Assets, Line of Business or Subsidiary
Success Criteria: As a member of the Contoso GRC team, I need the ability to assign ownership of assets to specific business units through, along with a mechanism to quickly visualize this relationship.
Acceptance Criteria:
- Defender EASM provides an approach to assigning ownership via labels
- Defender EASM allows users to apply labels to assets that meet specific indicators that indicate affiliation with a specific business unit
- Defender EASM provides the ability to apply labels in bulk
Validation:
- Click the “Inventory” link on the left of the main Defender EASM page to launch the search screen
- Run a search that returns all Page assets that are on the IP Block “10.10.10.0/24”. The Page assets on this network all belong to the Financial Services line of business, so it is the only indicator of ownership needed in this example.

Figure: Query to determine Page asset ownership by IP Block
- Select all assets in the result set by clicking the arrow to the right of the checkbox as shown in the following image and choose the option for all assets.

Figure: Selecting assets for bulk modification
- Click the link to modify assets, followed by the link to “Create a new label” on the blade that appears.
- A new screen will appear that allows the creation of a label. Enter a descriptive “Label name”, an optional “Display name”, select a desired color, and click “Add” to finish creating a label.

Figure: Link to modify assets and create a label

Figure: Create label detail
- After creating the label, you will be directed back to the screen to modify assets. Validate that the label was created successfully.
- Click into the label text box to see a list of labels available to choose from and select the one that was just created.
- Click “Update”

Figure: Label selected assets
- Click the bell icon to view task notifications to validate the status of labels update.

Figure: View status of label update task
- When the task is complete, run the search again to validate that labels have been applied to the assets owned by the Financial Services organization.

Figure: Query to validate labels have been applied to assets
Resources:
Finishing the PoC
Summarize Your Findings
Identify how the Defender EASM solution has provided increased visibility to your organization’s attack surface in the PoC.
- Have you discovered unknown assets related to Shadow IT?
- Were you able to find potentially abandoned assets related to an acquisition?
- Has your organization been able to better prioritize vulnerabilities to focus on the most severe risks?
- Do you know have a better view of asset ownership in your organization?
Feedback?
We would love to hear any ideas you may have to improve our Defender EASM platform or where and how you might use Defender EASM data elsewhere in the Microsoft Security ecosystem or other security 3rd party applications. Please contact us via email at mdesam-pm@microsoft.com to share any feedback you have regarding Defender EASM.
Interested in Learning About New Defender EASM Features?
Please join our Microsoft Security Connection Program if you are not a member and follow our Private & Public Preview events. You will not have access to this exclusive Teams channel until you complete the steps to become a Microsoft Security Connection Program member. Users that would like to influence the direction/strategy of our security products are encouraged to participate in our Private Preview events. Members who participate in these events will earn credit for respective Microsoft product badges delivered by Credly.
Conclusion
You now understand how to execute a simple Defender EASM PoC, to include deploying your first Defender EASM resource, identifying common personas, how to set requirements, and measure success. Do not forget! – you can enjoy a free 30-day trial by clicking on the link below.
You can discover your attack surface discovery journey today for free.
by Contributed | Nov 28, 2023 | Technology
This article is contributed. See the original author and article here.
We are excited to announce that Personal Desktop Autoscale on Azure Virtual Desktop is generally available as of November 15, 2023! With this feature, organizations with personal host pools can optimize costs by shutting down or hibernating idle session hosts, while ensuring that session hosts can be started when needed.
Personal Desktop Autoscale
Personal Desktop Autoscale is Azure Virtual Desktop’s native scaling solution that automatically starts session host virtual machines according to schedule or using Start VM on Connect and then deallocates or hibernates (in preview) session host virtual machines based on the user session state (log off/disconnect).
The following capabilities are now generally available with Personal Desktop Autoscale:
- Scaling plan configuration data can be stored in all regions where Azure Virtual Desktop host pool objects are, including Australia East, Canada Central, Canada East, Central US, East US, East US 2, Japan East, North Central US, North Europe, South Central US, UK South, UK West, West Central US, West Europe, West US, West US 2, and West US 3. It needs to be stored in the same region as the host pool objects it will be assigned to, however, we support deploying session host virtual machines in all Azure regions.
- You can use the Azure portal, REST API, PowerShell to enable and manage Personal Desktop Autoscale.
The following capabilities are new in public preview with Personal Desktop Autoscale:
- Hibernation is available as a scaling action. With the Hibernate-Resume feature in public preview, you will have a better experience as session state persists when the virtual machine hibernates. As a result, when the session host virtual machine starts, the user will be able to quickly resume where they left off. More details of the Hibernate-Resume feature can be found here.
Getting started
To enable Personal Desktop Autoscale, you need to:
- Create a personal scaling plan.
- Define whether to enable or disable Start VM on Connect.
- Choose what action to perform after a user session has been disconnected or logged off for a configurable period of time.
- Assign a personal scaling plan to one or more personal host pools.
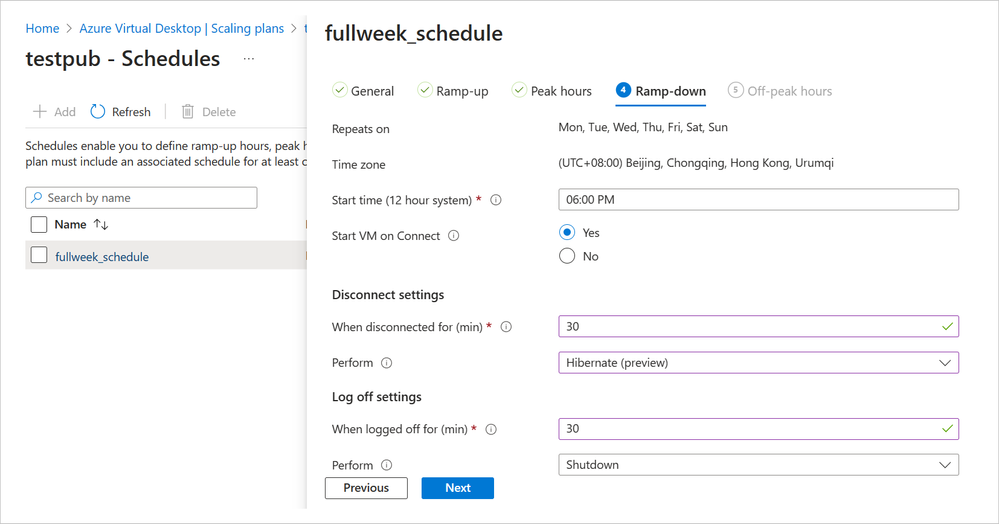
A screenshot of a scaling plan in Azure Virtual Desktop called “fullweek_schedule”. The ramp-down is shown as repeating every day of the week at 6:00 PM Beijing time, starting VM on Connect. Disconnect settings are set to hibernate at 30 minutes. Log off settings are set to shut down after 30 minutes.
If you want to use Personal Desktop Autoscale with the Hibernate-Resume option, you will need to self-register your subscription and enable Hibernate-Resume when creating VMs for your personal host pool. We recommend you create a new host pool of session hosts and virtual machines that are all enabled with Hibernate-Resume for simplicity. Hibernation can also work with Start VM on Connect for cost optimization.
You can set up diagnostics to monitor potential issues and fix them before they interfere with your Personal Desktop Autoscale scaling plan.
Helpful resources
We encourage you to learn more about setting up autoscale and review frequently asked questions for more details on how to use autoscale for Azure Virtual Desktop. You may also find these resources helpful:
by Contributed | Nov 27, 2023 | Technology
This article is contributed. See the original author and article here.
Azure AI Health Insights: New built-in models for patient-friendly and radiology insights
Azure AI Health Insights is an Azure AI service with built-in models that enable healthcare organizations to find relevant trials, surface cancer attributes, generate summaries, analyze patient data, and extract information from medical images.
Earlier this year, we introduced two new built-in models available for preview. These built-in models handle patient data in different modalities, perform analysis on the data, and provide insights in the form of inferences supported by evidence from the data or other sources.
The following models are available for preview:
- Patient-friendly reports model* This model simplifies medical reports and creates a patient-friendly simplified version of clinical notes while retaining the meaning of the original clinical information. This way, patients can easily consume their clinical notes in everyday language. Patient-friendly reports model is available in preview.
- Radiology insights model* This model uses radiology reports to surface relevant radiology insights that can help radiologists improve their workflow and provide better care. Radiology insights model is available in preview.
Simplify clinical reports
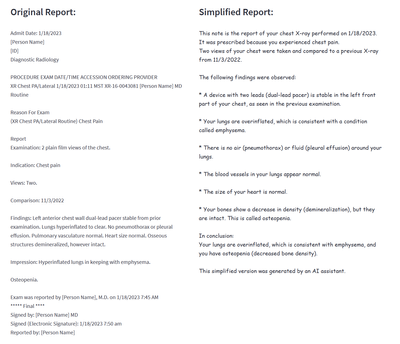
Patient-friendly reports is an AI model that provides an easy-to-read version of a patient’s clinical report. The simplified report explains or rephrases diagnoses, symptoms, anatomies, procedures, and other medical terms while retaining accuracy. The text is reformatted and presented in plain language to increase readability. The model simplifies any medical report, for example a radiology report, operative report, discharge summary, or consultation report.
The Patient-friendly reports model uses a hybrid approach that combines GPT models, healthcare-specialized Natural Language Processing (NLP) models, and rule-based methods. Patient-friendly reports also uses text alignment methods to allow mapping of sentences from the original report to the simplified report to make it easy to understand.
The system uses scenario-specific guardrails to detect hallucinations, omissions, and any other ungrounded content and does several steps to ensure the full information from the original clinical report is kept and no new additional information is added.
The Patient-friendly reports model helps healthcare professionals and patients consume medical information in a variety of scenarios. For example, Patient-friendly reports model saves clinicians the time and effort of explaining a report. A simplified version of a clinical report is generated by Patient-Friendly reports and shared with the patient, side by side with the original report. The patient can review the simplified version to better understand the original report, and to avoid unnecessary communication with the clinician to help with interpretation. The simplified version is marked clearly as text that was generated automatically by AI, and as text that must be used together with the original clinical note (which is always the source of truth).
Figure 1 Example of a simplified report created by the patient-friendly reports model
Improve the quality of radiology findings and flag follow-up recommendations
Radiology insights is a model that provides quality checks with feedback on errors and mismatches and ensures critical findings within the report are surfaced and presented using the full context of a radiology report. In addition, follow-up recommendations and clinical findings with measurements (sizes) documented by the radiologist are flagged.
Radiology insights inferences, with reference to the provided input that can be used as evidence for deeper understanding of the conclusions of the model. The radiology insights model helps radiologists improve their reports and patient outcomes in a variety of scenarios. For example:
- Surfaces possible mismatches. A radiologist can be provided with possible mismatches between what the radiologist documents in a radiology report and the information present in the metadata of the report. Mismatches can be identified for sex, age and body site laterality.
- Highlights critical and actionable findings. Often, a radiologist is provided with possible clinical findings that need to be acted on in a timely fashion by other healthcare professionals. The model extracts these critical or actionable findings where communication is essential for quality care.
- Flags follow-up recommendations. When a radiologist uncovers findings for which they recommend a follow up, the recommendation is extracted and normalized by the model for communication to a healthcare professional.
- Extracts measurements from clinical findings. When a radiologist documents clinical findings with measurements, the model extracts clinically relevant information pertaining to the findings. The radiologist can then use this information to create a report on the outcomes as well as observations from the report.
- Assists generate performance analytics for a radiology team. Based on extracted information, dashboards and retrospective analyses, Radiology insights provides updates on productivity and key quality metrics to guide improvement efforts, minimize errors, and improve report quality and consistency.

Figure2 Example of a finding with communication to a healthcare professional

Figure 3 Example of a radiology mismatch (sex) between metadata and content of a report with a follow-up recommendation
Get started today
Apply for the Early Access Program (EAP) for Azure AI Health Insights here.
After receiving confirmation of your entrance into the program, create and deploy Azure AI Health Insights on Azure portal or from the command line.

Figure 4 Example of how to create an Azure Health Insights resource on Azure portal
After a successful deployment, you send POST requests with patient data and configuration as required by the model you would like to try and receive responses with inferences and evidence.
Do more with your data with Microsoft Cloud for Healthcare
With Azure AI Health Insights, health organizations can transform their patient experience, discover new insights with the power of machine learning and AI, and manage protected health information (PHI) data with confidence. Enable your data for the future of healthcare innovation with Microsoft Cloud for Healthcare.
We look forward to working with you as you build the future of health.
*Important
Patient-friendly reports models and radiology insights model are capabilities provided “AS IS” and “WITH ALL FAULTS.” Patient-friendly reports and Radiology insights aren’t intended or made available for use as a medical device, clinical support, diagnostic tool, or other technology intended to be used in diagnosis, cure, mitigation, treatment, or prevention of disease or other conditions, and no license or right is granted by Microsoft to use this capability for such purposes. These capabilities aren’t designed or intended to be implemented or deployed as a substitute for professional medical advice or healthcare opinion, diagnosis, treatment, or the clinical judgment of a healthcare professional, and should not be used as such. The customer is solely responsible for any use of Patient-friendly reports model or Radiology insights model.

Recent Comments