by Contributed | Oct 23, 2024 | Technology
This article is contributed. See the original author and article here.
Delivery Optimization and Microsoft Connected Cache are comprehensive solutions from Microsoft for minimizing internet bandwidth consumption. Delivery Optimization acts as the distributed content source and Connected Cache acts as the dedicated content source. Organizations have benefited from these solutions, realizing significant bandwidth savings of up to 98 percent with Windows 11 upgrades, Windows Autopilot device provisioning, Microsoft Intune application installations, and monthly update deployments.
Until now, Connected Cache could only be deployed to Configuration Manager with distribution points. With the release of Connected Cache for Enterprise and Education to public preview on October 30, organizations will have more flexibility in deploying Connected Cache directly to host machines running Windows Server, Windows client, and Linux [Ubuntu and Red Hat Enterprise Linux (RHEL)].
Supporting scenarios that are important to enterprises
While Delivery Optimization is mostly known for being a peer-to-peer delivery solution, it’s also the downloader that pulls update content in Windows from the cloud and provides enterprise and education users with tools to manage bandwidth traffic, throttling capabilities, and more.
Connected Cache technology complements Delivery Optimization as a dedicated software caching solution that can be deployed within enterprise and education organizations’ networks. Once deployed to host machines within a network, Connected Cache nodes will transparently and dynamically cache the Microsoft-published content that downstream Windows devices need to download. Using this solution, content requests from Delivery Optimization can be served by the locally deployed Connected Cache node instead of the cloud. This results in fast, bandwidth-efficient delivery across connected devices. Microsoft worked closely with numerous enterprise and education organizations to gather information about their bandwidth management needs. We used the great feedback we received to develop Connected Cache as a solution that supports the scenarios most important to you.
Moving from on premises to hybrid or fully cloud-managed scenario
Enterprises and educational institutions have used solutions like Configuration Manager for device management and content distribution. Many of these organizations:
- Manage all or part of their device tenant with Intune or other mobile device management (MDM).
- Are tasked with decommissioning their Configuration Manager distribution points.
- Are still faced with the challenge of managing content delivery bandwidth.
To support the on-prem to hybrid or fully cloud managed scenario, Connected Cache can be deployed directly to hardware or a virtual machine (VM) running either Windows Server 2022 using Windows Subsystem for Linux (WSL) 2, which is an enterprise-ready, lightweight, first-party solution, or certain Linux distros (Ubuntu 22.04 and RHEL 8 and 9).
Branch office
Many enterprises and educational institutions have a global presence with remote locations where:
- Hundreds of Windows workstations are present.
- No dedicated server hardware or administrator is present on-site.
- Internet bandwidth may be limited and/or internet connectivity may be intermittent.
- Reserving bandwidth for office operations may be more important than download performance of Microsoft content.
To support the branch office scenario, Connected Cache can be deployed directly to Windows 11 workstations using WSL 2.
Enterprise or educational sites
The traditional enterprise or educational site occupies one or more buildings, and may have multiple locations where:
- Hundreds to thousands of Windows workstations, Windows servers, or virtual machines are present.
- Reuse of existing hardware is important (decommissioned Configuration Manager distribution point, file server, cloud print server) or dedicated server hardware is available on-site.
- Internet bandwidth may range from great to limited (T1), and/or internet connectivity may be intermittent.
- Reserving bandwidth for office or educational operations, especially during peak times, is a top priority.
- Performant downloads are necessary to support mass update, upgrade, or Autopilot provisioning operations.
To support the enterprise or educational site scenarios, Connected Cache can be deployed directly to hardware or VMs running Windows Server 2022. Deployments can be made using WSL 2. or certain Linux distros (Ubuntu 22.04 and RHEL 8 and 9).
Bulk management and deployment
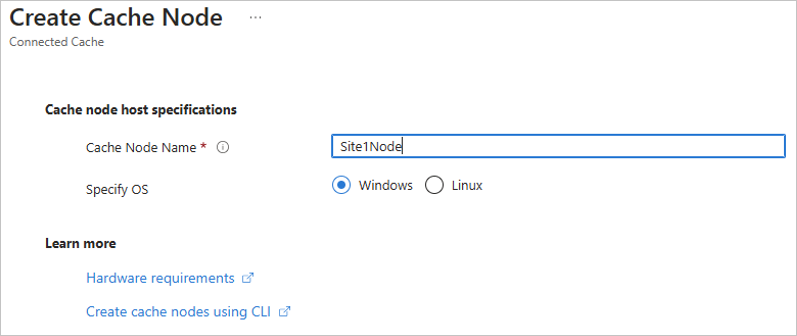
Connected Cache Azure resources are typically managed using the Microsoft Azure portal web interface, but they can also be managed using Command-Line Interface (CLI). Connected Cache nodes can be remotely deployed via PowerShell or Linux shell scripts that require no direct user input, enabling deployment of cache nodes without on-site presence.
 Create a Connected Cache in the Azure portal.
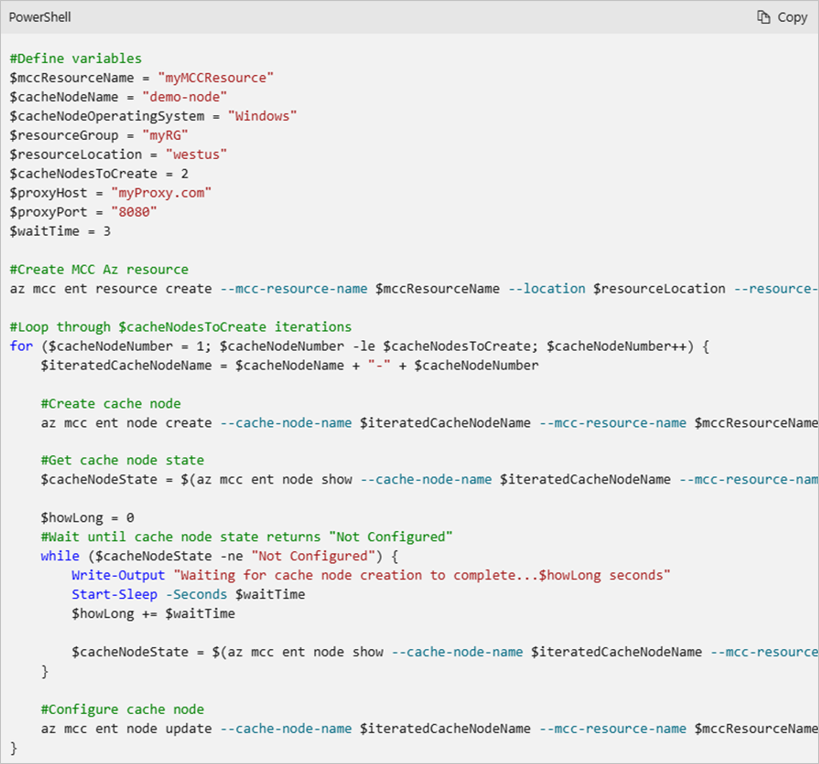 PowerShell snippet demonstrating use of Connected Cache CLI.
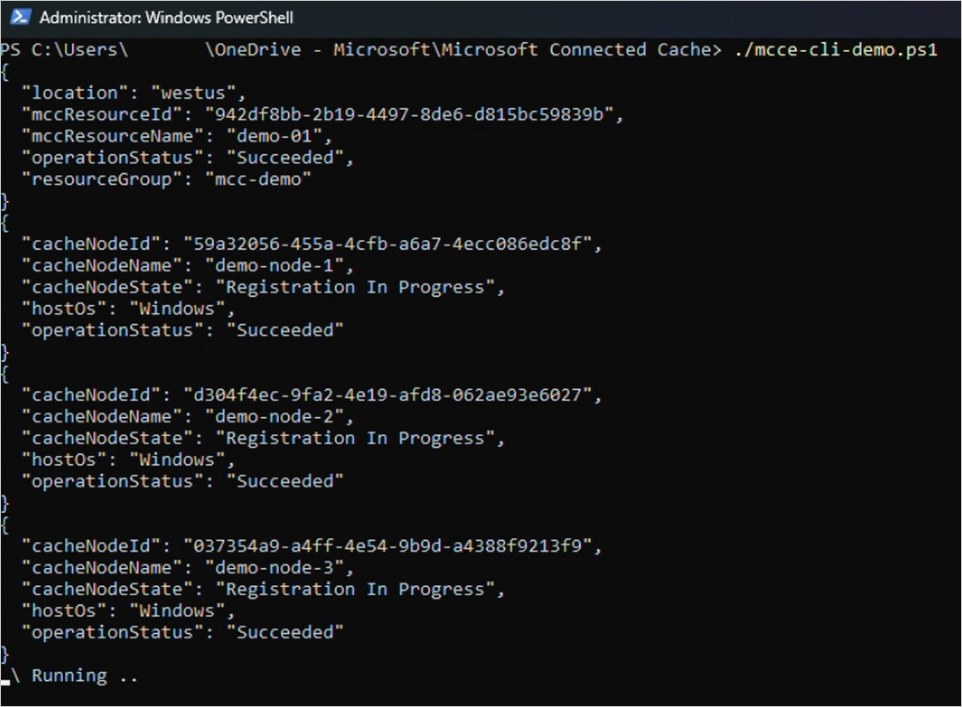 PowerShell script demonstrating use of bulk creations of cache nodes using CLI.
Telemetry by content type
Organizations want to have insights into the health of cache nodes and what content is being delivered to their devices. The Connected Cache Azure portal displays a near real-time and historical view of the outbound traffic in Mbps and volume by content type. These insights help ensure the cache is deployed correctly and devices are successfully pulling content from it. Further details such as cache efficiency (expressed as the percentage of content coming from Connected Cache), per site data, and per country data, will be available in Windows Update for Business reports.
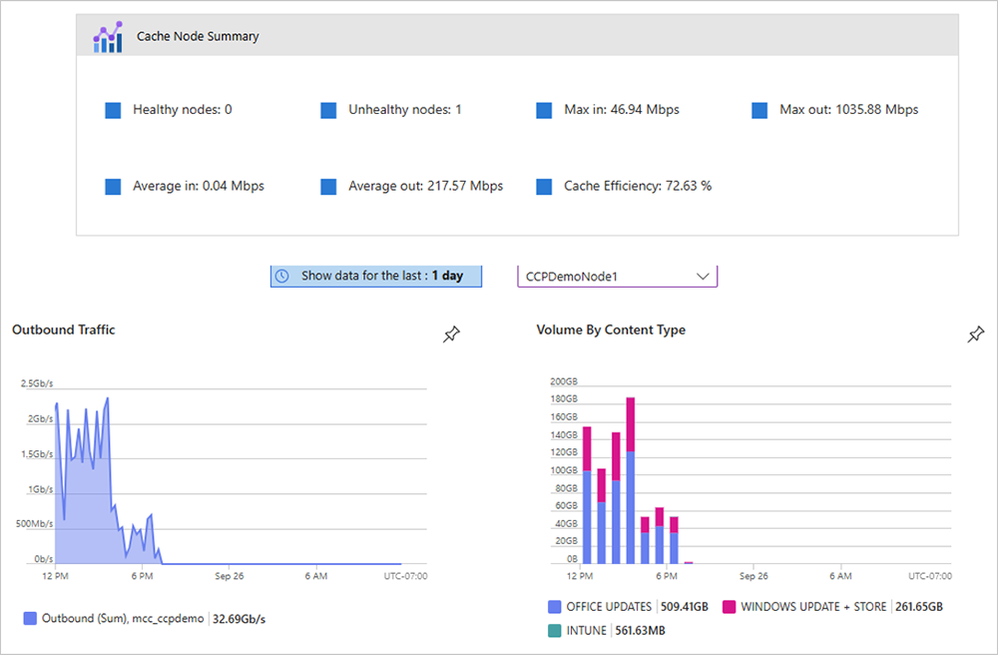 Connected Cache management in Azure portal shows Office, Windows Update, and Intune downloads.
Deploy Microsoft Connected Cache for Enterprise and Education
Starting October 30, 2024, Windows Enterprise (E3, E5, and F3) and Windows Education (A3 and A5) users will be able to use the Azure Marketplace to create “Microsoft Connected Cache for Enterprise and Education” Azure resources that will be used to manage Connected Cache deployments. Once the Connected Cache Azure resource has been created, users can create as many cache nodes as required to support their network topologies or content deployment. Please see the Microsoft Connected Cache for Enterprise and Education documentation overview page for more details.
Continue the conversation. Find best practices. Bookmark the Windows Tech Community, then follow us @MSWindowsITPro on X and on LinkedIn. Looking for support? Visit Windows on Microsoft Q&A.
by Contributed | Oct 22, 2024 | Technology
This article is contributed. See the original author and article here.
Welcome to the Viva Glint newsletter. These recurring communications coincide with platform releases and enhancements to help you get the most out of the Viva Glint product. You can access the current newsletter and past editions on the Viva Glint blog.
The Glint Customer Experience Survey is live!
We’re excited to announce that Glint’s Customer Experience Survey is now available. Your input is essential to our ability to provide a world-class experience for our customers and helps us to improve our product, customer support, and our Viva Glint resources.
If you participated in this survey previously, you may notice this cycle has been streamlined and feels a bit different. We appreciate you taking a few minutes to share your thoughts. The survey will take five minutes to complete and closes on Friday, November 8.
Complete your survey
New on your Viva Glint platform
Viva Glint Admins can modify predefined Glint product roles. This new capability within the User Roles feature reduces the time required to assign roles and reduces the necessity to create new roles. Learn more in Viva Glint User Roles.
Hide the Comments report export feature for any program cycle. Disabling this feature improves confidentiality measures by decreasing the risk of matching survey data to a specific survey respondent. Learn more in Reporting Setup.
More enhancements for PDF exports. With this release, the enhanced technology for exporting PDF feedback reports, released for recurring and ad hoc survey programs last month, is now in place for 360 feedback reports and Focus Area reports. Read more.
View and manage users’ custom data access. Glint administrators can use a new export feature on the User Roles page to export and view users’ customized data access for survey results and Focus Areas. Use the exported file as a guide to upload new custom access in bulk in Advanced Configuration. Learn more
Upcoming events
Ask the Experts | November 12,
Our next session in this popular series focuses on choosing the right benchmark comparison for your survey results. Good comparison choices for feedback reporting are crucial for understanding strengths and opportunities on your team. Bring your questions!
Register for Ask the Experts
Building Psychological Safety | November 18
Join us on for a conversation with Dr. Julie Morris to learn how to identify signs of psychological safety and what actions you can take to improve it on your team. Please invite your managers to this session!
Register for Building Psychological Safety
In case you missed it
Viva Community Call: Microsoft HR is Using Viva and M365 Copilot to Empower Employees
This webinar explored how Microsoft HR leverages the power of Microsoft Viva to communicate, provide opportunities for skilling and development, and measure success around M365 Copilot adoption and impact at Microsoft. Watch the video here.
Exciting new resource for all stakeholders
Are you looking to build a holistic employee listening ecosystem? Review this guide from the Viva People Science team to foster employee engagement and better performance. Check out the eBook here.
|
by Contributed | Oct 21, 2024 | Technology
This article is contributed. See the original author and article here.
Enhancing User Experience with Timely Responses
Building a conversational bot using Azure Bot Composer offers a myriad of possibilities to create a seamless and engaging user experience. One such feature that can significantly enhance user interaction is introducing a custom delay between two messages. This small yet impactful addition can mimic human-like pauses, making conversations feel more natural and thoughtful.
This blog will guide you through the steps to introduce custom delays between messages in Azure Bot Composer.
Why Introduce a Delay?
Introducing delays between messages can serve several purposes:
- Natural Flow: Mimics human conversation, making interactions feel less robotic.
- Attention Management: Gives users time to read and process information before moving on to the next message.
- Contextual Relevance: Helps in maintaining the context, especially in scenarios where the bot provides detailed explanations or instructions.
- Expected wait time : It often happens that we might want to make an outbound call from Azure bot composer to outside and fetch a response back, it might also need some time to get the desired response, for example when we would like to fetch a token in return, in such scenarios we would like to introduce intentional delay
Setting Up Azure Bot Composer
Before we dive into introducing custom delays, ensure you have Azure Bot Composer installed and set up. You can download it from the official GitHub repository and follow the installation instructions provided.
Install Composer
Step-by-Step Guide to Introduce Custom Delays
Step 1: Open Your Bot Project
Launch Azure Bot Composer and open your existing bot project or create a new one. Navigate to the dialog where you want to introduce the delay.
Step 2: Add a New Action
Within your dialog, click on the ‘+ Add’ button to insert a new action. From the list of available actions, select ‘Send a response’. This is the message you want to introduce the delay.
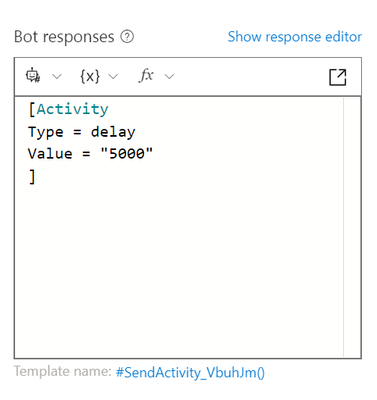
[Activity
Type = delay
Value = "5000"
]
Make sure to add this code as JSON, by clicking on view source code and then add above, it should look like :

Enter the message text you want to send after the delay. This could be any text, such as a follow-up question or additional information.
By default, the typing activity lasts for a short duration. To customize the delay, you can adjust the duration of the typing activity. Click on the typing activity and set the desired duration (in milliseconds) in the properties pane. For example, setting it to 3000 milliseconds will introduce a 3-second delay. Make sure to keep this value below 15 secs.
Step 3: Test Your Bot
Once you have configured the delay and follow-up message, it’s time to test your bot. Click on the ‘Test in Emulator’ button to launch the Bot Framework Emulator. Interact with your bot to ensure that the delay is working as expected, and the messages are being sent in the correct sequence.
Conclusion
Introducing custom delays between messages in Azure Bot Composer is a simple yet powerful way to enhance user experience. By following the steps outlined in this guide, you can create more natural and engaging conversations that keep users interested and informed.
by Contributed | Oct 20, 2024 | Technology
This article is contributed. See the original author and article here.
Virtual Machines deployed in Azure used to have Default Outbound Internet Access. Until today, this allows virtual machines to connect to resources on the internet (including public endpoints of Azure PaaS services) even if the Cloud administrators have not configured any outbound connectivity method for their virtual machines explicitly. Implicitly, Azure’s network stack performed source network address translation (SNAT) with a public IP address that was provided by the platform.
As part of their commitment to increase security on customer workloads, Microsoft will deprecate Default Outbound Internet Access on 30 September 2025 (see the official announcement here). As of this day, customers will need to configure an outbound connectivity method explicitly if their virtual machine requires internet connectivity. Customers will have the following options:
- Attach a dedicated Public IP Address to a virtual machine.
- Deploy a NAT gateway and attach it to the VNet subnet the VM is connected to.
- Deploy a Load Balancer and configure Load Balancer Outbound Rules for virtual machines.
- Deploy a Network Virtual Appliance (NVA) to perform SNAT, such as Azure Firewall, and route internet-bound traffic to the NVA before egressing to the internet.
Today, customers can start preparing their workloads for the updated platform behavior. By setting property defaultOutboundAccess to false during subnet creation, VMs deployed to this subnet will not benefit from the conventional default outbound access method, but adhere to the new conventions. Subnets with this configuration are also referred to as ‘private subnets’.
In this article, we are demonstrating (a) the limited connectivity of virtual machines deployed to private VNets. We are also exploring different options to (b) route traffic from these virtual machines to public internet and to (c) optimize the communication path for management and data plane operations targeting public endpoints of Azure services.
We will be focusing on connectivity with Azure services’ public endpoints. If you use Private Endpoints to expose services to your virtual network instead, routing in a private subnet remains unchanged.
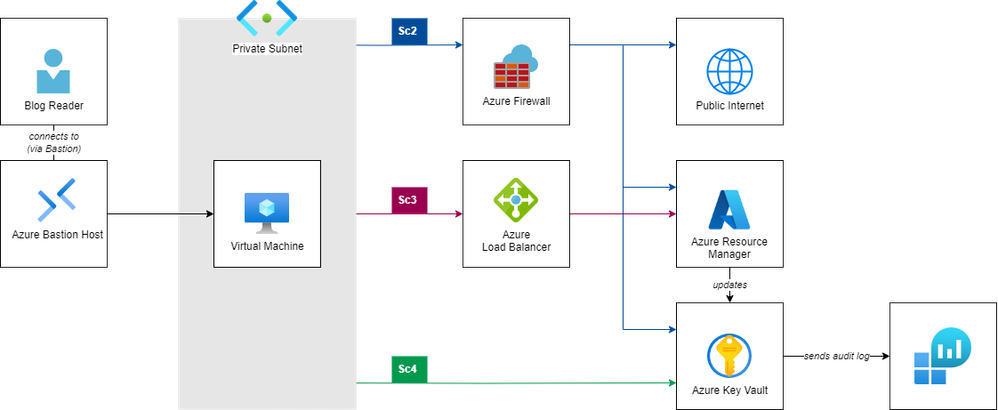
The following architecture diagram presents the sample setup that we’ll use to explore the network traffic with different components.

The setup comprises following components:
- A virtual network with a private subnet (i.e., a subnet that does not offer default outbound connectivity to the internet).
- A virtual machine (running Ubuntu Linux) connected to this subnet.
- A Key Vault including a stored secret as sample Azure PaaS service to explore Azure-bound connectivity.
- A Log Analytics Workspace, storing audit information (i.e., metadata of all control and data plane operations) from that Key Vault.
- A Bastion Host to securely connect to the virtual machine via SSH.
In the following sections, we will integrate following components to control the network traffic and explore the effects on communication flow:
- An Azure Firewall as central Network Virtual Appliance to route outbound internet traffic.
- An Azure Load Balancer with Outbound Rules to route Azure-bound traffic through the Azure Backbone (we’ll use the Azure Resource Manager in this example).
- A Service Endpoint to route data plane operations directly to the service.
We’ll use following examples to illustrate the communication paths:
- A simple http-call to
ifconfig.io which (if successful) will return the public IP address that will be used to make calls to public internet resources.
- An invocation of the Azure CLI to get Key Vault metadata (
az keyvault show), which (if successful) will return information about the Key Vault resources. This call to the Azure Resource Manager represents a management plane operation.
- An invocation of the Azure CLI to get a secret stored in the Key Vault (
az keyvault secret show), which (if successful) will return a secret stored in the Key Vault. This represents a data plane operation.
- A query to the Key Vault’s audit log (stored in the Log Analytics Workspace), to reveal the IP address of the caller for management and data plane operations.
The repository Azure-Samples/azure-networking_private-subnet-routing on GitHub contains all required Infrastructure as Code assets, allowing you to easily reproduce the setup and exploration in your own Azure subscription.
The implementation uses the following tools:
bash as Command Line Interpreter (consider using Windows Subsystem for Linux if you are on Windows)
git to clone the repository (find installation instructions here)
- Azure Command-Line Interface to interact with deployed Azure components (find installation instructions here)
- HashiCorp Terraform (find installation instructions here).
jq to parse and process JSON input (find installation instructions here)
- Clone the Git repository from [TODO: Repo link here] and change
cd into its repository root.
$ git clone https://github.com/Azure-Samples/azure-networking_private-subnet-routing

$ cd azure-networking_private-subnet-routing
- Login to your Azure subscription via Azure CLI and ensure you have access to your subscription.
$ az login
$ az account show
Getting ready: Deploy infrastructure.
We kick off our journey by deploying the infrastructure depicted in the architecture diagram above; we’ll do that using the IaC (Infrastructure as Code) assets from the repository.
Open file terraform.tfvars in your favorite code editor, and adjust the values of variables location (the region to which all resource will be deployed) and prefix (the shared name prefix for all resources). Also don’t forget to provide login credentials for your VM by setting values for admin_username and admin_password.
Set environment variable ARM_SUBSCRIPTION_ID to point terraform to the subscription you are currently logged on to.
$ export ARM_SUBSCRIPTION_ID=$(az account show –query “id” -o tsv)
Using your CLI and terraform, deploy the demo setup:
$ terraform init

  Initializing the backend…

  […]

  Terraform has been successfully initialized!
$ terraform apply

  […]

  Do you want to perform these actions?

  Terraform will perform the actions described above.

  Only ‘yes’ will be accepted to approve.

    Enter a value: yes

  […]
  Apply complete!

  […]
☝️ In case you are not familiar with Terraform, this tutorial might be insightful for you.
Explore the deployed resources in the Azure Portal. Note that although the network infrastructure components shown in the architecture drawing above are already deployed, they are not yet configured for use from the Virtual Machine:
- The Azure Firewall is deployed, but the route table attached to the VM subnet does not (yet) have any route directing traffic to the firewall (we will add this in Scenario 2).
- The Azure Load Balancer is already deployed, but the virtual machine is not yet member of its backend pool (we will change this in Scenario 3).
Log in to the Virtual Machine using the Bastion Host.
$ ./scripts/ssh-bastion.sh

azureuser@localhost’s password:

Welcome to Ubuntu 20.04.6 LTS (GNU/Linux 5.15.0-1064-azure x86_64)

azureuser@no-doa-demo-vm:~$
Scenario 1: Access from private subnet.
At this point, our virtual machine is deployed to a private subnet. As we do not have any outbound connectivity method set up, all calls to public internet resources as well as to the public endpoints of Azure resources will time out.
Test 1: Call to public internet
$ curl ifconfig.io –connect-timeout 10

curl: (28) Connection timed out after 10004 milliseconds
Test 2: Call to Azure Resource Manager
$ curl https://management.azure.com/ –connect-timeout 10

curl: (28) Connection timed out after 10001 milliseconds
Test 3: Call to Azure Key Vault (data plane)
$ curl https://no-doa-demo-kv.vault.azure.net/ –connect-timeout 10

curl: (28) Connection timed out after 10002 milliseconds
Scenario 2: Route all traffic through azure Firewall.
Typically, customers deploy a central Firewall in their network to ensure all outbound traffic is consistently SNATed through the same public IPs and all outbound traffic is centrally controlled and governed. In this scenario, we therefore modify our existing route table and add a default route (i.e., for CIDR range 0.0.0.0/0), directing all outbound traffic to the private IP of our Azure Firewall.
Add Firewall and routes.
- Browse to
network.tf, uncomment the definition of azurerm_route.default-to-firewall.
- Update your deployment.
$ terraform apply

  Terraform will perform the following actions:

    # azurerm_route.default-to-firewall will be created

  […]
Test 1: Call to public internet, revealing that outbound calls are routed through the firewall’s public IP.
$ curl ifconfig.io

4.184.163.38
Now that you have access to the internet, install Azure CLI.
$ curl -sL https://aka.ms/InstallAzureCLIDeb | sudo bash
Login to Azure with the Virtual machine’s managed identity.
Test 2: Call to Azure Resource Manager (you might need to change the Key Vault name if you changed the prefix in your terraform.tfvars)
$ az keyvault show –name “no-doa-demo-kv” -o table

Location            Name            ResourceGroup

——————  ————–  ————–

germanywestcentral  no-doa-demo-kv  no-doa-demo-rg
Test 3: Call to Azure Key Vault (data plane)
$ az keyvault secret show –vault-name “no-doa-demo-kv” –name message -o table

ContentType    Name     Value

————-  ——-  ————-

               message  Hello, World!
Query Key Vault Audit Log.
☝️ The ingestion of audit logs into the Log Analytics Workspace might take some time. Please make sure to wait for up to ten minutes before starting to troubleshoot.
Get Application ID of VM’s system-assigned managed identity:
$ ./scripts/vm_get-app-id.sh

AppId for Principal ID f889ca69-d4b0-45a7-8300-0a88f957613e is: 8aa9503c-ee91-43ee-96c7-49dc005ebecc
Go to Log Analytics Workspace, run the following query.
AzureDiagnostics |

where identity_claim_appid_g == “[Replace with App ID!]”

| project TimeGenerated, Resource, OperationName, CallerIPAddress

| order by TimeGenerated desc
Alternatively, run the prepared script kv_query-audit.sh:
$ ./scripts/kv_query-audit.sh

CallerIPAddress    OperationName    Resource       TableName      TimeGenerated

—————–  —————  ————–  ————-  —————————-

4.184.163.38       VaultGet         NO-DOA-DEMO-KV  PrimaryResult  2024-06-14T08:25:29.4821689Z

4.184.163.38       SecretGet        NO-DOA-DEMO-KV  PrimaryResult  2024-06-14T08:26:07.0067419Z
🗣 Note that both calls to the Key Vault succeed as they are routed through the central Firewall; both requests (to Azure Management plane and Key Vault data plane) hit their endpoints with the Firewall’s public IP.
Scenario 3: Bypass Firewall for traffic to Azure management plane.
At this point all, internet and Azure-bound traffic to public endpoints is routed through the Azure Firewall. Although this allows you to centrally control all traffic, you might have good reasons to prefer to offload some communication from this component by routing traffic targeting a specific IP address range through a different component for SNAT — for example to optimize latency or reduce load on the firewall component for communication with well-known hosts.
☝️ As mentioned before, dedicated Public IP addresses, NAT Gateways and Azure Load Balancers are alternative options to configure SNAT for outbound access. You can find a detailed discussion about all options here.
In this scenario, we assume that we want network traffic to the Azure Management plane to bypass the central Firewall (we pick this service for demonstration purposes here). Instead, we want to use the SNAT capabilities of an Azure Load Balancer with outbound rules to route traffic to the public endpoints of the Azure Resource Manager. We can achieve this by adding a more-specific route to the route table, directing traffic targeting the corresponding service tag (which is like a symbolic name comprising a set of IP ranges) to a different destination.
The integration of outbound load balancing rules into the communication path works differently than integrating a Network Virtual Appliance: While we defined the latter by setting the NVA’s private IP address as next hop in our user defined route in scenario 1, we only integrate the Load Balancer implicitly into our network flow — by specifying Internet as next hop in our route table. (Essentially, next hop ‘Internet’ instructs Azure to use either (a) the Public IP attached to the VM’s NIC, (b) the Load Balancer associated to the VM’s NIC with the help of an outbound rule, or (c) a NAT Gateway attached to the subnet the VM’s NIC is connected to.) Therefore, we need to take two steps to send traffic through our Load Balancer:
- Deploy a more-specific user-defined route for the respective service tag.
- Add our VM’s NIC to a load balancer’s backend pool with an outbound load balancing rule.
In our scenario, we’ll do this for the Service tag AzureResourceManager, which (amongst others) also comprises the IP addresses for management.azure.com, which is the endpoint for the Azure control plane. This will affect the az keyvault get operation to retrieve the Key Vault’s metadata.
Deploy more-specific route for AzureResourceManager service tag.
Add more specific route for AzureResourceManager
(optional) Repeat test 1 (call to public internet) and test 3 (call to Key Vault’s data plane) to confirm behavior remains unchanged.
$ curl ifconfig.io

4.184.163.38
$ az keyvault secret show –vault-name “no-doa-demo-kv” –name message -o table

ContentType    Name     Value

————-  ——-  ————-

               message  Hello, World!
Test 2: Call to Azure Resource Manager
$ az keyvault show –name “no-doa-demo-kv” -o table

: Failed to establish a new connection: [Errno 101] Network is unreachable
🗣 While the call to the Key Vault data plane succeeds, the call to the resource manager fails: Route azurerm_2_internet directs traffic to next hop type Internet. However, as the VM’s subnet is private, defining the outbound route is not sufficient and we still need to attach the VM’s NIC to the Load Balancers outbound rule.
Instruct Azure to send internet-bound traffic through Outbound Load Balancer
Add virtual machine’s NIC to a backend pool linked with an outbound load balancing rule.
(optional) Repeat test 1 (call to public internet) and test 3 (call to Key Vault’s data plane) to confirm behavior remains unchanged.
Repeat Test 2: Call to Azure Resource Manager
$ az keyvault show –name “no-doa-demo-kv” -o table

Location            Name            ResourceGroup

——————  ————–  —————

germanywestcentral  no-doa-demo-kv  no-doa-demo-rg
Re-run the prepared script kv_query-audit.sh:
$ ./scripts/kv_query-audit.sh

CallerIPAddress    OperationName    Resource        TableName      TimeGenerated

—————–  —————  ————–  ————-  —————————-

4.184.163.38       SecretGet        NO-DOA-DEMO-KV  PrimaryResult  2024-06-17T12:49:30.7165964Z

4.184.161.169      VaultGet         NO-DOA-DEMO-KV  PrimaryResult  2024-06-17T12:44:35.6599439Z

[…]
🗣 After adding the NIC to the backend of the outbound load balancer, routes with next hop type Internet will use the load balancer for outbound traffic. As we specified Internet as next hop type for AzureResourceManager, the VaultGet operation is now hitting the management plane from the load balancer’s public IP. (Communication with the Key Vault data plane remains unchanged; the SecretGet operation still hits the Key Vault from the Firewall’s Public IP.)
☝️ We explored this path for the platform-defined service tag AzureResourceManager. However, it’s equally possible to define this communication path for your self-defined IP addresses or ranges.
Scenario 4: Add ‘shortcut’ for traffic to Key Vault data plane.
For communication with many platform services, Azure offers customers Virtual Network Service Endpoints to enable an optimized connectivity method that keeps traffic on its backbone network. Customers can use this, for example, to offload traffic to platform services from their network resources and increase security by enabling access restrictions on their resources.
☝️ Note that service endpoints are not specific for individual resource instances; they will enable optimized connectivity for all deployments of this resource type (across different subscriptions, tenants and customers). You may want to make sure to deploy complementing firewall rules to your resource as an additional layer of security.
In this scenario, we’ll deploy a service endpoint for Azure Key Vaults. We’ll see that the platform will no longer SNAT traffic to our Kay Vault’s data plane but use the VM’s private IP for communication.
Deploy Service Endpoint for Key Vault
(optional) Repeat test 1 (call to public internet) and test 2 (call to Azure management plane) to confirm behavior remains unchanged.
Test 3: Call to Azure Key Vault (data plane)
$ az keyvault secret show –vault-name “no-doa-demo-kv” –name message -o table

ContentType    Name     Value

————-  ——-  ————-

               message  Hello, World!
Re-run the prepared script kv_query-audit.sh:
$ ./scripts/kv_query-audit.sh

CallerIPAddress    OperationName    Resource        TableName      TimeGenerated

—————–  —————  ————–  ————-  —————————-

10.3.1.4           SecretGet        NO-DOA-DEMO-KV  PrimaryResult  2024-06-17T14:21:28.3388285Z

[…]
🗣 After deploying a service endpoint, we see that traffic is hitting the Azure Key Vault data plane from the virtual machine’s private IP address, i.e., not passing through Firewall or outbound load balancer.
Inspect NIC’s effective routes.
Eventually, let’s explore how the different connectivity methods show up in the virtual machine’s NIC’s effective routes. Use one of the following options to show them:
In Azure portal, browse to the VM’s NIC and explore the ‘Effective Routes’ section in the ‘Help’ section.
Alternatively, run the provided script (please note that the script will only show the first IP address prefix in the output for brevity).
$ ./scripts/vm-nic_show-routes.sh

Source    FirstIpAddressPrefix    NextHopType                    NextHopIpAddress

——–  ———————-  —————————–  ——————

Default   10.0.0.0/16             VnetLocal

User      191.234.158.0/23        Internet

Default   0.0.0.0/0               Internet

Default   191.238.72.152/29       VirtualNetworkServiceEndpoint

User      0.0.0.0/0               VirtualAppliance               10.254.1.4
🗣 See that…
- …system-defined route
191.238.72.152/29 to VirtualNetworkServiceEndpoint is sending traffic to Azure Key Vault data plane via service endpoint.
- …user-defined route
191.234.158.0/23 to Internet is implicitly sending traffic to AzureResourceManager via Outbound Load Balancer (by defining Internet as next hop type for a VM attached to an outbound load balancer rule).
- …user-defined route
0.0.0.0/0 to VirtualAppliance (10.254.1.4) is sending all remaining internet-bound traffic to the Firewall.
by Contributed | Oct 18, 2024 | Technology
This article is contributed. See the original author and article here.
Why XML?
XML is widely used across various industries due to its versatility and ability to structure complex data. Some key industries that use XML:
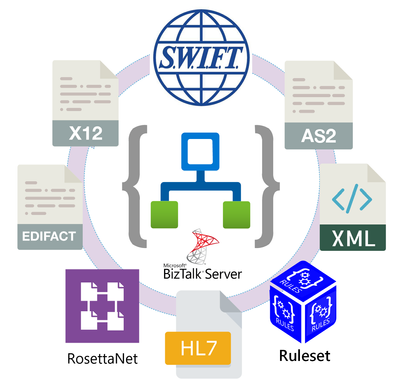
- Finance: XML is used for financial data interchange, such as in SWIFT messages for international banking transactions and in various financial reporting standards.
- Healthcare: XML is used in healthcare for data exchange standards like HL7, which facilitates the sharing of clinical and administrative data between healthcare providers.
- Supply Chain: XML is used in supply chain management for data interchange, such as in Electronic Data Interchange (EDI) standards.
- Government: Multiple government entities use XML for various data management and reporting tasks.
- Legal: XML is used in the legal industry to organize and manage documents, making it easier to find and manage information.
To provide continuous support to our customers in these industries, Microsoft has always provided strong capabilities for integration with XML workloads. For instance, XML was a first-class citizen in BizTalk Server. Now, despite the pervasiveness of the JSON format, we continue working to make Azure Logic Apps the best alternative for our BizTalk Server customers and customers using XML based workloads.

The XML Operations connector
We have recently added two actions for the XML Operations connector: Parse with schema and Compose with schema. With this addition, Logic Apps customers can now interact with the token picker during design time. The tokens are generated from the XML schema provided by the customer. As a result, the XML document and its contained properties will be easily accessible, created and manipulated in the workflow.
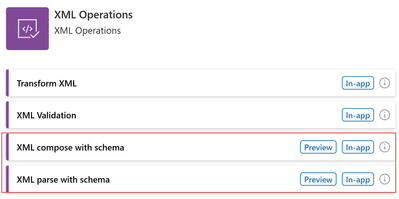
XML parse with schema
The XML parse with schema allow customers to parse XML data using an XSD file (an XML schema file). XSD files need to be uploaded to the Logic App schemas artifacts or an Integration account. Once they have been uploaded, you need to enter the enter your XML content, the source of the schema and the name of the schema file. The XML content may either be provided in-line or selected from previous operations in the workflow using the token picker.
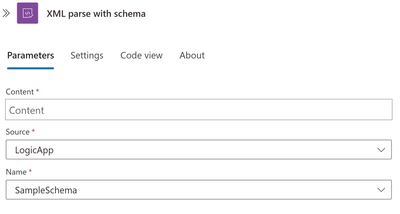
Based on the provided XML schema, tokens such as the following will be available to subsequent operations upon saving the workflow:
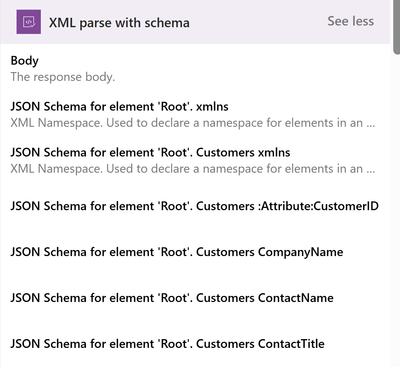
In the output, the Body field contains a wrapper ‘json’ property, so that additional properties may be provided besides the translated XML content, such as any parsing warning messages. To ignore the additional properties, you may pick the ‘json’ property instead.
You may also select the token for each individual properties of the XML document, as these tokens are generated from the provided XML schema.
XML compose with schema
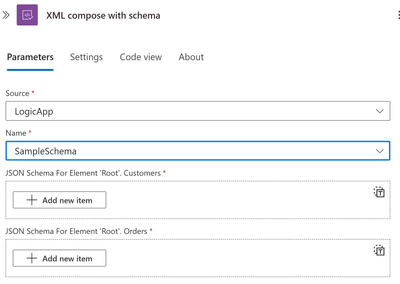
The XML compose with schema allows customers to generate XML data, using an XSD file. XSD files need to be uploaded to the Logic App schemas artifacts or an Integration account. Once they have been uploaded, you should select the XSD file along with entering the JSON root element or elements of your input XML schema. The JSON input elements will be dynamically generated based on the selected XML schema.
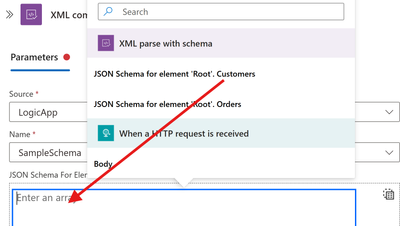
You can also switch to Array and pass an entire array for Customers and another for Orders:
Please watch the following video for a complete demonstration of this new feature.
In collaboration with @David_Burg.
Create a Connected Cache in the Azure portal.
PowerShell snippet demonstrating use of Connected Cache CLI.
PowerShell script demonstrating use of bulk creations of cache nodes using CLI.
Connected Cache management in Azure portal shows Office, Windows Update, and Intune downloads.


Recent Comments